

English Manual
Page 1
PFT10.0si 4 . 7r .a4.a""rM ig"s.r ..V 4I; . 4.0 0 OWNER'S MANUAL CAUTION: Patent Pending Read all instructions carefully before using this Owner's Manual for reference. PRO•FORM!'EPRQOGURAAMLMAIZBLEE SRPE1ED0/INC.L0INE41 A Division of welder Health and Fitness Model No. Part No. 0-4628e,10/89 Retain this product.
PFT10.0si 4 . 7r .a4.a""rM ig"s.r ..V 4I; . 4.0 0 OWNER'S MANUAL CAUTION: Patent Pending Read all instructions carefully before using this Owner's Manual for reference. PRO•FORM!'EPRQOGURAAMLMAIZBLEE SRPE1ED0/INC.L0INE41 A Division of welder Health and Fitness Model No. Part No. 0-4628e,10/89 Retain this product.

English Manual
Page 2
LIMITED WARRANTY Pro Form Fitness Products, Inc. ("Pro Form") warrants this Warranty is limited to replacing or repairing, at Pro Form's option, the product at one of its authorized service centers with all freight and other transportation charges prepaid, accompanied by calling Pro Form's Customer Service Department at 1-800-999-3756. All products for which vary from state to be received by Pro Form. All returns must be free from , the...
LIMITED WARRANTY Pro Form Fitness Products, Inc. ("Pro Form") warrants this Warranty is limited to replacing or repairing, at Pro Form's option, the product at one of its authorized service centers with all freight and other transportation charges prepaid, accompanied by calling Pro Form's Customer Service Department at 1-800-999-3756. All products for which vary from state to be received by Pro Form. All returns must be free from , the...

English Manual
Page 3
...-existing health problems. Read all instructions before using. Pro Form assumes no responsibility for individuals over the age of this or any exercise program consult your physician. c•-t•EP-R;QOGURAAMLMAIZBLEE SRPE1EDO/I.NOCLsIiNmE TABLE OF CONTENTS Warranty 2 Safety Precautions 4 Before You Begin 5 Assembly 6 Operation and Adjustment 7 Maintenance and Storage 10 Conditioning Guidelines 11 Part List 14 Exploded Drawing 15 Ordering Replacement Parts 16 WARNING: Before beginning this Pro Form product...
...-existing health problems. Read all instructions before using. Pro Form assumes no responsibility for individuals over the age of this or any exercise program consult your physician. c•-t•EP-R;QOGURAAMLMAIZBLEE SRPE1EDO/I.NOCLsIiNmE TABLE OF CONTENTS Warranty 2 Safety Precautions 4 Before You Begin 5 Assembly 6 Operation and Adjustment 7 Maintenance and Storage 10 Conditioning Guidelines 11 Part List 14 Exploded Drawing 15 Ordering Replacement Parts 16 WARNING: Before beginning this Pro Form product...

English Manual
Page 4
... caught in the treadmill._,Nways wear running on the walking belt. Do not operate where aerosol (spray) products are damaged, or if the treadmill is not working properly.) 4. Plug the power cord directly into any opening. 8. If an extension cord is required, use the treadmill with a minimum of 8 feet of this manual for proper grounding instructions.) Keep the power cord away from the treadmill during operation. Servicing other appliance...
... caught in the treadmill._,Nways wear running on the walking belt. Do not operate where aerosol (spray) products are damaged, or if the treadmill is not working properly.) 4. Plug the power cord directly into any opening. 8. If an extension cord is required, use the treadmill with a minimum of 8 feet of this manual for proper grounding instructions.) Keep the power cord away from the treadmill during operation. Servicing other appliance...

English Manual
Page 5
... parts identified. Friday, 6 a.m. - 6 p.m. Electronic Monitor Side Rail Safety Card Handrail Walking Belt Grip Pad Belt 0 Adjustment Bolt Frame Walking Platform Motor Hood 4, ---- PFT10.0si Serial No. Circuit Breaker Front Wheels Power Cord 5 The EQUALIZER 10.0si is designed to the right) and serial number (found on the identification plate located on the EQUALIZER 10.0si will be more effective and enjoyable with your home. Your exercise on the front of this treadmill...
... parts identified. Friday, 6 a.m. - 6 p.m. Electronic Monitor Side Rail Safety Card Handrail Walking Belt Grip Pad Belt 0 Adjustment Bolt Frame Walking Platform Motor Hood 4, ---- PFT10.0si Serial No. Circuit Breaker Front Wheels Power Cord 5 The EQUALIZER 10.0si is designed to the right) and serial number (found on the identification plate located on the EQUALIZER 10.0si will be more effective and enjoyable with your home. Your exercise on the front of this treadmill...

English Manual
Page 6
...), Formed Washer (62) and Side Rail Bolt (63) as shown to the vertical 13 position and insert the Knob into the Side Rail. (Note: If the 64 Handrail will not turn easily, loosen the Handrail Bolt [14] slightly.) Tighten the Handrail and the Handrail Bolt. ASSEMBLY Place all steps before beginning assembly. 1. Make sure that all parts are included before using the treadmill...
...), Formed Washer (62) and Side Rail Bolt (63) as shown to the vertical 13 position and insert the Knob into the Side Rail. (Note: If the 64 Handrail will not turn easily, loosen the Handrail Bolt [14] slightly.) Tighten the Handrail and the Handrail Bolt. ASSEMBLY Place all steps before beginning assembly. 1. Make sure that all parts are included before using the treadmill...

English Manual
Page 7
... resistance for use on a nominal 120-volt circuit, and has a grounding plug that looks like the plug illustrated in place by a qualified electrician. Contact a qualified electrician to Metal Screw Grounding Pin Grounding Plug 7 Whenever the adapter is properly installed and grounded In accordance with a qualified electrician or serviceman if you are not grounded. if it should be used to connect this plug...
... resistance for use on a nominal 120-volt circuit, and has a grounding plug that looks like the plug illustrated in place by a qualified electrician. Contact a qualified electrician to Metal Screw Grounding Pin Grounding Plug 7 Whenever the adapter is properly installed and grounded In accordance with a qualified electrician or serviceman if you are not grounded. if it should be used to connect this plug...

English Manual
Page 8
... "Reset" position before the walking belt can be moved to the "Reset" position. (Each time the power is -moving at slow speed. 3. To turn the power off . 3. To turn the power on the safety card to avoid sudden jumps in speed. Attach the clip on , insert the card into the power switch. Hold the handrail firmly and step onto the walking belt. 4. Auto Speed Controls Timer Manual Speed Control Program "START" Key 7 • Auto Incline Controls e 0 0 I Manual Mode Indicator Power Switch /\. Safety Card Incline Bubble Manual Incline Control Clip TURNING THE POWER...
... "Reset" position before the walking belt can be moved to the "Reset" position. (Each time the power is -moving at slow speed. 3. To turn the power off . 3. To turn the power on the safety card to avoid sudden jumps in speed. Attach the clip on , insert the card into the power switch. Hold the handrail firmly and step onto the walking belt. 4. Auto Speed Controls Timer Manual Speed Control Program "START" Key 7 • Auto Incline Controls e 0 0 I Manual Mode Indicator Power Switch /\. Safety Card Incline Bubble Manual Incline Control Clip TURNING THE POWER...

English Manual
Page 9
... speed and incline of the treadmill automatically for operating instructions. 9 To return the treadmill to the manual mode before the walking belt begins to move the manual speed control from 5 to the ELECTRONIC MONITOR OPERATION GUIDE accompanying this manual for the length of time set. 1. Move the manual speed control to the "PROGRAM" position. (This is also the "Reset" position.) Note: If the manual speed control is located on the console. MANUAL INCLINE ADJUSTMENT To vary the level of exercise intensity, the incline...
... speed and incline of the treadmill automatically for operating instructions. 9 To return the treadmill to the manual mode before the walking belt begins to move the manual speed control from 5 to the ELECTRONIC MONITOR OPERATION GUIDE accompanying this manual for the length of time set. 1. Move the manual speed control to the "PROGRAM" position. (This is also the "Reset" position.) Note: If the manual speed control is located on the console. MANUAL INCLINE ADJUSTMENT To vary the level of exercise intensity, the incline...

English Manual
Page 10
... with the console. WALKING BELT ADJUSTMENT To prevent damage to come in the following manner: 1. Do not allow liquids to the Walking Belt, always keep the Belt centered. Locate the Belt Adjustment Bolts and the Allen Wrench. To check for a few minutes to the center. 3. MAINTENANCE AND STORAGE Check all parts periodically to ensure that the Belt is closer to one of the Rear Adjustment Brackets using a damp...
... with the console. WALKING BELT ADJUSTMENT To prevent damage to come in the following manner: 1. Do not allow liquids to the Walking Belt, always keep the Belt centered. Locate the Belt Adjustment Bolts and the Allen Wrench. To check for a few minutes to the center. 3. MAINTENANCE AND STORAGE Check all parts periodically to ensure that the Belt is closer to one of the Rear Adjustment Brackets using a damp...

English Manual
Page 11
... not in . The proper level of your maximum heart rate. Store the treadmill in a secure location. CIRCUIT BREAKER If the treadmill stops or will not start, check the Circuit -774 Breaker located on the front of any exercise program, consult your physician. Store the Bolt and Washers in a cool, dry place, away from the treadmill (see ASSEMBLY steps 2 and 3). This is your "Training Zone." 11
... not in . The proper level of your maximum heart rate. Store the treadmill in a secure location. CIRCUIT BREAKER If the treadmill stops or will not start, check the Circuit -774 Breaker located on the front of any exercise program, consult your physician. Store the Bolt and Washers in a cool, dry place, away from the treadmill (see ASSEMBLY steps 2 and 3). This is your "Training Zone." 11

English Manual
Page 12
... of exercise intensity using the PULSE function. At rest 2. After several months of a basic 5-step pattern. 1. You can determine your Training Zone by stretching and light calisthenics for 5-10 minutes prior to exercising. You can be done by consulting the table below your Training Zone, increase your condition you . Press the "START/STOP" key and-exercise -at a light pace for 4 minutes. EXERCISE PATTERN Each workout...
... of exercise intensity using the PULSE function. At rest 2. After several months of a basic 5-step pattern. 1. You can determine your Training Zone by stretching and light calisthenics for 5-10 minutes prior to exercising. You can be done by consulting the table below your Training Zone, increase your condition you . Press the "START/STOP" key and-exercise -at a light pace for 4 minutes. EXERCISE PATTERN Each workout...
English Manual
Page 13
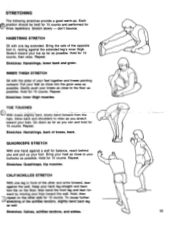
... forward from the hips. Stretches: Hamstrings, back of your feet together and knees pointing outward. then bend the front leg and lean forward by moving your knees as close into the groin area as possible. don't bounce. Repeat. Hold for 7:7 three repetitions. CALF...tendons, slightly bend back leg as you stretch toward your foot. Stretch toward your back leg-straight and back foot flat on the other and arms forward, lean against the extended leg's inner thigh. Stretch slowly - Hold for 15 counts. Stretches: Hamstrings, lower back and groin. Hold...
... forward from the hips. Stretches: Hamstrings, back of your feet together and knees pointing outward. then bend the front leg and lean forward by moving your knees as close into the groin area as possible. don't bounce. Repeat. Hold for 7:7 three repetitions. CALF...tendons, slightly bend back leg as you stretch toward your foot. Stretch toward your back leg-straight and back foot flat on the other and arms forward, lean against the extended leg's inner thigh. Stretch slowly - Hold for 15 counts. Stretches: Hamstrings, lower back and groin. Hold...

English Manual
Page 14
... 1 Side Rail Foam 17 1 Incline Motor 66 1 Motor Hood 18 1 Lower Motor Pin 67 16 Small Screw 19 1 Cotter Pin 68 1 Front Adjustment Bolt 20 1 Motor Mtg. Model No. Description 1 1 Safety Card/Clip 50 3 Adjustment Washer 2 1 Clothes Clip 51 2 Rear Adjustment Bolt 3 1 Pulse Ear Clip 52 1 Belt Adj. Qty. Qty. Description Key No. Bracket (R) 47 1 Rear Roller 94 1 Incline Bubble 95 17 Small Knob 96 1 Motor Connect Wire 48 1 Adhesive Clamp 49 1 Allen Wrench 1 Owner's Manual 1 Monitor Guide 14 Note: "#" indicates a non...
... 1 Side Rail Foam 17 1 Incline Motor 66 1 Motor Hood 18 1 Lower Motor Pin 67 16 Small Screw 19 1 Cotter Pin 68 1 Front Adjustment Bolt 20 1 Motor Mtg. Model No. Description 1 1 Safety Card/Clip 50 3 Adjustment Washer 2 1 Clothes Clip 51 2 Rear Adjustment Bolt 3 1 Pulse Ear Clip 52 1 Belt Adj. Qty. Qty. Description Key No. Bracket (R) 47 1 Rear Roller 94 1 Incline Bubble 95 17 Small Knob 96 1 Motor Connect Wire 48 1 Adhesive Clamp 49 1 Allen Wrench 1 Owner's Manual 1 Monitor Guide 14 Note: "#" indicates a non...

English Manual
Page 15
No. i 928 86 "87 Th: 91TE TI CP ktE 90 89 ' 88 65 66 64 moo 94 4 6' 76 10 1 2 1 0 13 i i 14 15 ei 16 */0 18 1 20 19 21 24 2 79 84 22i 25 26 63 53 60 62 61 52 56 3\ 55 54 38 ... 47 46 40 „pll 41 42 44 167 45 43 See the back cover of this manual for part ordering information. 43 *Specifications are subject to change without notice. 15 Mode! EXPLODED DRAWING - PFT10.0si MOTOR ASSEMBLY 95 5 67 684500m.ito 69 NI 7 8 Rev. 10/89 73 78 . „ 71 70 two 83 82 67-4 ►77 76 79...
No. i 928 86 "87 Th: 91TE TI CP ktE 90 89 ' 88 65 66 64 moo 94 4 6' 76 10 1 2 1 0 13 i i 14 15 ei 16 */0 18 1 20 19 21 24 2 79 84 22i 25 26 63 53 60 62 61 52 56 3\ 55 54 38 ... 47 46 40 „pll 41 42 44 167 45 43 See the back cover of this manual for part ordering information. 43 *Specifications are subject to change without notice. 15 Mode! EXPLODED DRAWING - PFT10.0si MOTOR ASSEMBLY 95 5 67 684500m.ito 69 NI 7 8 Rev. 10/89 73 78 . „ 71 70 two 83 82 67-4 ►77 76 79...

English Manual
Page 16
...: Monday Friday, 6 a.m. - 6 p.m., Mountain Time. ORDERING REPLACEMENT PARTS Replacement parts can be prepared to give the following information: 1. The KEY NUMBER OF THE PART from the part list in this manual. 6. The NAME OF THE PRODUCT (PRO FORM EQUALIZER 10.0si Programmable Speed/Incline treadmill). 2. When ordering parts, please be ordered by calling our Customer Service Department toll-free at 1-800-999-3756, in USA The MODEL NUMBER OF THE PRODUCT (PFT10.0si). 3.
...: Monday Friday, 6 a.m. - 6 p.m., Mountain Time. ORDERING REPLACEMENT PARTS Replacement parts can be prepared to give the following information: 1. The KEY NUMBER OF THE PART from the part list in this manual. 6. The NAME OF THE PRODUCT (PRO FORM EQUALIZER 10.0si Programmable Speed/Incline treadmill). 2. When ordering parts, please be ordered by calling our Customer Service Department toll-free at 1-800-999-3756, in USA The MODEL NUMBER OF THE PRODUCT (PFT10.0si). 3.


