Owner's Manual
Page 2
... the on-screen keyboard 24 Searching for and selecting a location Searching for a location by coordinates 32 Selecting a location you can do on external storage devices (USB, SD) 31 Searching for a location by address 25 Searching for recently 33 - Searching for internal memory 11 - Resetting the microprocessor 11 Basic operation Checking part names and functions 13 Inserting/ejecting a disc 14 - Displaying the rear camera image 19 How to use the map...
... the on-screen keyboard 24 Searching for and selecting a location Searching for a location by coordinates 32 Selecting a location you can do on external storage devices (USB, SD) 31 Searching for a location by address 25 Searching for recently 33 - Searching for internal memory 11 - Resetting the microprocessor 11 Basic operation Checking part names and functions 13 Inserting/ejecting a disc 14 - Displaying the rear camera image 19 How to use the map...
Owner's Manual
Page 6
... screen brightness 137 - Switching the sound muting/ attenuation 144 - Displayed Info 126 - Warnings 128 - Setting the POI appearance 130 - Setting your customized POI 132 - Checking the version information 138 - Using subwoofer output 141 - Setting the rear output 144 - Time Settings 124 - 3D Settings 125 - Demo Mode 129 - Setting the rear view camera 136 - Switching the auto antenna setting 143 - Using the Game Alert function 118 - Restore Factory Settings 129 - Set Home 129 - Sound settings 130 - Setting the illumination color 137 - Adjusting source...
... screen brightness 137 - Switching the sound muting/ attenuation 144 - Displayed Info 126 - Warnings 128 - Setting the POI appearance 130 - Setting your customized POI 132 - Checking the version information 138 - Using subwoofer output 141 - Setting the rear output 144 - Time Settings 124 - 3D Settings 125 - Demo Mode 129 - Setting the rear view camera 136 - Switching the auto antenna setting 143 - Using the Game Alert function 118 - Restore Factory Settings 129 - Set Home 129 - Sound settings 130 - Setting the illumination color 137 - Adjusting source...
Owner's Manual
Page 7
... Operating Your Navigation System with Voice To Ensure Safe Driving 146 Basics of the disc 168 - Entering the password 152 - How do GPS and "Dead Reckoning" work together? 163 Handling large errors 164 - Conditions likely to hands-free phoning 150 Tips for Audio Functions 160 Positioning technology 163 - About playing DualDisc 169 - Compatibility 169 - Destination Menu 179 - DVD Setup 183 Glossary 184 Specifications 187 En 7 Starting voice operation 147 Operating iPod...
... Operating Your Navigation System with Voice To Ensure Safe Driving 146 Basics of the disc 168 - Entering the password 152 - How do GPS and "Dead Reckoning" work together? 163 Handling large errors 164 - Conditions likely to hands-free phoning 150 Tips for Audio Functions 160 Positioning technology 163 - About playing DualDisc 169 - Compatibility 169 - Destination Menu 179 - DVD Setup 183 Glossary 184 Specifications 187 En 7 Starting voice operation 147 Operating iPod...

Owner's Manual
Page 9
... file formats ! If it indicates the USB memory and USB portable audio player only, they are collectively referred to as the "external storage device (USB, SD)". You can also create your own customized POIs and categories. p This function may not work under certain conditions. If your original image data is possible to operate the navigation and audio functions by using the touch panel key. 2D and 3D map view modes Various types of screen displays...
... file formats ! If it indicates the USB memory and USB portable audio player only, they are collectively referred to as the "external storage device (USB, SD)". You can also create your own customized POIs and categories. p This function may not work under certain conditions. If your original image data is possible to operate the navigation and audio functions by using the touch panel key. 2D and 3D map view modes Various types of screen displays...
Owner's Manual
Page 10
... phone featuring Bluetooth® technology can be able to use is protected by selecting an item from the list. Reverse engineering or disassembly is available. iPod nano first generation; Ver. 1.1 ! The cellular phone used must be connected wirelessly. - Rear display entertainment Video sources can be authorized by Macrovision Corporation and other countries. External storage device (USB, SD) Following file types is a trademark of this navigation system, refer to -operate audio functions...
... phone featuring Bluetooth® technology can be able to use is protected by selecting an item from the list. Reverse engineering or disassembly is available. iPod nano first generation; Ver. 1.1 ! The cellular phone used must be connected wirelessly. - Rear display entertainment Video sources can be authorized by Macrovision Corporation and other countries. External storage device (USB, SD) Following file types is a trademark of this navigation system, refer to -operate audio functions...
Owner's Manual
Page 11
... or factory settings on our website. Do not use the stylus for internal memory Before removing the vehicle battery If the battery is output from the LCD screen to the default or factory settings on the rear display. - Rear view camera ready You can result in the form of the black density for special calibrations. When using a cellular phone, keep the antenna of the cellular phone away from the builtin DVD drive (DVD-V, DVD-VR, DivX...
... or factory settings on our website. Do not use the stylus for internal memory Before removing the vehicle battery If the battery is output from the LCD screen to the default or factory settings on the rear display. - Rear view camera ready You can result in the form of the black density for special calibrations. When using a cellular phone, keep the antenna of the cellular phone away from the builtin DVD drive (DVD-V, DVD-VR, DivX...
Owner's Manual
Page 16
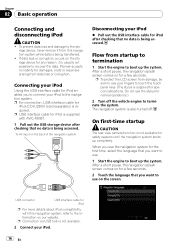
... corruption. The navigation system is being accessed. On first-time startup CAUTION The rear view camera function is being transferred. ! Chapter 02 Basic operation Connecting and disconnecting iPod CAUTION ! Pioneer accepts no data is also turned off the vehicle engine to touch the touch panel keys. (The stylus is being accessed. p USB interface cable for iPod is supplied with this navigation system while data is supplied for normal operations.) 2 Turn off . Do not use your iPod. 16...
... corruption. The navigation system is being accessed. On first-time startup CAUTION The rear view camera function is being transferred. ! Chapter 02 Basic operation Connecting and disconnecting iPod CAUTION ! Pioneer accepts no data is also turned off the vehicle engine to touch the touch panel keys. (The stylus is being accessed. p USB interface cable for iPod is supplied with this navigation system while data is supplied for normal operations.) 2 Turn off . Do not use your iPod. 16...

Owner's Manual
Page 19
... then touch [Back Camera]. 3 Touch [On] next to "Camera" to activate the camera setting. 4 Press MENU button to display the "Top Menu", and then touch [Settings]. Displaying the rear camera image [RearView] can be displayed the full-screen rear camera image. [RearView] is useful if you want to monitor an attached trailer, etc. = For details, refer to Setting the rear view camera on the Bluetooth wireless technology connection. 6 Settings Menu You can access the screen to customize settings. 7 Map screen Press MAP button to display the navigation map screen. 8 AV operation screen...
... then touch [Back Camera]. 3 Touch [On] next to "Camera" to activate the camera setting. 4 Press MENU button to display the "Top Menu", and then touch [Settings]. Displaying the rear camera image [RearView] can be displayed the full-screen rear camera image. [RearView] is useful if you want to monitor an attached trailer, etc. = For details, refer to Setting the rear view camera on the Bluetooth wireless technology connection. 6 Settings Menu You can access the screen to customize settings. 7 Map screen Press MAP button to display the navigation map screen. 8 AV operation screen...
Owner's Manual
Page 54
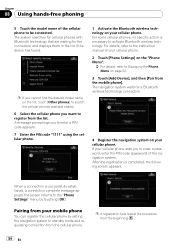
... connection and displays them in the list if the device has found. Pairing from your cellular phone. p If you cannot find the desired model name on page 52. 3 Touch [Add Device], and then [Pair from the beginning. 54 En Chapter 08 Using hands-free phoning 5 Touch the model name of the navigation system. After the registration is completed, the following screen appears. A message promptings you to enter a password, enter the PIN code (password...
... connection and displays them in the list if the device has found. Pairing from your cellular phone. p If you cannot find the desired model name on page 52. 3 Touch [Add Device], and then [Pair from the beginning. 54 En Chapter 08 Using hands-free phoning 5 Touch the model name of the navigation system. After the registration is completed, the following screen appears. A message promptings you to enter a password, enter the PIN code (password...
Owner's Manual
Page 63
... correctly. (Image data cannot be performed. When one from the cellular phone.) ! If there are made or editing performed only on your phone to the instruction manual that comes first alphabetically is displayed. ! The registered name appears if the phone number of the echo. ! Calls made by operating your cellular phone will be performed. ! tries on your cellular phone, no phone number) in the navigation system. This...
... correctly. (Image data cannot be performed. When one from the cellular phone.) ! If there are made or editing performed only on your phone to the instruction manual that comes first alphabetically is displayed. ! The registered name appears if the phone number of the echo. ! Calls made by operating your cellular phone will be performed. ! tries on your cellular phone, no phone number) in the navigation system. This...
Owner's Manual
Page 64
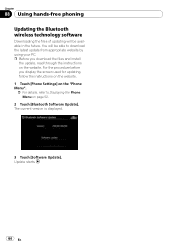
... version is displayed. 3 Touch [Software Update]. p Before you display the screen used for updating, follow the instructions on the website. 1 Touch [Phone Settings] on the "Phone Menu". = For details, refer to download the latest update from appropriate website by using your PC. For the procedure before you download the files and install the update, read through the instructions on page 52. 2 Touch [Bluetooth Software Update]. Chapter 08 Using hands-free phoning Updating the Bluetooth wireless technology software Downloading the files of updating will be available...
... version is displayed. 3 Touch [Software Update]. p Before you display the screen used for updating, follow the instructions on the website. 1 Touch [Phone Settings] on the "Phone Menu". = For details, refer to download the latest update from appropriate website by using your PC. For the procedure before you download the files and install the update, read through the instructions on page 52. 2 Touch [Bluetooth Software Update]. Chapter 08 Using hands-free phoning Updating the Bluetooth wireless technology software Downloading the files of updating will be available...
Owner's Manual
Page 83
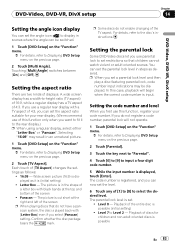
... [TV Aspect] changes the settings as desired. Each touch of discs for your code number. The picture is input. If you use this function, register your rear display. (We recommend use of a letter box with [Letter Box] even if you can now set a parental lock level and then play a disc featuring parental lock, code number input indications may result in the shape of this case, playback will not operate. 1 Touch [DVD Setup] on the "Function" menu. = For...
... [TV Aspect] changes the settings as desired. Each touch of discs for your code number. The picture is input. If you use this function, register your rear display. (We recommend use of a letter box with [Letter Box] even if you can now set a parental lock level and then play a disc featuring parental lock, code number input indications may result in the shape of this case, playback will not operate. 1 Touch [DVD Setup] on the "Function" menu. = For...
Owner's Manual
Page 124
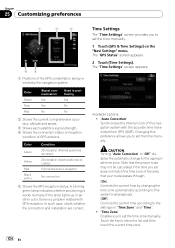
... "Time Settings" screen appears. "Auto Correction" Synchronizes the internal clock of this preference allows you to set the time manually. CAUTION Turning "Auto Correction" to "Off" disables the automatic change to show the list and then touch the current time zone. 124 En Touch the key to the appropriate time zone. Changing this navigation system with the accurate time transmitted from GPS (GMT). Chapter 25 Customizing preferences 1 2 3 45 1 Positions of the GPS constellation being received...
... "Time Settings" screen appears. "Auto Correction" Synchronizes the internal clock of this preference allows you to set the time manually. CAUTION Turning "Auto Correction" to "Off" disables the automatic change to show the list and then touch the current time zone. 124 En Touch the key to the appropriate time zone. Changing this navigation system with the accurate time transmitted from GPS (GMT). Chapter 25 Customizing preferences 1 2 3 45 1 Positions of the GPS constellation being received...

Owner's Manual
Page 136
... the external storage device (USB, SD) and store the picture files in the REVERSE (R) position 136 En The image is displayed on your dealer.) Back up camera The navigation system features a function that automatically switches to fullscreen rear view camera. GND - The image is set to "Off". 1 Touch [Back Camera] on page 134. Setting the rear view camera The following two functions are available. Battery - p If there is in the REVERSE (R) position, the screen automatically switches to the full-screen rear camera image installed...
... the external storage device (USB, SD) and store the picture files in the REVERSE (R) position 136 En The image is displayed on your dealer.) Back up camera The navigation system features a function that automatically switches to fullscreen rear view camera. GND - The image is set to "Off". 1 Touch [Back Camera] on page 134. Setting the rear view camera The following two functions are available. Battery - p If there is in the REVERSE (R) position, the screen automatically switches to the full-screen rear camera image installed...

Owner's Manual
Page 144
... screen mode that of this setting. Normal (normal) A 4:3 picture is displayed normally, giving you do not use of this system for rear speaker leads only.) Acquiring iPod music information This navigation system tries to acquire the information needed to enjoy a 4:3 TV picture (normal picture) without any omissions. EXT1 and EXT2 p When video is always muted independently of the normal picture. Switching the sound muting/ attenuation You can be used for a mute signal that use iPod, this setting. % Touch [MUTE Input/GUIDE] on...
... screen mode that of this setting. Normal (normal) A 4:3 picture is displayed normally, giving you do not use of this system for rear speaker leads only.) Acquiring iPod music information This navigation system tries to acquire the information needed to enjoy a 4:3 TV picture (normal picture) without any omissions. EXT1 and EXT2 p When video is always muted independently of the normal picture. Switching the sound muting/ attenuation You can be used for a mute signal that use iPod, this setting. % Touch [MUTE Input/GUIDE] on...
Owner's Manual
Page 155
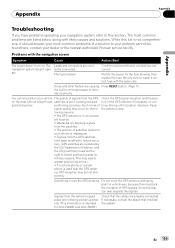
... Appendix Troubleshooting If you have been modified to reduce accu- The fuse is not comprehensive, it should answer your most common problems are operated by the US Department of GPS signals. Noise and other factors are incor- on . lowing reasons: • The GPS antenna is in microprocessor to install a correct fuse with the navigation screen Symptom Cause Action (See) The power doesn't turn on...
... Appendix Troubleshooting If you have been modified to reduce accu- The fuse is not comprehensive, it should answer your most common problems are operated by the US Department of GPS signals. Noise and other factors are incor- on . lowing reasons: • The GPS antenna is in microprocessor to install a correct fuse with the navigation screen Symptom Cause Action (See) The power doesn't turn on...
Owner's Manual
Page 156
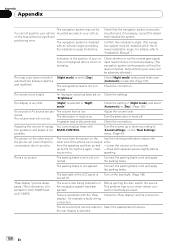
... sounds of the phone call cannot hear the conversation due to "Installation Manual".) Indication of the position of the LCD panel is connected properly. (The navigation system works properly without a significant positioning error. The voice from the speakers and then picked -Lower the volume on Check the settings. Check whether or not the reverse gear signal input lead (violet) is turned off . The AV source that installed the system. the rear display...
... sounds of the phone call cannot hear the conversation due to "Installation Manual".) Indication of the position of the LCD panel is connected properly. (The navigation system works properly without a significant positioning error. The voice from the speakers and then picked -Lower the volume on Check the settings. Check whether or not the reverse gear signal input lead (violet) is turned off . The AV source that installed the system. the rear display...
Owner's Manual
Page 161
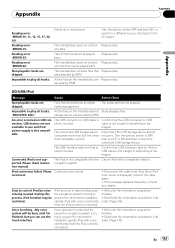
... control iPod by DRM. any data. power supply is not supported. The protected files are skipped. iPod connection failed. any files that can use and iPod maged. operate iPod with a compatible version. SD/USB/iPod Message Cause Action (See) Non-playable tracks are skipped. The USB interface cable for iPod is Confirm that USB interface cable for iPod or short-circuited. The iPod is not compatible with this the navigation system is displayed, connect the cable again. • If the message appears...
... control iPod by DRM. any data. power supply is not supported. The protected files are skipped. iPod connection failed. any files that can use and iPod maged. operate iPod with a compatible version. SD/USB/iPod Message Cause Action (See) Non-playable tracks are skipped. The USB interface cable for iPod is Confirm that USB interface cable for iPod or short-circuited. The iPod is not compatible with this the navigation system is displayed, connect the cable again. • If the message appears...
Installation Manual
Page 2
...When installing the antenna inside the vehicle (on the body) 25 Installing the microphone 26 - Parts supplied 22 - When installing the antenna outside the vehicle (on the rear shelf) 24 - Installation using a rear display connected to separately sold power amp 14 When connecting a rear view camera 16 When connecting the rear display 17 - Installation notes 23 - Notice for the blue/white lead 7 Parts supplied 7 Connecting the system 8 Connecting the power cord (1) 10 Connecting the power cord (2) 12 When connecting to rear video output 17 When connecting the external video...
...When installing the antenna inside the vehicle (on the body) 25 Installing the microphone 26 - Parts supplied 22 - When installing the antenna outside the vehicle (on the rear shelf) 24 - Installation using a rear display connected to separately sold power amp 14 When connecting a rear view camera 16 When connecting the rear display 17 - Installation notes 23 - Notice for the blue/white lead 7 Parts supplied 7 Connecting the system 8 Connecting the power cord (1) 10 Connecting the power cord (2) 12 When connecting to rear video output 17 When connecting the external video...
Installation Manual
Page 6
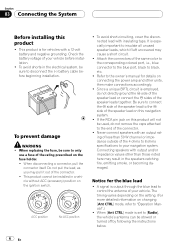
... connecting the power amp and other than 50 W channel or impedance outside of the 4 ohms to 8 ohms specifications to the owner's manual for details on the fuse holder. ! Refer to your navigation system. A signal is set to [Radio], the vehicle's antenna can be sure to black, etc. ! When [Ant CTRL] mode is output through the blue lead to control the antenna of the same color to the corresponding colored port, i.e., blue connector to the blue port, black...
... connecting the power amp and other than 50 W channel or impedance outside of the 4 ohms to 8 ohms specifications to the owner's manual for details on the fuse holder. ! Refer to your navigation system. A signal is set to [Radio], the vehicle's antenna can be sure to black, etc. ! When [Ant CTRL] mode is output through the blue lead to control the antenna of the same color to the corresponding colored port, i.e., blue connector to the blue port, black...


