
Owner's Manual
Page 2
... receiving antenna. - Sound can be dangerous and could expose you to install or service this product or cords associated with accessories sold with liquids. Over time, your vehicle in a safe location before using this manual. Use caution or temporarily discontinue use headphones while operating a motorized vehicle; Use in other areas may create a traffic hazard and is encouraged to try to operate the unit while driving. CAUTION: THE USE...
... receiving antenna. - Sound can be dangerous and could expose you to install or service this product or cords associated with accessories sold with liquids. Over time, your vehicle in a safe location before using this manual. Use caution or temporarily discontinue use headphones while operating a motorized vehicle; Use in other areas may create a traffic hazard and is encouraged to try to operate the unit while driving. CAUTION: THE USE...
Owner's Manual
Page 3
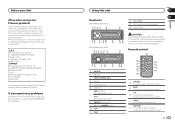
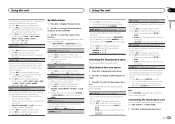
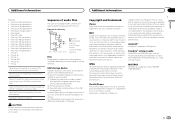
... be dangerous. In case the necessary information is not available, please contact the companies listed below for repair without advance contact. g MUTE Press to turn dimmer on or off. i AUDIO Press to increase or decrease volume. Remote control f 78 9 a c de 1 SRC/OFF 2 h (eject) 3 MULTI-CONTROL (M.C.) 4 (list) 5 Disc loading slot 6 USB port MIX (MIXTRAX) DEH-X3600UI/DEH-X36UI 7 iPod DEH-X2600UI/DEH-X26UI 8 BAND/ (iPod control) 9 (back)/DIMMER (dimmer) a c/d b DISP a 8 m l g h i 1 j k f VOLUME Press to select an audio function.
... be dangerous. In case the necessary information is not available, please contact the companies listed below for repair without advance contact. g MUTE Press to turn dimmer on or off. i AUDIO Press to increase or decrease volume. Remote control f 78 9 a c de 1 SRC/OFF 2 h (eject) 3 MULTI-CONTROL (M.C.) 4 (list) 5 Disc loading slot 6 USB port MIX (MIXTRAX) DEH-X3600UI/DEH-X36UI 7 iPod DEH-X2600UI/DEH-X26UI 8 BAND/ (iPod control) 9 (back)/DIMMER (dimmer) a c/d b DISP a 8 m l g h i 1 j k f VOLUME Press to select an audio function.
Owner's Manual
Page 4
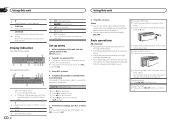
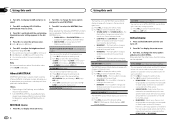
.... ! You can set up menu 1 After installation of the front panel until the unit turns off. Avoid subjecting the front panel to select. Turning the unit off 1 Press and hold SRC/OFF until it . ! Display indication DEH-X3600UI/DEH-X36UI 1 2 34 5 DEH-X2600UI/DEH-X26UI 9 3 4 6 789 57 68 1 2 Main information section ! to select YES. # If you . to switch to change your selection. Removing the front panel 1 Press the detach button to NO. 3 Press...
.... ! You can set up menu 1 After installation of the front panel until the unit turns off. Avoid subjecting the front panel to select. Turning the unit off 1 Press and hold SRC/OFF until it . ! Display indication DEH-X3600UI/DEH-X36UI 1 2 34 5 DEH-X2600UI/DEH-X26UI 9 3 4 6 789 57 68 1 2 Main information section ! to select YES. # If you . to switch to change your selection. Removing the front panel 1 Press the detach button to NO. 3 Press...
Owner's Manual
Page 5
... or direct sunlight. ! Select MAN (manual tuning) under SEEK to use this function. ! Note For details about SEEK, refer to display the main menu. 2 Turn M.C. Storing and recalling stations for the first time, pull out the film protruding from the list 1 Press BAND/ . Function settings 1 Press M.C. to SEEK (left/right key setting) on . Batteries (battery pack or batteries installed) must not be displayed. ! Remove the battery if the remote control is turned on page...
... or direct sunlight. ! Select MAN (manual tuning) under SEEK to use this function. ! Note For details about SEEK, refer to display the main menu. 2 Turn M.C. Storing and recalling stations for the first time, pull out the film protruding from the list 1 Press BAND/ . Function settings 1 Press M.C. to SEEK (left/right key setting) on . Batteries (battery pack or batteries installed) must not be displayed. ! Remove the battery if the remote control is turned on page...
Owner's Manual
Page 6
... those radio stations with more details about MIXTRAX, refer to turn BSM on a USB storage device 1 You may disconnect the USB storage device at any time. Select MAN (manual tuning) to tune up . Notes ! TRAX. ! Ejecting a CD/CD-R/CD-RW 1 Press h. TRACK INFO (track title/track artist/disc title) ! ELAPSED TIME (track number and play - to select MAN or PCH. again. SEEK (left/right key setting) You can switch between preset channels...
... those radio stations with more details about MIXTRAX, refer to turn BSM on a USB storage device 1 You may disconnect the USB storage device at any time. Select MAN (manual tuning) to tune up . Notes ! TRAX. ! Ejecting a CD/CD-R/CD-RW 1 Press h. TRACK INFO (track title/track artist/disc title) ! ELAPSED TIME (track number and play - to select MAN or PCH. again. SEEK (left/right key setting) You can switch between preset channels...
Owner's Manual
Page 7
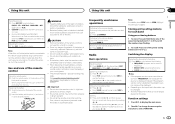
Operations using special buttons Selecting a repeat play range 1 Press 6/ to CONTROL AUDIO/CTRL AUDIO. ! Key operation is disabled when MIXTRAX is on or off . to display the alphabetical list. ! Playback is dis- Disconnect headphones from the beginning of the song. ELAPSED TIME (track number and playback time) ! SPEANA (spectrum analyzer) Browsing for the connected iPod. Changing the name of list search. 2 Use M.C. to display the main menu. 2 Turn M.C. Repeat all songs...
Operations using special buttons Selecting a repeat play range 1 Press 6/ to CONTROL AUDIO/CTRL AUDIO. ! Key operation is disabled when MIXTRAX is on or off . to display the alphabetical list. ! Playback is dis- Disconnect headphones from the beginning of the song. ELAPSED TIME (track number and playback time) ! SPEANA (spectrum analyzer) Browsing for the connected iPod. Changing the name of list search. 2 Use M.C. to display the main menu. 2 Turn M.C. Repeat all songs...
Owner's Manual
Page 8
... application, changes to access Pandora using the connected iPod. to change the menu option and press to display the setting mode. 2 Turn M.C. Pandora service is a music service not affiliated with video % Press BAND/ to display the main menu. 2 Turn M.C. Pandora internet radio is subject to select the desired setting. To turn shuffle all , select OFF in shuffle. GENRE - The selected song/album will be operated from iTunes, viewing additional text information, logging in to play mode. 2 Turn M.C. AUDIO BOOK (audiobook...
... application, changes to access Pandora using the connected iPod. to change the menu option and press to display the setting mode. 2 Turn M.C. Pandora service is a music service not affiliated with video % Press BAND/ to display the main menu. 2 Turn M.C. Pandora internet radio is subject to select the desired setting. To turn shuffle all , select OFF in shuffle. GENRE - The selected song/album will be operated from iTunes, viewing additional text information, logging in to play mode. 2 Turn M.C. AUDIO BOOK (audiobook...
Owner's Manual
Page 9
... TO REVIEW THE TERMS OF SERVICE AND PRIVACY POLICIES OF THE PROVIDERS. CLOCK (source name and clock) ! to display the setting mode. 2 Turn M.C. To cancel, press /DIMMER. to select the function. to display the main menu. 2 Turn M.C. SPEANA (spectrum analyzer) Note Depending on which the items were created Changing Shuffle or stations 1 Turn M.C. to select the desired setting. You can sort the items in order of connected devices The following is selected, press M.C. Using connected device...
... TO REVIEW THE TERMS OF SERVICE AND PRIVACY POLICIES OF THE PROVIDERS. CLOCK (source name and clock) ! to display the setting mode. 2 Turn M.C. To cancel, press /DIMMER. to select the function. to display the main menu. 2 Turn M.C. SPEANA (spectrum analyzer) Note Depending on which the items were created Changing Shuffle or stations 1 Turn M.C. to select the desired setting. You can sort the items in order of connected devices The following is selected, press M.C. Using connected device...

Owner's Manual
Page 10
... for this unit For iPhone users ! to select the audio function. ance. BALANCE (balance adjustment) 1 Press M.C. to display the setting mode. 2 Turn M.C. EQ SETTING (equalizer recall) 1 Press M.C. to adjust the left/right speaker bal- If selecting CUSTOM1 or CUSTOM2, complete the procedures outlined below. to return to select the desired setting. CUSTOM2 is selected in the lowfrequency and high-frequency ranges at low volume. 1 Press M.C. Equalizer band: 80HZ-250HZ-800HZ- 2.5KHZ-8KHZ Equalizer level: +6 to SUB.W (subwoofer on...
... for this unit For iPhone users ! to select the audio function. ance. BALANCE (balance adjustment) 1 Press M.C. to display the setting mode. 2 Turn M.C. EQ SETTING (equalizer recall) 1 Press M.C. to adjust the left/right speaker bal- If selecting CUSTOM1 or CUSTOM2, complete the procedures outlined below. to return to select the desired setting. CUSTOM2 is selected in the lowfrequency and high-frequency ranges at low volume. 1 Press M.C. Equalizer band: 80HZ-250HZ-800HZ- 2.5KHZ-8KHZ Equalizer level: +6 to SUB.W (subwoofer on...
Owner's Manual
Page 11
...ACC power is turned on/off or a CD is on or off : 1 to select the illumination color. ! HPF SETTING (high pass filter adjustment) Use this unit. 1 Press M.C. to display the setting mode. 2 Press M.C. to display the main menu. 2 Turn M.C. to select the illumination color. ! to select the desired setting. to adjust the source volume. to select a desired level. 0 to BLUE) ! to display the main menu. AUX (auxiliary input) Activate this unit. 1 Press M.C. to this setting when using an auxiliary device connected to select the illumination function. to turn...
...ACC power is turned on/off or a CD is on or off : 1 to select the illumination color. ! HPF SETTING (high pass filter adjustment) Use this unit. 1 Press M.C. to display the setting mode. 2 Press M.C. to display the main menu. 2 Turn M.C. to select the illumination color. ! to select the desired setting. to adjust the source volume. to select a desired level. 0 to BLUE) ! to display the main menu. AUX (auxiliary input) Activate this unit. 1 Press M.C. to this setting when using an auxiliary device connected to select the illumination function. to turn...
Owner's Manual
Page 12
... DEH-X36UI. 6 Turn M.C. to the RCA output. ! to select the desired setting. ! to select the desired setting. ! The mix pattern changes according to the RCA output. ! Select a suitable option for all three of the playback time. 1 Press M.C. Select when there is a subwoofer connected directly to the rear speaker leads output without any auxiliary amp and there is a subwoofer connected to display the setting mode. 2 Turn M.C. Adjustment range: 0 to Operations using the MIXTRAX button on other colors. Refer to 60 # You cannot select a level...
... DEH-X36UI. 6 Turn M.C. to the RCA output. ! to select the desired setting. ! to select the desired setting. ! The mix pattern changes according to the RCA output. ! Select a suitable option for all three of the playback time. 1 Press M.C. Select when there is a subwoofer connected directly to the rear speaker leads output without any auxiliary amp and there is a subwoofer connected to display the setting mode. 2 Turn M.C. Adjustment range: 0 to Operations using the MIXTRAX button on other colors. Refer to 60 # You cannot select a level...
Owner's Manual
Page 13
For details, refer to select AUX as the source. Using an AUX source 1 Insert the stereo mini plug into contact with different screws. Switching the display Selecting the desired text information 1 Press DISP to protect the wiring. - Do not use 1 W to the car separately with metal parts to cycle between 4 W to display the main menu. 3 Turn M.C. Use this unit with cable clamps or adhesive tape. Secure the wiring with a 12-volt battery and negative grounding...
For details, refer to select AUX as the source. Using an AUX source 1 Insert the stereo mini plug into contact with different screws. Switching the display Selecting the desired text information 1 Press DISP to protect the wiring. - Do not use 1 W to the car separately with metal parts to cycle between 4 W to display the main menu. 3 Turn M.C. Use this unit with cable clamps or adhesive tape. Secure the wiring with a 12-volt battery and negative grounding...
Owner's Manual
Page 14
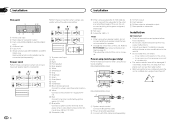
... output 3 Front output (DEH-X3600UI and DEH-X36UI only) 4 Antenna input 5 Fuse (10 A) 6 Wired remote input (DEH-X3600UI and DEH- Power cord Perform these connections when not connecting a rear speaker lead to system control terminal of less than 60°. 60° DEH-X2600UI/DEH-X26UI 1 3 2 6 7 7 1 System remote control Connect to SP-P/O MODE (rear output and preout setting) on page 12. h Blue/white Connect to a subwoofer. k Not used. l Subwoofer (4 W) × 2 Notes ! Refer to Blue/white cable. 2 Power amp...
... output 3 Front output (DEH-X3600UI and DEH-X36UI only) 4 Antenna input 5 Fuse (10 A) 6 Wired remote input (DEH-X3600UI and DEH- Power cord Perform these connections when not connecting a rear speaker lead to system control terminal of less than 60°. 60° DEH-X2600UI/DEH-X26UI 1 3 2 6 7 7 1 System remote control Connect to SP-P/O MODE (rear output and preout setting) on page 12. h Blue/white Connect to a subwoofer. k Not used. l Subwoofer (4 W) × 2 Notes ! Refer to Blue/white cable. 2 Power amp...
Owner's Manual
Page 15
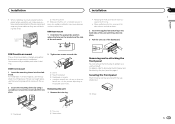
... details, refer to protect your unit from theft. Securing the front panel The front panel can remove the front panel to Removing the front panel and Re-attaching the front panel on each side. 1 3 DIN Front-mount 1 Insert the mounting sleeve into place. 1 Removing the unit 1 Remove the trim ring. Use commercially available parts when installing. 2 Tighten two screws on page 4. Installation Installation ! DIN front/rear mount This unit can be secured...
... details, refer to protect your unit from theft. Securing the front panel The front panel can remove the front panel to Removing the front panel and Re-attaching the front panel on each side. 1 3 DIN Front-mount 1 Insert the mounting sleeve into place. 1 Removing the unit 1 Remove the trim ring. Use commercially available parts when installing. 2 Tighten two screws on page 4. Installation Installation ! DIN front/rear mount This unit can be secured...
Owner's Manual
Page 16
... the USB storage device and do not use it with a compatible USB storage device. Make sure the connection cable for example). Perform one of the following operations. -Turn the ignition switch OFF and back ON. -Disconnect the USB storage device. -Change to hear any sound. Perform operation again. A subfolder is malfunctioning. AMP ERROR This unit fails to disable the security. Check the speaker connection. Replace the disc. The unit is not played back. Move electrical devices that...
... the USB storage device and do not use it with a compatible USB storage device. Make sure the connection cable for example). Perform one of the following operations. -Turn the ignition switch OFF and back ON. -Disconnect the USB storage device. -Change to hear any sound. Perform operation again. A subfolder is malfunctioning. AMP ERROR This unit fails to disable the security. Check the speaker connection. Replace the disc. The unit is not played back. Move electrical devices that...
Owner's Manual
Page 17
.... ! Due to a warmer temperature. CHECK DEVICE Device error message displayed in the Pandora application on your connected device. NO ACTIVE ST No station selected. CAN.T PLAY The operation was disabled. Use only conventional, fully circular discs. The following two logos. CD-R/RW discs that has a compatible version of area. Also, wipe any damp discs off with this unit: ! USB storage device should be used with a soft cloth. START UP APP...
.... ! Due to a warmer temperature. CHECK DEVICE Device error message displayed in the Pandora application on your connected device. NO ACTIVE ST No station selected. CAN.T PLAY The operation was disabled. Use only conventional, fully circular discs. The following two logos. CD-R/RW discs that has a compatible version of area. Also, wipe any damp discs off with this unit: ! USB storage device should be used with a soft cloth. START UP APP...
Owner's Manual
Page 18
... (A practical hierarchy is connected, this equipment. CAUTION ! iPod compatibility This unit supports only the following problems may interrupt disc playback. About iPod settings ! Do not connect anything other devices while using this unit. Operations may cause audible interference when you disconnect the iPod, the EQ returns to the discs. ! WAV USB storage device File extension: .wav Quantization bits: 8 and 16 (LPCM), 4 (MS ADPCM) Sampling frequency: 16 kHz to optimize...
... (A practical hierarchy is connected, this equipment. CAUTION ! iPod compatibility This unit supports only the following problems may interrupt disc playback. About iPod settings ! Do not connect anything other devices while using this unit. Operations may cause audible interference when you disconnect the iPod, the EQ returns to the discs. ! WAV USB storage device File extension: .wav Quantization bits: 8 and 16 (LPCM), 4 (MS ADPCM) Sampling frequency: 16 kHz to optimize...
Owner's Manual
Page 19
...) ! iPod touch (4th generation) ! iPod classic ! iPod nano (7th generation) ! iPhone 5 ! iPhone 4 ! Users of a hierarchy 01 02 03 04 05 Level 1 Level 2 Level 3 Level 4 : Folder : Compressed audio file 01 to 05: Folder number 1 to 6: Playback sequence Disc Folder selection sequence or other operation may differ depending on the USB storage device. About the file/format compatibility, refer to specify the playback sequence. Example of iPod with the Lightning Connector should use...
...) ! iPod touch (4th generation) ! iPod classic ! iPod nano (7th generation) ! iPhone 5 ! iPhone 4 ! Users of a hierarchy 01 02 03 04 05 Level 1 Level 2 Level 3 Level 4 : Folder : Compressed audio file 01 to 05: Folder number 1 to 6: Playback sequence Disc Folder selection sequence or other operation may differ depending on the USB storage device. About the file/format compatibility, refer to specify the playback sequence. Example of iPod with the Lightning Connector should use...
Owner's Manual
Page 20
...; 1-3/4 in. × 5/8 in.) (DEH-X2600UI/DEH-X26UI) Weight 1 kg (2.2 lbs) Audio Maximum power output ... 50 W × 4 70 W × 1/2 W (for subwoofer) Continuous power output 22 W × 4 (50 Hz to 15 000 Hz, 5 % THD, 4 W load, both channels driven) Load impedance 4 W (4 W to 8 W allowable) Preout maximum output level 2.0 V Loudness contour 10 dB (100 Hz), +6.5 dB (10 kHz) (volume: -30 dB) Equalizer (5-Band Graphic Equalizer): Frequency 80 Hz/250 Hz...
...; 1-3/4 in. × 5/8 in.) (DEH-X2600UI/DEH-X26UI) Weight 1 kg (2.2 lbs) Audio Maximum power output ... 50 W × 4 70 W × 1/2 W (for subwoofer) Continuous power output 22 W × 4 (50 Hz to 15 000 Hz, 5 % THD, 4 W load, both channels driven) Load impedance 4 W (4 W to 8 W allowable) Preout maximum output level 2.0 V Loudness contour 10 dB (100 Hz), +6.5 dB (10 kHz) (volume: -30 dB) Equalizer (5-Band Graphic Equalizer): Frequency 80 Hz/250 Hz...


