Installation Manual
Page 2
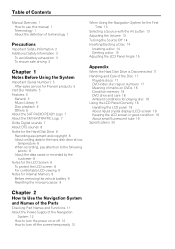
... 3 To avoid battery exhaustion 3 To ensure safe driving 3 Chapter 1 Notes Before Using the System Important (Serial Number:) 5 After-sales service for Pioneer products 5 Visit Our Website 5 Features 5 General 5 Music Library 5 Disc playback 6 Others ... of the Disc 17 Playable discs 17 DVD-Video disc region numbers 17 Meaning of marks on DVDs 18 Condition memory 18 DVD drive and care 18 Ambient conditions for ... 20 Chapter 2 How to Use the Navigation System and Names of the Parts Checking Part Names and Functions 11 About the Power Supply of the Navigation System 12 How to turn the power on...
... 3 To avoid battery exhaustion 3 To ensure safe driving 3 Chapter 1 Notes Before Using the System Important (Serial Number:) 5 After-sales service for Pioneer products 5 Visit Our Website 5 Features 5 General 5 Music Library 5 Disc playback 6 Others ... of the Disc 17 Playable discs 17 DVD-Video disc region numbers 17 Meaning of marks on DVDs 18 Condition memory 18 DVD drive and care 18 Ambient conditions for ... 20 Chapter 2 How to Use the Navigation System and Names of the Parts Checking Part Names and Functions 11 About the Power Supply of the Navigation System 12 How to turn the power on...
Installation Manual
Page 3
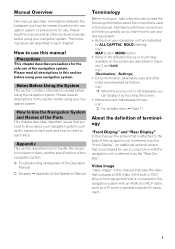
...as the "Rear Display". The following information about your navigation system. Video image "Video image" in this manual, the screen that is played a DVD-Video in the built-in each part, and how to the body of parts for the navigation system or precautions for the safe use your new equipment. ...• Buttons on your navigation unit are indicated by touching the screen. • ...
...as the "Rear Display". The following information about your navigation system. Video image "Video image" in this manual, the screen that is played a DVD-Video in the built-in each part, and how to the body of parts for the navigation system or precautions for the safe use your new equipment. ...• Buttons on your navigation unit are indicated by touching the screen. • ...
Installation Manual
Page 6
... on trailers, or while backing up. • SCREEN IMAGE MAY APPEAR REVERSED. • USE INPUT ONLY FOR REVERSE OR MIRROR IMAGE REAR VIEW CAMERA. The navigation system detects whether your vehicle in a safe place and apply the parking brake. will be used for entertainment purposes. • Please note that enables the driver... in a location that the edges of front seat video source while driving is for more information. To watch "Video image", the warning ATTENTION! Also, no part of the navigation system should not be inferior to watch "Video image" while driving.
... on trailers, or while backing up. • SCREEN IMAGE MAY APPEAR REVERSED. • USE INPUT ONLY FOR REVERSE OR MIRROR IMAGE REAR VIEW CAMERA. The navigation system detects whether your vehicle in a safe place and apply the parking brake. will be used for entertainment purposes. • Please note that enables the driver... in a location that the edges of front seat video source while driving is for more information. To watch "Video image", the warning ATTENTION! Also, no part of the navigation system should not be inferior to watch "Video image" while driving.
Installation Manual
Page 13
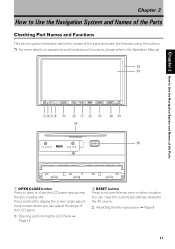
c d Chapter 2 How to Use the Navigation System and Names of functions, please refer to the Operation Manual. You can adjust the angle of the LCD panel. ➲ Opening and Closing the LCD ... to the AV source. ➲ Resetting the Microprocessor ➞ Page 9 11 Chapter 2 How to Use the Navigation System and Names of the Parts Checking Part Names and Functions This section gives information about the names of the parts and main the features using the buttons. ❒ For more details on operations and limitations of the...
c d Chapter 2 How to Use the Navigation System and Names of functions, please refer to the Operation Manual. You can adjust the angle of the LCD panel. ➲ Opening and Closing the LCD ... to the AV source. ➲ Resetting the Microprocessor ➞ Page 9 11 Chapter 2 How to Use the Navigation System and Names of the Parts Checking Part Names and Functions This section gives information about the names of the parts and main the features using the buttons. ❒ For more details on operations and limitations of the...
Installation Manual
Page 14
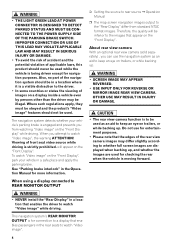
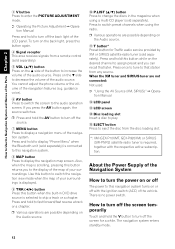
...button Press to switch the screen to decrease the volume of the audio source. a P.LIST (/) button Press to change the discs in DVD drive source is selected to skip a track or a chapter. Press and hold to display "Phone Menu" when the Bluetooth unit (sold separately)....surroundings. Press to switch preset channels when using a multi-CD player (sold separately). b T button* Preset button for a while. Press on or off the back light of the LCD panel. How to Use the Navigation System and Names of the Parts Chapter 2 3 V button Press to enter the PICTURE ADJUSTMENT ...
...button Press to switch the screen to decrease the volume of the audio source. a P.LIST (/) button Press to change the discs in DVD drive source is selected to skip a track or a chapter. Press and hold to display "Phone Menu" when the Bluetooth unit (sold separately)....surroundings. Press to switch preset channels when using a multi-CD player (sold separately). b T button* Preset button for a while. Press on or off the back light of the LCD panel. How to Use the Navigation System and Names of the Parts Chapter 2 3 V button Press to enter the PICTURE ADJUSTMENT ...

Installation Manual
Page 15
Press the AV button repeatedly to switch between the following sources: [CD/ROM (MP3)/DVD] (built-in DVD drive) - [LIBRARY] (HDD player) - [FM] (FM tuner) - [AM] (AM tuner) - [XM] (XM tuner) - [SIRIUS]... Press and hold the AV button to a Pioneer product (such as a source, the basic functions can be controlled by GPS satellites so the location of the Parts ❒ To cancel standby mode, press the ...player. - Selecting a Source with high accuracy. ❒ When an error message appears during the initial learning, refer to "Message and how to react to them to the navigation system...
Press the AV button repeatedly to switch between the following sources: [CD/ROM (MP3)/DVD] (built-in DVD drive) - [LIBRARY] (HDD player) - [FM] (FM tuner) - [AM] (AM tuner) - [XM] (XM tuner) - [SIRIUS]... Press and hold the AV button to a Pioneer product (such as a source, the basic functions can be controlled by GPS satellites so the location of the Parts ❒ To cancel standby mode, press the ...player. - Selecting a Source with high accuracy. ❒ When an error message appears during the initial learning, refer to "Message and how to react to them to the navigation system...
Installation Manual
Page 16
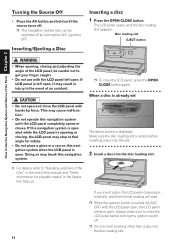
.../Ejecting a Disc Inserting a disc 1 Press the OPEN CLOSE button. Disc loading slot EJECT button How to Use the Navigation System and Names of the Parts Chapter 2 • When opening or closing and adjusting the angle of this manual and "Detail information for safety. • Do not place a glass or a can ...
.../Ejecting a Disc Inserting a disc 1 Press the OPEN CLOSE button. Disc loading slot EJECT button How to Use the Navigation System and Names of the Parts Chapter 2 • When opening or closing and adjusting the angle of this manual and "Detail information for safety. • Do not place a glass or a can ...
Installation Manual
Page 17
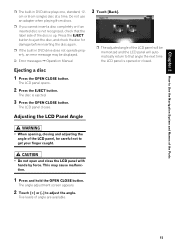
...The LCD panel opens. 2 Press the EJECT button. Five levels of the Parts ❒ The built-in DVD drive does not operate properly, an error message may cause malfunction. 1 Press...; Do not open and close the LCD panel with hands by force. Chapter 2 How to Use the Navigation System and Names of angle are available. 15 Adjusting the LCD Panel Angle • When opening, closing and ... eject the disc, and check the disc for damage before inserting the disc again. ❒ If the built-in DVD drive plays one, standard, 12cm or 8-cm (single) disc at a time. Ejecting a disc 1 Press the ...
...The LCD panel opens. 2 Press the EJECT button. Five levels of the Parts ❒ The built-in DVD drive does not operate properly, an error message may cause malfunction. 1 Press...; Do not open and close the LCD panel with hands by force. Chapter 2 How to Use the Navigation System and Names of angle are available. 15 Adjusting the LCD Panel Angle • When opening, closing and ... eject the disc, and check the disc for damage before inserting the disc again. ❒ If the built-in DVD drive plays one, standard, 12cm or 8-cm (single) disc at a time. Ejecting a disc 1 Press the ...

Installation Manual
Page 18
How to Use the Navigation System and Names of the Parts Chapter 2 16
How to Use the Navigation System and Names of the Parts Chapter 2 16
Other Manual
Page 3
Installation using a rear display connected to rear video output Installation 20 To guard against electromagnetic interference 21 Before installing 21 Installing this navigation system 4 To prevent damage 5 Parts supplied 6 Connecting the system 7 Connecting the multi-channel processor 9 Connecting the power cord (1 11 Connecting the power cord (2 13 When connecting to separately sold power amp 15...
Installation using a rear display connected to rear video output Installation 20 To guard against electromagnetic interference 21 Before installing 21 Installing this navigation system 4 To prevent damage 5 Parts supplied 6 Connecting the system 7 Connecting the multi-channel processor 9 Connecting the power cord (1 11 Connecting the power cord (2 13 When connecting to separately sold power amp 15...
Other Manual
Page 4
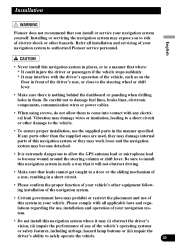
... or microphone cable to become caught in the Installation Manual. • Secure all wiring with metal parts, short-circuiting can cause damage to the navigation system that you install your navigation system yourself. We recommend that only authorized Pioneer service personnel, who have special training and experience in the mobile electronics installations, please carefully follow all...
... or microphone cable to become caught in the Installation Manual. • Secure all wiring with metal parts, short-circuiting can cause damage to the navigation system that you install your navigation system yourself. We recommend that only authorized Pioneer service personnel, who have special training and experience in the mobile electronics installations, please carefully follow all...
Other Manual
Page 21
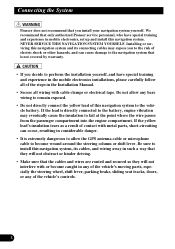
... if the vehicle stops suddenly. * It may interfere with all installation and servicing of your navigation system to authorized Pioneer service personnel. • Never install this navigation system in places, or in a short circuit. • Please confirm the proper function of your...impair the driver's ability to the vehicle. • To ensure proper installation, use the supplied parts in your navigation system yourself. Installing or servicing the navigation system may expose you install or service your vehicle. Please comply with the driver's operation of the vehicle...
... if the vehicle stops suddenly. * It may interfere with all installation and servicing of your navigation system to authorized Pioneer service personnel. • Never install this navigation system in places, or in a short circuit. • Please confirm the proper function of your...impair the driver's ability to the vehicle. • To ensure proper installation, use the supplied parts in your navigation system yourself. Installing or servicing the navigation system may expose you install or service your vehicle. Please comply with the driver's operation of the vehicle...

Other Manual
Page 24
Installation Parts supplied The navigation unit Binding screw (5 × 6 mm) (8 pcs.) Flush surface screw (5 × 6 mm) (8 pcs.) Frame 23
Installation Parts supplied The navigation unit Binding screw (5 × 6 mm) (8 pcs.) Flush surface screw (5 × 6 mm) (8 pcs.) Frame 23

Other Manual
Page 27
... the GPS antenna faces the window. Notes: • When attaching the metal sheet, do not cut it is removed. Clamps Use clamps to pass through. Parts supplied English Español Deutsch Français GPS antenna Metal sheet Clamp (5 pcs.) Waterproof pad When installing the antenna inside the vehicle. Place...
... the GPS antenna faces the window. Notes: • When attaching the metal sheet, do not cut it is removed. Clamps Use clamps to pass through. Parts supplied English Español Deutsch Français GPS antenna Metal sheet Clamp (5 pcs.) Waterproof pad When installing the antenna inside the vehicle. Place...

Other Manual
Page 29
...Microphone clip Clamps Use clamps to sun visor. It cannot recognize the driver's voice if the sun visor is turned off. (ACC OFF) Parts supplied English Español Deutsch Français Microphone Microphone clip Mounting on the sun visor when it easiest to pick up position. ...distance from the driver make it is in the up the driver's voice. • Make sure to connect the microphone to the navigation system after the system is in the down position. 28 Italiano Nederlands Install the microphone on the sun visor Double-sided tape 1. Install the microphone in the...
...Microphone clip Clamps Use clamps to sun visor. It cannot recognize the driver's voice if the sun visor is turned off. (ACC OFF) Parts supplied English Español Deutsch Français Microphone Microphone clip Mounting on the sun visor when it easiest to pick up position. ...distance from the driver make it is in the up the driver's voice. • Make sure to connect the microphone to the navigation system after the system is in the down position. 28 Italiano Nederlands Install the microphone on the sun visor Double-sided tape 1. Install the microphone in the...


