
Owner's Manual
Page 1
For more information, please contact your vehicle, additional installation may be required. Important Information for the User first! Be sure to your vehicle's parking brake and depending on your Authorized Pioneer Electronics retailer or call us at (800) 421-1404. English Operation Manual MULTIMEDIA NAVIGATION RECEIVER AVIC-Z140BH AVIC-X940BT Notice to all users: This software requires that the navigation system is properly connected to read Important Information for the User includes the important information that you must understand before using this navigation system.
For more information, please contact your vehicle, additional installation may be required. Important Information for the User first! Be sure to your vehicle's parking brake and depending on your Authorized Pioneer Electronics retailer or call us at (800) 421-1404. English Operation Manual MULTIMEDIA NAVIGATION RECEIVER AVIC-Z140BH AVIC-X940BT Notice to all users: This software requires that the navigation system is properly connected to read Important Information for the User includes the important information that you must understand before using this navigation system.
Owner's Manual
Page 2
... properly. Ejecting an SD memory card (for AVIC-Z140BH) 18 - A message about the map database 24 Demonstration images 24 How to use the navigation menu screens Screen switching overview 26 What you can do on -screen keyboard 28 How to use this manual 10 - Changing the scale of the road ...an SD memory card (for AVIC-X940BT) 18 - Disconnecting your iPod 22 - POI list) 28 Operating the on each menu 27 Shortcut Menu 27 - Display during freeway driving 31 Types of the map 31 - After you for buying this Pioneer product. Conventions used in this manual 10 Notice regarding video viewing...
... properly. Ejecting an SD memory card (for AVIC-Z140BH) 18 - A message about the map database 24 Demonstration images 24 How to use the navigation menu screens Screen switching overview 26 What you can do on -screen keyboard 28 How to use this manual 10 - Changing the scale of the road ...an SD memory card (for AVIC-X940BT) 18 - Disconnecting your iPod 22 - POI list) 28 Operating the on each menu 27 Shortcut Menu 27 - Display during freeway driving 31 Types of the map 31 - After you for buying this Pioneer product. Conventions used in this manual 10 Notice regarding video viewing...

Owner's Manual
Page 4
...procedure 76 Reading the screen 76 Using the touch panel keys 77 - Deleting a registered device 62 Connecting a registered Bluetooth device manually 62 - Answering an incoming call home easily 65 - Tuning in the phone book 65 - Searching for traffic congestion automatically 57... screen and the list screen 74 - Clearing memory 71 - Checking traffic information manually 57 Selecting traffic information to display 58 Selecting preferred RDS-TMC service provider manually 58 Registering and connecting a Bluetooth device Preparing communication devices 59 Registering your Bluetooth...
...procedure 76 Reading the screen 76 Using the touch panel keys 77 - Deleting a registered device 62 Connecting a registered Bluetooth device manually 62 - Answering an incoming call home easily 65 - Tuning in the phone book 65 - Searching for traffic congestion automatically 57... screen and the list screen 74 - Clearing memory 71 - Checking traffic information manually 57 Selecting traffic information to display 58 Selecting preferred RDS-TMC service provider manually 58 Registering and connecting a Bluetooth device Preparing communication devices 59 Registering your Bluetooth...

Owner's Manual
Page 10
... MODE button. ! How to use this manual Finding the operation procedure for what you want to do When you have decided what you want to check the meaning of an item displayed on , take a few minutes to read Important Information for AVIC-Z140BH. Finding the operation procedure from a menu... name If you want to do, you can be connected to this navigation unit will find the meanings of the manual. If you should note. Extra information, alternatives and other ...
... MODE button. ! How to use this manual Finding the operation procedure for what you want to do When you have decided what you want to check the meaning of an item displayed on , take a few minutes to read Important Information for AVIC-Z140BH. Finding the operation procedure from a menu... name If you want to do, you can be connected to this navigation unit will find the meanings of the manual. If you should note. Extra information, alternatives and other ...

Owner's Manual
Page 11
... may vary depending on the iPod models and the software version of this navigation system conveys only a license for such use this manual, iPod and iPhone will be compatible with a Pioneer USB interface cable for commercial or public viewing purposes may not be re- iPhone 3GS: iOS 5.0 ! p Operation methods may not work...
... may vary depending on the iPod models and the software version of this navigation system conveys only a license for such use this manual, iPod and iPhone will be compatible with a Pioneer USB interface cable for commercial or public viewing purposes may not be re- iPhone 3GS: iOS 5.0 ! p Operation methods may not work...
Owner's Manual
Page 15
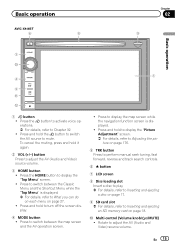
Press the HOME button to Chapter 32. ! En 15 Basic operation AVIC-X940BT 6 8 Chapter 02 9 Basic operation 3 a 7 4 5 b c 1 button ! Press and hold the button to switch the AV source to What you can do on each menu on ... displayed. ! Press and hold to display the "Picture Adjustment" screen. = For details, refer to Adjusting the picture on page 176. 5 TRK button Press to perform manual seek tuning, fast forward, reverse and track search controls. 6 h button 7 LCD screen 8 Disc-loading slot Insert a disc to play. = For details, refer to Inserting and...
Press the HOME button to Chapter 32. ! En 15 Basic operation AVIC-X940BT 6 8 Chapter 02 9 Basic operation 3 a 7 4 5 b c 1 button ! Press and hold the button to switch the AV source to What you can do on each menu on ... displayed. ! Press and hold to display the "Picture Adjustment" screen. = For details, refer to Adjusting the picture on page 176. 5 TRK button Press to perform manual seek tuning, fast forward, reverse and track search controls. 6 h button 7 LCD screen 8 Disc-loading slot Insert a disc to play. = For details, refer to Inserting and...

Owner's Manual
Page 18
...Pioneer accepts no liability for ejecting the media appear. 2 Touch [Disc Eject]. The touch panel keys for damages, costs or expenses arising from data loss or corruption. ! Chapter 02 Basic operation 3 Insert a disc into the disc-loading slot. % Insert a disc into the disc-loading slot. Ejecting a disc (for AVIC-Z140BH... to eject the SD memory card by the procedure described in this manual. ! Ejecting a disc (for AVIC-X940BT) 1 Press the h button. If data loss or corruption occurs on the storage device for AVIC-X940BT) CAUTION Do not insert anything other than SD memory cards. ...
...Pioneer accepts no liability for ejecting the media appear. 2 Touch [Disc Eject]. The touch panel keys for damages, costs or expenses arising from data loss or corruption. ! Chapter 02 Basic operation 3 Insert a disc into the disc-loading slot. % Insert a disc into the disc-loading slot. Ejecting a disc (for AVIC-Z140BH... to eject the SD memory card by the procedure described in this manual. ! Ejecting a disc (for AVIC-X940BT) 1 Press the h button. If data loss or corruption occurs on the storage device for AVIC-X940BT) CAUTION Do not insert anything other than SD memory cards. ...
Owner's Manual
Page 27
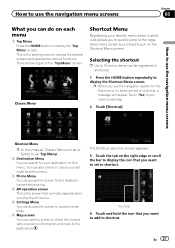
... can search for the first time or no items are two types of the "Top Menu" screen. En 27 There are set route from this manual, Classic Menu will appear. How to use the navigation menu screens How to use the navigation menu screens Chapter 03 What you can do on...
... can search for the first time or no items are two types of the "Top Menu" screen. En 27 There are set route from this manual, Classic Menu will appear. How to use the navigation menu screens How to use the navigation menu screens Chapter 03 What you can do on...
Owner's Manual
Page 48
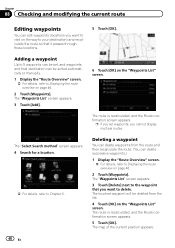
The route is recalculated, and the Route confirmation screen appears. The touched waypoint will be sorted automatically or manually. 1 Display the "Route Overview" screen. = For details, refer to Displaying the route overview on page 46. 2 Touch [Waypoints]. p If you set , and waypoints and final ...
The route is recalculated, and the Route confirmation screen appears. The touched waypoint will be sorted automatically or manually. 1 Display the "Route Overview" screen. = For details, refer to Displaying the route overview on page 46. 2 Touch [Waypoints]. p If you set , and waypoints and final ...

Owner's Manual
Page 57
... route is recalculated taking all traffic congestion on your vehicle deviates from the current position of entry into account. p There is displayed. Checking traffic information manually Touching the notification icon on the map screen allows you touch [Current] while the recommended route is displayed, the screen switches to search for traffic...
... route is recalculated taking all traffic congestion on your vehicle deviates from the current position of entry into account. p There is displayed. Checking traffic information manually Touching the notification icon on the map screen allows you touch [Current] while the recommended route is displayed, the screen switches to search for traffic...

Owner's Manual
Page 58
...to Screen switching overview on page 26. 2 Touch [Traffic]. The "Traffic Menu" screen appears. 3 Touch [Traffic Settings]. If you can manually select one from available RDS-TMC service providers. 1 Display the "Destination Menu" screen. = For details of the operations, refer to display....appears. 5 Touch the traffic information item to Screen switching overview on page 26. 2 Touch [Traffic]. Selecting preferred RDS-TMC service provider manually A default preferred TMC service provider for traffic congestion automatically on the previous page. # If you touch [List], the "Traffic on your ...
...to Screen switching overview on page 26. 2 Touch [Traffic]. The "Traffic Menu" screen appears. 3 Touch [Traffic Settings]. If you can manually select one from available RDS-TMC service providers. 1 Display the "Destination Menu" screen. = For details of the operations, refer to display....appears. 5 Touch the traffic information item to Screen switching overview on page 26. 2 Touch [Traffic]. Selecting preferred RDS-TMC service provider manually A default preferred TMC service provider for traffic congestion automatically on the previous page. # If you touch [List], the "Traffic on your ...
Owner's Manual
Page 59
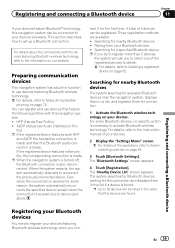
... made and then the Bluetooth audio connection is found . A total of 5 devices can be connected to your devices wirelessly. For details, refer to the instruction manual of your devices. 2 Display the "Settings Menu" screen. = For details of the registered devices to delete. = For details, refer to device operation). The system searches...
... made and then the Bluetooth audio connection is found . A total of 5 devices can be connected to your devices wirelessly. For details, refer to the instruction manual of your devices. 2 Display the "Settings Menu" screen. = For details of the registered devices to delete. = For details, refer to device operation). The system searches...
Owner's Manual
Page 60
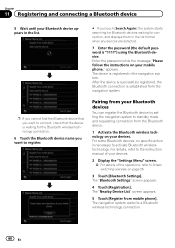
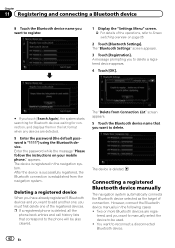
... in the list format when any devices are detected. 7 Enter the password (the default password is necessary to register. For details, refer to the instruction manual of your devices. 2 Display the "Settings Menu" screen. = For details of the operations, refer to standby mode and requesting connection from your Bluetooth devices You...
... in the list format when any devices are detected. 7 Enter the password (the default password is necessary to register. For details, refer to the instruction manual of your devices. 2 Display the "Settings Menu" screen. = For details of the operations, refer to standby mode and requesting connection from your Bluetooth devices You...
Owner's Manual
Page 61
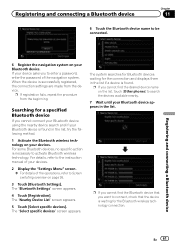
... to search the devices available nearby. 7 Wait until your devices. Registering and connecting a Bluetooth device Chapter 11 6 Touch the Bluetooth device name to the instruction manual of your devices. 2 Display the "Settings Menu" screen. = For details of the navigation system. For details, refer to be connected. The "Nearby Device List" screen...
... to search the devices available nearby. 7 Wait until your devices. Registering and connecting a Bluetooth device Chapter 11 6 Touch the Bluetooth device name to the instruction manual of your devices. 2 Display the "Settings Menu" screen. = For details of the navigation system. For details, refer to be connected. The "Nearby Device List" screen...
Owner's Manual
Page 62
...to reconnect a disconnected Bluetooth device. 62 En You want to delete. The device is registered in the navigation system. tered, and you want to manually select the device to be also cleared. A message prompting you to delete a registered device appears. 4 Touch [OK]. # If you touch [... devices and you want to add another one, you must first delete one of connection. Connecting a registered Bluetooth device manually The navigation system automatically connects the Bluetooth device selected as the target of the registered devices. However, connect the Bluetooth device...
...to reconnect a disconnected Bluetooth device. 62 En You want to delete. The device is registered in the navigation system. tered, and you want to manually select the device to be also cleared. A message prompting you to delete a registered device appears. 4 Touch [OK]. # If you touch [... devices and you want to add another one, you must first delete one of connection. Connecting a registered Bluetooth device manually The navigation system automatically connects the Bluetooth device selected as the target of the registered devices. However, connect the Bluetooth device...
Owner's Manual
Page 63
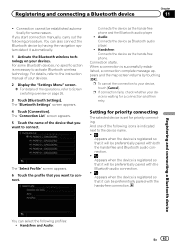
...for priority connecting The selected device is registered so that it will be preferentially paired with the hands-free connection. If you start connection manually, carry out the following icons is indicated next to the device name. !: Appears when the device is registered so that it will be...set for a connection and then retry. The "Connection List" screen appears. 5 Touch the name of the device that you want to the instruction manual of your devices. Audio: Connects the device as the hands-free phone. Connection starts. When a connection is waiting for priority connecting. p To ...
...for priority connecting The selected device is registered so that it will be preferentially paired with the hands-free connection. If you start connection manually, carry out the following icons is indicated next to the device name. !: Appears when the device is registered so that it will be...set for a connection and then retry. The "Connection List" screen appears. 5 Touch the name of the device that you want to the instruction manual of your devices. Audio: Connects the device as the hands-free phone. Connection starts. When a connection is waiting for priority connecting. p To ...
Owner's Manual
Page 67
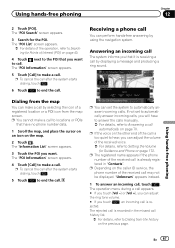
... . 5 Touch to end the call . The "Information List" screen appears. 3 Touch the POI you want to locations or POIs that have to answer the calls manually. = For details, refer to Dialing from the map You can make a call . p To cancel the call after the system starts dialing, touch . 6 Touch to end...
... . 5 Touch to end the call . The "Information List" screen appears. 3 Touch the POI you want to locations or POIs that have to answer the calls manually. = For details, refer to Dialing from the map You can make a call . p To cancel the call after the system starts dialing, touch . 6 Touch to end...
Owner's Manual
Page 68
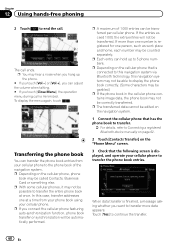
... be edited on the navigation system. 1 Connect the cellular phone that has the phone book to transfer. = For details, refer to Connecting a registered Bluetooth device manually on page 62. 2 Touch [Contacts Transfer] on the "Phone Menu" screen. 3 Check that is displayed, and operate your cellular phone. To display the menu again...
... be edited on the navigation system. 1 Connect the cellular phone that has the phone book to transfer. = For details, refer to Connecting a registered Bluetooth device manually on page 62. 2 Touch [Contacts Transfer] on the "Phone Menu" screen. 3 Check that is displayed, and operate your cellular phone. To display the menu again...
Owner's Manual
Page 71
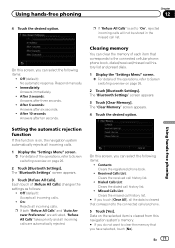
... list. ! Clearing memory You can select the following items: ! The "Clear Memory" screen appears. 4 Touch the desired option. Contacts: Clears the registered phone book. ! Respond manually. ! After 3 seconds: Answers after ten seconds. After 6 seconds: Answers after six seconds. ! The "Bluetooth Settings" screen appears. 3 Touch [Clear Memory]. The "Bluetooth Settings" screen appears...
... list. ! Clearing memory You can select the following items: ! The "Clear Memory" screen appears. 4 Touch the desired option. Contacts: Clears the registered phone book. ! Respond manually. ! After 3 seconds: Answers after ten seconds. After 6 seconds: Answers after six seconds. ! The "Bluetooth Settings" screen appears. 3 Touch [Clear Memory]. The "Bluetooth Settings" screen appears...
Owner's Manual
Page 72
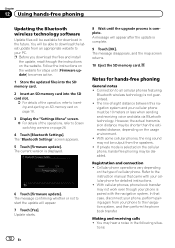
... files into the SD memory card. 2 Insert an SD memory card into the SD card slot. = For details of the operations, refer to the instruction manual that case, disconnect your phone, perform pairing again from your phone is not guaranteed. ! Notes for steps until the upgrade process is displayed. 6 Touch [Firmware...
... files into the SD memory card. 2 Insert an SD memory card into the SD card slot. = For details of the operations, refer to the instruction manual that case, disconnect your phone, perform pairing again from your phone is not guaranteed. ! Notes for steps until the upgrade process is displayed. 6 Touch [Firmware...


