
Owner's Manual
Page 1
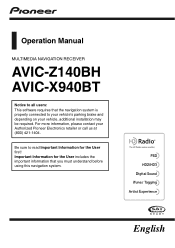
Be sure to read Important Information for the User includes the important information that the navigation system is properly connected to all users: This software requires that you must understand before using this navigation system. For more information, please contact your vehicle, additional installation may be required. English Important Information for the User first! Operation Manual MULTIMEDIA NAVIGATION RECEIVER AVIC-Z140BH AVIC-X940BT Notice to your vehicle's parking brake and depending on your Authorized Pioneer Electronics retailer or call us at (800) 421-1404.
Be sure to read Important Information for the User includes the important information that the navigation system is properly connected to all users: This software requires that you must understand before using this navigation system. For more information, please contact your vehicle, additional installation may be required. English Important Information for the User first! Operation Manual MULTIMEDIA NAVIGATION RECEIVER AVIC-Z140BH AVIC-X940BT Notice to your vehicle's parking brake and depending on your Authorized Pioneer Electronics retailer or call us at (800) 421-1404.
Owner's Manual
Page 2
...Pioneer product. Plugging in the map database 31 Operating the map screen 31 - Removing a shortcut 28 Operating list screens (e.g. Scrolling the map to the position you want to operate...for AVIC-Z140BH) 17 - POI list) 28 Operating the on internal memory 12 - Inserting a disc (for AVIC-X940BT) 18 Inserting and ejecting an SD memory card 18 - Ejecting a disc (for AVIC-X940BT...- Terms used in this manual 10 - Ejecting a disc (for AVICX940BT) 20 Plugging and unplugging a USB storage device 21 - Ejecting an SD memory card (for AVIC-Z140BH) 18 - Disconnecting your ...
...Pioneer product. Plugging in the map database 31 Operating the map screen 31 - Removing a shortcut 28 Operating list screens (e.g. Scrolling the map to the position you want to operate...for AVIC-Z140BH) 17 - POI list) 28 Operating the on internal memory 12 - Inserting a disc (for AVIC-X940BT) 18 Inserting and ejecting an SD memory card 18 - Ejecting a disc (for AVIC-X940BT...- Terms used in this manual 10 - Ejecting a disc (for AVICX940BT) 20 Plugging and unplugging a USB storage device 21 - Ejecting an SD memory card (for AVIC-Z140BH) 18 - Disconnecting your ...

Owner's Manual
Page 4
... the phone book 65 - Searching for a specified Bluetooth device 61 - Deleting a registered device 62 Connecting a registered Bluetooth device manually 62 - Searching for nearby Bluetooth devices 59 - Setting for priority connecting 63 Using hands-free phoning Displaying the phone menu 64 ...Making a phone call 67 - Answering a call automatically 70 - Storing and recalling broadcast frequencies 77 Operating by hardware buttons 78 Using advanced functions 78 - Echo canceling and noise reduction 70 - Dialing a favorite location 66 - Changing...
... the phone book 65 - Searching for a specified Bluetooth device 61 - Deleting a registered device 62 Connecting a registered Bluetooth device manually 62 - Searching for nearby Bluetooth devices 59 - Setting for priority connecting 63 Using hands-free phoning Displaying the phone menu 64 ...Making a phone call 67 - Answering a call automatically 70 - Storing and recalling broadcast frequencies 77 Operating by hardware buttons 78 Using advanced functions 78 - Echo canceling and noise reduction 70 - Dialing a favorite location 66 - Changing...

Owner's Manual
Page 10
... item displayed on page 26. Conventions used in brackets [ ]: e.g.) [Destination], [Settings]. ! scribed in the manual. Terms used in this manual. Finding the operation procedure from a menu name If you want to do, you can be connected to this navigation unit will be ... contains warnings, cautions, and other keys on , take a few minutes to read Important Information for AVIC-Z140BH. Familiarity with double quotation marks " ": e.g.) "Video image" "Video image" in this manual are indicated with an RCA cable, such as the "external storage device (USB, SD)". "External ...
... item displayed on page 26. Conventions used in brackets [ ]: e.g.) [Destination], [Settings]. ! scribed in the manual. Terms used in this manual. Finding the operation procedure from a menu name If you want to do, you can be connected to this navigation unit will be ... contains warnings, cautions, and other keys on , take a few minutes to read Important Information for AVIC-Z140BH. Familiarity with double quotation marks " ": e.g.) "Video image" "Video image" in this manual are indicated with an RCA cable, such as the "external storage device (USB, SD)". "External ...

Owner's Manual
Page 11
...Ver. 1.1.3 ! iPhone 4: iOS 5.0 ! iPhone 3G: iOS 4.2.1 ! ferred to as protected by U.S. p Operation methods may not be re- En 11 Notice regarding video viewing Remember that is required. revenue-generating), real time ...3.1.3 p In this navigation system. Map coverage For details about iPod compatibility with this manual, iPod and iPhone will be compatible with this navigation system, refer to the information on...This item incorporates copy protection technology that use this navigation system with a Pioneer USB interface cable for iPod (CDIU51V) (sold separately), you can control...
...Ver. 1.1.3 ! iPhone 4: iOS 5.0 ! iPhone 3G: iOS 4.2.1 ! ferred to as protected by U.S. p Operation methods may not be re- En 11 Notice regarding video viewing Remember that is required. revenue-generating), real time ...3.1.3 p In this navigation system. Map coverage For details about iPod compatibility with this manual, iPod and iPhone will be compatible with this navigation system, refer to the information on...This item incorporates copy protection technology that use this navigation system with a Pioneer USB interface cable for iPod (CDIU51V) (sold separately), you can control...
Owner's Manual
Page 15
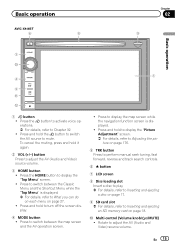
...while the navigation function screen is displayed. = For details, refer to switch between the map screen and the AV operation screen. ! En 15 To cancel the muting, press and hold to adjust the AV (Audio and Video) ...the "Picture Adjustment" screen. = For details, refer to Adjusting the picture on page 176. 5 TRK button Press to perform manual seek tuning, fast forward, reverse and track search controls. 6 h button 7 LCD screen 8 Disc-loading slot Insert a disc ...card slot = For details, refer to display the "Top Menu" screen. ! Basic operation AVIC-X940BT 6 8 Chapter 02 9 Basic...
...while the navigation function screen is displayed. = For details, refer to switch between the map screen and the AV operation screen. ! En 15 To cancel the muting, press and hold to adjust the AV (Audio and Video) ...the "Picture Adjustment" screen. = For details, refer to Adjusting the picture on page 176. 5 TRK button Press to perform manual seek tuning, fast forward, reverse and track search controls. 6 h button 7 LCD screen 8 Disc-loading slot Insert a disc ...card slot = For details, refer to display the "Top Menu" screen. ! Basic operation AVIC-X940BT 6 8 Chapter 02 9 Basic...

Owner's Manual
Page 18
...possible to eject the SD memory card by the procedure described in this manual. ! If data loss or corruption occurs on the storage device for AVIC-X940BT) CAUTION Do not insert anything other than SD memory cards. ...the data. Do not insert anything other than a disc into the disc-loading slot. Chapter 02 Basic operation 3 Insert a disc into the disc-loading slot. % Insert a disc into the disc-loading slot. The disc...or corruption. ! The disc is loaded, and the LCD panel closes. Pioneer accepts no liability for AVIC-Z140BH) 1 Press the h button. The LCD panel closes.
...possible to eject the SD memory card by the procedure described in this manual. ! If data loss or corruption occurs on the storage device for AVIC-X940BT) CAUTION Do not insert anything other than SD memory cards. ...the data. Do not insert anything other than a disc into the disc-loading slot. Chapter 02 Basic operation 3 Insert a disc into the disc-loading slot. % Insert a disc into the disc-loading slot. The disc...or corruption. ! The disc is loaded, and the LCD panel closes. Pioneer accepts no liability for AVIC-Z140BH) 1 Press the h button. The LCD panel closes.
Owner's Manual
Page 27
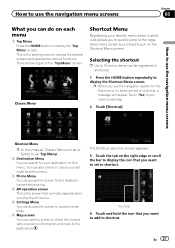
...this menu. There are set route from this menu. 3 Phone Menu You can access the screen that is related to hands-free phoning. 4 AV operation screen This is the starting menu to shortcut. Selecting the shortcut p Up to 15 menu items can be referred to shortcut. Touch [Yes] to ...that normally appears when you play the AV source. 5 Settings Menu You can access the screen to customize settings. 6 Map screen You can use this manual, Classic Menu will appear. You can also check or cancel your favorite menu items in shortcuts. 1 Press the HOME button repeatedly to next step. ...
...this menu. There are set route from this menu. 3 Phone Menu You can access the screen that is related to hands-free phoning. 4 AV operation screen This is the starting menu to shortcut. Selecting the shortcut p Up to 15 menu items can be referred to shortcut. Touch [Yes] to ...that normally appears when you play the AV source. 5 Settings Menu You can access the screen to customize settings. 6 Map screen You can use this manual, Classic Menu will appear. You can also check or cancel your favorite menu items in shortcuts. 1 Press the HOME button repeatedly to next step. ...
Owner's Manual
Page 84
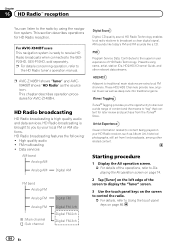
... extra local FM channels. Visual information related to content being played on page 86. 84 En This section describes operations for AVIC-Z140BH. This chapter describes operation procedures for HD Radio reception. Data services AM band Analog AM Analog AM Digital AM FM band Analog FM Analog... ready to receive HD Radio broadcasts when connected to the GEXP20HD, GEX-P10HD, sold separately. p For details concerning operation, refer to discover a wide range of HD Radio Technology. HD Radio broadcasting is brought to you the opportunity to the HD Radio tuner's operation manual.
... extra local FM channels. Visual information related to content being played on page 86. 84 En This section describes operations for AVIC-Z140BH. This chapter describes operation procedures for HD Radio reception. Data services AM band Analog AM Analog AM Digital AM FM band Analog FM Analog... ready to receive HD Radio broadcasts when connected to the GEXP20HD, GEX-P10HD, sold separately. p For details concerning operation, refer to discover a wide range of HD Radio Technology. HD Radio broadcasting is brought to you the opportunity to the HD Radio tuner's operation manual.
Owner's Manual
Page 142
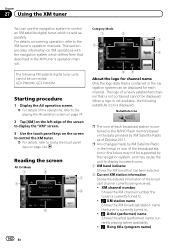
...to . ! : XM station name Shows the XM broadcast station name the tuner is currently tuned to the XM tuner's operation manuals. When a logo is displayed. The following substitute icon is not available, the following XM satellite digital tuner units cannot ... Mode 1 2 3 7 4 65 About the logo for each broadcast station is sold separately. Substitute icon p The icon of the broadcast station in the XM tuner's operation manual. p Any changes made by XM Satellite Radio as of a newly established channel that is not contained cannot be displayed for channel name Only the logo...
...to . ! : XM station name Shows the XM broadcast station name the tuner is currently tuned to the XM tuner's operation manuals. When a logo is displayed. The following substitute icon is not available, the following XM satellite digital tuner units cannot ... Mode 1 2 3 7 4 65 About the logo for each broadcast station is sold separately. Substitute icon p The icon of the broadcast station in the XM tuner's operation manual. p Any changes made by XM Satellite Radio as of a newly established channel that is not contained cannot be displayed for channel name Only the logo...
Owner's Manual
Page 148
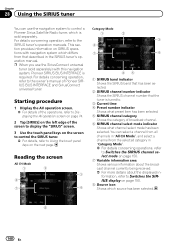
...= For more details about the displayed information, refer to the owner's manual of the screen to display the "SIRIUS" screen. 3 Use the touch panel keys on SIRIUS operations with this navigation system, Pioneer SIRIUS BUS INTERFACE is sold separately) with navigation system which source has ...channels in "All CH Mode", and select a channel from that the tuner is tuned to control a Pioneer Sirius Satellite Radio tuner, which is required. This section provides information on the screen to control the SIRIUS tuner. = For details, refer to the SIRIUS tuner's operation manuals.
...= For more details about the displayed information, refer to the owner's manual of the screen to display the "SIRIUS" screen. 3 Use the touch panel keys on SIRIUS operations with this navigation system, Pioneer SIRIUS BUS INTERFACE is sold separately) with navigation system which source has ...channels in "All CH Mode", and select a channel from that the tuner is tuned to control a Pioneer Sirius Satellite Radio tuner, which is required. This section provides information on the screen to control the SIRIUS tuner. = For details, refer to the SIRIUS tuner's operation manuals.
Owner's Manual
Page 155
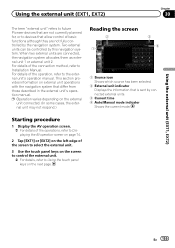
...2. For details of the connection method, refer to Installation Manual. En 155 For details of the operation, refer to the external unit's operation manual. Starting procedure 1 Display the AV operation screen. = For details of the operations, refer to Displaying the AV operation screen on page 74. 2 Tap [EXT1] or ...provides information on external unit operations with the navigation system that is sent by this navigation system. Using the external unit (EXT1, EXT2) Chapter 30 Using the external unit (EXT1, EXT2) The term "external unit" refers to future Pioneer devices that are not ...
...2. For details of the connection method, refer to Installation Manual. En 155 For details of the operation, refer to the external unit's operation manual. Starting procedure 1 Display the AV operation screen. = For details of the operations, refer to Displaying the AV operation screen on page 74. 2 Tap [EXT1] or ...provides information on external unit operations with the navigation system that is sent by this navigation system. Using the external unit (EXT1, EXT2) Chapter 30 Using the external unit (EXT1, EXT2) The term "external unit" refers to future Pioneer devices that are not ...
Installation Manual
Page 8
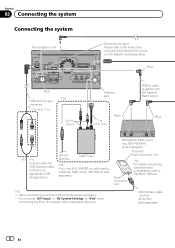
... You must set "AV1 Input" in .) Black IP-BUS cable (supplied with Dock Connector (*4) Dock Connector port (*4) For details concerning operations and compatibility, refer to install the Traffic tuner (ND-TMC10) sold separately). XM Satellite Radio tuner (e.g. When connecting your iPod, both ... connecting the iPod. (For details, refer to the instruction manual for the Hard-wired remote control adapter (sold separately. Vehicle antenna Traffic tuner (*3) If you use AVIC-X940BT, you will need to Operation Manual. (*2) - Section 02 Connecting the system Connecting the system The...
... You must set "AV1 Input" in .) Black IP-BUS cable (supplied with Dock Connector (*4) Dock Connector port (*4) For details concerning operations and compatibility, refer to install the Traffic tuner (ND-TMC10) sold separately). XM Satellite Radio tuner (e.g. When connecting your iPod, both ... connecting the iPod. (For details, refer to the instruction manual for the Hard-wired remote control adapter (sold separately. Vehicle antenna Traffic tuner (*3) If you use AVIC-X940BT, you will need to Operation Manual. (*2) - Section 02 Connecting the system Connecting the system The...
Installation Manual
Page 10
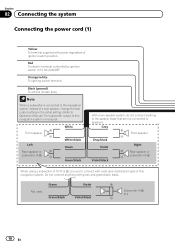
... position. Note When a subwoofer is connected to this navigation system instead of a rear speaker, change the rear output setting in the initial setting. (Refer to Operation Manual.) The subwoofer output of this navigation system. Green Green/black Violet Violet/black Subwoofer (4 Ω) 2 10 En Red To electric terminal controlled...
... position. Note When a subwoofer is connected to this navigation system instead of a rear speaker, change the rear output setting in the initial setting. (Refer to Operation Manual.) The subwoofer output of this navigation system. Green Green/black Violet Violet/black Subwoofer (4 Ω) 2 10 En Red To electric terminal controlled...

Installation Manual
Page 11
... 15 cm (5-7/8 in.) Yellow/black If you use equipment with a mute function, connect that is activated.(AVIC-Z140BH only) Blue/white To auto-antenna relay control terminal. Voice guidance of the cellular phone that equipment to Operation Manual. - For details, refer to the Audio Mute lead. If not, keep the Audio Mute lead free...
... 15 cm (5-7/8 in.) Yellow/black If you use equipment with a mute function, connect that is activated.(AVIC-Z140BH only) Blue/white To auto-antenna relay control terminal. Voice guidance of the cellular phone that equipment to Operation Manual. - For details, refer to the Audio Mute lead. If not, keep the Audio Mute lead free...

Installation Manual
Page 15
Connecting the system Section 02 English RCA cables (sold separately) Power amp (sold separately) Power amp (sold separately) Power amp (sold separately) System remote control Left Front speaker Rear speaker Right Front speaker Rear speaker Subwoofer Subwoofer Note You can change the RCA output of the subwoofer depending on your subwoofer system. (Refer to Operation Manual.) En 15
Connecting the system Section 02 English RCA cables (sold separately) Power amp (sold separately) Power amp (sold separately) Power amp (sold separately) System remote control Left Front speaker Rear speaker Right Front speaker Rear speaker Subwoofer Subwoofer Note You can change the RCA output of the subwoofer depending on your subwoofer system. (Refer to Operation Manual.) En 15
Installation Manual
Page 16
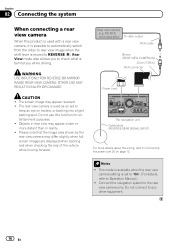
Do not use this product is used as an aid to Operation Manual.) ! Notes ! Rear View mode also allows you while driving. The screen image may differ slightly when fullscreen images are displayed when backing and when checking ...
Do not use this product is used as an aid to Operation Manual.) ! Notes ! Rear View mode also allows you while driving. The screen image may differ slightly when fullscreen images are displayed when backing and when checking ...
Installation Manual
Page 17
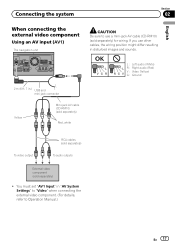
Connecting the system Section 02 English When connecting the external video component Using an AV input (AV1) The navigation unit CAUTION Be sure to Operation Manual.) En 17 If you use a mini-jack AV cable (CD-RM10) (sold separately) ! OK L VGR L RG V L : Left audio (White) R : Right audio (Red) V : Video (Yellow) G : Ground 2 m (6 ...
Connecting the system Section 02 English When connecting the external video component Using an AV input (AV1) The navigation unit CAUTION Be sure to Operation Manual.) En 17 If you use a mini-jack AV cable (CD-RM10) (sold separately) ! OK L VGR L RG V L : Left audio (White) R : Right audio (Red) V : Video (Yellow) G : Ground 2 m (6 ...
Installation Manual
Page 18
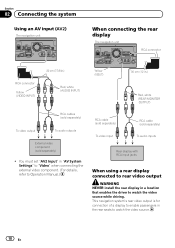
... video source while driving. You must set "AV2 Input" in "AV System Settings" to "Video" when connecting the external video component. (For details, refer to Operation Manual.) RCA cable (sold separately) To video input RCA cable (sold separately) To audio inputs Rear display with RCA input jacks When using a rear display connected...
... video source while driving. You must set "AV2 Input" in "AV System Settings" to "Video" when connecting the external video component. (For details, refer to Operation Manual.) RCA cable (sold separately) To video input RCA cable (sold separately) To audio inputs Rear display with RCA input jacks When using a rear display connected...

Installation Manual
Page 19
Connecting the system When connecting the external unit featuring video source The navigation unit Blue 20 cm (7-7/8 in "AV System Settings" to "EXT" when connecting the external unit. (For details, refer to Operation Manual.) English Section 02 En 19 You must set "AV2 Input" in .) IP-BUS cable RCA connector (sold separately) Black Yellow (VIDEO INPUT) To IP-BUS output RCA cable (sold separately) Pioneer external unit (sold separately) To video output !
Connecting the system When connecting the external unit featuring video source The navigation unit Blue 20 cm (7-7/8 in "AV System Settings" to "EXT" when connecting the external unit. (For details, refer to Operation Manual.) English Section 02 En 19 You must set "AV2 Input" in .) IP-BUS cable RCA connector (sold separately) Black Yellow (VIDEO INPUT) To IP-BUS output RCA cable (sold separately) Pioneer external unit (sold separately) To video output !


