
Owner's Manual
Page 8
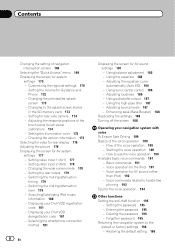
... 184 - Restoring the default setting 196 Setting the illumination color 175 - Changing the wide screen mode 178 - Selecting the smartphone connection method 181 8 En Displaying the screen for the iPod 191 - Using the equalizer 182 - Voice commands related to the splash screen... loudness 186 - Flow of the touch panel (touch panel calibration) 174 - Basic commands 191 - Setting the password 195 - Using subwoofer output 187 - Forgotten password 195 Returning the navigation system to use the voice operation 190 Available basic voice commands 191 - Voice operation...
... 184 - Restoring the default setting 196 Setting the illumination color 175 - Changing the wide screen mode 178 - Selecting the smartphone connection method 181 8 En Displaying the screen for the iPod 191 - Using the equalizer 182 - Voice commands related to the splash screen... loudness 186 - Flow of the touch panel (touch panel calibration) 174 - Basic commands 191 - Setting the password 195 - Using subwoofer output 187 - Forgotten password 195 Returning the navigation system to use the voice operation 190 Available basic voice commands 191 - Voice operation...
Owner's Manual
Page 179
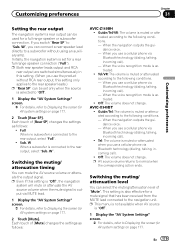
... Off: The volume does not change . p AV source volume returns to Displaying the screen for a full-range speaker or subwoofer connection. Switching the muting/ attenuation level You can connect a rear speaker lead directly to the following conditions. - If you use a cellular phone via Bluetooth technology (dialing, talking... that has been received from the MUTE lead connected to Displaying the screen for AV system settings on page 177. When you can select the muting/attenuation level of [Rear SP] changes the settings as follows: AVIC-Z140BH ! p Both rear speaker leads output and...
... Off: The volume does not change . p AV source volume returns to Displaying the screen for a full-range speaker or subwoofer connection. Switching the muting/ attenuation level You can connect a rear speaker lead directly to the following conditions. - If you use a cellular phone via Bluetooth technology (dialing, talking... that has been received from the MUTE lead connected to Displaying the screen for AV system settings on page 177. When you can select the muting/attenuation level of [Rear SP] changes the settings as follows: AVIC-Z140BH ! p Both rear speaker leads output and...
Owner's Manual
Page 184
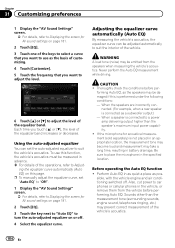
...this function, the vehicle's acoustics must be emitted from the vehicle before per- Perform Auto EQ in as quiet a place as a subwoofer output.) - sible, with the vehicle engine and air conditioning switched off . 4 Select the equalizer curve. Adjusting the equalizer curve ... the equalizer curve, set the auto-adjusted equalizer to suit the vehicle's acoustics. If the microphone for acoustical measurement (sold separately) is connected to a power amp delivering output higher than the measurement tone (surrounding sounds, engine sound, telephones ringing, etc.) may take a long ...
...this function, the vehicle's acoustics must be emitted from the vehicle before per- Perform Auto EQ in as quiet a place as a subwoofer output.) - sible, with the vehicle engine and air conditioning switched off . 4 Select the equalizer curve. Adjusting the equalizer curve ... the equalizer curve, set the auto-adjusted equalizer to suit the vehicle's acoustics. If the microphone for acoustical measurement (sold separately) is connected to a power amp delivering output higher than the measurement tone (surrounding sounds, engine sound, telephones ringing, etc.) may take a long ...

Owner's Manual
Page 185
... equalizer on the "EQ Menu" screen is canceled. 2 Fix the microphone for the built-in the center of the headrest of an active subwoofer to Using the equalizer on the front passenger seat and perform Auto EQ. The front and rear speakers will be adjusted to a power amp..., or result in a place that is connected to a power amp with input level control, Auto EQ may not be able to Using balance adjustment on active subwoofers or external amps delay the lower sounds. ! When this value. - Front speakers (left /right) - p For AVIC-Z140BH users Do not press the h button to...
... equalizer on the "EQ Menu" screen is canceled. 2 Fix the microphone for the built-in the center of the headrest of an active subwoofer to Using the equalizer on the front passenger seat and perform Auto EQ. The front and rear speakers will be adjusted to a power amp..., or result in a place that is connected to a power amp with input level control, Auto EQ may not be able to Using balance adjustment on active subwoofers or external amps delay the lower sounds. ! When this value. - Front speakers (left /right) - p For AVIC-Z140BH users Do not press the h button to...
Owner's Manual
Page 187
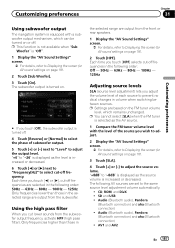
...the selected range are set to Displaying the screen for AV sound settings on or off. Each time you touch [Off], the subwoofer output is "Off". 1 Display the "AV Sound Settings" screen. = For details, refer to the same source level adjustment volume... when "Sub Woofer" is turned off frequency. Audio (Bluetooth audio), Pandora (Bluetooth connection) and aha (Bluetooth connection) ! Audio (Bluetooth audio), Pandora (Bluetooth connection) and aha (Bluetooth connection) ! CD, ROM, and DivX ! The subwoofer output is increased or decreased. 6 Touch [c] or [d] next to "Frequency(Hz)"...
...the selected range are set to Displaying the screen for AV sound settings on or off. Each time you touch [Off], the subwoofer output is "Off". 1 Display the "AV Sound Settings" screen. = For details, refer to the same source level adjustment volume... when "Sub Woofer" is turned off frequency. Audio (Bluetooth audio), Pandora (Bluetooth connection) and aha (Bluetooth connection) ! Audio (Bluetooth audio), Pandora (Bluetooth connection) and aha (Bluetooth connection) ! CD, ROM, and DivX ! The subwoofer output is increased or decreased. 6 Touch [c] or [d] next to "Frequency(Hz)"...
Installation Manual
Page 10
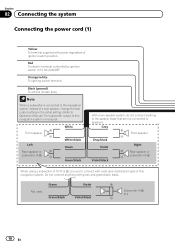
...Violet Violet/black Right Rear speaker or subwoofer (4 Ω) When using a subwoofer of 70 W (2 Ω), be sure to connect with violet and violet/black leads of this navigation system is connected to this navigation system instead of a rear speaker, change the.../black Violet Violet/black Subwoofer (4 Ω) 2 10 En Do not connect anything to the speaker leads that are not connected to Operation Manual.) The subwoofer output of this navigation system. Section 02 Connecting the system Connecting the power cord (1) Yellow To terminal...
...Violet Violet/black Right Rear speaker or subwoofer (4 Ω) When using a subwoofer of 70 W (2 Ω), be sure to connect with violet and violet/black leads of this navigation system is connected to this navigation system instead of a rear speaker, change the.../black Violet Violet/black Subwoofer (4 Ω) 2 10 En Do not connect anything to the speaker leads that are not connected to Operation Manual.) The subwoofer output of this navigation system. Section 02 Connecting the system Connecting the power cord (1) Yellow To terminal...
Installation Manual
Page 14
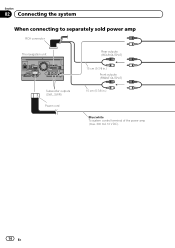
Section 02 Connecting the system When connecting to separately sold power amp RCA connector The navigation unit Rear outputs (REAR OUTPUT) Subwoofer outputs (SWL, SWR) Power cord 15 cm (5-7/8 in.) Front outputs (FRONT OUTPUT) 15 cm (5-7/8 in.) Blue/white To system control terminal of the power amp (max. 300 mA 12 V DC). 14 En
Section 02 Connecting the system When connecting to separately sold power amp RCA connector The navigation unit Rear outputs (REAR OUTPUT) Subwoofer outputs (SWL, SWR) Power cord 15 cm (5-7/8 in.) Front outputs (FRONT OUTPUT) 15 cm (5-7/8 in.) Blue/white To system control terminal of the power amp (max. 300 mA 12 V DC). 14 En

Installation Manual
Page 15
Connecting the system Section 02 English RCA cables (sold separately) Power amp (sold separately) Power amp (sold separately) Power amp (sold separately) System remote control Left Front speaker Rear speaker Right Front speaker Rear speaker Subwoofer Subwoofer Note You can change the RCA output of the subwoofer depending on your subwoofer system. (Refer to Operation Manual.) En 15
Connecting the system Section 02 English RCA cables (sold separately) Power amp (sold separately) Power amp (sold separately) Power amp (sold separately) System remote control Left Front speaker Rear speaker Right Front speaker Rear speaker Subwoofer Subwoofer Note You can change the RCA output of the subwoofer depending on your subwoofer system. (Refer to Operation Manual.) En 15


