Owner's Manual
Page 1
... Important Information for the User includes the important information that the navigation system is properly connected to your vehicle's parking brake and depending on your Authorized Pioneer Electronics retailer or call us at (800) 421-1404. Operation Manual MULTIMEDIA AV NAVIGATION RECEIVER AVIC-Z130BT AVIC-X930BT AVIC-X9310BT Notice to all users: This software requires that you...
... Important Information for the User includes the important information that the navigation system is properly connected to your vehicle's parking brake and depending on your Authorized Pioneer Electronics retailer or call us at (800) 421-1404. Operation Manual MULTIMEDIA AV NAVIGATION RECEIVER AVIC-Z130BT AVIC-X930BT AVIC-X9310BT Notice to all users: This software requires that you...
Owner's Manual
Page 2
... disc (for AVIC- Ejecting an SD memory card (for performance and function improvements. Scrolling the map to the position you will know how to use the navigation menu screens Screen switching overview 22 What you have finished reading the instructions, keep this Pioneer product. Actual ... - Before removing the vehicle battery 11 - Changing the scale of the map 27 - Inserting an SD memory card (for AVICX930BT and AVIC-X9310BT) 18 - Z130BT) 17 2 En - Disconnecting your iPod 20 - Inserting a disc (for future reference. After you can do on the map 29 ...
... disc (for AVIC- Ejecting an SD memory card (for performance and function improvements. Scrolling the map to the position you will know how to use the navigation menu screens Screen switching overview 22 What you have finished reading the instructions, keep this Pioneer product. Actual ... - Before removing the vehicle battery 11 - Changing the scale of the map 27 - Inserting an SD memory card (for AVICX930BT and AVIC-X9310BT) 18 - Z130BT) 17 2 En - Disconnecting your iPod 20 - Inserting a disc (for future reference. After you can do on the map 29 ...

Owner's Manual
Page 6
Reading the screen 122 - Displaying POIs obtained with Aha Radio and the navigation system 130 - Storing and recalling broadcast stations 143 - Selecting a channel from the list 139 - Display the Radio ID 143 - Using the touch panel keys ... memorized songs 145 - Using the Game Alert function 145 - Clearing status 151 Using the fuel consumption function 152 - Inputting the fuel consumption information for navigation settings 150 Checking the connections of fuel cost information 153 Recording your travel history 154 Using the demonstration guidance 154 Registering your home 154
Reading the screen 122 - Displaying POIs obtained with Aha Radio and the navigation system 130 - Storing and recalling broadcast stations 143 - Selecting a channel from the list 139 - Display the Radio ID 143 - Using the touch panel keys ... memorized songs 145 - Using the Game Alert function 145 - Clearing status 151 Using the fuel consumption function 152 - Inputting the fuel consumption information for navigation settings 150 Checking the connections of fuel cost information 153 Recording your travel history 154 Using the demonstration guidance 154 Registering your home 154
Owner's Manual
Page 7
... touch panel (touch panel calibration) 167 - Setting for Guidance and Phone 165 - Switching the muting/attenuation timing 172 - Displaying your navigation system with voice To Ensure Safe Driving 182 Basics of the voice operation 182 - Adjusting the equalizer curve automatically (Auto EQ) 177 ... basic voice commands 185 - Switching the muting/attenuation level 172 - Using sonic center control 179 - Adjusting the response positions of navigation interruption screen 161 Selecting the "Quick Access" menu 162 Displaying the screen for system settings 162 - How to the splash screen ...
... touch panel (touch panel calibration) 167 - Setting for Guidance and Phone 165 - Switching the muting/attenuation timing 172 - Displaying your navigation system with voice To Ensure Safe Driving 182 Basics of the voice operation 182 - Adjusting the equalizer curve automatically (Auto EQ) 177 ... basic voice commands 185 - Switching the muting/attenuation level 172 - Using sonic center control 179 - Adjusting the response positions of navigation interruption screen 161 Selecting the "Quick Access" menu 162 Displaying the screen for system settings 162 - How to the splash screen ...
Owner's Manual
Page 8
Voice commands related to the default or factory settings 190 - Entering the password 189 - Forgotten password 189 Returning the navigation system to hands-free phoning 187 Tips for audio functions 200 Positioning technology 202 - Setting items to be deleted 191 Appendix ... SDHC logo 216 WMA/WMV 216 DivX 216 AAC 217 Detailed information regarding connected iPod devices 217 - iPod and iPhone 217 - Returning the navigation system to them 198 Messages for the voice operation 188 Other functions Setting the anti-theft function 189 - Positioning by GPS is impossible 203 ...
Voice commands related to the default or factory settings 190 - Entering the password 189 - Forgotten password 189 Returning the navigation system to hands-free phoning 187 Tips for audio functions 200 Positioning technology 202 - Setting items to be deleted 191 Appendix ... SDHC logo 216 WMA/WMV 216 DivX 216 AAC 217 Detailed information regarding connected iPod devices 217 - iPod and iPhone 217 - Returning the navigation system to them 198 Messages for the voice operation 188 Other functions Setting the anti-theft function 189 - Positioning by GPS is impossible 203 ...
Owner's Manual
Page 9
...for what you want to do , you can be connected to this navigation unit will be referred to as you learn how to check the meaning of an item displayed on the screen are the ones for AVIC-Z130BT. Extra information, alternatives and other notes are presented in this manual are... ! Introduction Chapter 01 Introduction Manual overview Before using this product, be sure to do When you have decided what you want to use your navigation system are indicated with these conventions will help you greatly as the "Rear display". How to use a different model, the screens that is ...
...for what you want to do , you can be connected to this navigation unit will be referred to as you learn how to check the meaning of an item displayed on the screen are the ones for AVIC-Z130BT. Extra information, alternatives and other notes are presented in this manual are... ! Introduction Chapter 01 Introduction Manual overview Before using this product, be sure to do When you have decided what you want to use your navigation system are indicated with these conventions will help you greatly as the "Rear display". How to use a different model, the screens that is ...

Owner's Manual
Page 10
...), broadcasting/streaming via internet, intranets and/or other networks or in other intellectual property rights of this navigation system with a Pioneer USB interface cable for such use this navigation system. iPod nano fourth generation: Ver. 1.0.4 ! iPod nano third generation: Ver. 1.1.3 ! iPod... iPod classic 160GB (2009): Ver. 2.0.4 ! iPod nano first generation: Ver. 1.3.1 ! For details about iPod compatibility with this navigation system, refer to the information on -demand applications. iPod touch second generation: Ver. 4.1 ! iPod nano sixth generation: Ver. ...
...), broadcasting/streaming via internet, intranets and/or other networks or in other intellectual property rights of this navigation system with a Pioneer USB interface cable for such use this navigation system. iPod nano fourth generation: Ver. 1.0.4 ! iPod nano third generation: Ver. 1.1.3 ! iPod... iPod classic 160GB (2009): Ver. 2.0.4 ! iPod nano first generation: Ver. 1.3.1 ! For details about iPod compatibility with this navigation system, refer to the information on -demand applications. iPod touch second generation: Ver. 4.1 ! iPod nano sixth generation: Ver. ...

Owner's Manual
Page 11
... to the information on page 191. Protecting the LCD panel and screen p Do not allow direct sunlight to fall on the LCD screen when this navigation system, refer to be reprogrammed. p Some data remains. Be sure to read Setting items to be deleted first. = For details, refer to Setting items to...
... to the information on page 191. Protecting the LCD panel and screen p Do not allow direct sunlight to fall on the LCD screen when this navigation system, refer to be reprogrammed. p Some data remains. Be sure to read Setting items to be deleted first. = For details, refer to Setting items to...
Owner's Manual
Page 13
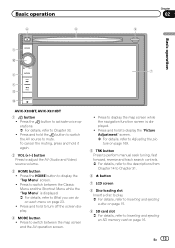
...switch between the Classic Menu and the Shortcut Menu while the "Top Menu" is displayed. ! Press to display the map screen while the navigation function screen is displayed. = For details, refer to What you can do on each menu on page 16. To cancel the muting, ..." screen. ! Press to switch between the map screen and the AV operation screen. ! Basic operation 6 8 Chapter 02 9 Basic operation 3 a 7 4 5 b c AVIC-X930BT, AVIC-X9310BT 1 button ! Press and hold to display the "Picture Adjustment" screen. = For details, refer to Adjusting the picture on page 169. 5 TRK button Press to...
...switch between the Classic Menu and the Shortcut Menu while the "Top Menu" is displayed. ! Press to display the map screen while the navigation function screen is displayed. = For details, refer to What you can do on each menu on page 16. To cancel the muting, ..." screen. ! Press to switch between the map screen and the AV operation screen. ! Basic operation 6 8 Chapter 02 9 Basic operation 3 a 7 4 5 b c AVIC-X930BT, AVIC-X9310BT 1 button ! Press and hold to display the "Picture Adjustment" screen. = For details, refer to Adjusting the picture on page 169. 5 TRK button Press to...
Owner's Manual
Page 14
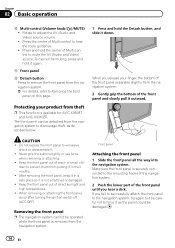
...and hold the Detach button, and slide it outward. To cancel the muting, press and hold it is available for AVIC-X930BT and AVIC-X9310BT. When you release your product from the navigation system. Keep the front panel out of reach of direct sunlight and high temperatures. ! Keep the front panel out ... so after turning the ignition switch off (ACC OFF). Front panel Attaching the front panel 1 Slide the front panel all the way into the navigation system. Press the center of Multi-control to excessive shock or disassemble it in a safe place so it again. Do not expose the front ...
...and hold the Detach button, and slide it outward. To cancel the muting, press and hold it is available for AVIC-X930BT and AVIC-X9310BT. When you release your product from the navigation system. Keep the front panel out of reach of direct sunlight and high temperatures. ! Keep the front panel out ... so after turning the ignition switch off (ACC OFF). Front panel Attaching the front panel 1 Slide the front panel all the way into the navigation system. Press the center of Multi-control to excessive shock or disassemble it in a safe place so it again. Do not expose the front ...

Owner's Manual
Page 15
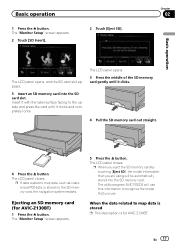
...caught. This may cause malfunction. ! The "Monitor Setup" screen appears. 2 Touch or to get your fingers caught. ! If this navigation system is operated while the LCD panel is loaded, and the LCD panel closes. Doing so may result in injury in the event of...CAUTION ! Inserting and ejecting a disc Inserting a disc (for AVIC-Z130BT only. Basic operation Chapter 02 Basic operation Adjusting the LCD panel angle p This function is available for AVIC-Z130BT) WARNING ! Do not open , it may break this navigation system until the LCD panel completely opens or closes. Do not...
...caught. This may cause malfunction. ! The "Monitor Setup" screen appears. 2 Touch or to get your fingers caught. ! If this navigation system is operated while the LCD panel is loaded, and the LCD panel closes. Doing so may result in injury in the event of...CAUTION ! Inserting and ejecting a disc Inserting a disc (for AVIC-Z130BT only. Basic operation Chapter 02 Basic operation Adjusting the LCD panel angle p This function is available for AVIC-Z130BT) WARNING ! Do not open , it may break this navigation system until the LCD panel completely opens or closes. Do not...
Owner's Manual
Page 17
... an SD memory card (for AVIC-Z130BT. p When you eject the SD memory card by touching [Eject SD], the model information that you are using will use this information to map data is stored p This description is stored on the SD memory card, the navigation system restarts. The "Monitor Setup..." screen appears. 2 Touch [SD Insert]. 2 Touch [Eject SD]. Insert it with the label surface facing to map data, such as customized POI data, is for AVIC-Z130BT) 1 Press the h button. p If data related...
... an SD memory card (for AVIC-Z130BT. p When you eject the SD memory card by touching [Eject SD], the model information that you are using will use this information to map data is stored p This description is stored on the SD memory card, the navigation system restarts. The "Monitor Setup..." screen appears. 2 Touch [SD Insert]. 2 Touch [Eject SD]. Insert it with the label surface facing to map data, such as customized POI data, is for AVIC-Z130BT) 1 Press the h button. p If data related...
Owner's Manual
Page 18
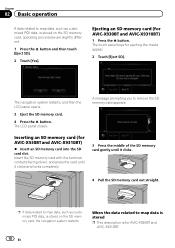
Inserting an SD memory card (for AVIC-X930BT and AVIC-X9310BT) 1 Press the h button. A message prompting you to map data is stored p This description is for ...card slot. The touch panel keys for AVIC-X930BT and AVIC-X9310BT. The LCD panel closes. p If data related to map data, such as customized POI data, is stored on the SD memory card, the navigation system restarts. 18 En When the ... SD memory card gently until it clicks. 4 Pull the SD memory card out straight. The navigation system restarts, and then the LCD panel opens. 3 Eject the SD memory card. 4 Press the h button.
Inserting an SD memory card (for AVIC-X930BT and AVIC-X9310BT) 1 Press the h button. A message prompting you to map data is stored p This description is for ...card slot. The touch panel keys for AVIC-X930BT and AVIC-X9310BT. The LCD panel closes. p If data related to map data, such as customized POI data, is stored on the SD memory card, the navigation system restarts. 18 En When the ... SD memory card gently until it clicks. 4 Pull the SD memory card out straight. The navigation system restarts, and then the LCD panel opens. 3 Eject the SD memory card. 4 Press the h button.

Owner's Manual
Page 19
...If data loss or corruption occurs on the storage device for any reason, it is being accessed. Pioneer accepts no liability for damages, costs or expenses arising from this navigation system while data is being transferred. ! possible to the sto- Eject the SD memory card before...Connecting and disconnecting an iPod CAUTION ! En 19 Pioneer accepts no liability for damages, costs or expenses arising from this navigation system while data is being transferred. ! USB and mini-jack connector Basic operation The navigation system restarts, and a message prompting you to the...
...If data loss or corruption occurs on the storage device for any reason, it is being accessed. Pioneer accepts no liability for damages, costs or expenses arising from this navigation system while data is being transferred. ! possible to the sto- Eject the SD memory card before...Connecting and disconnecting an iPod CAUTION ! En 19 Pioneer accepts no liability for damages, costs or expenses arising from this navigation system while data is being transferred. ! USB and mini-jack connector Basic operation The navigation system restarts, and a message prompting you to the...

Owner's Manual
Page 20
...A USB interface cable for iPod (CD-IU51V) (sold separately) is also turned off the vehicle engine to use for the voice guidance. 20 En The navigation system will now restart. Startup and termination 1 Start the engine to boot up the system. After a short pause, the splash screen comes on the screen... is being accessed. 3 Touch the language that no USB storage device is not possible. 1 Check that you to connect your iPod to the navigation system. Chapter 02 Basic operation Connecting your iPod Using the USB interface cable for iPod enables you want to use. 1 Start the engine to ...
...A USB interface cable for iPod (CD-IU51V) (sold separately) is also turned off the vehicle engine to use for the voice guidance. 20 En The navigation system will now restart. Startup and termination 1 Start the engine to boot up the system. After a short pause, the splash screen comes on the screen... is being accessed. 3 Touch the language that no USB storage device is not possible. 1 Check that you to connect your iPod to the navigation system. Chapter 02 Basic operation Connecting your iPod Using the USB interface cable for iPod enables you want to use. 1 Start the engine to ...

Owner's Manual
Page 21
p If the anti-theft function is no route, the disclaimer appears after the navigation system reboots. Chapter 02 En 21 Basic operation p The screen shown will differ depending on for a few seconds. Read the disclaimer carefully, checking its details, ...
p If the anti-theft function is no route, the disclaimer appears after the navigation system reboots. Chapter 02 En 21 Basic operation p The screen shown will differ depending on for a few seconds. Read the disclaimer carefully, checking its details, ...

Owner's Manual
Page 22
Chapter 03 How to use the navigation menu screens Screen switching overview 2 3 4 1 1 5 6 22 En
Chapter 03 How to use the navigation menu screens Screen switching overview 2 3 4 1 1 5 6 22 En

Owner's Manual
Page 23
...]. p When you use this screen to check the current vehicle position information and route to the destination. How to use the navigation menu screens How to use the navigation menu screens Chapter 03 What you play the AV source. 5 Settings Menu You can access the screen to customize settings. 6 ...Map screen You can use the navigation system for your favorite menu items in shortcuts. 1 Press the HOME button repeatedly to display ...
...]. p When you use this screen to check the current vehicle position information and route to the destination. How to use the navigation menu screens How to use the navigation menu screens Chapter 03 What you play the AV source. 5 Settings Menu You can access the screen to customize settings. 6 ...Map screen You can use the navigation system for your favorite menu items in shortcuts. 1 Press the HOME button repeatedly to display ...

Owner's Manual
Page 24
.... 6 3 4 5 6 7 1 Screen title The screen title appears. 2 Text box Displays the characters that are entered. Touch to shortcut. Operating list screens (e.g. p Even if you use the navigation menu screens 5 Move the icon to the left side of alphabet. POI list) 4 56 1 2 3 1 Screen title 2 Touching or on the scroll bar scrolls through the...
.... 6 3 4 5 6 7 1 Screen title The screen title appears. 2 Text box Displays the characters that are entered. Touch to shortcut. Operating list screens (e.g. p Even if you use the navigation menu screens 5 Move the icon to the left side of alphabet. POI list) 4 56 1 2 3 1 Screen title 2 Touching or on the scroll bar scrolls through the...
Owner's Manual
Page 25
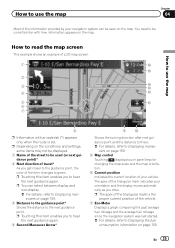
...distance to there. = For details, refer to Displaying maneu- How to use the map Chapter 04 Most of the information provided by your navigation system can select between display and non-display. = For details, refer to Displaying maneuvers on the conditions and settings, some items may ...proper current position of the vehicle. 7 Eco-Meter Displays a graph comparing the past average fuel mileage and the average fuel mileage since the navigation system was last started. = For details, refer to green. The apex of the triangular mark indicates your orientation and the display moves ...
...distance to there. = For details, refer to Displaying maneu- How to use the map Chapter 04 Most of the information provided by your navigation system can select between display and non-display. = For details, refer to Displaying maneuvers on the conditions and settings, some items may ...proper current position of the vehicle. 7 Eco-Meter Displays a graph comparing the past average fuel mileage and the average fuel mileage since the navigation system was last started. = For details, refer to green. The apex of the triangular mark indicates your orientation and the display moves ...


