Owner's Manual
Page 1
... Authorized Pioneer Electronics retailer or call us at (800) 421-1404. English For more information, please contact your vehicle, additional installation may be required. Important Information for the User first! Operation Manual MULTIMEDIA AV NAVIGATION RECEIVER AVIC-Z130BT AVIC-X930BT AVIC-X9310BT... Notice to all users: This software requires that the navigation system is properly connected to read Important Information for the User includes ...
... Authorized Pioneer Electronics retailer or call us at (800) 421-1404. English For more information, please contact your vehicle, additional installation may be required. Important Information for the User first! Operation Manual MULTIMEDIA AV NAVIGATION RECEIVER AVIC-Z130BT AVIC-X930BT AVIC-X9310BT... Notice to all users: This software requires that the navigation system is properly connected to read Important Information for the User includes ...
Owner's Manual
Page 2
...disc (for AVIC- Ejecting an SD memory card (for AVIC-X930BT and AVIC-X9310BT) 16 Inserting and ejecting an SD memory card 16 - Disconnecting your iPod 20 Startup and termination 20 On first-time startup 20 Regular startup 21 How to use the navigation menu screens ...your model properly. Please read the map screen 25 - Important The screens shown in this Pioneer product. Introduction Manual overview 9 - Inserting a disc (for AVIC- Inserting an SD memory card (for AVIC-Z130BT) 15 - Z130BT) 16 - Z130BT) 17 2 En - Inserting an SD memory card (for buying this manual 9 -...
...disc (for AVIC- Ejecting an SD memory card (for AVIC-X930BT and AVIC-X9310BT) 16 Inserting and ejecting an SD memory card 16 - Disconnecting your iPod 20 Startup and termination 20 On first-time startup 20 Regular startup 21 How to use the navigation menu screens ...your model properly. Please read the map screen 25 - Important The screens shown in this Pioneer product. Introduction Manual overview 9 - Inserting a disc (for AVIC- Inserting an SD memory card (for AVIC-Z130BT) 15 - Z130BT) 16 - Z130BT) 17 2 En - Inserting an SD memory card (for buying this manual 9 -...

Owner's Manual
Page 6
... directly 138 - Display the Radio ID 143 - Using the Game Alert function 145 - Selecting a channel from the list 139 - Inputting the fuel consumption information for navigation settings 150 Checking the connections of fuel cost information 153 Recording your travel history 154 Using the demonstration guidance 154 Registering your home 154 Setting... panel keys 137 - Clearing status 151 Using the fuel consumption function 152 - Displaying the Radio ID 138 - Displaying POIs obtained with Aha Radio and the navigation system 130 - Reading the screen 122 - Contents -
... directly 138 - Display the Radio ID 143 - Using the Game Alert function 145 - Selecting a channel from the list 139 - Inputting the fuel consumption information for navigation settings 150 Checking the connections of fuel cost information 153 Recording your travel history 154 Using the demonstration guidance 154 Registering your home 154 Setting... panel keys 137 - Clearing status 151 Using the fuel consumption function 152 - Displaying the Radio ID 138 - Displaying POIs obtained with Aha Radio and the navigation system 130 - Reading the screen 122 - Contents -
Owner's Manual
Page 7
...Changing the view mode 161 Setting the map color change between day and night 161 Changing the road color 161 Changing the setting of navigation interruption screen 161 Selecting the "Quick Access" menu 162 Displaying the screen for Guidance and Phone 165 - Changing to use the ...voice operation 183 Available basic voice commands 185 - Displaying your navigation system with voice To Ensure Safe Driving 182 Basics of the voice operation 182 - Using balance adjustment 175 - Enhancing bass (Bass Booster) 181...
...Changing the view mode 161 Setting the map color change between day and night 161 Changing the road color 161 Changing the setting of navigation interruption screen 161 Selecting the "Quick Access" menu 162 Displaying the screen for Guidance and Phone 165 - Changing to use the ...voice operation 183 Available basic voice commands 185 - Displaying your navigation system with voice To Ensure Safe Driving 182 Basics of the voice operation 182 - Using balance adjustment 175 - Enhancing bass (Bass Booster) 181...
Owner's Manual
Page 8
...diode) backlight 219 Display information 220 - Navi Settings menu 221 - AV Sound Settings menu 224 Glossary 225 Specifications 228 Returning the navigation system to cause noticeable positioning errors 204 Route setting information 206 - iTunes 217 Using App-based Connected Contents 217 - Entering the ... 216 AAC 217 Detailed information regarding connected iPod devices 217 - Pandora 218 - Settings Menu 221 - Forgotten password 189 Returning the navigation system to hands-free phoning 187 Tips for playing a disc 207 Playable discs 207 - Liquid crystal display (LCD) screen 218 ...
...diode) backlight 219 Display information 220 - Navi Settings menu 221 - AV Sound Settings menu 224 Glossary 225 Specifications 228 Returning the navigation system to cause noticeable positioning errors 204 Route setting information 206 - iTunes 217 Using App-based Connected Contents 217 - Entering the ... 216 AAC 217 Detailed information regarding connected iPod devices 217 - Pandora 218 - Settings Menu 221 - Forgotten password 189 Returning the navigation system to hands-free phoning 187 Tips for playing a disc 207 Playable discs 207 - Liquid crystal display (LCD) screen 218 ...
Owner's Manual
Page 9
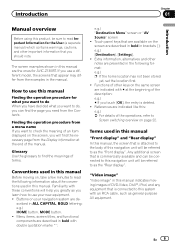
...be referred to Screen switching overview on your new equipment. ! If you touch [OK], the entry is connected to use your navigation system are the ones for AVIC-Z130BT. Any additional screen that appear may differ from a menu name If you want to read Important Information for what you want ...to check the meaning of an item displayed on the screen are described in bold in this navigation unit will find the ...
...be referred to Screen switching overview on your new equipment. ! If you touch [OK], the entry is connected to use your navigation system are the ones for AVIC-Z130BT. Any additional screen that appear may differ from a menu name If you want to read Important Information for what you want ...to check the meaning of an item displayed on the screen are described in bold in this navigation unit will find the ...

Owner's Manual
Page 10
... Ver. 1.1.3 ! iPhone 3G: Ver. 4.1 ! p Operation methods may not work correctly. ! iPod touch second generation: Ver. 4.1 ! iPod with a Pioneer USB interface cable for such use is referred to as the "USB storage device". iPhone: Ver. 3.1.3 p In this manual, iPod and iPhone will be compatible...viewing purposes may not be re- iPod classic 80GB: Ver. 1.1.2 ! p When you can control an iPod compatible with this navigation system, refer to as protected by U.S. Notice regarding DVDVideo viewing This item incorporates copy protection technology that use of Rovi Corporation....
... Ver. 1.1.3 ! iPhone 3G: Ver. 4.1 ! p Operation methods may not work correctly. ! iPod touch second generation: Ver. 4.1 ! iPod with a Pioneer USB interface cable for such use is referred to as the "USB storage device". iPhone: Ver. 3.1.3 p In this manual, iPod and iPhone will be compatible...viewing purposes may not be re- iPod classic 80GB: Ver. 1.1.2 ! p When you can control an iPod compatible with this navigation system, refer to as protected by U.S. Notice regarding DVDVideo viewing This item incorporates copy protection technology that use of Rovi Corporation....

Owner's Manual
Page 11
... or discharged, the memory will be erased and must be deleted on page 191. Introduction Map coverage For details about the map coverage of this navigation system, refer to fall on the LCD screen when this product is not being used. p When using a cellular phone, keep the antenna of spots, colored...
... or discharged, the memory will be erased and must be deleted on page 191. Introduction Map coverage For details about the map coverage of this navigation system, refer to fall on the LCD screen when this product is not being used. p When using a cellular phone, keep the antenna of spots, colored...
Owner's Manual
Page 13
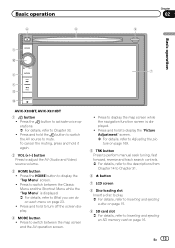
... MODE button ! Press to adjust the AV (Audio and Video) source volume. 3 HOME button ! Press to display the map screen while the navigation function screen is displayed. = For details, refer to What you can do on each menu on page 16. En 13 To cancel the muting...ejecting an SD memory card on page 23. ! Press the HOME button to mute. Basic operation 6 8 Chapter 02 9 Basic operation 3 a 7 4 5 b c AVIC-X930BT, AVIC-X9310BT 1 button ! Press and hold to display the "Picture Adjustment" screen. = For details, refer to Adjusting the picture on page 169. 5 TRK button Press to...
... MODE button ! Press to adjust the AV (Audio and Video) source volume. 3 HOME button ! Press to display the map screen while the navigation function screen is displayed. = For details, refer to What you can do on each menu on page 16. En 13 To cancel the muting...ejecting an SD memory card on page 23. ! Press the HOME button to mute. Basic operation 6 8 Chapter 02 9 Basic operation 3 a 7 4 5 b c AVIC-X930BT, AVIC-X9310BT 1 button ! Press and hold to display the "Picture Adjustment" screen. = For details, refer to Adjusting the picture on page 169. 5 TRK button Press to...
Owner's Manual
Page 14
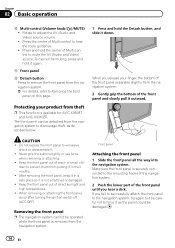
... your finger, the bottom of the front panel separates slightly from putting it . ! Do not expose the front panel to prevent them from the navigation system. 2 Gently grip the bottom of small chil- dren to excessive shock or disassemble it in a safe place so it outward. When removing or...14 En Front panel Attaching the front panel 1 Slide the front panel all the way into the navigation system. Keep the front panel out of reach of the front panel and slowly pull it is available for AVIC-X930BT and AVIC-X9310BT. After removing the front panel, keep it in their mouths. !
... your finger, the bottom of the front panel separates slightly from putting it . ! Do not expose the front panel to prevent them from the navigation system. 2 Gently grip the bottom of small chil- dren to excessive shock or disassemble it in a safe place so it outward. When removing or...14 En Front panel Attaching the front panel 1 Slide the front panel all the way into the navigation system. Keep the front panel out of reach of the front panel and slowly pull it is available for AVIC-X930BT and AVIC-X9310BT. After removing the front panel, keep it in their mouths. !

Owner's Manual
Page 15
...of the LCD panel, be memorized and the LCD panel will be careful not to get your fingers caught. ! This may break this navigation system. ! If this navigation system until the LCD panel completely opens or closes. The LCD panel opens, and the disc-loading slot appears. 3 Insert a disc into... a can on the open . Do not use with the LCD panel left open or close the LCD panel by force. The disc is available for AVIC-Z130BT only. Do not open or close the LCD panel by force. The "Monitor Setup" screen appears. 2 Touch [Open]. 3 Touch . Inserting and ejecting a disc ...
...of the LCD panel, be memorized and the LCD panel will be careful not to get your fingers caught. ! This may break this navigation system. ! If this navigation system until the LCD panel completely opens or closes. The LCD panel opens, and the disc-loading slot appears. 3 Insert a disc into... a can on the open . Do not use with the LCD panel left open or close the LCD panel by force. The disc is available for AVIC-Z130BT only. Do not open or close the LCD panel by force. The "Monitor Setup" screen appears. 2 Touch [Open]. 3 Touch . Inserting and ejecting a disc ...
Owner's Manual
Page 17
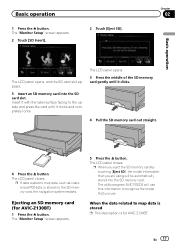
...The "Monitor Setup" screen appears. 5 Press the h button. The utility program AVIC FEEDS will use this information to map data is stored p This description is stored on the SD memory card, the navigation system restarts. En 17 When the data related to recognize the model that you... use. p If data related to the upside and press the card until it clicks and completely locks. Insert it with the label surface facing to map data, such as customized POI data, is for AVIC-Z130BT...
...The "Monitor Setup" screen appears. 5 Press the h button. The utility program AVIC FEEDS will use this information to map data is stored p This description is stored on the SD memory card, the navigation system restarts. En 17 When the data related to recognize the model that you... use. p If data related to the upside and press the card until it clicks and completely locks. Insert it with the label surface facing to map data, such as customized POI data, is for AVIC-Z130BT...
Owner's Manual
Page 18
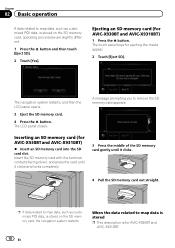
...Press the h button and then touch [Eject SD]. 2 Touch [Yes]. The navigation system restarts, and then the LCD panel opens. 3 Eject the SD memory card. 4 Press the h button. The touch panel keys for AVIC-X930BT and AVIC-X9310BT) 1 Press the h button. Chapter 02 Basic operation If data related to ...map data, such as customized POI data, is stored on the SD memory card, the navigation system restarts. 18 En When the data related to...
...Press the h button and then touch [Eject SD]. 2 Touch [Yes]. The navigation system restarts, and then the LCD panel opens. 3 Eject the SD memory card. 4 Press the h button. The touch panel keys for AVIC-X930BT and AVIC-X9310BT) 1 Press the h button. Chapter 02 Basic operation If data related to ...map data, such as customized POI data, is stored on the SD memory card, the navigation system restarts. 18 En When the data related to...

Owner's Manual
Page 19
... occurs on the storage device for damages, costs or expenses arising from this navigation system while data is not guaranteed. To prevent data loss and damage to remove the SD memory card appears. Pioneer accepts no liability for any reason, it is usually not Unplugging a USB ...message is stored on the storage device for damages, costs or expenses arising from this navigation system while data is usually not possible to recover the data. Pioneer accepts no data is being accessed. The navigation system restarts. Plugging in a USB storage device % Plug a USB storage device ...
... occurs on the storage device for damages, costs or expenses arising from this navigation system while data is not guaranteed. To prevent data loss and damage to remove the SD memory card appears. Pioneer accepts no liability for any reason, it is usually not Unplugging a USB ...message is stored on the storage device for damages, costs or expenses arising from this navigation system while data is usually not possible to recover the data. Pioneer accepts no data is being accessed. The navigation system restarts. Plugging in a USB storage device % Plug a USB storage device ...

Owner's Manual
Page 20
... operation Connecting your iPod Using the USB interface cable for a few seconds. 2 Touch the language that you want to use the navigation system for the voice guidance. 20 En The navigation system will now restart. p A USB interface cable for iPod (CD-IU51V) (sold separately) is being accessed. 3 Touch the ...to the information on for connection. p To protect the LCD screen from damage, be sure to touch the touch panel keys with this navigation system, refer to terminate the system. USB and mini-jack connector USB interface cable for iPod Disconnecting your iPod to the...
... operation Connecting your iPod Using the USB interface cable for a few seconds. 2 Touch the language that you want to use the navigation system for the voice guidance. 20 En The navigation system will now restart. p A USB interface cable for iPod (CD-IU51V) (sold separately) is being accessed. 3 Touch the ...to the information on for connection. p To protect the LCD screen from damage, be sure to touch the touch panel keys with this navigation system, refer to terminate the system. USB and mini-jack connector USB interface cable for iPod Disconnecting your iPod to the...

Owner's Manual
Page 21
... its details, and then touch [OK] if you agree to the conditions. p If the anti-theft function is no route, the disclaimer appears after the navigation system reboots. After a short pause, the splash screen comes on the previous conditions. Chapter 02 En 21 Basic operation The map screen appears. p The screen...
... its details, and then touch [OK] if you agree to the conditions. p If the anti-theft function is no route, the disclaimer appears after the navigation system reboots. After a short pause, the splash screen comes on the previous conditions. Chapter 02 En 21 Basic operation The map screen appears. p The screen...

Owner's Manual
Page 22
Chapter 03 How to use the navigation menu screens Screen switching overview 2 3 4 1 1 5 6 22 En
Chapter 03 How to use the navigation menu screens Screen switching overview 2 3 4 1 1 5 6 22 En

Owner's Manual
Page 23
... to 15 menu items can search for the first time or no items are two types of the "Top Menu" screen. p When you use the navigation system for your set route from this menu. 3 Phone Menu You can do on this manual, Classic Menu will appear. Touch [Yes] to proceed to... access the desired screens and operate the various functions. Shortcut Menu p In this menu. How to use the navigation menu screens How to use the navigation menu screens Chapter 03 What you can access the screen that is related to hands-free phoning. 4 AV operation screen This is...
... to 15 menu items can search for the first time or no items are two types of the "Top Menu" screen. p When you use the navigation system for your set route from this menu. 3 Phone Menu You can do on this manual, Classic Menu will appear. Touch [Yes] to proceed to... access the desired screens and operate the various functions. Shortcut Menu p In this menu. How to use the navigation menu screens How to use the navigation menu screens Chapter 03 What you can access the screen that is related to hands-free phoning. 4 AV operation screen This is...

Owner's Manual
Page 24
... can enter other characters of alphabet. Touch to toggle the selection. Operating list screens (e.g. If there is added to shortcut. p Even if you use the navigation menu screens 5 Move the icon to the left side of the screen, and then release it . POI list) 4 56 1 2 3 1 Screen title 2 Touching or on the...
... can enter other characters of alphabet. Touch to toggle the selection. Operating list screens (e.g. If there is added to shortcut. p Even if you use the navigation menu screens 5 Move the icon to the left side of the screen, and then release it . POI list) 4 56 1 2 3 1 Screen title 2 Touching or on the...
Owner's Manual
Page 25
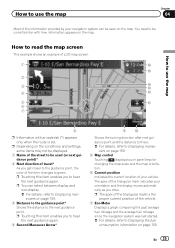
How to use the map Chapter 04 Most of the information provided by your navigation system can select between display and non-display. = For details, refer to Displaying maneuvers on page 159. 5 Map control Touching displays touch panel keys for ... is the proper current position of the vehicle. 7 Eco-Meter Displays a graph comparing the past average fuel mileage and the average fuel mileage since the navigation system was last started. = For details, refer to Displaying the fuel consumption information on the map. p Depending on the map. En 25 p The apex of...
How to use the map Chapter 04 Most of the information provided by your navigation system can select between display and non-display. = For details, refer to Displaying maneuvers on page 159. 5 Map control Touching displays touch panel keys for ... is the proper current position of the vehicle. 7 Eco-Meter Displays a graph comparing the past average fuel mileage and the average fuel mileage since the navigation system was last started. = For details, refer to Displaying the fuel consumption information on the map. p Depending on the map. En 25 p The apex of...


