Installation Manual
Page 2
...supplied 25 - Notice for the blue/white lead 6 Parts supplied 7 Installing the HDMI® cable holder 7 Connecting the system 8 When connecting the Android™ device (for AVIC-Z150BH and AVIC-X950BH) 9 Connecting the power cord (1) 10 Connecting the power cord (2) ... Precautions Your new navigation system and this manual 3 Important safeguards 3 Connecting the system Precautions before installation 19 To avoid electromagnetic interference 19 Before installing 19 - For AVIC-Z150BH users 20 Installing the navigation system 20 - Installation using a rear display connected to separately...
...supplied 25 - Notice for the blue/white lead 6 Parts supplied 7 Installing the HDMI® cable holder 7 Connecting the system 8 When connecting the Android™ device (for AVIC-Z150BH and AVIC-X950BH) 9 Connecting the power cord (1) 10 Connecting the power cord (2) ... Precautions Your new navigation system and this manual 3 Important safeguards 3 Connecting the system Precautions before installation 19 To avoid electromagnetic interference 19 Before installing 19 - For AVIC-Z150BH users 20 Installing the navigation system 20 - Installation using a rear display connected to separately...
Installation Manual
Page 3
...of this product (and the rear view camera option if purchased) are in mobile electronics, set up and install this manual fully and carefully before making the necessary adjustments. ! Operation of electric shock or other hazards, and can be possible to...traffic restrictions and potentially unsafe driving areas. Important safeguards WARNING Pioneer does not recommend that only authorized Pioneer service personnel, who have special training and experience in an accident, your injuries can cause damage to install this manual handy for the navigation system. ! En 3 We recommend ...
...of this product (and the rear view camera option if purchased) are in mobile electronics, set up and install this manual fully and carefully before making the necessary adjustments. ! Operation of electric shock or other hazards, and can be possible to...traffic restrictions and potentially unsafe driving areas. Important safeguards WARNING Pioneer does not recommend that only authorized Pioneer service personnel, who have special training and experience in an accident, your injuries can cause damage to install this manual handy for the navigation system. ! En 3 We recommend ...

Installation Manual
Page 5
...into the lead. Failure to do , the protection circuit (fuse holder, fuse resistor or filter, etc.) may eventually cause the insulation to install this unit with metal parts, short-circuiting can occur, resulting in considerable danger. ! En 5 Altering the antenna cable could result in ... steering column or shift lever. Tampering with cable clamps or electrical tape. If you do so may become damaged, resulting in the installation manual. ! It is extremely dangerous to allow any leads. Never feed power to high temperatures. Do not cut the GPS antenna cable ...
...into the lead. Failure to do , the protection circuit (fuse holder, fuse resistor or filter, etc.) may eventually cause the insulation to install this unit with metal parts, short-circuiting can occur, resulting in considerable danger. ! En 5 Altering the antenna cable could result in ... steering column or shift lever. Tampering with cable clamps or electrical tape. If you do so may become damaged, resulting in the installation manual. ! It is extremely dangerous to allow any leads. Never feed power to high temperatures. Do not cut the GPS antenna cable ...

Installation Manual
Page 6
... the power supply lead for this unit. ! To avoid short-circuiting, cover the disconnected lead with different screws. Be sure not to the owner's manual for the blue/white lead ! Do not use this product. ! Ensure that the ground wire is employed, do not directly ground the * side... ACC position The control signal is output through the blue/white lead, even if the audio source is output through the blue/white lead. When installing this unit. ! If the screw for this unit or power amp (sold separately), make connections accordingly. ! Ground wire Power amp Other devices ...
... the power supply lead for this unit. ! To avoid short-circuiting, cover the disconnected lead with different screws. Be sure not to the owner's manual for the blue/white lead ! Do not use this product. ! Ensure that the ground wire is employed, do not directly ground the * side... ACC position The control signal is output through the blue/white lead, even if the audio source is output through the blue/white lead. When installing this unit. ! If the screw for this unit or power amp (sold separately), make connections accordingly. ! Ground wire Power amp Other devices ...
Installation Manual
Page 18
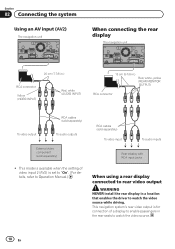
This navigation system's rear video output is set to "On". (For details, refer to Operation Manual.) RCA cables (sold separately) ! Section 02 Connecting the system Using an AV input (AV2) The navigation unit When connecting the rear display The navigation unit ... (sold separately) To video input To audio inputs Rear display with RCA input jacks When using a rear display connected to rear video output WARNING NEVER install the rear display in the rear seats to watch the video source. 18 En This mode is available when the setting of video input 2 (AV2...
This navigation system's rear video output is set to "On". (For details, refer to Operation Manual.) RCA cables (sold separately) ! Section 02 Connecting the system Using an AV input (AV2) The navigation unit When connecting the rear display The navigation unit ... (sold separately) To video input To audio inputs Rear display with RCA input jacks When using a rear display connected to rear video output WARNING NEVER install the rear display in the rear seats to watch the video source. 18 En This mode is available when the setting of video input 2 (AV2...

Installation Manual
Page 19
...ones are used, they may damage internal parts of your vehicle's owner's manual for errors in the manner specified after installation of the driver's seat, or close to safely operate the vehicle. ! Never install the navigation system in front of or next to the place in the dashboard... antenna and its lead In addition, you have the parts' compatibility checked by the driver or passenger if the vehicle stops quickly. ! Before installing ! When using screws, do not allow cables to damage fuel lines, brake lines, electronic components, communication wires or power cables. ! Make ...
...ones are used, they may damage internal parts of your vehicle's owner's manual for errors in the manner specified after installation of the driver's seat, or close to safely operate the vehicle. ! Never install the navigation system in front of or next to the place in the dashboard... antenna and its lead In addition, you have the parts' compatibility checked by the driver or passenger if the vehicle stops quickly. ! Before installing ! When using screws, do not allow cables to damage fuel lines, brake lines, electronic components, communication wires or power cables. ! Make ...
Operation Manual
Page 1
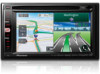
... must understand before using this navigation system. For more information, please contact your vehicle, additional installation may be required. Operation Manual MULTIMEDIA NAVIGATION RECEIVER AVIC-Z150BH AVIC-X950BH AVIC-X850BT AVIC-X8510BT Notice to your vehicle's parking brake and depending on your Authorized Pioneer Electronics retailer or call us at (800) 421-1404. Important Information for the User...
... must understand before using this navigation system. For more information, please contact your vehicle, additional installation may be required. Operation Manual MULTIMEDIA NAVIGATION RECEIVER AVIC-Z150BH AVIC-X950BH AVIC-X850BT AVIC-X8510BT Notice to your vehicle's parking brake and depending on your Authorized Pioneer Electronics retailer or call us at (800) 421-1404. Important Information for the User...

Operation Manual
Page 108
... 71. 108 En p The cable connection method varies depending on your smartphone to this product via the separately sold App Connectivity Kit (CD-AH200) (for AVIC-Z150BH and AVIC-X950BH). = For details of the operations, refer to the Installation Manual. When you touch [Pandora] or [aha], the navigation system starts establishing Bluetooth connection.
... 71. 108 En p The cable connection method varies depending on your smartphone to this product via the separately sold App Connectivity Kit (CD-AH200) (for AVIC-Z150BH and AVIC-X950BH). = For details of the operations, refer to the Installation Manual. When you touch [Pandora] or [aha], the navigation system starts establishing Bluetooth connection.

Operation Manual
Page 125
... curves = For details, refer to Using the equalizer on page 151. 2 Hides the touch panel keys and information of the connection method, refer to the Installation Manual. To view video images, you want to display the touch panel keys and information of the screen. Using AV input Chapter 25 Using AV input...
... curves = For details, refer to Using the equalizer on page 151. 2 Hides the touch panel keys and information of the connection method, refer to the Installation Manual. To view video images, you want to display the touch panel keys and information of the screen. Using AV input Chapter 25 Using AV input...

Operation Manual
Page 129
.... p The cable connection method varies depending on page 157. 2 Register your device. = For details of the operations, refer to the Installation Manual. 5 Press the HOME button to the condition of Bluetooth connection as the priority device. = For details, refer to this navigation system.... Using AppRadio Mode Chapter 26 Using AppRadio Mode 7 Touch the desired application icon. For smartphone users p This description is for AVIC-Z150BH and AVIC-X950BH. 1 Prepare the navigation system to connect to your smartphone. = For details, refer to Selecting the device connection method on ...
.... p The cable connection method varies depending on page 157. 2 Register your device. = For details of the operations, refer to the Installation Manual. 5 Press the HOME button to the condition of Bluetooth connection as the priority device. = For details, refer to this navigation system.... Using AppRadio Mode Chapter 26 Using AppRadio Mode 7 Touch the desired application icon. For smartphone users p This description is for AVIC-Z150BH and AVIC-X950BH. 1 Prepare the navigation system to connect to your smartphone. = For details, refer to Selecting the device connection method on ...

Operation Manual
Page 131
... application, appears on screen. p The cable connection method varies depending on your device. = For details of the operations, refer to the Installation Manual. 2 Press the HOME button to the "Top Menu" screen. Displaying the image of your iPhone. The black screen appears. 6 Launch an... iPhone, which asks you whether you use this product. A message, which is not compatible with all smartphones is available on AVIC-Z150BH and AVIC-X950BH. p Compatibility with AppRadio Mode, to launch the application. 5 Touch [OK] on your Bluetooth device before using this product via ...
... application, appears on screen. p The cable connection method varies depending on your device. = For details of the operations, refer to the Installation Manual. 2 Press the HOME button to the "Top Menu" screen. Displaying the image of your iPhone. The black screen appears. 6 Launch an... iPhone, which asks you whether you use this product. A message, which is not compatible with all smartphones is available on AVIC-Z150BH and AVIC-X950BH. p Compatibility with AppRadio Mode, to launch the application. 5 Touch [OK] on your Bluetooth device before using this product via ...
Operation Manual
Page 168
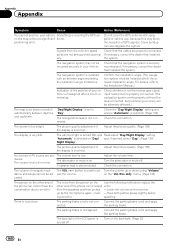
...not rise. A speaker lead is not con- menu. (Page 136) justed. The parking brake cord is disconnected. positioning error. Confirm the installation angle. (The navigation system must be ad- Adjust the picture quality. (Page 158) The display is not applied. The volume level will be... and Read about "Day/Night Display" setting "Automatic" is output echo: from the person on the Use the following methods to the Installation Manual.) Indication of the position of navigation gui- The VOL (+/-) button is incorrect. The person on the receiver up or down using "Volume...
...not rise. A speaker lead is not con- menu. (Page 136) justed. The parking brake cord is disconnected. positioning error. Confirm the installation angle. (The navigation system must be ad- Adjust the picture quality. (Page 158) The display is not applied. The volume level will be... and Read about "Day/Night Display" setting "Automatic" is output echo: from the person on the Use the following methods to the Installation Manual.) Indication of the position of navigation gui- The VOL (+/-) button is incorrect. The person on the receiver up or down using "Volume...

