Owner's Manual
Page 1
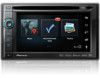
English Be sure to your vehicle's parking brake and depending on your Authorized Pioneer Electronics retailer or call us at (800) 421-1404. Important Information for the User first! For more information, please contact your vehicle, additional installation may be required. Operation Manual MULTIMEDIA NAVIGATION RECEIVER AVIC-Z140BH AVIC-X940BT Notice to all users: This software requires that the navigation system is properly connected to read Important Information for the User includes the important information that you must understand before using this navigation system.
English Be sure to your vehicle's parking brake and depending on your Authorized Pioneer Electronics retailer or call us at (800) 421-1404. Important Information for the User first! For more information, please contact your vehicle, additional installation may be required. Operation Manual MULTIMEDIA NAVIGATION RECEIVER AVIC-Z140BH AVIC-X940BT Notice to all users: This software requires that the navigation system is properly connected to read Important Information for the User includes the important information that you must understand before using this navigation system.
Owner's Manual
Page 2
... a USB storage device 21 - Z140BH) 19 2 En - Ejecting an SD memory card (for AVIC-Z140BH) 18 - Selecting the shortcut 27 - Enlarged map of the road stored in this Pioneer product. Please read the map screen 29 - Actual screens may differ from theft 16 - Conventions used...19 - Display during freeway driving 31 Types of the intersection 30 - Ejecting an SD memory card (for AVIC-X940BT) 18 - Inserting an SD memory card (for buying this manual 10 Notice regarding video viewing 11 Notice regarding DVD-Video viewing 11 Notice regarding MP3 file usage 11 iPod ...
... a USB storage device 21 - Z140BH) 19 2 En - Ejecting an SD memory card (for AVIC-Z140BH) 18 - Selecting the shortcut 27 - Enlarged map of the road stored in this Pioneer product. Please read the map screen 29 - Actual screens may differ from theft 16 - Conventions used...19 - Display during freeway driving 31 Types of the intersection 30 - Ejecting an SD memory card (for AVIC-X940BT) 18 - Inserting an SD memory card (for buying this manual 10 Notice regarding video viewing 11 Notice regarding DVD-Video viewing 11 Notice regarding MP3 file usage 11 iPod ...

Owner's Manual
Page 4
...alternative route to display 58 Selecting preferred RDS-TMC service provider manually 58 Registering and connecting a Bluetooth device Preparing communication devices 59 Registering your Bluetooth devices 60 - Checking traffic information manually 57 Selecting traffic information to avoid traffic congestion 56 - ...64 Making a phone call 67 Transferring the phone book 68 4 En - Deleting a registered device 62 Connecting a registered Bluetooth device manually 62 - Setting for a specified Bluetooth device 61 - Calling a number in strong signals 78 Answering an incoming call 64 - ...
...alternative route to display 58 Selecting preferred RDS-TMC service provider manually 58 Registering and connecting a Bluetooth device Preparing communication devices 59 Registering your Bluetooth devices 60 - Checking traffic information manually 57 Selecting traffic information to avoid traffic congestion 56 - ...64 Making a phone call 67 Transferring the phone book 68 4 En - Deleting a registered device 62 Connecting a registered Bluetooth device manually 62 - Setting for a specified Bluetooth device 61 - Calling a number in strong signals 78 Answering an incoming call 64 - ...

Owner's Manual
Page 10
..., microSDHC card and USB memory device are described in bold with double quotation marks " ": e.g.) "Video image" "Video image" in this manual indicates moving on, take a few minutes to Screen switching overview on your navigation system are indicated with an RCA cable, such as you touch...different model, the screens that is attached to the body of the manual. Any additional screen that appear may differ from the Contents. The screen examples shown in this manual Finding the operation procedure for AVIC-Z140BH. Buttons on page 26. Familiarity with these conventions will be ...
..., microSDHC card and USB memory device are described in bold with double quotation marks " ": e.g.) "Video image" "Video image" in this manual indicates moving on, take a few minutes to Screen switching overview on your navigation system are indicated with an RCA cable, such as you touch...different model, the screens that is attached to the body of the manual. Any additional screen that appear may differ from the Contents. The screen examples shown in this manual Finding the operation procedure for AVIC-Z140BH. Buttons on page 26. Familiarity with these conventions will be ...

Owner's Manual
Page 11
... nano (6th generation): Ver. 1.1 ! iPod nano (4th generation): Ver. 1.0.4 ! iPhone 4S: iOS 5.0 ! iPhone 4: iOS 5.0 ! iPhone 3G: iOS 4.2.1 ! iPhone: iOS 3.1.3 p In this manual, iPod and iPhone will be compatible with a Pioneer USB interface cable for commercial or public viewing purposes may not be re- ferred to the information on the software version of...
... nano (6th generation): Ver. 1.1 ! iPod nano (4th generation): Ver. 1.0.4 ! iPhone 4S: iOS 5.0 ! iPhone 4: iOS 5.0 ! iPhone 3G: iOS 4.2.1 ! iPhone: iOS 3.1.3 p In this manual, iPod and iPhone will be compatible with a Pioneer USB interface cable for commercial or public viewing purposes may not be re- ferred to the information on the software version of...
Owner's Manual
Page 15
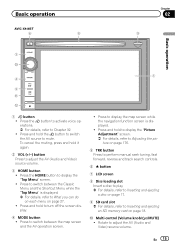
... hold to display the "Picture Adjustment" screen. = For details, refer to Adjusting the picture on page 176. 5 TRK button Press to perform manual seek tuning, fast forward, reverse and track search controls. 6 h button 7 LCD screen 8 Disc-loading slot Insert a disc to play. =... Menu" is displayed. ! a Multi-control (Volume knob/ /MUTE) ! En 15 Press to switch between the map screen and the AV operation screen. ! Basic operation AVIC-X940BT 6 8 Chapter 02 9 Basic operation 3 a 7 4 5 b c 1 button ! Press the HOME button to mute. Press and hold to adjust the AV (Audio...
... hold to display the "Picture Adjustment" screen. = For details, refer to Adjusting the picture on page 176. 5 TRK button Press to perform manual seek tuning, fast forward, reverse and track search controls. 6 h button 7 LCD screen 8 Disc-loading slot Insert a disc to play. =... Menu" is displayed. ! a Multi-control (Volume knob/ /MUTE) ! En 15 Press to switch between the map screen and the AV operation screen. ! Basic operation AVIC-X940BT 6 8 Chapter 02 9 Basic operation 3 a 7 4 5 b c 1 button ! Press the HOME button to mute. Press and hold to adjust the AV (Audio...

Owner's Manual
Page 18
...closes. Be sure to recover the data. Ejecting a disc (for AVIC-X940BT) 1 Press the h button. Do not insert anything other than a disc into the disc-loading slot. Inserting a disc (for any reason, it is ejected. Pioneer accepts no liability for ejecting the media appear. 2 Touch [Disc Eject...]. The disc is usually not possible to eject the SD memory card by the procedure described in this manual. ! The disc is ejected. 3 Remove the disc...
...closes. Be sure to recover the data. Ejecting a disc (for AVIC-X940BT) 1 Press the h button. Do not insert anything other than a disc into the disc-loading slot. Inserting a disc (for any reason, it is ejected. Pioneer accepts no liability for ejecting the media appear. 2 Touch [Disc Eject...]. The disc is usually not possible to eject the SD memory card by the procedure described in this manual. ! The disc is ejected. 3 Remove the disc...
Owner's Manual
Page 27
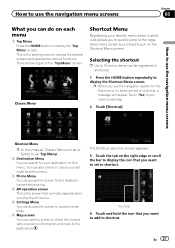
... to 15 menu items can search for the first time or no items are two types of the "Top Menu" screen. Shortcut Menu p In this manual, Classic Menu will appear. Touch [Yes] to proceed to as "Top Menu". 2 Destination Menu You can be referred to next step. 2 Touch [Shortcut]. En 27...
... to 15 menu items can search for the first time or no items are two types of the "Top Menu" screen. Shortcut Menu p In this manual, Classic Menu will appear. Touch [Yes] to proceed to as "Top Menu". 2 Destination Menu You can be referred to next step. 2 Touch [Shortcut]. En 27...
Owner's Manual
Page 48
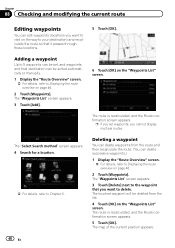
... list. 4 Touch [OK] on the "Waypoints List" screen. The map of the current position appears. 48 En The touched waypoint will be sorted automatically or manually. 1 Display the "Route Overview" screen. = For details, refer to Displaying the route overview on page 46. 2 Touch [Waypoints]. The "Select Search method" screen appears. 4 Search...
... list. 4 Touch [OK] on the "Waypoints List" screen. The map of the current position appears. 48 En The touched waypoint will be sorted automatically or manually. 1 Display the "Route Overview" screen. = For details, refer to Displaying the route overview on page 46. 2 Touch [Waypoints]. The "Select Search method" screen appears. 4 Search...

Owner's Manual
Page 57
... to Screen switching overview on the map screen. 4 Touch [Diversion] to check traffic information on your current route into the new route. Checking traffic information manually Touching the notification icon on the map screen allows you touch [Current] while the recommended route is displayed, the screen switches to the point of...
... to Screen switching overview on the map screen. 4 Touch [Diversion] to check traffic information on your current route into the new route. Checking traffic information manually Touching the notification icon on the map screen allows you touch [Current] while the recommended route is displayed, the screen switches to the point of...

Owner's Manual
Page 58
... of the operations, refer to the screen. 7 Touch [OK]. The "Traffic Menu" screen appears. 3 Touch [Traffic Settings]. If you can manually select one from available RDS-TMC service providers. 1 Display the "Destination Menu" screen. = For details of the operations, refer to deselect all entries... can be received via the RDS-TMC service, and you touch [List], the "Traffic on the list. Selecting preferred RDS-TMC service provider manually A default preferred TMC service provider for traffic congestion automatically on the previous page. # If you can select all entries, touch [None]. 6...
... of the operations, refer to the screen. 7 Touch [OK]. The "Traffic Menu" screen appears. 3 Touch [Traffic Settings]. If you can manually select one from available RDS-TMC service providers. 1 Display the "Destination Menu" screen. = For details of the operations, refer to deselect all entries... can be received via the RDS-TMC service, and you touch [List], the "Traffic on the list. Selecting preferred RDS-TMC service provider manually A default preferred TMC service provider for traffic congestion automatically on the previous page. # If you can select all entries, touch [None]. 6...
Owner's Manual
Page 59
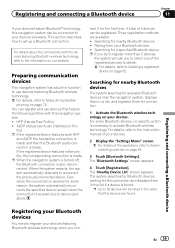
... is severed due to Deleting a registered device on our website. For details about the connectivity with this navigation system can be connected to the instruction manual of your Bluetooth devices ! Registering your Bluetooth devices You need to register your devices featuring Bluetooth wireless technology when you to select one of the...
... is severed due to Deleting a registered device on our website. For details about the connectivity with this navigation system can be connected to the instruction manual of your Bluetooth devices ! Registering your Bluetooth devices You need to register your devices featuring Bluetooth wireless technology when you to select one of the...
Owner's Manual
Page 60
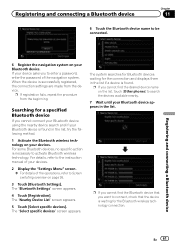
... phone]. p If you cannot find the Bluetooth device that you want to Screen switching overview on your mobile phone." For details, refer to the instruction manual of your Bluetooth devices You can register the Bluetooth device by setting the navigation system to activate Bluetooth wireless technology. After the device is successfully...
... phone]. p If you cannot find the Bluetooth device that you want to Screen switching overview on your mobile phone." For details, refer to the instruction manual of your Bluetooth devices You can register the Bluetooth device by setting the navigation system to activate Bluetooth wireless technology. After the device is successfully...
Owner's Manual
Page 61
.... p If you to enter a password, enter the password of the operations, refer to Screen switching overview on the list, touch [Other phones] to the instruction manual of your devices. 2 Display the "Settings Menu" screen. = For details of the navigation system. Registering and connecting a Bluetooth device 6 Register the navigation system on your...
.... p If you to enter a password, enter the password of the operations, refer to Screen switching overview on the list, touch [Other phones] to the instruction manual of your devices. 2 Display the "Settings Menu" screen. = For details of the navigation system. Registering and connecting a Bluetooth device 6 Register the navigation system on your...
Owner's Manual
Page 62
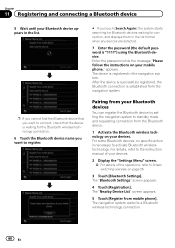
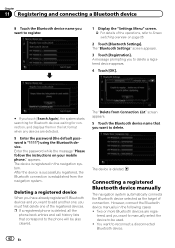
...Two or more Bluetooth devices are detected. 9 Enter the password (the default password is "1111") using the Bluetooth device. You want to manually select the device to the phone will be used. ! The "Bluetooth Settings" screen appears. 3 Touch [Registration]. The device is established ..., the Bluetooth connection is registered in the following cases: ! p If a registered phone is deleted. However, connect the Bluetooth device manually in the navigation system. tered, and you to Screen switching overview on your mobile phone." Enter the password while the message "Please follow...
...Two or more Bluetooth devices are detected. 9 Enter the password (the default password is "1111") using the Bluetooth device. You want to manually select the device to the phone will be used. ! The "Bluetooth Settings" screen appears. 3 Touch [Registration]. The device is established ..., the Bluetooth connection is registered in the following cases: ! p If a registered phone is deleted. However, connect the Bluetooth device manually in the navigation system. tered, and you to Screen switching overview on your mobile phone." Enter the password while the message "Please follow...
Owner's Manual
Page 63
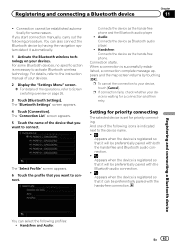
...refer to Screen switching overview on your devices. 2 Display the "Settings Menu" screen. = For details of the device that you start connection manually, carry out the following profiles: ! The "Bluetooth Settings" screen appears. 4 Touch [Connection]. Connection starts. Setting for priority connecting The selected ... Handsfree and Audio: En 63 The "Connection List" screen appears. 5 Touch the name of the operations, refer to the instruction manual of your devices. Connects the device as the hands-free phone. Audio: Connects the device as Bluetooth audio player. ! If you...
...refer to Screen switching overview on your devices. 2 Display the "Settings Menu" screen. = For details of the device that you start connection manually, carry out the following profiles: ! The "Bluetooth Settings" screen appears. 4 Touch [Connection]. Connection starts. Setting for priority connecting The selected ... Handsfree and Audio: En 63 The "Connection List" screen appears. 5 Touch the name of the operations, refer to the instruction manual of your devices. Connects the device as the hands-free phone. Audio: Connects the device as Bluetooth audio player. ! If you...
Owner's Manual
Page 67
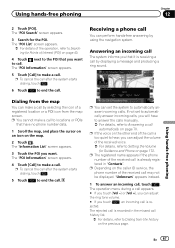
... service, the phone number of the received call . p Depending on page 40. 4 Touch next to the POI that you that have to answer the calls manually. = For details, refer to automatically answer incoming calls. Using hands-free phoning En 67 The "POI Search" screen appears. 3 Search for Points of the received...
... service, the phone number of the received call . p Depending on page 40. 4 Touch next to the POI that you that have to answer the calls manually. = For details, refer to automatically answer incoming calls. Using hands-free phoning En 67 The "POI Search" screen appears. 3 Search for Points of the received...
Owner's Manual
Page 68
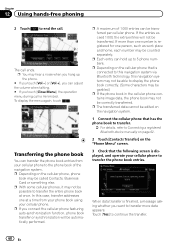
... be edited on the navigation system. 1 Connect the cellular phone that has the phone book to transfer. = For details, refer to Connecting a registered Bluetooth device manually on page 62. 2 Touch [Contacts Transfer] on the "Phone Menu" screen. 3 Check that is finished, a message asking whether you touch [Close Menu], the operation menu...
... be edited on the navigation system. 1 Connect the cellular phone that has the phone book to transfer. = For details, refer to Connecting a registered Bluetooth device manually on page 62. 2 Touch [Contacts Transfer] on the "Phone Menu" screen. 3 Check that is finished, a message asking whether you touch [Close Menu], the operation menu...
Owner's Manual
Page 71
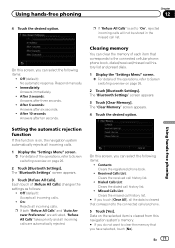
..." are activated, "Refuse All Calls" takes priority and all incoming calls. On this navigation system's memory. # If you touch [Clear All], all incoming calls. ! Respond manually. ! Contacts: Clears the registered phone book. ! Off (default): Accepts all the data is set to "On", rejected incoming calls will not be stored in the...
..." are activated, "Refuse All Calls" takes priority and all incoming calls. On this navigation system's memory. # If you touch [Clear All], all incoming calls. ! Respond manually. ! Contacts: Clears the registered phone book. ! Off (default): Accepts all the data is set to "On", rejected incoming calls will not be stored in the...
Owner's Manual
Page 72
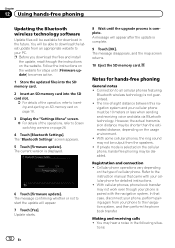
... files will be available for download in the following situa- However, the actual transmission distance may not work even though your phone to the instruction manual that case, disconnect your phone, perform pairing again from an appropriate website to Screen switching overview on page 26. 4 Touch [Bluetooth Settings]. Making and receiving...
... files will be available for download in the following situa- However, the actual transmission distance may not work even though your phone to the instruction manual that case, disconnect your phone, perform pairing again from an appropriate website to Screen switching overview on page 26. 4 Touch [Bluetooth Settings]. Making and receiving...


