Owner's Manual
Page 2
... Before removing the vehicle battery 12 - Attaching the detachable faceplate 16 Adjusting the LCD panel angle 17 Inserting and ejecting a disc 17 - Inserting a disc (for AVIC-X940BT) 18 Inserting and ejecting an SD memory card 18 - Ejecting a disc (for AVIC-X940BT) 18 - Z140BH) 19 2 En - Plugging in ... so you have finished reading the instructions, keep this document in this Pioneer product. Ejecting a disc (for AVICX940BT) 20 Plugging and unplugging a USB storage device 21 - Ejecting an SD memory card (for AVIC-Z140BH) 18 - Disconnecting your iPod 22 - Conventions used in a safe...
... Before removing the vehicle battery 12 - Attaching the detachable faceplate 16 Adjusting the LCD panel angle 17 Inserting and ejecting a disc 17 - Inserting a disc (for AVIC-X940BT) 18 Inserting and ejecting an SD memory card 18 - Ejecting a disc (for AVIC-X940BT) 18 - Z140BH) 19 2 En - Plugging in ... so you have finished reading the instructions, keep this document in this Pioneer product. Ejecting a disc (for AVICX940BT) 20 Plugging and unplugging a USB storage device 21 - Ejecting an SD memory card (for AVIC-Z140BH) 18 - Disconnecting your iPod 22 - Conventions used in a safe...
Owner's Manual
Page 16
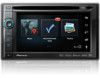
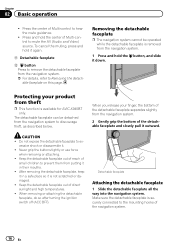
.... Chapter 02 Basic operation ! Press the center of small children to hear the route guidance. ! The detachable faceplate can be operated while the detachable faceplate is removed from theft p This function is securely connected to the mounting hooks of direct sunlight and high temperatures.... and hold the button, and slide it in a safe place so it . ! Do not expose the detachable faceplate to discourage theft, as described below. Never grip the buttons tightly or use force when removing or attaching. ! Make sure the detachable faceplate is available for AVIC-X940BT only.
.... Chapter 02 Basic operation ! Press the center of small children to hear the route guidance. ! The detachable faceplate can be operated while the detachable faceplate is removed from theft p This function is securely connected to the mounting hooks of direct sunlight and high temperatures.... and hold the button, and slide it in a safe place so it . ! Do not expose the detachable faceplate to discourage theft, as described below. Never grip the buttons tightly or use force when removing or attaching. ! Make sure the detachable faceplate is available for AVIC-X940BT only.

Owner's Manual
Page 17
...Be especially cautious of children's hands and fingers. ! Doing so may break this navigation system until you fail to successfully attach the detachable faceplate to the navigation system, try again but be careful not to adjust the angle. This may cause malfunction. 1 Press the h button... system is operated while the LCD panel is opened or closed. Inserting and ejecting a disc Inserting a disc (for AVIC-Z140BH only. If LCD panel is available for AVIC-Z140BH) WARNING ! p The adjusted angle of the LCD panel will be memorized and the LCD panel will automatically return...
...Be especially cautious of children's hands and fingers. ! Doing so may break this navigation system until you fail to successfully attach the detachable faceplate to the navigation system, try again but be careful not to adjust the angle. This may cause malfunction. 1 Press the h button... system is operated while the LCD panel is opened or closed. Inserting and ejecting a disc Inserting a disc (for AVIC-Z140BH only. If LCD panel is available for AVIC-Z140BH) WARNING ! p The adjusted angle of the LCD panel will be memorized and the LCD panel will automatically return...
Installation Manual
Page 2
... new navigation system and this product 4 To prevent damage 4 - AVIC-X940BT 6 Connecting the system 8 Connecting the power cord (1) 10 Connecting ... screw holes on the sun visor 26 - Parts supplied 22 - Fastening the detachable faceplate 23 Installing the GPS antenna 24 - Adjusting the microphone angle 27 Parts supplied 26 - Notice for the ... notes 24 - Mounting on the side of the navigation unit 22 2 En - Installation notes 21 - For AVIC-Z140BH users 21 Installing the navigation system 21 - Installation using a rear display connected to separately sold power amp ...
... new navigation system and this product 4 To prevent damage 4 - AVIC-X940BT 6 Connecting the system 8 Connecting the power cord (1) 10 Connecting ... screw holes on the sun visor 26 - Parts supplied 22 - Fastening the detachable faceplate 23 Installing the GPS antenna 24 - Adjusting the microphone angle 27 Parts supplied 26 - Notice for the ... notes 24 - Mounting on the side of the navigation unit 22 2 En - Installation notes 21 - For AVIC-Z140BH users 21 Installing the navigation system 21 - Installation using a rear display connected to separately sold power amp ...

Installation Manual
Page 23
If you do not plan to remove the detachable faceplate, the detachable faceplate can be fastened with the supplied screw. Screw (2 mm × 4 mm) English Section 03 En 23 Installation Fastening the detachable faceplate p This description is for AVIC-X940BT.
If you do not plan to remove the detachable faceplate, the detachable faceplate can be fastened with the supplied screw. Screw (2 mm × 4 mm) English Section 03 En 23 Installation Fastening the detachable faceplate p This description is for AVIC-X940BT.
