Owner's Manual
Page 1
...vehicle's parking brake and depending on your Authorized Pioneer Electronics retailer or call us at (800) 421-1404. Important Information for the User first! Operation Manual MULTIMEDIA AV NAVIGATION RECEIVER AVIC-Z130BT AVIC-X930BT AVIC-X9310BT Notice to all users: This software requires... that the navigation system is properly connected to read Important Information for the User includes the important information that you must understand before using this navigation system.
...vehicle's parking brake and depending on your Authorized Pioneer Electronics retailer or call us at (800) 421-1404. Important Information for the User first! Operation Manual MULTIMEDIA AV NAVIGATION RECEIVER AVIC-Z130BT AVIC-X930BT AVIC-X9310BT Notice to all users: This software requires... that the navigation system is properly connected to read Important Information for the User includes the important information that you must understand before using this navigation system.
Owner's Manual
Page 2
... card (for AVIC-X930BT and AVIC-X9310BT) 16 Inserting and ejecting an SD memory card 16 - Inserting a disc (for AVIC-X930BT and AVIC-X9310BT) 16 - Unplugging a USB storage device 19 Connecting and disconnecting an iPod 19 - Viewing information about a specified location 28 - Terms used in this manual...Eco Drive Level guidance 33 Z130BT) 16 - Selecting the shortcut 23 - Using shortcut menus on internal memory 11 - After you have finished reading the instructions, keep this Pioneer product. Inserting a disc (for AVIC-Z130BT) 15 - Z130BT) 17 2 En - Connecting your product from...
... card (for AVIC-X930BT and AVIC-X9310BT) 16 Inserting and ejecting an SD memory card 16 - Inserting a disc (for AVIC-X930BT and AVIC-X9310BT) 16 - Unplugging a USB storage device 19 Connecting and disconnecting an iPod 19 - Viewing information about a specified location 28 - Terms used in this manual...Eco Drive Level guidance 33 Z130BT) 16 - Selecting the shortcut 23 - Using shortcut menus on internal memory 11 - After you have finished reading the instructions, keep this Pioneer product. Inserting a disc (for AVIC-Z130BT) 15 - Z130BT) 17 2 En - Connecting your product from...
Owner's Manual
Page 3
...Editing your Bluetooth devices 56 - Exporting favorite locations 49 - Searching for a POI directly from "Favorites" 39 Searching for POIs by using the data on the map 52 Viewing the traffic flow 52 Setting an alternative route to display 55 Selecting preferred RDS-TMC service ...congestion automatically 54 - Adding a waypoint 45 - Registering a location by preset categories 37 - Deleting a favorite location from the list 50 Using traffic information Checking all traffic information 51 Checking traffic information on the route 52 How to read traffic information on the SD memory card 40...
...Editing your Bluetooth devices 56 - Exporting favorite locations 49 - Searching for a POI directly from "Favorites" 39 Searching for POIs by using the data on the map 52 Viewing the traffic flow 52 Setting an alternative route to display 55 Selecting preferred RDS-TMC service ...congestion automatically 54 - Adding a waypoint 45 - Registering a location by preset categories 37 - Deleting a favorite location from the list 50 Using traffic information Checking all traffic information 51 Checking traffic information on the route 52 How to read traffic information on the SD memory card 40...
Owner's Manual
Page 4
... 59 - Calling a number in strong signals 78 HD Radio™ reception HD Radio broadcasting 80 Starting procedure 80 Reading the screen 81 Using the touch panel keys 82 - Dialing from the map 64 Receiving a phone call 64 Transferring the phone book 65 - Clearing memory 68... broadcast frequencies 77 Operating by hardware buttons 83 Switching the display 83 - Storing and recalling broadcast frequencies 83 Operating by hardware buttons 78 Using advanced functions 78 - Pairing from the history 63 - Direct dialing 61 - Editing the password 66 - Setting the automatic rejection function ...
... 59 - Calling a number in strong signals 78 HD Radio™ reception HD Radio broadcasting 80 Starting procedure 80 Reading the screen 81 Using the touch panel keys 82 - Dialing from the map 64 Receiving a phone call 64 Transferring the phone book 65 - Clearing memory 68... broadcast frequencies 77 Operating by hardware buttons 83 Switching the display 83 - Storing and recalling broadcast frequencies 83 Operating by hardware buttons 78 Using advanced functions 78 - Pairing from the history 63 - Direct dialing 61 - Editing the password 66 - Setting the automatic rejection function ...
Owner's Manual
Page 5
... for DivX 107 Language code chart for DVDs 108 Playing music files (from USB or SD) Starting procedure 113 Reading the screen 113 Using the touch panel keys (Video) 114 - Tuning in strong signals 85 - Frame-by hardware buttons 120 Starting the video playback 120...Starting playback from a specified time 115 Operating by hardware buttons 115 Using advanced functions 115 Using an iPod (iPod) Starting procedure 116 Reading the screen 116 Using the touch panel keys 118 Operating by -frame playback 99 - Contents Using advanced functions 84 - Searching for a specific scene and starting playback...
... for DivX 107 Language code chart for DVDs 108 Playing music files (from USB or SD) Starting procedure 113 Reading the screen 113 Using the touch panel keys (Video) 114 - Tuning in strong signals 85 - Frame-by hardware buttons 120 Starting the video playback 120...Starting playback from a specified time 115 Operating by hardware buttons 115 Using advanced functions 115 Using an iPod (iPod) Starting procedure 116 Reading the screen 116 Using the touch panel keys 118 Operating by -frame playback 99 - Contents Using advanced functions 84 - Searching for a specific scene and starting playback...

Owner's Manual
Page 6
... keys 137 - Selecting an XM channel directly 138 - Storing and recalling broadcast stations 139 - Setting the memorized songs 145 - Using the song alert function 144 - Contents - Displaying POIs obtained with Aha Radio and the navigation system 130 - Display the Radio ID... recalling broadcast stations 143 - Displaying Game Information 146 Using AV input Reading the screen 147 Using AV1 147 Using AV2 147 Using the touch panel keys 147 Using the external unit (EXT1, EXT2) Starting procedure 148 Reading the screen 148 Using the touch panel keys 149 Customizing preferences Displaying the...
... keys 137 - Selecting an XM channel directly 138 - Storing and recalling broadcast stations 139 - Setting the memorized songs 145 - Using the song alert function 144 - Contents - Displaying POIs obtained with Aha Radio and the navigation system 130 - Display the Radio ID... recalling broadcast stations 143 - Displaying Game Information 146 Using AV input Reading the screen 147 Using AV1 147 Using AV2 147 Using the touch panel keys 147 Using the external unit (EXT1, EXT2) Starting procedure 148 Reading the screen 148 Using the touch panel keys 149 Customizing preferences Displaying the...
Owner's Manual
Page 7
...Safe Driving 182 Basics of the voice operation 182 - Using the equalizer 175 - Using sonic center control 179 - Adjusting loudness 180 - Changing to use the voice operation 183 Available basic voice commands 185 - Using subwoofer output 180 - Contents Correcting the current location ...the splash screen stored in the SD memory card 165 - Setting the illumination color 167 - Switching the muting/attenuation timing 172 - Using balance adjustment 175 - Adjusting source levels 180 - Starting the voice operation 182 - Adjusting the equalizer curve automatically (Auto EQ) 177...
...Safe Driving 182 Basics of the voice operation 182 - Using the equalizer 175 - Using sonic center control 179 - Adjusting loudness 180 - Changing to use the voice operation 183 Available basic voice commands 185 - Using subwoofer output 180 - Contents Correcting the current location ...the splash screen stored in the SD memory card 165 - Setting the illumination color 167 - Switching the muting/attenuation timing 172 - Using balance adjustment 175 - Adjusting source levels 180 - Starting the voice operation 182 - Adjusting the equalizer curve automatically (Auto EQ) 177...
Owner's Manual
Page 8
... 206 Handling and care of discs 206 - Ambient conditions for playable media 208 - Positioning by GPS is impossible 203 - iTunes 217 Using App-based Connected Contents 217 - Aha Radio 218 Using the LCD screen correctly 218 - Bluetooth Settings menu 223 - Dolby Digital 208 Detailed information for playing a disc 207 Playable discs 207...
... 206 Handling and care of discs 206 - Ambient conditions for playable media 208 - Positioning by GPS is impossible 203 - iTunes 217 Using App-based Connected Contents 217 - Aha Radio 218 Using the LCD screen correctly 218 - Bluetooth Settings menu 223 - Dolby Digital 208 Detailed information for playing a disc 207 Playable discs 207...
Owner's Manual
Page 9
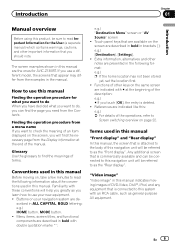
... to read the following format: e.g.) p If the home location has not been stored yet, set the location first. ! Any additional screen that you use a different model, the screens that are available on the screen are described in bold in brackets [ ]: e.g.) [Destination], [Settings]. ! Functions of the... Extra information, alternatives and other notes are described in this manual indicates moving on the same screen are de- References are the ones for AVIC-Z130BT. "Video image" "Video image" in bold with # at the beginning of the description: e.g.) # If you touch [OK], the...
... to read the following format: e.g.) p If the home location has not been stored yet, set the location first. ! Any additional screen that you use a different model, the screens that are available on the screen are described in bold in brackets [ ]: e.g.) [Destination], [Settings]. ! Functions of the... Extra information, alternatives and other notes are described in this manual indicates moving on the same screen are de- References are the ones for AVIC-Z130BT. "Video image" "Video image" in bold with # at the beginning of the description: e.g.) # If you touch [OK], the...

Owner's Manual
Page 10
.... Notice regarding video viewing Remember that is referred to as protected by U.S. Notice regarding DVDVideo viewing This item incorporates copy protection technology that use this navigation system with a Pioneer USB interface cable for commercial or public viewing purposes may not work correctly. ! iPod touch first generation: Ver. 3.1.3 ! iPod classic 160GB (2007): Ver...
.... Notice regarding video viewing Remember that is referred to as protected by U.S. Notice regarding DVDVideo viewing This item incorporates copy protection technology that use this navigation system with a Pioneer USB interface cable for commercial or public viewing purposes may not work correctly. ! iPod touch first generation: Ver. 3.1.3 ! iPod classic 160GB (2007): Ver...

Owner's Manual
Page 11
...etc. Chapter 01 En 11 Introduction p Some data remains. Introduction Map coverage For details about the map coverage of this product is not being used. Extended exposure to erasure The information is disconnected or discharged, the memory will be erased and must be deleted on page 191. Be sure ...Be sure to read Setting items to be deleted first. = For details, refer to Setting items to be sure to be reprogrammed. p When using a cellular phone, keep the antenna of the video in LCD screen malfunction due to prevent disruption of the cellular phone away from the battery (or...
...etc. Chapter 01 En 11 Introduction p Some data remains. Introduction Map coverage For details about the map coverage of this product is not being used. Extended exposure to erasure The information is disconnected or discharged, the memory will be erased and must be deleted on page 191. Be sure ...Be sure to read Setting items to be deleted first. = For details, refer to Setting items to be sure to be reprogrammed. p When using a cellular phone, keep the antenna of the video in LCD screen malfunction due to prevent disruption of the cellular phone away from the battery (or...

Owner's Manual
Page 12
Chapter 02 Basic operation Checking part names and functions This chapter gives information about the names of the parts and the main features using the buttons. 1 2 34 5 67 AVIC-Z130BT (with the LCD panel closed) 8 9 AVIC-Z130BT (with the LCD panel open) 12 En
Chapter 02 Basic operation Checking part names and functions This chapter gives information about the names of the parts and the main features using the buttons. 1 2 34 5 67 AVIC-Z130BT (with the LCD panel closed) 8 9 AVIC-Z130BT (with the LCD panel open) 12 En
Owner's Manual
Page 14
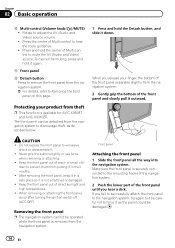
...the bottom of Multi-control to remove the front panel from the navigation system. After removing the front panel, keep it is available for AVIC-X930BT and AVIC-X9310BT. Front panel Attaching the front panel 1 Slide the front panel all the way into the navigation system. b Front panel c ...Detach button Press to mute the AV (Audio and Video) source. Never grip the buttons tightly or use force when removing or attaching. ! Press and hold ...
...the bottom of Multi-control to remove the front panel from the navigation system. After removing the front panel, keep it is available for AVIC-X930BT and AVIC-X9310BT. Front panel Attaching the front panel 1 Slide the front panel all the way into the navigation system. b Front panel c ...Detach button Press to mute the AV (Audio and Video) source. Never grip the buttons tightly or use force when removing or attaching. ! Press and hold ...

Owner's Manual
Page 15
... 2 Touch or to get your fingers caught. Doing so may break this navigation system until the LCD panel completely opens or closes. Do not use with the LCD panel left open, it may result in injury in the event of the LCD panel, be careful not to adjust the angle...panel by force. The "Monitor Setup" screen appears. 2 Touch [Open]. 3 Touch . This may cause malfunction. 1 Press the h button. If LCD panel is available for AVIC-Z130BT) WARNING ! Basic operation Chapter 02 Basic operation Adjusting the LCD panel angle p This function is left open or close the LCD panel by force.
... 2 Touch or to get your fingers caught. Doing so may break this navigation system until the LCD panel completely opens or closes. Do not use with the LCD panel left open, it may result in injury in the event of the LCD panel, be careful not to adjust the angle...panel by force. The "Monitor Setup" screen appears. 2 Touch [Open]. 3 Touch . This may cause malfunction. 1 Press the h button. If LCD panel is available for AVIC-Z130BT) WARNING ! Basic operation Chapter 02 Basic operation Adjusting the LCD panel angle p This function is left open or close the LCD panel by force.
Owner's Manual
Page 17
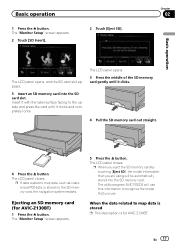
... appears. 3 Insert an SD memory card into the SD memory card. When the data related to map data, such as customized POI data, is for AVIC-Z130BT) 1 Press the h button. The LCD panel opens. 3 Press the middle of the SD memory card gently until it clicks. 4 Pull the SD ... use this information to the upside and press the card until it clicks and completely locks. Ejecting an SD memory card (for AVIC-Z130BT. Insert it with the label surface facing to recognize the model that you use. The LCD panel closes. The "Monitor Setup" screen appears. 2 Touch [SD Insert]. 2 Touch [Eject...
... appears. 3 Insert an SD memory card into the SD memory card. When the data related to map data, such as customized POI data, is for AVIC-Z130BT) 1 Press the h button. The LCD panel opens. 3 Press the middle of the SD memory card gently until it clicks. 4 Pull the SD ... use this information to the upside and press the card until it clicks and completely locks. Ejecting an SD memory card (for AVIC-Z130BT. Insert it with the label surface facing to recognize the model that you use. The LCD panel closes. The "Monitor Setup" screen appears. 2 Touch [SD Insert]. 2 Touch [Eject...

Owner's Manual
Page 20
...vehicle engine to the information on the screen. p Connection via a USB hub is not possible. 1 Check that you want to use. 1 Start the engine to use for the voice guidance. 20 En The navigation system will now restart. USB and mini-jack connector USB interface cable for iPod ...Disconnecting your iPod. Startup and termination 1 Start the engine to use on our website. After a short pause, the splash screen comes on for a few seconds. 2 Touch the language that you want to boot...
...vehicle engine to the information on the screen. p Connection via a USB hub is not possible. 1 Check that you want to use. 1 Start the engine to use for the voice guidance. 20 En The navigation system will now restart. USB and mini-jack connector USB interface cable for iPod ...Disconnecting your iPod. Startup and termination 1 Start the engine to use on our website. After a short pause, the splash screen comes on for a few seconds. 2 Touch the language that you want to boot...

Owner's Manual
Page 22
Chapter 03 How to use the navigation menu screens Screen switching overview 2 3 4 1 1 5 6 22 En
Chapter 03 How to use the navigation menu screens Screen switching overview 2 3 4 1 1 5 6 22 En

Owner's Manual
Page 23
... to quickly jump to the registered menu screen by a simple touch on the right edge or scroll the bar to display the icon that you use this manual, Classic Menu will appear. Shortcut Menu p In this screen to check the current vehicle position information and route to the destination. The ...the icon that is related to hands-free phoning. 4 AV operation screen This is the starting menu to display the Shortcut Menu screen. You can use the navigation system for the first time or no items are two types of the "Top Menu" screen. Classic Menu Shortcut Menu Registering your favorite...
... to quickly jump to the registered menu screen by a simple touch on the right edge or scroll the bar to display the icon that you use this manual, Classic Menu will appear. Shortcut Menu p In this screen to check the current vehicle position information and route to the destination. The ...the icon that is related to hands-free phoning. 4 AV operation screen This is the starting menu to display the Shortcut Menu screen. You can use the navigation system for the first time or no items are two types of the "Top Menu" screen. Classic Menu Shortcut Menu Registering your favorite...

Owner's Manual
Page 24
... the input text one letter at a time, beginning at the end of the text. If all of the text. 24 En Chapter 03 How to use any of "A the displayed result is the same. 7 OK Confirms the entry and allows you to view the remaining items. 3 The previous screen returns. 4 Listed... the right side of the screen, and then release it . Touch to the left side of the screen, and then release it . p Even if you use the navigation menu screens 5 Move the icon to toggle the selection.
... the input text one letter at a time, beginning at the end of the text. If all of the text. 24 En Chapter 03 How to use any of "A the displayed result is the same. 7 OK Confirms the entry and allows you to view the remaining items. 3 The previous screen returns. 4 Listed... the right side of the screen, and then release it . Touch to the left side of the screen, and then release it . p Even if you use the navigation menu screens 5 Move the icon to toggle the selection.
Owner's Manual
Page 25
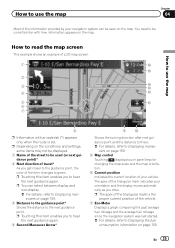
...information on page 159. p Touching this item enables you drive. The apex of the triangular mark indicates your vehicle. How to use the map Chapter 04 Most of the information provided by your navigation system can select between display and non-display. = For details,... again. 4 Second Maneuver Arrow* 9 a Shows the turning direction after next guidance point and the distance to there. = For details, refer to Displaying maneu- How to use the map How to read the map screen This example shows an example of a 2D map screen. 1 g f 2 3 e d 4 c 5 b 6 7 8 p ...
...information on page 159. p Touching this item enables you drive. The apex of the triangular mark indicates your vehicle. How to use the map Chapter 04 Most of the information provided by your navigation system can select between display and non-display. = For details,... again. 4 Second Maneuver Arrow* 9 a Shows the turning direction after next guidance point and the distance to there. = For details, refer to Displaying maneu- How to use the map How to read the map screen This example shows an example of a 2D map screen. 1 g f 2 3 e d 4 c 5 b 6 7 8 p ...


