
Operation Manual
Page 2
... operate 23 - PIONEER AVIC-X9115BT, AVIC-X7115BT - Definitions of terminology 24 2 En Notice regarding video viewing 25 Notice regarding DVD-Video viewing 25 Notice regarding MP3 file usage 25 iPod compatibility 25 Map coverage 26 Protecting the LCD panel and screen 26 Notes on each menu 35 - Before removing the vehicle battery 26 - Inserting a disc 29 - Ejecting an SD memory card 30 Plugging and unplugging a USB storage device 30 - How to use the map 36 - Rear view...
... operate 23 - PIONEER AVIC-X9115BT, AVIC-X7115BT - Definitions of terminology 24 2 En Notice regarding video viewing 25 Notice regarding DVD-Video viewing 25 Notice regarding MP3 file usage 25 iPod compatibility 25 Map coverage 26 Protecting the LCD panel and screen 26 Notes on each menu 35 - Before removing the vehicle battery 26 - Inserting a disc 29 - Ejecting an SD memory card 30 Plugging and unplugging a USB storage device 30 - How to use the map 36 - Rear view...

Operation Manual
Page 4
... - Deleting a registered phone 76 Receiving a phone call automatically 82 - Answering a call 77 - Editing the device name 83 Notes for hands-free phoning 84 Updating the Bluetooth wireless technology software 85 Playing audio CDs Reading the screen 86 Using the touch panel keys 86 Selecting a track from the history 78 4 En - Browsing embedded text information 89 Using the "Function" menu 90 Playing a DVD-Video Reading the screen 91 Using the touch panel keys 91...
... - Deleting a registered phone 76 Receiving a phone call automatically 82 - Answering a call 77 - Editing the device name 83 Notes for hands-free phoning 84 Updating the Bluetooth wireless technology software 85 Playing audio CDs Reading the screen 86 Using the touch panel keys 86 Selecting a track from the history 78 4 En - Browsing embedded text information 89 Using the "Function" menu 90 Playing a DVD-Video Reading the screen 91 Using the touch panel keys 91...

Operation Manual
Page 5
... lock 104 - Setting the code number and level 104 Displaying your DivX VOD registration code 105 Setting "Auto Play" 105 Setting the subtitle file for DivX 106 Language code chart for a specific scene and starting playback from a specified time 113 Using the "Function" menu 114 Using an iPod (iPod) Starting procedure 115 Reading the screen 115 Using the touch panel keys (Music) 116 - Searching for a specific scene and starting playback from USB or SD) Starting...
... lock 104 - Setting the code number and level 104 Displaying your DivX VOD registration code 105 Setting "Auto Play" 105 Setting the subtitle file for DivX 106 Language code chart for a specific scene and starting playback from a specified time 113 Using the "Function" menu 114 Using an iPod (iPod) Starting procedure 115 Reading the screen 115 Using the touch panel keys (Music) 116 - Searching for a specific scene and starting playback from USB or SD) Starting...

Operation Manual
Page 7
...Track Logs 148 - Setting the illumination color 158 - Adjusting loudness 162 - Using subwoofer output 163 - Adjusting source levels 163 - Setting the rear output 166 - Voice operation for the iPod 170 - Route 148 - Displaying the "AV System Settings" menu 164 - Basic operations in the "Navi Settings" menu 144 - Time Settings 145 - Smart Zoom 147 - Selecting the language 156 - Turning off the screen 160 The "AV Sound Settings" menu options 160 - Using balance adjustment 160 - Changing the wide screen mode 165 - POI Settings 146 - 3D Settings 146 - Editing...
...Track Logs 148 - Setting the illumination color 158 - Adjusting loudness 162 - Using subwoofer output 163 - Adjusting source levels 163 - Setting the rear output 166 - Voice operation for the iPod 170 - Route 148 - Displaying the "AV System Settings" menu 164 - Basic operations in the "Navi Settings" menu 144 - Time Settings 145 - Smart Zoom 147 - Selecting the language 156 - Turning off the screen 160 The "AV Sound Settings" menu options 160 - Using balance adjustment 160 - Changing the wide screen mode 165 - POI Settings 146 - 3D Settings 146 - Editing...
Operation Manual
Page 8
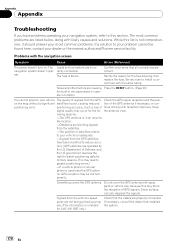
... "Dead Reckoning" work together? 187 Handling large errors 188 - Conditions likely to the default or factory settings 175 - Built-in drive and care 192 - DVD-Video and CD 193 - AVCHD recorded discs 193 - Playing DualDisc 193 - DTS sound 193 8 En Detailed information for Voice Operation 173 Other functions Setting the anti-theft function 174 - Liquid crystal display (LCD) screen 203 - Phone Menu 205 - Settings Menu 206 - DVD Setup 209 Glossary 210 Specifications 213
... "Dead Reckoning" work together? 187 Handling large errors 188 - Conditions likely to the default or factory settings 175 - Built-in drive and care 192 - DVD-Video and CD 193 - AVCHD recorded discs 193 - Playing DualDisc 193 - DTS sound 193 8 En Detailed information for Voice Operation 173 Other functions Setting the anti-theft function 174 - Liquid crystal display (LCD) screen 203 - Phone Menu 205 - Settings Menu 206 - DVD Setup 209 Glossary 210 Specifications 213

Operation Manual
Page 29
... of the reach of MULTICONTROL to perform manual seek tuning, fast forward or reverse. p This operation is available only while the map screen is ejected. To cancel the muting, press and hold it again. 8 Bluetooth connection status indicator Lights up when your phone is paired to Inserting and ejecting an SD memory card on the storage device for any reason, it is the "AV2...
... of the reach of MULTICONTROL to perform manual seek tuning, fast forward or reverse. p This operation is available only while the map screen is ejected. To cancel the muting, press and hold it again. 8 Bluetooth connection status indicator Lights up when your phone is paired to Inserting and ejecting an SD memory card on the storage device for any reason, it is the "AV2...
Operation Manual
Page 35
... and change the settings on the Bluetooth wireless technology connection. 6 Settings Menu You can access the screen to customize settings. 7 Map screen Press the MAP button to display the navigation map screen. 8 AV operation screen This is the screen that normally appears when you play . 5 Phone Menu You can access the screen that is the starting menu to access the desired screens and operate the various functions. 2 Destination Menu You can search for selecting the audio...
... and change the settings on the Bluetooth wireless technology connection. 6 Settings Menu You can access the screen to customize settings. 7 Map screen Press the MAP button to display the navigation map screen. 8 AV operation screen This is the screen that normally appears when you play . 5 Phone Menu You can access the screen that is the starting menu to access the desired screens and operate the various functions. 2 Destination Menu You can search for selecting the audio...
Operation Manual
Page 75
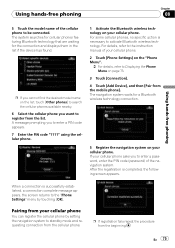
... specific action is necessary to enter a password, enter the PIN code (password) of the navigation system. The navigation system waits for the connection and displays them in the list if the device has found. Pairing from your cellular phone asks you to activate Bluetooth wireless technology. If your cellular phone You can register the cellular phone by touching [OK]. For details, refer to the instruction manual...
... specific action is necessary to enter a password, enter the PIN code (password) of the navigation system. The navigation system waits for the connection and displays them in the list if the device has found. Pairing from your cellular phone asks you to activate Bluetooth wireless technology. If your cellular phone You can register the cellular phone by touching [OK]. For details, refer to the instruction manual...
Operation Manual
Page 84
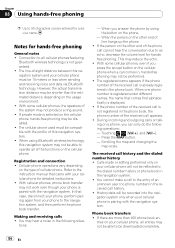
... operations: - When using the button on your cellular phone is already registered in the phone book, the phone number of cellular phone. Refer to the instruction manual that case, disconnect your phone, perform pairing again from your cellular phone, all entries may be performed. ! You may not be shorter than 400 phone book en- If the person on the cellular phone. Press the MAP button. - If private mode is displayed...
... operations: - When using the button on your cellular phone is already registered in the phone book, the phone number of cellular phone. Refer to the instruction manual that case, disconnect your phone, perform pairing again from your cellular phone, all entries may be performed. ! You may not be shorter than 400 phone book en- If the person on the cellular phone. Press the MAP button. - If private mode is displayed...
Operation Manual
Page 85
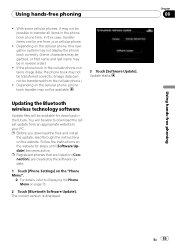
... the cellular phone, phone book transfer may not be available for steps until [Software Update] becomes active. Follow the instructions on the website. Using hands-free phoning ! p Before you download the files and install the update, read through the instructions on the website for download in the phone book at one by the software update. 1 Touch [Phone Settings] on [Connection] are cleared by one from the cellular phone.) ! Using hands-free phoning Chapter 08...
... the cellular phone, phone book transfer may not be available for steps until [Software Update] becomes active. Follow the instructions on the website. Using hands-free phoning ! p Before you download the files and install the update, read through the instructions on the website for download in the phone book at one by the software update. 1 Touch [Phone Settings] on [Connection] are cleared by one from the cellular phone.) ! Using hands-free phoning Chapter 08...

Operation Manual
Page 104
...- played as it to the rear display.) p When using a regular display, select either "Letter Box" or "Panscan". Setting the parental lock Some DVD-Video discs let you select [Panscan] setting. Setting the code number and level When you do not enable changing of [TV Aspect] changes the setting as desired. Level 8 - In this function, register your code number in case you forget it. 104 En Chapter 14 DVD-Video, DVD-VR, DivX setup Setting the angle icon display You...
...- played as it to the rear display.) p When using a regular display, select either "Letter Box" or "Panscan". Setting the parental lock Some DVD-Video discs let you select [Panscan] setting. Setting the code number and level When you do not enable changing of [TV Aspect] changes the setting as desired. Level 8 - In this function, register your code number in case you forget it. 104 En Chapter 14 DVD-Video, DVD-VR, DivX setup Setting the angle icon display You...

Operation Manual
Page 145
... "GPS Status" screen appears. 2 Touch [Time Settings]. "Auto Correction" Synchronizes the internal clock of GPS antenna. Changing this preference allows you to set the time zone manually. Note that your route passes through. [On]: Corrects the current time by the navigation system Color Green Gray Red Signal communication Yes Yes No Used in another color, there is works normally. If the lamp lights up in positioning...
... "GPS Status" screen appears. 2 Touch [Time Settings]. "Auto Correction" Synchronizes the internal clock of GPS antenna. Changing this preference allows you to set the time zone manually. Note that your route passes through. [On]: Corrects the current time by the navigation system Color Green Gray Red Signal communication Yes Yes No Used in another color, there is works normally. If the lamp lights up in positioning...
Operation Manual
Page 157
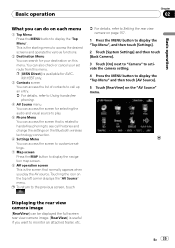
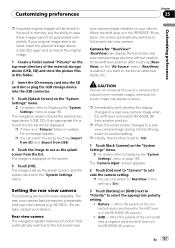
... or plug the USB storage device into the USB connector. 3 Touch [Splash Screen] on the screen. 5 Touch [OK]. The image is in the REVERSE (R) position En 157 The rear view camera feature requires a separately sold rear view camera (e.g. p When the whole screen changes to a rear view camera image during normal driving, switch to the "System Settings" menu. The "Camera Input" screen appears. 2 Touch [On] next to "Camera" to use of the connected lead...
... or plug the USB storage device into the USB connector. 3 Touch [Splash Screen] on the screen. 5 Touch [OK]. The image is in the REVERSE (R) position En 157 The rear view camera feature requires a separately sold rear view camera (e.g. p When the whole screen changes to a rear view camera image during normal driving, switch to the "System Settings" menu. The "Camera Input" screen appears. 2 Touch [On] next to "Camera" to use of the connected lead...

Operation Manual
Page 163
... Using subwoofer output The navigation system is increased or decreased. CD, ROM (for AVIC-X9115BT) ! Each time you touch [+] or [-], cut -off frequencies in the selected range are output from the front or rear speakers. 1 Touch [HPF] on the "AV Sound Settings" menu. = For details, refer to Displaying the "AV Sound Settings" menu on page 160. 2 Touch [On] to the same source level adjustment volume automatically. ! Each time you touch [HPF] selects cut -off . p Settings...
... Using subwoofer output The navigation system is increased or decreased. CD, ROM (for AVIC-X9115BT) ! Each time you touch [+] or [-], cut -off frequencies in the selected range are output from the front or rear speakers. 1 Touch [HPF] on the "AV Sound Settings" menu. = For details, refer to Displaying the "AV Sound Settings" menu on page 160. 2 Touch [On] to the same source level adjustment volume automatically. ! Each time you touch [HPF] selects cut -off . p Settings...

Operation Manual
Page 166
... guidance and beep sounds are mixed and the volume can deactivate [VR Catalog Mode] until you to switch the rear output setting. When no subwoofer is turned off , this setting is routing you update the content/data on page 164. 2 Touch [Rear SP] to a destination), the volume of the music files being played, even if a different volume level has been selected on an external storage device (USB, SD) are not...
... guidance and beep sounds are mixed and the volume can deactivate [VR Catalog Mode] until you to switch the rear output setting. When no subwoofer is turned off , this setting is routing you update the content/data on page 164. 2 Touch [Rear SP] to a destination), the volume of the music files being played, even if a different volume level has been selected on an external storage device (USB, SD) are not...
Operation Manual
Page 178
... GPS satellites have problems operating your dealer or the nearest authorized Pioneer service facility. If necessary, consult the dealer that the cables are operated by the US Department of GPS signals. rectly connected. Be very sure to this section. on . na, GPS reception may occur for AVIC-X9115BT only.) Check that installed the system. 178 En Something covers the GPS antenna. Snow...
... GPS satellites have problems operating your dealer or the nearest authorized Pioneer service facility. If necessary, consult the dealer that the cables are operated by the US Department of GPS signals. rectly connected. Be very sure to this section. on . na, GPS reception may occur for AVIC-X9115BT only.) Check that installed the system. 178 En Something covers the GPS antenna. Snow...

Operation Manual
Page 179
...- The volume level is disconnected. The volume level will be You cannot position your vehicle. A speaker lead is low. The volume of AV source are used. speaking There's no picture. The parking brake cord is selected. Turn on Check the settings. nection methods are pro- display", for AVIC-X9115BT only.) The backlight of the LCD panel is selected in your vehicle mounted securely in "Night mode". the rear display is not...
...- The volume level is disconnected. The volume level will be You cannot position your vehicle. A speaker lead is low. The volume of AV source are used. speaking There's no picture. The parking brake cord is selected. Turn on Check the settings. nection methods are pro- display", for AVIC-X9115BT only.) The backlight of the LCD panel is selected in your vehicle mounted securely in "Night mode". the rear display is not...

Operation Manual
Page 180
... each type of disc it . not be used . The parking brake interlock is covered by -frame playback with DVD-Video. The volume level will not work prop- The parking brake lead is incorrect. is not con- cable side. (If only one of the USB interface Connect both the USB plug and the RCA iPod. Press the MAP button, and then press the MENU button to return...
... each type of disc it . not be used . The parking brake interlock is covered by -frame playback with DVD-Video. The volume level will not work prop- The parking brake lead is incorrect. is not con- cable side. (If only one of the USB interface Connect both the USB plug and the RCA iPod. Press the MAP button, and then press the MENU button to return...

Operation Manual
Page 181
... and subtitle language settings selected in [DVD Setup]. Songs on iPod connected with the USB interface cable for voice commands with iPod content), or cataloging was not the data on the disc. The connection between the cellular Perform the connection process. En 181 with the phone screen Symptom Cause Action (Reference) Dialing is recognized. this does not solve the problem, press the RESET button on . Turn the ignition...
... and subtitle language settings selected in [DVD Setup]. Songs on iPod connected with the USB interface cable for voice commands with iPod content), or cataloging was not the data on the disc. The connection between the cellular Perform the connection process. En 181 with the phone screen Symptom Cause Action (Reference) Dialing is recognized. this does not solve the problem, press the RESET button on . Turn the ignition...
Operation Manual
Page 185
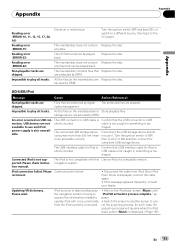
... contain Replace the disc. All the files on the iPod basic screen (Music) until "iPod VR activation process complete." SD/USB/iPod Message Cause Action (Reference) Non-playable tracks are skipped. storage device are protected by DRM. The USB connector or USB cable is not caught in something or da- cable is Confirm that USB interface cable for iPod is trying to acquire the information needed to use it. available to operate iPod...
... contain Replace the disc. All the files on the iPod basic screen (Music) until "iPod VR activation process complete." SD/USB/iPod Message Cause Action (Reference) Non-playable tracks are skipped. storage device are protected by DRM. The USB connector or USB cable is not caught in something or da- cable is Confirm that USB interface cable for iPod is trying to acquire the information needed to use it. available to operate iPod...


