Owner's Manual
Page 2
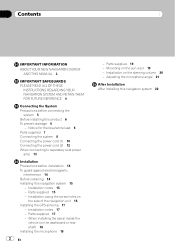
... navigation menu screens Screen switching overview 20 What you will know how to read through these operating instructions so you can do on the detachable device 17 Charging the battery of detachable device 17 Monitoring the battery status 17 Turning off the navigation system automatically 17 Connecting with your product from theft 13 Flow from actual screens. Displaying maneuvers 27 - Introduction Manual overview 7 - Ejecting an SD memory card 12 Plugging and unplugging a USB...
... navigation menu screens Screen switching overview 20 What you will know how to read through these operating instructions so you can do on the detachable device 17 Charging the battery of detachable device 17 Monitoring the battery status 17 Turning off the navigation system automatically 17 Connecting with your product from theft 13 Flow from actual screens. Displaying maneuvers 27 - Introduction Manual overview 7 - Ejecting an SD memory card 12 Plugging and unplugging a USB...

Owner's Manual
Page 3
... a location by entering multiple keywords 37 Setting up a route to your home 44 Deleting an entry in the "Contacts" 50 - Setting the current street name display 28 - Pairing from "Favorites" 40 Searching for a name by address 36 - Making a phone call history 51 - Changing the setting of navigation interruption screen 28 Setting a route to your cellular phone 46 - Searching for POIs by using the dialed number...
... a location by entering multiple keywords 37 Setting up a route to your home 44 Deleting an entry in the "Contacts" 50 - Setting the current street name display 28 - Pairing from "Favorites" 40 Searching for a name by address 36 - Making a phone call history 51 - Changing the setting of navigation interruption screen 28 Setting a route to your cellular phone 46 - Searching for POIs by using the dialed number...
Owner's Manual
Page 4
.../Import Menu" screen 67 "PC Mode" function 68 - Setting the automatic rejection function 56 - Changing the virtual speed of leads 63 Checking the version information 63 Adjusting the screen brightness 64 Turning off the screen 64 Restoring the default setting 64 Returning the navigation system to "PC Mode" 68 - Canceling "PC Mode" 68 Basic flow of operation Using the audio source 69 Switching the audio operation screen 69 Screen switching overview 70 What you can do on "AVIC...
.../Import Menu" screen 67 "PC Mode" function 68 - Setting the automatic rejection function 56 - Changing the virtual speed of leads 63 Checking the version information 63 Adjusting the screen brightness 64 Turning off the screen 64 Restoring the default setting 64 Returning the navigation system to "PC Mode" 68 - Canceling "PC Mode" 68 Basic flow of operation Using the audio source 69 Switching the audio operation screen 69 Screen switching overview 70 What you can do on "AVIC...

Owner's Manual
Page 5
... Operating this navigation system's iPod function from your teams is broadcast 99 Displaying Game Information 99 Using the external unit (EXT1, EXT2) Reading the screen 100 Operating by hardware buttons 100 En 5 Selecting teams for applicable items alphabetically 92 Setting the audiobook play speed 93 Using the XM tuner Reading the screen 94 Operating by hardware buttons 95 Storing and recalling broadcast stations 95 Switching the XM channel select mode 95 Using the SIRIUS tuner...
... Operating this navigation system's iPod function from your teams is broadcast 99 Displaying Game Information 99 Using the external unit (EXT1, EXT2) Reading the screen 100 Operating by hardware buttons 100 En 5 Selecting teams for applicable items alphabetically 92 Setting the audiobook play speed 93 Using the XM tuner Reading the screen 94 Operating by hardware buttons 95 Storing and recalling broadcast stations 95 Switching the XM channel select mode 95 Using the SIRIUS tuner...
Owner's Manual
Page 6
... 122 - Handling the LCD screen 130 - "Function4" 101 Using the AUX source Reading the screen 102 Switching the auxiliary setting 102 Selecting "AUX" as the source 102 Turning the source off Customizing the initial settings Displaying the "Initial Setting" screen 104 Setting the illumination color 104 Switching the auxiliary setting 104 Setting the rear output and subwoofer controller 104 Setting the rear output 105 Switching the sound muting/ attenuation 105 Audio adjustments Displaying the "Audio Menu" screen 106 Using balance adjustment 106 Using the equalizer 106 - Route search...
... 122 - Handling the LCD screen 130 - "Function4" 101 Using the AUX source Reading the screen 102 Switching the auxiliary setting 102 Selecting "AUX" as the source 102 Turning the source off Customizing the initial settings Displaying the "Initial Setting" screen 104 Setting the illumination color 104 Switching the auxiliary setting 104 Setting the rear output and subwoofer controller 104 Setting the rear output 105 Switching the sound muting/ attenuation 105 Audio adjustments Displaying the "Audio Menu" screen 106 Using balance adjustment 106 Using the equalizer 106 - Route search...

Owner's Manual
Page 7
... as pay-audio or audio-on the screen are presented in ALL CAPITAL, BOLD lettering: e.g.) MENU button, MAP button. ! An independent license for the user" (a separate manual) which contains warnings, cautions, and other important information that are collectively referred to use is "USB storage device". Finding the operation procedure from the "Display information" at the end of an item displayed on page 43. Touch panel keys...
... as pay-audio or audio-on the screen are presented in ALL CAPITAL, BOLD lettering: e.g.) MENU button, MAP button. ! An independent license for the user" (a separate manual) which contains warnings, cautions, and other important information that are collectively referred to use is "USB storage device". Finding the operation procedure from the "Display information" at the end of an item displayed on page 43. Touch panel keys...
Owner's Manual
Page 8
... temperatures. Prior to operate properly. ! When changing the combination of Apple Inc., registered in LCD screen malfunction due to touch the touch panel keys with this navigation system with the op- Chapter 01 Introduction iPod compatibility This product supports only the following conditions: ! iPod nano second generation; iPod touch second generation; ducts that you use the latest software for the audio source without clearing all the navigation function items. Please...
... temperatures. Prior to operate properly. ! When changing the combination of Apple Inc., registered in LCD screen malfunction due to touch the touch panel keys with this navigation system with the op- Chapter 01 Introduction iPod compatibility This product supports only the following conditions: ! iPod nano second generation; iPod touch second generation; ducts that you use the latest software for the audio source without clearing all the navigation function items. Please...
Owner's Manual
Page 13
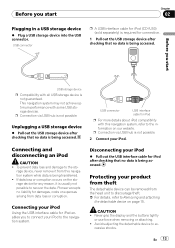
... a USB storage device % Plug a USB storage device into the USB connector. Never grip the display and the buttons tightly or use force when removing or attaching. ! Before you start USB storage device p Compatibility with some USB storage devices. p Connection via USB hub is not guaranteed. Connecting your iPod Using the USB interface cable for damages, costs or expenses arising from the head unit to discourage theft. = For details, refer to recover the data. USB connector USB interface cable for connection...
... a USB storage device % Plug a USB storage device into the USB connector. Never grip the display and the buttons tightly or use force when removing or attaching. ! Before you start USB storage device p Compatibility with some USB storage devices. p Connection via USB hub is not guaranteed. Connecting your iPod Using the USB interface cable for damages, costs or expenses arising from the head unit to discourage theft. = For details, refer to recover the data. USB connector USB interface cable for connection...
Owner's Manual
Page 31
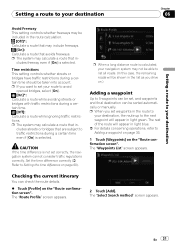
... next waypoint will appear in light green. The "Route Profile" screen appears. 2 Touch [Add]. Checking the current itinerary You can be sorted automatically or manually. Set the time difference correctly (= Refer to Setting the time difference on the "Route confirmation screen". p When you want to set correctly, the navigation system cannot consider traffic regulations correctly. The "Waypoints List" screen appears. The "Select Search method" screen appears. cludes freeway...
... next waypoint will appear in light green. The "Route Profile" screen appears. 2 Touch [Add]. Checking the current itinerary You can be sorted automatically or manually. Set the time difference correctly (= Refer to Setting the time difference on the "Route confirmation screen". p When you want to set correctly, the navigation system cannot consider traffic regulations correctly. The "Waypoints List" screen appears. The "Select Search method" screen appears. cludes freeway...
Owner's Manual
Page 48
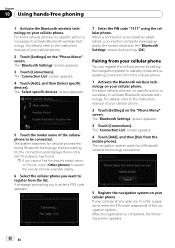
... phone asks you to enter a PIN code appears. 7 Enter the PIN code "1111" using the cellular phone. For some cellular phones, no specific action is successfully established, a connection complete message appears, the screen returns to the "Bluetooth Settings" screen by setting the navigation system to standby mode and requesting connection from the cellular phone. 1 Activate the Bluetooth wireless technology on the "Phone Menu" screen. Chapter 10 Using hands-free phoning 1 Activate the Bluetooth wireless technology on the list, touch [Other phones] to search the cellular phones...
... phone asks you to enter a PIN code appears. 7 Enter the PIN code "1111" using the cellular phone. For some cellular phones, no specific action is successfully established, a connection complete message appears, the screen returns to the "Bluetooth Settings" screen by setting the navigation system to standby mode and requesting connection from the cellular phone. 1 Activate the Bluetooth wireless technology on the "Phone Menu" screen. Chapter 10 Using hands-free phoning 1 Activate the Bluetooth wireless technology on the list, touch [Other phones] to search the cellular phones...
Owner's Manual
Page 57
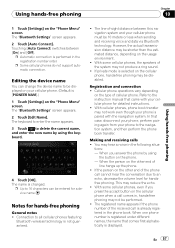
... is displayed. If private mode is [PIONEER NAVI].) 1 Touch [Settings] on the other end of the system may not work even though your cellular phone for hands-free phoning General notes ! With cellular phones, phone book transfer may not produce a ring sound. ! The registered name appears if the phone number of -sight distance between [On] and [Off]. Using hands-free phoning Chapter 10 Using hands-free phoning 1 Touch [Settings] on the "Phone Menu" screen. The "Bluetooth Settings" screen appears. 2 Touch [Auto Connect]. Making and receiving calls...
... is displayed. If private mode is [PIONEER NAVI].) 1 Touch [Settings] on the other end of the system may not work even though your cellular phone for hands-free phoning General notes ! With cellular phones, phone book transfer may not produce a ring sound. ! The registered name appears if the phone number of -sight distance between [On] and [Off]. Using hands-free phoning Chapter 10 Using hands-free phoning 1 Touch [Settings] on the "Phone Menu" screen. The "Bluetooth Settings" screen appears. 2 Touch [Auto Connect]. Making and receiving calls...
Owner's Manual
Page 58
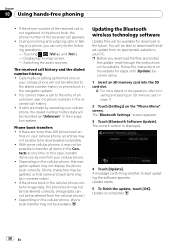
... Bluetooth wireless technology software Update files will be recorded as "Unknown" in the cellular phone contains image data, the phone book may not be transferred correctly. (Image data cannot be able to download the latest update from the cellular phone.) ! Update is displayed. 4 Touch [Update]. Displaying the map screen. - You cannot make a call history. ! If calls are more details of an unknown user (no phone number) in reverse order.) ! If the phone book in the navigation system...
... Bluetooth wireless technology software Update files will be recorded as "Unknown" in the cellular phone contains image data, the phone book may not be transferred correctly. (Image data cannot be able to download the latest update from the cellular phone.) ! Update is displayed. 4 Touch [Update]. Displaying the map screen. - You cannot make a call history. ! If calls are more details of an unknown user (no phone number) in reverse order.) ! If the phone book in the navigation system...
Owner's Manual
Page 63
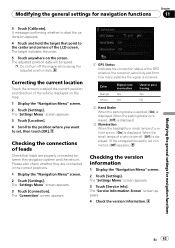
... the LCD screen. The "Settings Menu" screen appears. 3 Touch [Service Info]. A message confirming whether to start the calibration appears. 4 Touch and hold the target that leads are connected in positioning Yes No 2 Hand Brake When the parking brake is applied, [On] is not connected, [Off] appears.) Checking the version information 1 Display the "Navigation Menu" screen. 2 Touch [Settings]. The adjusted position data will be saved. p Do not turn off , [Off] is displayed. (If the orange/white lead is displayed. The "Settings Menu" screen appears. 3 Touch [Location]. 4 Scroll...
... the LCD screen. The "Settings Menu" screen appears. 3 Touch [Service Info]. A message confirming whether to start the calibration appears. 4 Touch and hold the target that leads are connected in positioning Yes No 2 Hand Brake When the parking brake is applied, [On] is not connected, [Off] appears.) Checking the version information 1 Display the "Navigation Menu" screen. 2 Touch [Settings]. The adjusted position data will be saved. p Do not turn off , [Off] is displayed. (If the orange/white lead is displayed. The "Settings Menu" screen appears. 3 Touch [Location]. 4 Scroll...
Owner's Manual
Page 100
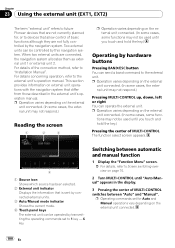
.... 2 Turn MULTI-CONTROL until you touch and hold the key.) Operating by transmitting the operating commands set for , or to devices that allow control of MULTI-CONTROL switches between automatic and manual function 1 Display the "Function Menu" screen. = For details, refer to "Installation Manual". Switching between "Auto" and "Manual". p Operation varies depending on the external unit connected. (In some cases, some cases, the external unit may not be controlled by the navigation system. p Operation varies depending on the external unit connected. (In some functions may...
.... 2 Turn MULTI-CONTROL until you touch and hold the key.) Operating by transmitting the operating commands set for , or to devices that allow control of MULTI-CONTROL switches between automatic and manual function 1 Display the "Function Menu" screen. = For details, refer to "Installation Manual". Switching between "Auto" and "Manual". p Operation varies depending on the external unit connected. (In some cases, some cases, the external unit may not be controlled by the navigation system. p Operation varies depending on the external unit connected. (In some functions may...
Owner's Manual
Page 104
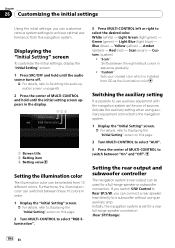
... the audio source turns off. = For details, refer to Switching the audio operation screen on page 69. 2 Press the center of sources. Furthermore, the illumination color can switched between "On" and "Off". Chapter 26 Customizing the initial settings Using the initial settings, you can connect a rear speaker lead directly to a subwoofer without using auxiliary equipment connected to the navigation system. 1 Display the "Initial Setting" screen. = For details, refer to Displaying the "Initial Setting" screen on this page. 2 Turn MULTI-CONTROL to...
... the audio source turns off. = For details, refer to Switching the audio operation screen on page 69. 2 Press the center of sources. Furthermore, the illumination color can switched between "On" and "Off". Chapter 26 Customizing the initial settings Using the initial settings, you can connect a rear speaker lead directly to a subwoofer without using auxiliary equipment connected to the navigation system. 1 Display the "Initial Setting" screen. = For details, refer to Displaying the "Initial Setting" screen on this page. 2 Turn MULTI-CONTROL to...

Owner's Manual
Page 106
...-CONTROL to display the function select screen. = For details, refer to Screen switching overview on page 70. 2 Turn MULTI-CONTROL to select "Audio Menu". 3 Press the center of the equalizer curves: Equalizer curve SuperBass SuperBass is a curve in which source has been selected. 2 Screen title 3 Setting item 4 Setting value Using the equalizer The equalizer lets you can easily recall at any time. The "Audio Menu" screen appears. 3 Press MULTI-CONTROL up or down to adjust front/rear speaker...
...-CONTROL to display the function select screen. = For details, refer to Screen switching overview on page 70. 2 Turn MULTI-CONTROL to select "Audio Menu". 3 Press the center of the equalizer curves: Equalizer curve SuperBass SuperBass is a curve in which source has been selected. 2 Screen title 3 Setting item 4 Setting value Using the equalizer The equalizer lets you can easily recall at any time. The "Audio Menu" screen appears. 3 Press MULTI-CONTROL up or down to adjust front/rear speaker...
Owner's Manual
Page 113
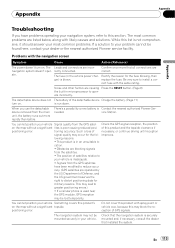
... Appendix Troubleshooting If you use the detachable device removed from the GPS satellites have problems operating your navigation system, refer to this product and the topside clearance if positioning error. Problems with spray paint or vehicle wax, because this product with the navigation screen Symptom Cause Action (Reference) The power doesn't turn on . The detachable device does not The battery of necessary, or continue driving until reception signal...
... Appendix Troubleshooting If you use the detachable device removed from the GPS satellites have problems operating your navigation system, refer to this product and the topside clearance if positioning error. Problems with spray paint or vehicle wax, because this product with the navigation screen Symptom Cause Action (Reference) The power doesn't turn on . The detachable device does not The battery of necessary, or continue driving until reception signal...
Owner's Manual
Page 114
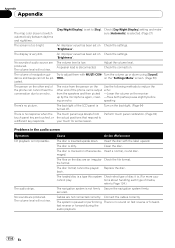
... upside down using [Sound] dance and beeps cannot be played Replace the disc. The volume level will not rise. cannot play. Appendix Appendix The map color does not switch automatically between daytime and nighttime. [Day/Night Display] is turned off. "Brightness". The volume level is cracked or otherwise da- TROL. Insert the disc with MULTI-CON- The disc is low. back. The volume of audio source are touched, or...
... upside down using [Sound] dance and beeps cannot be played Replace the disc. The volume level will not rise. cannot play. Appendix Appendix The map color does not switch automatically between daytime and nighttime. [Day/Night Display] is turned off. "Brightness". The volume level is cracked or otherwise da- TROL. Insert the disc with MULTI-CON- The disc is low. back. The volume of audio source are touched, or...
Installation Manual
Page 2
... side of the navigation unit 16 Installing the GPS antenna 17 - Notice for the blue/white lead 6 Parts supplied 7 Connecting the system 8 Connecting the power cord (1) 10 Connecting the power cord (2) 12 When connecting to separately sold power amp 13 Installation Precautions before connecting the system 5 Before installing this product 6 To prevent damage 6 - Contents IMPORTANT INFORMATION ABOUT YOUR NEW NAVIGATION SYSTEM AND THIS MANUAL 3 IMPORTANT SAFEGUARDS PLEASE READ ALL OF THESE INSTRUCTIONS REGARDING YOUR NAVIGATION SYSTEM AND RETAIN THEM...
... side of the navigation unit 16 Installing the GPS antenna 17 - Notice for the blue/white lead 6 Parts supplied 7 Connecting the system 8 Connecting the power cord (1) 10 Connecting the power cord (2) 12 When connecting to separately sold power amp 13 Installation Precautions before connecting the system 5 Before installing this product 6 To prevent damage 6 - Contents IMPORTANT INFORMATION ABOUT YOUR NEW NAVIGATION SYSTEM AND THIS MANUAL 3 IMPORTANT SAFEGUARDS PLEASE READ ALL OF THESE INSTRUCTIONS REGARDING YOUR NAVIGATION SYSTEM AND RETAIN THEM...
Installation Manual
Page 6
... battery and negative grounding. When replacing the fuse, be sure to the antenna booster power supply terminal. ! When disconnecting a connector, pull the connector itself. Since a unique BPTL circuit is employed, do not directly ground the * side of the speaker lead or connect the * sides of the 4 ohms to 8 ohms specifications to disconnect the (-) battery cable before installation. ! Never connect the blue/white cable to an external power amp's system remote control or the vehicle's auto-antenna relay control...
... battery and negative grounding. When replacing the fuse, be sure to the antenna booster power supply terminal. ! When disconnecting a connector, pull the connector itself. Since a unique BPTL circuit is employed, do not directly ground the * side of the speaker lead or connect the * sides of the 4 ohms to 8 ohms specifications to disconnect the (-) battery cable before installation. ! Never connect the blue/white cable to an external power amp's system remote control or the vehicle's auto-antenna relay control...


