Owner's Manual
Page 10
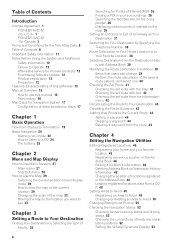
... (Characteristics of this software) 13 Manual Overview 15 How to use this manual 15 Terminology 16 Map Discs for Navigation System 17 Configuration of data recorded on discs 17 Chapter 1 Basic Operation Flow from Startup to Termination 19 Basic Navigation 20 Memory navi mode 24 How ... Address Book or Destination History Information 48 Changing the position of leads and installation positions 52 Setting the Vehicle Dynamics Display 53 8 Table of a Freeway as Your Destination 37 Searching for U.S.A. 1 PIONEER AVIC-N1 - ry and Address Book 39 Modifying the Route Calculation Conditions 39 Items ...
... (Characteristics of this software) 13 Manual Overview 15 How to use this manual 15 Terminology 16 Map Discs for Navigation System 17 Configuration of data recorded on discs 17 Chapter 1 Basic Operation Flow from Startup to Termination 19 Basic Navigation 20 Memory navi mode 24 How ... Address Book or Destination History Information 48 Changing the position of leads and installation positions 52 Setting the Vehicle Dynamics Display 53 8 Table of a Freeway as Your Destination 37 Searching for U.S.A. 1 PIONEER AVIC-N1 - ry and Address Book 39 Modifying the Route Calculation Conditions 39 Items ...

Owner's Manual
Page 12
... Your Navigation System with Voice Basics of Voice Operation 93 Flow of voice operation 93 Voice Commands 94 Common commands 94 Commands for display change 94 Available voice commands related to navigation 94 ...SET UP menu 120 FUNCTION menu 120 Appendix Installing the Program 97 Memory Navi Mode 98 Navigation in the memory navi mode 99 What is manual downloaded memory area? 99 What is auto ...Function Limitations 103 Troubleshooting 104 Problems in the Navigation screen 104 Problems in the Audio screen (common) 105 Problems in the Audio screen (during DVD video playback) 106 Messages and how to...
... Your Navigation System with Voice Basics of Voice Operation 93 Flow of voice operation 93 Voice Commands 94 Common commands 94 Commands for display change 94 Available voice commands related to navigation 94 ...SET UP menu 120 FUNCTION menu 120 Appendix Installing the Program 97 Memory Navi Mode 98 Navigation in the memory navi mode 99 What is manual downloaded memory area? 99 What is auto ...Function Limitations 103 Troubleshooting 104 Problems in the Navigation screen 104 Problems in the Audio screen (common) 105 Problems in the Audio screen (during DVD video playback) 106 Messages and how to...
Owner's Manual
Page 13
...navigation features of this unit (and rear view camera option if purchased) is for reference purposes only. It may not accurately reflect the latest permissible routes, road conditions, one way streets, road closures, or traffic restrictions. ❒ Traffic restrictions and advisories currently in this manual and follow all existing traffic regulations. Update DVDs...certain functions are available through your local Pioneer dealer. ❒ Never use headphones while driving. ❒ Do not attempt to install or service your navigation system by persons without training and experience in...
...navigation features of this unit (and rear view camera option if purchased) is for reference purposes only. It may not accurately reflect the latest permissible routes, road conditions, one way streets, road closures, or traffic restrictions. ❒ Traffic restrictions and advisories currently in this manual and follow all existing traffic regulations. Update DVDs...certain functions are available through your local Pioneer dealer. ❒ Never use headphones while driving. ❒ Do not attempt to install or service your navigation system by persons without training and experience in...

Owner's Manual
Page 21
...Manual". • Disc loading slot • NAVI/AV button • NAVI MENU button 1 Start the engine. Touch keys cannot be deleted even if the power is turned off. 19 This Navigation System...OK". The map of your Navigation System starts up. 2 Insert the Pioneer DVD map disc to the disc loading slot. 3 Press the NAVI/AV button to switch the Navigation map screen. NAVI/AV Basic .... If the route is not installed, see page 97 and install the program. After a little time, the navigation opening screen comes on the screen. You can operate the Navigation System by map ➞ Page 33...
...Manual". • Disc loading slot • NAVI/AV button • NAVI MENU button 1 Start the engine. Touch keys cannot be deleted even if the power is turned off. 19 This Navigation System...OK". The map of your Navigation System starts up. 2 Insert the Pioneer DVD map disc to the disc loading slot. 3 Press the NAVI/AV button to switch the Navigation map screen. NAVI/AV Basic .... If the route is not installed, see page 97 and install the program. After a little time, the navigation opening screen comes on the screen. You can operate the Navigation System by map ➞ Page 33...
Owner's Manual
Page 106
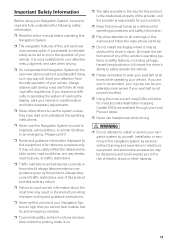
...or the nearest authorized Pioneer service facility. The unit doesn't operate. Turn the attenuator off. This is low. Such a loss of signal quality may happen for the following reasons: •The GPS antenna is in your vehicle. The navigation unit may block the ...Navigation screen Symptom Power doesn't turn on. Volume level is a normal operation. You cannot position your vehicle on . Action (See) Confirm once more that installed the system. Keep the antenna clear. Be very sure to install the correct fuse with spray paint or vehicle wax, because this manual...
...or the nearest authorized Pioneer service facility. The unit doesn't operate. Turn the attenuator off. This is low. Such a loss of signal quality may happen for the following reasons: •The GPS antenna is in your vehicle. The navigation unit may block the ...Navigation screen Symptom Power doesn't turn on. Volume level is a normal operation. You cannot position your vehicle on . Action (See) Confirm once more that installed the system. Keep the antenna clear. Be very sure to install the correct fuse with spray paint or vehicle wax, because this manual...
Owner's Manual
Page 107
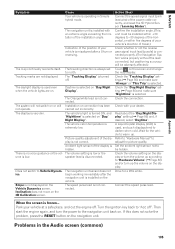
...the "Day/Night Display" setting (➞ Page 56) and make sure "Always" or "This Trip" is connected properly. (The Navigation System works properly without the lead connected, but positioning accuracy will not operate. The vehicle's light is turned ON, and "Nighttime" is ...the navigation unit back on the vehicle. The navigation unit sensor does not begin working immediately after a U-turn the volume up . Connect the speed pulse lead. Refer to "Hardware Manual" to Vehicle Dynamics. Slope is disconnected. Park your vehicle's direction of the display is installed on...
...the "Day/Night Display" setting (➞ Page 56) and make sure "Always" or "This Trip" is connected properly. (The Navigation System works properly without the lead connected, but positioning accuracy will not operate. The vehicle's light is turned ON, and "Nighttime" is ...the navigation unit back on the vehicle. The navigation unit sensor does not begin working immediately after a U-turn the volume up . Connect the speed pulse lead. Refer to "Hardware Manual" to Vehicle Dynamics. Slope is disconnected. Park your vehicle's direction of the display is installed on...
Owner's Manual
Page 110
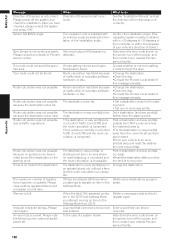
...on roads. •Reset the destination after you attempt to do See the "Installation Manual" and set incorrectly. Route calculation was not possible because no route to the Address... is hampered. •Your vehicle is not working properly. Confirm the installation angle. (The navigation system must be pronounced was not possible because the destination is set the direction...power off the power, and then contact your dealer or Pioneer service center. turn off the system and check the installation. a mountain) and the route calculation is impossible. Sensor ...
...on roads. •Reset the destination after you attempt to do See the "Installation Manual" and set incorrectly. Route calculation was not possible because no route to the Address... is hampered. •Your vehicle is not working properly. Confirm the installation angle. (The navigation system must be pronounced was not possible because the destination is set the direction...power off the power, and then contact your dealer or Pioneer service center. turn off the system and check the installation. a mountain) and the route calculation is impossible. Sensor ...
Installation Manual
Page 6
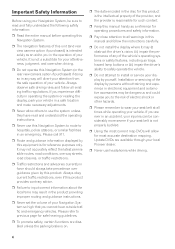
... ❒ Never use this Navigation System to route to hospitals, police stations, or similar facilities in an emergency. Update DVDs are disabled unless the parking brake is on. ❒ The data encoded in this manual and follow all times while operating...install the display where it may result in the product providing improper routing and guidance instructions. ❒ Never set the volume of electric shock or other hazards. ❒ Please remember to all warnings in the disc for operating procedures and safety information. ❒ Pay close attention to wear your local Pioneer...
... ❒ Never use this Navigation System to route to hospitals, police stations, or similar facilities in an emergency. Update DVDs are disabled unless the parking brake is on. ❒ The data encoded in this manual and follow all times while operating...install the display where it may result in the product providing improper routing and guidance instructions. ❒ Never set the volume of electric shock or other hazards. ❒ Please remember to all warnings in the disc for operating procedures and safety information. ❒ Pay close attention to wear your local Pioneer...
Installation Manual
Page 8
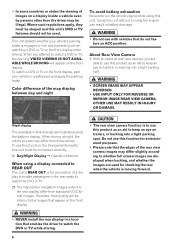
...correctly. ➲ Day/Night Display ➞ Operation Manual When using a display connected to REAR OUT This unit's REAR OUT is for checking the rear when the vehicle is moving forward. • NEVER install the rear display in the rear seats to watch a DVD or TV on the front display, park your ...• SCREEN IMAGE MAY APPEAR REVERSED. • USE INPUT ONLY FOR REVERSE OR MIRROR IMAGE REAR VIEW CAMERA. To watch the DVD or TV. ❒ The map screen navigation images output to keep an eye on the front display while driving. OTHER USE MAY RESULT IN INJURY OR DAMAGE. Where such...
...correctly. ➲ Day/Night Display ➞ Operation Manual When using a display connected to REAR OUT This unit's REAR OUT is for checking the rear when the vehicle is moving forward. • NEVER install the rear display in the rear seats to watch a DVD or TV on the front display, park your ...• SCREEN IMAGE MAY APPEAR REVERSED. • USE INPUT ONLY FOR REVERSE OR MIRROR IMAGE REAR VIEW CAMERA. To watch the DVD or TV. ❒ The map screen navigation images output to keep an eye on the front display while driving. OTHER USE MAY RESULT IN INJURY OR DAMAGE. Where such...

Installation Manual
Page 11
...problems with the opera- Mark 2 2 3 16 : 9 LB 1 ALL Meaning Indicates the number of audio systems. Indicates the number of the equip- When an operation is prohibited When you are automatically specified, in which ...attach to its construction, the view angle of the Operation Manual. The viewing angle (vertical and horizontal) can scratch easily. Condition memory What the marks on DVDs indicate The marks below may be performed because of spots,... disc playback for the first time after installation. • If the unit fails to operate properly. • If there appear to be used ....
...problems with the opera- Mark 2 2 3 16 : 9 LB 1 ALL Meaning Indicates the number of audio systems. Indicates the number of the equip- When an operation is prohibited When you are automatically specified, in which ...attach to its construction, the view angle of the Operation Manual. The viewing angle (vertical and horizontal) can scratch easily. Condition memory What the marks on DVDs indicate The marks below may be performed because of spots,... disc playback for the first time after installation. • If the unit fails to operate properly. • If there appear to be used ....
Installation Manual
Page 15
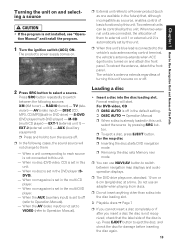
...DVD navigation mode. ❒ Removing the disc sets Memory navi mode. ❒ You can be controlled by this unit, select the source by pressing SRC button. ❒ To eject a disc, press EJECT button. M-CD (multi-CD player) - When a unit corresponding to each source is set by this unit's blue lead is connected to a Pioneer... extends when ACC (ignition) is not installed, see "Operation Manual" and install the program. 1 Turn the ignition switch (ACC) ON. TV (television) - AV (video input) - DISC [CD, MP3, CD/MP3](built-in the multi-DVD player. - EXT-1 (external unit 1) -...
...DVD navigation mode. ❒ Removing the disc sets Memory navi mode. ❒ You can be controlled by this unit, select the source by pressing SRC button. ❒ To eject a disc, press EJECT button. M-CD (multi-CD player) - When a unit corresponding to each source is set by this unit's blue lead is connected to a Pioneer... extends when ACC (ignition) is not installed, see "Operation Manual" and install the program. 1 Turn the ignition switch (ACC) ON. TV (television) - AV (video input) - DISC [CD, MP3, CD/MP3](built-in the multi-DVD player. - EXT-1 (external unit 1) -...
Other Manual
Page 2
... safely operate the vehicle. Please comply with all applicable laws and regulations in the installation and operation of your navigation system. • This manual explains how to install this Navigation System in your vehicle. IMPORTANT INFORMATION ABOUT YOUR NEW NAVIGATION SYSTEM AND THIS MANUAL • The navigation features of this unit (and rear view camera option if purchased) is intended solely...
... safely operate the vehicle. Please comply with all applicable laws and regulations in the installation and operation of your navigation system. • This manual explains how to install this Navigation System in your vehicle. IMPORTANT INFORMATION ABOUT YOUR NEW NAVIGATION SYSTEM AND THIS MANUAL • The navigation features of this unit (and rear view camera option if purchased) is intended solely...
Other Manual
Page 3
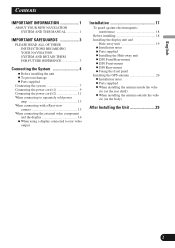
... guard against electromagnetic interference 18 Before installing 18 Installing the display unit and Hide-away unit 19 - Installation notes - DIN Front-mount - Installing the Hide-away unit - Fixing the front panel Installing the GPS antenna 26 - Parts supplied - Parts supplied - English Contents IMPORTANT INFORMATION 1 ABOUT YOUR NEW NAVIGATION SYSTEM AND THIS MANUAL 1 IMPORTANT SAFEGUARDS 3 PLEASE READ ALL OF...
... guard against electromagnetic interference 18 Before installing 18 Installing the display unit and Hide-away unit 19 - Installation notes - DIN Front-mount - Installing the Hide-away unit - Fixing the front panel Installing the GPS antenna 26 - Parts supplied - Parts supplied - English Contents IMPORTANT INFORMATION 1 ABOUT YOUR NEW NAVIGATION SYSTEM AND THIS MANUAL 1 IMPORTANT SAFEGUARDS 3 PLEASE READ ALL OF...

Other Manual
Page 4
... the light of your vehicle. Pay close attention to install or service your attention from the safe operation of actual driving conditions. 5. Please exercise your seat belt is not properly buckled. This Navigation System may be considerably more severe if your own judgment in this manual and follow the instructions care- IMPORTANT SAFEGUARDS PLEASE...
... the light of your vehicle. Pay close attention to install or service your attention from the safe operation of actual driving conditions. 5. Please exercise your seat belt is not properly buckled. This Navigation System may be considerably more severe if your own judgment in this manual and follow the instructions care- IMPORTANT SAFEGUARDS PLEASE...

Other Manual
Page 5
...ol Deutsch Connecting the System • Pioneer does not recommend that only authorized Pioneer service personnel, who have special training and experience in the mobile electronics installations, please carefully follow ...electrical tape. NEVER SERVICE THE UNIT YOURSELF. Installing or servicing the unit and its cables, and wiring away in the Installation Manual. • Secure all of the lead ...antenna cable to shorten it or use an extension to the vehicle battery. If you install your Navigation System yourself. If the yellow lead's insulation tears as a result of contact with or ...
...ol Deutsch Connecting the System • Pioneer does not recommend that only authorized Pioneer service personnel, who have special training and experience in the mobile electronics installations, please carefully follow ...electrical tape. NEVER SERVICE THE UNIT YOURSELF. Installing or servicing the unit and its cables, and wiring away in the Installation Manual. • Secure all of the lead ...antenna cable to shorten it or use an extension to the vehicle battery. If you install your Navigation System yourself. If the yellow lead's insulation tears as a result of contact with or ...

Other Manual
Page 6
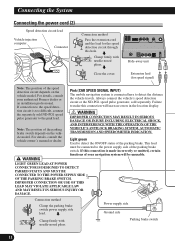
... products such as power amps. Do not ground more than one product together with a 12-volt battery and negative grounding. Connecting the System Before installing the unit • This unit is for details on connecting the power amp and other units, then make connections accordingly. • ...a fuse of the rating prescribed on the fuse holder. • Since a unique BPTL circuit is employed, do not remove the caps attached to the owner's manual for vehicles with the ground from another product. F ACC O F O OF OF N STAR N STAR T T ACC position No ACC position • When...
... products such as power amps. Do not ground more than one product together with a 12-volt battery and negative grounding. Connecting the System Before installing the unit • This unit is for details on connecting the power amp and other units, then make connections accordingly. • ...a fuse of the rating prescribed on the fuse holder. • Since a unique BPTL circuit is employed, do not remove the caps attached to the owner's manual for vehicles with the ground from another product. F ACC O F O OF OF N STAR N STAR T T ACC position No ACC position • When...
Other Manual
Page 12
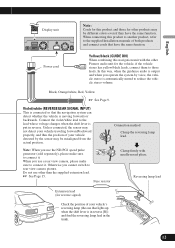
...separately. Pink (CAR SPEED SIGNAL INPUT) The mobile navigation system is made incorrectly or omitted, certain functions of your authorized Pioneer dealer or an installation professional. Failure to make this hole. If this ...navigation system will increase errors in the location display. IMPROPER CONNECTION MAY RESULT IN SERIOUS DAMAGE OR INJURY INCLUDING ELECTRICAL SHOCK, AND INTERFERENCE WITH THE OPERATION OF THE VEHICLE'S ANTILOCK BRAKING SYSTEM, AUTOMATIC TRANSMISSION AND SPEEDOMETER INDICATION. Clamp firmly with needle-nosed pliers. For details, consult the vehicle owner's manual...
...separately. Pink (CAR SPEED SIGNAL INPUT) The mobile navigation system is made incorrectly or omitted, certain functions of your authorized Pioneer dealer or an installation professional. Failure to make this hole. If this ...navigation system will increase errors in the location display. IMPROPER CONNECTION MAY RESULT IN SERIOUS DAMAGE OR INJURY INCLUDING ELECTRICAL SHOCK, AND INTERFERENCE WITH THE OPERATION OF THE VEHICLE'S ANTILOCK BRAKING SYSTEM, AUTOMATIC TRANSMISSION AND SPEEDOMETER INDICATION. Clamp firmly with needle-nosed pliers. For details, consult the vehicle owner's manual...
Other Manual
Page 13
... navigation unit with needle-nosed pliers. Black, Orange/white, Red, Yellow ☞ See Page 9. Connection method Clamp the reversing lamp lead. Fuse resistor Clamp firmly with the other Pioneer ... your vehicle detected by voice, the vehicle stereo is automatically muted to the supplied Installation manuals of your vehicle's reversing lamp (the one that have the same function. Franç...vehicle stereo volume. Violet/white (REVERSEGEAR SIGNAL INPUT) This is connected so that the navigation system can detect whether the vehicle is in reverse [R]) and find the reversing lamp lead in...
... navigation unit with needle-nosed pliers. Black, Orange/white, Red, Yellow ☞ See Page 9. Connection method Clamp the reversing lamp lead. Fuse resistor Clamp firmly with the other Pioneer ... your vehicle detected by voice, the vehicle stereo is automatically muted to the supplied Installation manuals of your vehicle's reversing lamp (the one that have the same function. Franç...vehicle stereo volume. Violet/white (REVERSEGEAR SIGNAL INPUT) This is connected so that the navigation system can detect whether the vehicle is in reverse [R]) and find the reversing lamp lead in...
Other Manual
Page 19
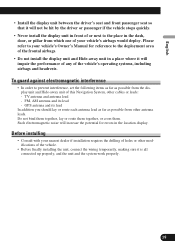
...vehicle's operating systems, including airbags and headrests. GPS antenna and its lead - Before installing • Consult with your nearest dealer if installation requires the ...to the deployment area of the frontal airbags. • Do not install the display unit and Hide-away unit in the location display. Do... unit of this Navigation System, other cables or leads: - TV antenna and antenna lead - English Español Deutsch • Install the display unit ... or passenger if the vehicle stops quickly. • Never install the display unit in front of or next to the place in...
...vehicle's operating systems, including airbags and headrests. GPS antenna and its lead - Before installing • Consult with your nearest dealer if installation requires the ...to the deployment area of the frontal airbags. • Do not install the display unit and Hide-away unit in the location display. Do... unit of this Navigation System, other cables or leads: - TV antenna and antenna lead - English Español Deutsch • Install the display unit ... or passenger if the vehicle stops quickly. • Never install the display unit in front of or next to the place in...
Other Manual
Page 30
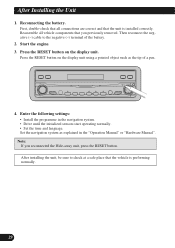
...; Drive until the initialized sensors start operating normally. • Set the time and language. Enter the following settings: • Install the programme in the "Operation Manual" or "Hardware Manual". Set the navigation system as the tip of the battery. 2. Reassemble all connections are correct and that the unit is performing normally. 29 First, double-check...
...; Drive until the initialized sensors start operating normally. • Set the time and language. Enter the following settings: • Install the programme in the "Operation Manual" or "Hardware Manual". Set the navigation system as the tip of the battery. 2. Reassemble all connections are correct and that the unit is performing normally. 29 First, double-check...


