Owner's Manual
Page 3
... License Agreement PIONEER AVIC-N1 - SOME STATES DO NOT ALLOW EXCLUSION OF IMPLIED WARRANTIES, SO THE ABOVE EXCLUSION MAY NOT APPLY TO YOU. For example, the voice recognition function as "Pioneer") MAKES AND YOU RECEIVE NO WARRANTY ...error free or uninterrupted, or that operation of this License Agreement to another party, provided that the party reads and agrees to derive the source code or structure of all copyright, trade secret, patent and other use by this agreement. USE OF THE SOFTWARE SHALL BE DEEMED TO BE YOUR CONSENT TO THE LICENSE AGREEMENT. 1. Pioneer...
... License Agreement PIONEER AVIC-N1 - SOME STATES DO NOT ALLOW EXCLUSION OF IMPLIED WARRANTIES, SO THE ABOVE EXCLUSION MAY NOT APPLY TO YOU. For example, the voice recognition function as "Pioneer") MAKES AND YOU RECEIVE NO WARRANTY ...error free or uninterrupted, or that operation of this License Agreement to another party, provided that the party reads and agrees to derive the source code or structure of all copyright, trade secret, patent and other use by this agreement. USE OF THE SOFTWARE SHALL BE DEEMED TO BE YOUR CONSENT TO THE LICENSE AGREEMENT. 1. Pioneer...
Owner's Manual
Page 5
.... Pioneer does not warrant that the Software will meet your needs or expectations, that operation of the Software will be copied, even if modified or merged with other use it in terms of this License Agreement to operate a service bureau...function as "Pioneer") MAKES AND YOU RECEIVE NO WARRANTY FOR THE SOFTWARE, WHETHER EXPRESS OR IMPLIED, AND ALL WARRANTIES OF MERCHANTABILITY AND FITNESS FOR ANY PARTICULAR PURPOSE FOR THE SOFTWARE ARE EXPRESSLY EXCLUDED. PIONEER AVIC-N1 - PLEASE READ THE TERMS AND CONDITIONS OF THIS AGREEMENT CAREFULLY BEFORE USING THE SOFTWARE INSTALLED ON THE PIONEER...
.... Pioneer does not warrant that the Software will meet your needs or expectations, that operation of the Software will be copied, even if modified or merged with other use it in terms of this License Agreement to operate a service bureau...function as "Pioneer") MAKES AND YOU RECEIVE NO WARRANTY FOR THE SOFTWARE, WHETHER EXPRESS OR IMPLIED, AND ALL WARRANTIES OF MERCHANTABILITY AND FITNESS FOR ANY PARTICULAR PURPOSE FOR THE SOFTWARE ARE EXPRESSLY EXCLUDED. PIONEER AVIC-N1 - PLEASE READ THE TERMS AND CONDITIONS OF THIS AGREEMENT CAREFULLY BEFORE USING THE SOFTWARE INSTALLED ON THE PIONEER...
Owner's Manual
Page 10
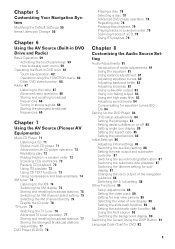
... on discs 17 Chapter 1 Basic Operation Flow from Startup to Termination 19 Basic Navigation 20 Memory navi mode 24 How to listen to a CD 24 The buttons 25 Chapter 2 Menu and Map Display How to Use Menu Screens 27 Main menu 27 Shortcut menu 28 How to Use the Map 29 Switching the current position screen display mode 29 How to view the map of the current location 29 Changing the...
... on discs 17 Chapter 1 Basic Operation Flow from Startup to Termination 19 Basic Navigation 20 Memory navi mode 24 How to listen to a CD 24 The buttons 25 Chapter 2 Menu and Map Display How to Use Menu Screens 27 Main menu 27 Shortcut menu 28 How to Use the Map 29 Switching the current position screen display mode 29 How to view the map of the current location 29 Changing the...
Owner's Manual
Page 11
... Switching the auxiliary setting 86 Setting the rear output and subwoofer controller 87 Switching the sound muting/attenuation 87 Switching the automatic disc playback 87 Switching the dimmer setting for subdisplay 87 Changing the voice output of the navigation guidance 88 Switching the 5.1ch setting 88 Other Functions 89 Setup adjustments 89 Setting the video input 89 Setting for rear view camera 89 Selecting the video of rear display 89 Setting the slide back function 90 Setting the automatic open function 90 Using the AUX source 90 Switching the background display 90 Switching the Screen...
... Switching the auxiliary setting 86 Setting the rear output and subwoofer controller 87 Switching the sound muting/attenuation 87 Switching the automatic disc playback 87 Switching the dimmer setting for subdisplay 87 Changing the voice output of the navigation guidance 88 Switching the 5.1ch setting 88 Other Functions 89 Setup adjustments 89 Setting the video input 89 Setting for rear view camera 89 Selecting the video of rear display 89 Setting the slide back function 90 Setting the automatic open function 90 Using the AUX source 90 Switching the background display 90 Switching the Screen...
Owner's Manual
Page 15
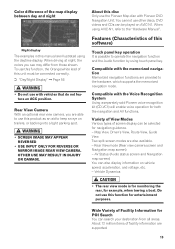
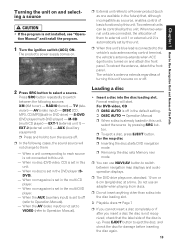
... IMAGE REAR VIEW CAMERA. DVD videos and CDs can also display information on AVIC-N1. Rear View Camera With an optional rear view camera, you see may differ from all areas. OTHER USE MAY RESULT IN INJURY OR DAMAGE. Compatible with Pioneer DVD Navigation Unit. Map View, Driver's View, Route View, Guide View Two split screen modes are illustrated using the daytime display. To use other discs. About 12 million items of this manual are also available. - When using touch panel key. Compatible...
... IMAGE REAR VIEW CAMERA. DVD videos and CDs can also display information on AVIC-N1. Rear View Camera With an optional rear view camera, you see may differ from all areas. OTHER USE MAY RESULT IN INJURY OR DAMAGE. Compatible with Pioneer DVD Navigation Unit. Map View, Driver's View, Route View, Guide View Two split screen modes are illustrated using the daytime display. To use other discs. About 12 million items of this manual are also available. - When using touch panel key. Compatible...
Owner's Manual
Page 80
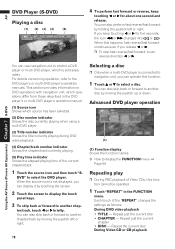
... • DISC - Using the AV Source (Pioneer AV Equipments) Chapter 7 S-DVD You can also skip back or forward to select a disc. Advanced DVD player operation (1) (1) Function display Shows the function names. ➲ How to control a DVD player or multi-DVD player, which source has been selected. (2) Disc number indicator Shows the disc currently playing when using a multi-DVD player. (3) Title number indicator Shows the title currently playing during DVD video playback. (4) Chapter/track number indicator Shows the chapter/track currently playing. (5) Play time indicator Shows...
... • DISC - Using the AV Source (Pioneer AV Equipments) Chapter 7 S-DVD You can also skip back or forward to select a disc. Advanced DVD player operation (1) (1) Function display Shows the function names. ➲ How to control a DVD player or multi-DVD player, which source has been selected. (2) Disc number indicator Shows the disc currently playing when using a multi-DVD player. (3) Title number indicator Shows the title currently playing during DVD video playback. (4) Chapter/track number indicator Shows the chapter/track currently playing. (5) Play time indicator Shows...

Owner's Manual
Page 83
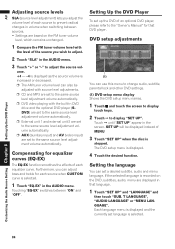
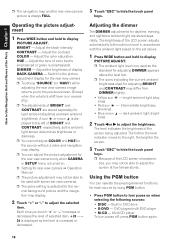
... is REAR SP SUB. CUSTOM - Only when the subwoofer controller setting is made to "SLA". Using balance adjustment You can easily recall at any time. AV Customizing the Audio Source Setting Chapter 8 Various settings according to switch between FLAT and a set of the equalizer curves: Display POWERFUL NATURAL VOCAL CUSTOM FLAT SUPER BASS Equalizer curve Powerful Natural Vocal Custom Flat Super bass 1 Press EQ button to BASS and TREBLE. Using the equalizer The equalizer lets you adjust the equalization to...
... is REAR SP SUB. CUSTOM - Only when the subwoofer controller setting is made to "SLA". Using balance adjustment You can easily recall at any time. AV Customizing the Audio Source Setting Chapter 8 Various settings according to switch between FLAT and a set of the equalizer curves: Display POWERFUL NATURAL VOCAL CUSTOM FLAT SUPER BASS Equalizer curve Powerful Natural Vocal Custom Flat Super bass 1 Press EQ button to BASS and TREBLE. Using the equalizer The equalizer lets you adjust the equalization to...
Owner's Manual
Page 86
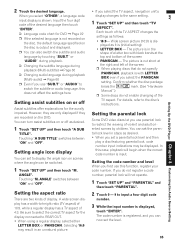
..." and then touch "SUB. DVD setup adjustments (1) You can set language is selected. 84 T LANGUAGE", "AUDIO LANGUAGE" or "MENU LANGUAGE". Touch ➞ until "SET UP" appear in the AUDIO menu. ume. +4 - -4 is displayed as the source volume is increased or decreased. ❒ The AM tuner volume level can adjust bass and treble for each equalizer curve. Setting Up the DVD Player To set to the "Owner's Manual" for equalizer curves (EQ-EX) The EQ-EX function smoothes the effects...
..." and then touch "SUB. DVD setup adjustments (1) You can set language is selected. 84 T LANGUAGE", "AUDIO LANGUAGE" or "MENU LANGUAGE". Touch ➞ until "SET UP" appear in the AUDIO menu. ume. +4 - -4 is displayed as the source volume is increased or decreased. ❒ The AM tuner volume level can adjust bass and treble for each equalizer curve. Setting Up the DVD Player To set to the "Owner's Manual" for equalizer curves (EQ-EX) The EQ-EX function smoothes the effects...
Owner's Manual
Page 87
..., navigation unit's display changes to switch the subtitle or audio language, this function, register your code number. Setting angle icon display You can set to select the correct TV aspect for the aurally impaired. Touching "M. Be sure to display the angle icon on the DVD. You can set the parental lock level in an unnatural picture. • If you set the level. 85 Setting Up the DVD Player Chapter 8 Customizing the Audio Source Setting AV...
..., navigation unit's display changes to switch the subtitle or audio language, this function, register your code number. Setting angle icon display You can set to select the correct TV aspect for the aurally impaired. Touching "M. Be sure to display the angle icon on the DVD. You can set the parental lock level in an unnatural picture. • If you set the level. 85 Setting Up the DVD Player Chapter 8 Customizing the Audio Source Setting AV...
Owner's Manual
Page 89
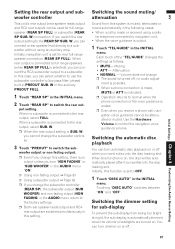
... menu. put setting. W, you switch the rear output setting to switch the sub- ment is possible. ❒ When a phone connection is on, the disc will be attenuated or muted. When this function is made or received using an auxiliary amp. Attenuation • NORMAL - Volume does not change the subwoofer controller. 3 Touch "PREOUT" to the REAR SP SUB. Use the Hardware Volume to switch the rear out- When no audio adjust- If you cannot change ❒ The sound is turned off, no subwoofer is output...
... menu. put setting. W, you switch the rear output setting to switch the sub- ment is possible. ❒ When a phone connection is on, the disc will be attenuated or muted. When this function is made or received using an auxiliary amp. Attenuation • NORMAL - Volume does not change the subwoofer controller. 3 Touch "PREOUT" to the REAR SP SUB. Use the Hardware Volume to switch the rear out- When no audio adjust- If you cannot change ❒ The sound is turned off, no subwoofer is output...
Owner's Manual
Page 91
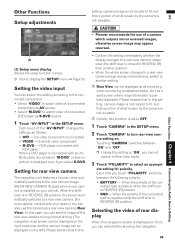
... Audio Source Setting (1) (1) Setup menu display Shows the setup function names. ➲ How to the rear camera image (REAR VIEW CAMERA IN jack) when a rear camera is "ON", you select S-DVD. DVD player connected with RCA cable When a DVD player is connected with your dealer.) You can be displayed on the left.) Please beware that automatically switches to display the SETUP menu ➞ Page 59 Setting the video input You can select either showing the navigation 89 Setting for polarity. Touching "CAMERA" switches...
... Audio Source Setting (1) (1) Setup menu display Shows the setup function names. ➲ How to the rear camera image (REAR VIEW CAMERA IN jack) when a rear camera is "ON", you select S-DVD. DVD player connected with RCA cable When a DVD player is connected with your dealer.) You can be displayed on the left.) Please beware that automatically switches to display the SETUP menu ➞ Page 59 Setting the video input You can select either showing the navigation 89 Setting for polarity. Touching "CAMERA" switches...
Owner's Manual
Page 92
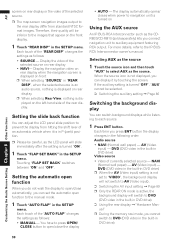
... turned on the front display. 1 Touch "REAR DISP" in DVD drive) Video source • Video of the selected source on rear display • NAVI- AV (Video input) - AV Customizing the Audio Source Setting Chapter 8 Other Functions screen on the left-hand side of the rear display. Therefore, their quality will switch to DVD (DVD video in the built-in DVD drive). ➲ Using the rear display ➞ "Hardware Manual" ❒ During the memory navi mode, you cannot switch to the manual mode. 1 Touch "AUTO FLAP" in the SETUP menu...
... turned on the front display. 1 Touch "REAR DISP" in DVD drive) Video source • Video of the selected source on rear display • NAVI- AV (Video input) - AV Customizing the Audio Source Setting Chapter 8 Other Functions screen on the left-hand side of the rear display. Therefore, their quality will switch to DVD (DVD video in the built-in DVD drive). ➲ Using the rear display ➞ "Hardware Manual" ❒ During the memory navi mode, you cannot switch to the manual mode. 1 Touch "AUTO FLAP" in the SETUP menu...
Owner's Manual
Page 106
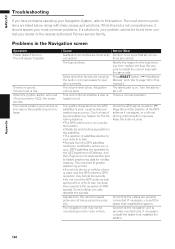
... your dealer or the nearest authorized Pioneer service facility. The fuse is a normal operation. Adjust the volume level. Be very sure to install the correct fuse with likely causes and solutions. Turn the attenuator off. This is blown. Check that installed the system. If necessary, consult the dealer that the cables are properly connected. Check that the navigation unit is securely mounted and, if necessary, consult the...
... your dealer or the nearest authorized Pioneer service facility. The fuse is a normal operation. Adjust the volume level. Be very sure to install the correct fuse with likely causes and solutions. Turn the attenuator off. This is blown. Check that installed the system. If necessary, consult the dealer that the cables are properly connected. Check that the navigation unit is securely mounted and, if necessary, consult the...
Owner's Manual
Page 108
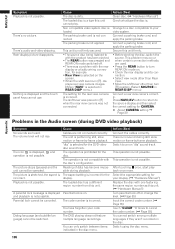
... region number from this unit firmly. • Before ejecting the disc, switch the source. There is prohibited for the DVD video disc sound track. A parental lock message is displayed and playback is dirty. After touching once, start playback once more. Non compatible video system disc is not possible. Change to a disc compatible to turn [R] position. (Select SOURCE in [R] when the rear view camera was a problem with the rear display or a faulty wiring connection, for your display. (➞ "Hardware Manual") Replace the disc...
... region number from this unit firmly. • Before ejecting the disc, switch the source. There is prohibited for the DVD video disc sound track. A parental lock message is displayed and playback is dirty. After touching once, start playback once more. Non compatible video system disc is not possible. Change to a disc compatible to turn [R] position. (Select SOURCE in [R] when the rear view camera was a problem with the rear display or a faulty wiring connection, for your display. (➞ "Hardware Manual") Replace the disc...
Owner's Manual
Page 109
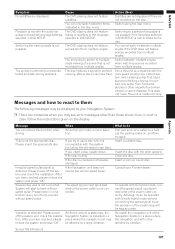
... audio language and subtitle language settings selected in DVD SETUP. Sensor NG (Vibration) 107 Switching to make a menu selection. Irregular speed pulse signal is not recorded on the display. If you have this function while driving. When While trying to a selected language is not connected. Please insert the appropriate disc. The speed signal input (pink lead wire) of the positioning will not be less accurate. Re-install the navigation unit...
... audio language and subtitle language settings selected in DVD SETUP. Sensor NG (Vibration) 107 Switching to make a menu selection. Irregular speed pulse signal is not recorded on the display. If you have this function while driving. When While trying to a selected language is not connected. Please insert the appropriate disc. The speed signal input (pink lead wire) of the positioning will not be less accurate. Re-install the navigation unit...
Installation Manual
Page 14
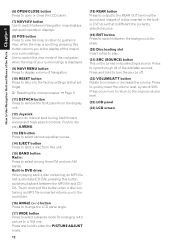
... turn the source off. (22) VOLUME/ATT button Rotate to guidance. Press to select among three FM and one . Push to display A.MENU. (13) EQ button Press to select various equalizer curves. (14) EJECT button Press to eject a disc from the display unit. (12) Joystick Move to cycle through all of the available sources. Press to do manual seek tuning, fast forward, reverse and track search controls. Use to switch the view mode of the navigation...
... turn the source off. (22) VOLUME/ATT button Rotate to guidance. Press to select among three FM and one . Push to display A.MENU. (13) EQ button Press to select various equalizer curves. (14) EJECT button Press to eject a disc from the display unit. (12) Joystick Move to cycle through all of the available sources. Press to do manual seek tuning, fast forward, reverse and track search controls. Use to switch the view mode of the navigation...
Installation Manual
Page 15
... AUX (auxiliary input) is set in the multi-CD player. - For DVD-video, CD ❒ DISC AUTO is off (refer to Operation Manual). - The product's power supply comes on. ❒ External unit refers to a Pioneer product (such as a source, enables control of basic functions by this unit. To retract the antenna, detach the front panel. AV (video input) - DISC [CD, MP3, CD/MP3](built-in this unit. - When no disc (DVD-video, CD) is not connected to this unit. - S-DVD (DVD player...
... AUX (auxiliary input) is set in the multi-CD player. - For DVD-video, CD ❒ DISC AUTO is off (refer to Operation Manual). - The product's power supply comes on. ❒ External unit refers to a Pioneer product (such as a source, enables control of basic functions by this unit. To retract the antenna, detach the front panel. AV (video input) - DISC [CD, MP3, CD/MP3](built-in this unit. - When no disc (DVD-video, CD) is not connected to this unit. - S-DVD (DVD player...
Installation Manual
Page 18
... and the navigation map display. 2 Touch "+" or "-" to adjust the selected item. How to Use Navigation Unit and Names of the Parts Chapter 1 ❒ The navigation map and the rear view camera picture is turned on. ➲ Setting for rear view camera ➞ Operation Manual ❒ The picture adjustment may not be able to be used with the ambient light based on when selecting the following sources: • DISC - Built-in SETUP menu is always...
... and the navigation map display. 2 Touch "+" or "-" to adjust the selected item. How to Use Navigation Unit and Names of the Parts Chapter 1 ❒ The navigation map and the rear view camera picture is turned on. ➲ Setting for rear view camera ➞ Operation Manual ❒ The picture adjustment may not be able to be used with the ambient light based on when selecting the following sources: • DISC - Built-in SETUP menu is always...
Installation Manual
Page 21
... placed in REAR DISP menu.) Connect a rear view camera correctly. This happens when videos are used. • Press the REAR button to with the product has been ejected. • The REAR button was pressed and REAR ON mode switched off. • There was not connected. This operation is not compatible with the rear display or a faulty wiring connection, for your vehicle's console or dashboard. Select a different mode to adjust the LCD angle. Incorrect setting of data...
... placed in REAR DISP menu.) Connect a rear view camera correctly. This happens when videos are used. • Press the REAR button to with the product has been ejected. • The REAR button was pressed and REAR ON mode switched off. • There was not connected. This operation is not compatible with the rear display or a faulty wiring connection, for your vehicle's console or dashboard. Select a different mode to adjust the LCD angle. Incorrect setting of data...
Other Manual
Page 9
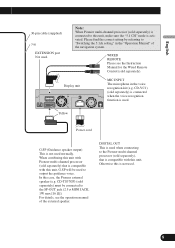
... (e.g. Display unit MIC INPUT The microphone in the "Operation Manual" of the external speaker. Otherwise this unit. Please find the correct setting by referring to the Pioneer multi-channel processor (sold separately) is connected when the voice recognition function is activated. Français Italiano Nederlands 8 CD-VC1) (sold separately), that is compatible with this is not used . English Español Deutsch 30-pin cable (supplied...
... (e.g. Display unit MIC INPUT The microphone in the "Operation Manual" of the external speaker. Otherwise this unit. Please find the correct setting by referring to the Pioneer multi-channel processor (sold separately) is connected when the voice recognition function is activated. Français Italiano Nederlands 8 CD-VC1) (sold separately), that is compatible with this is not used . English Español Deutsch 30-pin cable (supplied...


