
Owner's Manual
Page 1
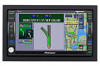
Operation Manual DOUBLE-DIN DVD NAVIGATION SYSTEM AVIC-D2 Notice to your Authorized Pioneer Electronics retailer or call us at (800) 421-1404. For more information, please contact your vehicle's parking brake. If not properly connected and depending on your vehicle, additional installation may be properly connected to all users: This software requires that the navigation system be required.
Operation Manual DOUBLE-DIN DVD NAVIGATION SYSTEM AVIC-D2 Notice to your Authorized Pioneer Electronics retailer or call us at (800) 421-1404. For more information, please contact your vehicle's parking brake. If not properly connected and depending on your vehicle, additional installation may be properly connected to all users: This software requires that the navigation system be required.

Owner's Manual
Page 11
... Information on avoiding traffic congestion on route ahead 52 When checking traffic congestion information manually 52 Traffic flow information 53 Selecting traffic information to display 53 Using the XM ...P920XM) 82 Listening to the channel that was received im- tion positions 61 Correcting the Installation Angle 62 Chapter 5 Customizing Your Navigation System Modifying the Default Settings 63 Items Users ... strongest broadcast frequencies 77 Tuning in strong signals 77 Chapter 7 Using the AV Source (Pioneer AV Equipment) Multi-CD Player 79 Listening a CD 79 Pausing CD playback 80 Advanced...
... Information on avoiding traffic congestion on route ahead 52 When checking traffic congestion information manually 52 Traffic flow information 53 Selecting traffic information to display 53 Using the XM ...P920XM) 82 Listening to the channel that was received im- tion positions 61 Correcting the Installation Angle 62 Chapter 5 Customizing Your Navigation System Modifying the Default Settings 63 Items Users ... strongest broadcast frequencies 77 Tuning in strong signals 77 Chapter 7 Using the AV Source (Pioneer AV Equipment) Multi-CD Player 79 Listening a CD 79 Pausing CD playback 80 Advanced...
Owner's Manual
Page 12
... by using 1 key - 6 key 94 Advanced external unit operation 94 Operate the external unit by using FUNCTION 1 - FUNCTION 4 94 Switching the automatic and manual function 95 AUX 95 Selecting AUX as the source 95 AV Input (AV) 95 Selecting AV as the source 95 Changing the wide screen mode... setting 103 Changing the Wide Screen Mode 104 Operating the Picture Adjustment 104 Adjusting the dimmer 105 Switching the Backlight On/Off 105 Appendix Installing the Program 107 Positioning Technology 109 Positioning by GPS 109 Positioning by dead reckoning 109 How do GPS and dead reckoning work together? 109...
... by using 1 key - 6 key 94 Advanced external unit operation 94 Operate the external unit by using FUNCTION 1 - FUNCTION 4 94 Switching the automatic and manual function 95 AUX 95 Selecting AUX as the source 95 AV Input (AV) 95 Selecting AV as the source 95 Changing the wide screen mode... setting 103 Changing the Wide Screen Mode 104 Operating the Picture Adjustment 104 Adjusting the dimmer 105 Switching the Backlight On/Off 105 Appendix Installing the Program 107 Positioning Technology 109 Positioning by GPS 109 Positioning by dead reckoning 109 How do GPS and dead reckoning work together? 109...

Owner's Manual
Page 13
...Please call 911. ❒ Route and guidance information displayed by the navigation system. Installation or servicing of the navigation system by yourself. If you in the operation of your... procedures and safety information. ❒ Pay close attention to all warnings in this manual and follow all times while operating your seat belt is responsible for your attentiveness, ...operate the vehicle. ❒ Please remember to you are available for purchase through your local Pioneer dealer. ❒ Never use this navigation system where it may (i) obstruct the driver's...
...Please call 911. ❒ Route and guidance information displayed by the navigation system. Installation or servicing of the navigation system by yourself. If you in the operation of your... procedures and safety information. ❒ Pay close attention to all warnings in this manual and follow all times while operating your seat belt is responsible for your attentiveness, ...operate the vehicle. ❒ Please remember to you are available for purchase through your local Pioneer dealer. ❒ Never use this navigation system where it may (i) obstruct the driver's...

Owner's Manual
Page 21
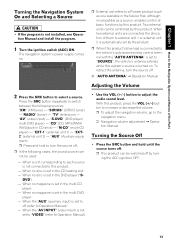
...NAVI/AV Chapter 1 Basic Operation Chapter 1 Basic Operation Flow from Startup to insert the disc appears. If the route is not installed, see page 107 and install the program. OPEN/CLOSE button 4 Press the MAP button to switch to route guidance mode. Pressing the AV button switches between...of the following features using the "Hardware Manual". • DVD-ROM loading slot • MAP button • DEST button • OPEN/CLOSE button 1 Start the engine. The LCD panel fully opens, and the DVD-ROM loading slot appears. 3 Insert the Pioneer DVD Map Disc to assign a destination ...
...NAVI/AV Chapter 1 Basic Operation Chapter 1 Basic Operation Flow from Startup to insert the disc appears. If the route is not installed, see page 107 and install the program. OPEN/CLOSE button 4 Press the MAP button to switch to route guidance mode. Pressing the AV button switches between...of the following features using the "Hardware Manual". • DVD-ROM loading slot • MAP button • DEST button • OPEN/CLOSE button 1 Start the engine. The LCD panel fully opens, and the DVD-ROM loading slot appears. 3 Insert the Pioneer DVD Map Disc to assign a destination ...
Owner's Manual
Page 117
... • The GPS antenna is not comprehensive, it should answer your dealer or the nearest authorized Pioneer service facility. Press the RESET button. (➞ Refer to "Hardware Manual" and page 113 in your navigation system, refer to this list is in Simple hybrid mode. Check...may lead to greater positioning errors.) • If a vehicle phone or cellular phone is blown. If necessary, consult the dealer that installed the system. While this section. Cause Leads and connectors are incorrectly connected. Signals from the GPS satellites is large. Noise and other ...
... • The GPS antenna is not comprehensive, it should answer your dealer or the nearest authorized Pioneer service facility. Press the RESET button. (➞ Refer to "Hardware Manual" and page 113 in your navigation system, refer to this list is in Simple hybrid mode. Check...may lead to greater positioning errors.) • If a vehicle phone or cellular phone is blown. If necessary, consult the dealer that installed the system. While this section. Cause Leads and connectors are incorrectly connected. Signals from the GPS satellites is large. Noise and other ...

Owner's Manual
Page 118
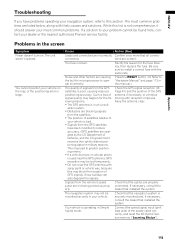
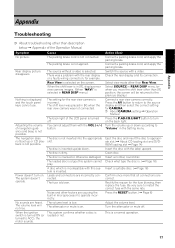
... vehicle lights are on . Turn the attenuator or mute off ". Turn the ignition key back to "Installation Manual" and "Installation Angle Setup" on the 3D Calibration screen. Confirm the installation angle. (The navigation system must be hidden or switch the "DIMMER" to "Operating the Picture play ... Cause Action (See) The navigation system is selected. Check the "Tracking Display" settings (➞ Page 65) and make sure "Nighttime" is installed with the VOL (+/-) button. Check the "Day/Night Display" setting (➞ Page 65) and make sure "Always" or "This Trip" ...
... vehicle lights are on . Turn the attenuator or mute off ". Turn the ignition key back to "Installation Manual" and "Installation Angle Setup" on the 3D Calibration screen. Confirm the installation angle. (The navigation system must be hidden or switch the "DIMMER" to "Operating the Picture play ... Cause Action (See) The navigation system is selected. Check the "Tracking Display" settings (➞ Page 65) and make sure "Nighttime" is installed with the VOL (+/-) button. Check the "Day/Night Display" setting (➞ Page 65) and make sure "Always" or "This Trip" ...

Owner's Manual
Page 120
... correctly. The screen cannot be displayed with an extreme angle exceeding the limitation of Gyrosensor is installed with Vehicle Dynamics Display. The navigation system is Please consult your nearest Pioneer service facility. Insert a normal, round disc. turn off the system and check the installa-... What to do Insert a suitable disc. If the Navigation unit does not receive the vehicle speed pulse. For details, refer to "Installation Manual" and "Installation Angle Setup" on the display. In such a case, follow the instructions given on page 62.) Wait for Gyro Sensor has been...
... correctly. The screen cannot be displayed with an extreme angle exceeding the limitation of Gyrosensor is installed with Vehicle Dynamics Display. The navigation system is Please consult your nearest Pioneer service facility. Insert a normal, round disc. turn off the system and check the installa-... What to do Insert a suitable disc. If the Navigation unit does not receive the vehicle speed pulse. For details, refer to "Installation Manual" and "Installation Angle Setup" on the display. In such a case, follow the instructions given on page 62.) Wait for Gyro Sensor has been...

Hardware Manual
Page 5
...the operation of the provider, and the provider is responsible for such content. ❒ Keep this manual handy as an aid to you are available for reference purposes only. Installation or servicing of the vehicle's operating systems or safety features, including air bags, hazard lamp buttons ...observe safe driving rules and follow the instructions carefully. ❒ Do not install the navigation system where it may be considerably more severe if your seat belt is for purchase through your local Pioneer dealer. ❒ Never use this navigation system to route to hospitals, ...
...the operation of the provider, and the provider is responsible for such content. ❒ Keep this manual handy as an aid to you are available for reference purposes only. Installation or servicing of the vehicle's operating systems or safety features, including air bags, hazard lamp buttons ...observe safe driving rules and follow the instructions carefully. ❒ Do not install the navigation system where it may be considerably more severe if your seat belt is for purchase through your local Pioneer dealer. ❒ Never use this navigation system to route to hospitals, ...

Hardware Manual
Page 7
... position. will be inferior to keep an eye on trailers, or while backing up. • "Visual image" in this manual indicates the moving forward. • NEVER install the rear display in battery drainage. • Do not use with vehicles that enables the driver to this product with AV-... it is engaged or not, and prevents you from the equipments which are used for connection of a display to enable passengers in the Operation Manual for navigation purposes. Also, Rear Displays should not be illegal. See "Parking brake interlock" in the rear seats to watch visual images while ...
... position. will be inferior to keep an eye on trailers, or while backing up. • "Visual image" in this manual indicates the moving forward. • NEVER install the rear display in battery drainage. • Do not use with vehicles that enables the driver to this product with AV-... it is engaged or not, and prevents you from the equipments which are used for connection of a display to enable passengers in the Operation Manual for navigation purposes. Also, Rear Displays should not be illegal. See "Parking brake interlock" in the rear seats to watch visual images while ...

Hardware Manual
Page 10
...personal preference. Resetting the Microprocessor • Pressing the RESET button deletes the contents of the LCD screen is a trademark of the Operation Manual. Pressing the RESET button lets you reset the microprocessor to its initial settings without changing the condition memory. RESET button 8 About the .... To Protect the LCD Screen ❒ Do not allow direct sunlight to fall on the display when this product for the first time after installation. • If the product fails to operate properly. • If there appear to be reset under the following conditions: • Prior ...
...personal preference. Resetting the Microprocessor • Pressing the RESET button deletes the contents of the LCD screen is a trademark of the Operation Manual. Pressing the RESET button lets you reset the microprocessor to its initial settings without changing the condition memory. RESET button 8 About the .... To Protect the LCD Screen ❒ Do not allow direct sunlight to fall on the display when this product for the first time after installation. • If the product fails to operate properly. • If there appear to be reset under the following conditions: • Prior ...
Hardware Manual
Page 15
.... ❒ External unit refers to a Pioneer product (such as one available in the multi-CD player. - When two external units are connected, the allocation of them to external unit 1 or external unit 2 is not installed, see Operation Manual and install the program. 1 Turn the ignition switch ...(ACC) ON. "S-DVD" (DVD player/ multi-DVD player) - "EXT-1" (external unit 1) - When the "AUX" (auxiliary input) is set to "VIDEO" (refer to Operation Manual). • Use the VOL (+/-)...
.... ❒ External unit refers to a Pioneer product (such as one available in the multi-CD player. - When two external units are connected, the allocation of them to external unit 1 or external unit 2 is not installed, see Operation Manual and install the program. 1 Turn the ignition switch ...(ACC) ON. "S-DVD" (DVD player/ multi-DVD player) - "EXT-1" (external unit 1) - When the "AUX" (auxiliary input) is set to "VIDEO" (refer to Operation Manual). • Use the VOL (+/-)...
Hardware Manual
Page 19
... rear view camera images. (When "NAVI" is selected in REAR DISP menu.) The setting for CAMERA. ➲ About CAMERA setting ➞ Operation Manual Press the P.ADJ/B.LIGHT button to operate incorrectly. You cannot adjust them with a video. The disc is on the screen. Noise and other than ... in microprocessor to turn on the back light. Switch the source with the VOL (+/-) button. Eject the disc and insert the disc to install the correct fuse with the label upward. Insert a normal, round disc. When the ignition switch is cracked or otherwise damaged. The disc ...
... rear view camera images. (When "NAVI" is selected in REAR DISP menu.) The setting for CAMERA. ➲ About CAMERA setting ➞ Operation Manual Press the P.ADJ/B.LIGHT button to operate incorrectly. You cannot adjust them with a video. The disc is on the screen. Noise and other than ... in microprocessor to turn on the back light. Switch the source with the VOL (+/-) button. Eject the disc and insert the disc to install the correct fuse with the label upward. Insert a normal, round disc. When the ignition switch is cracked or otherwise damaged. The disc ...

Other Manual
Page 2
...explained in force should always take precedence over guidance given by this product. Traffic restrictions and advisories currently in the separate Operation Manual or Hardware Manual for your attentiveness, judgment and care when driving. • Never use of navigation systems in any of the vehicle's operating... solely as an aid to you in your vehicle. Please comply with all applicable laws and regulations in the installation and operation of your navigation system. • This manual explains how to install this navigation system in the operation of the vehicle interior. 1
...explained in force should always take precedence over guidance given by this product. Traffic restrictions and advisories currently in the separate Operation Manual or Hardware Manual for your attentiveness, judgment and care when driving. • Never use of navigation systems in any of the vehicle's operating... solely as an aid to you in your vehicle. Please comply with all applicable laws and regulations in the installation and operation of your navigation system. • This manual explains how to install this navigation system in the operation of the vehicle interior. 1

Other Manual
Page 3
... (2 11 When connecting to rear video output Installation 17 To guard against electromagnetic interference 18 Before installing 18 Installing this product - When installing the antenna outside the vehi- Parts supplied - DIN Front-mount - Before installing this product 19 - When using a display ... When connecting the external video component and the display 16 - Installation notes - cle (on the rear shelf) - English Contents IMPORTANT INFORMATION 1 ABOUT YOUR NEW NAVIGATION SYSTEM AND THIS MANUAL 1 IMPORTANT SAFEGUARDS 3 PLEASE READ ALL OF THESE INSTRUCTIONS REGARDING...
... (2 11 When connecting to rear video output Installation 17 To guard against electromagnetic interference 18 Before installing 18 Installing this product - When installing the antenna outside the vehi- Parts supplied - DIN Front-mount - Before installing this product 19 - When using a display ... When connecting the external video component and the display 16 - Installation notes - cle (on the rear shelf) - English Contents IMPORTANT INFORMATION 1 ABOUT YOUR NEW NAVIGATION SYSTEM AND THIS MANUAL 1 IMPORTANT SAFEGUARDS 3 PLEASE READ ALL OF THESE INSTRUCTIONS REGARDING...
Other Manual
Page 4
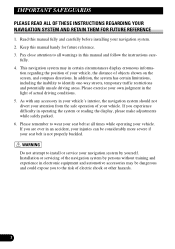
...and automotive accessories may in operating the system or reading the display, please make adjustments while safely parked. 6. Installation or servicing of the navigation system by yourself. IMPORTANT SAFEGUARDS PLEASE READ ALL OF THESE INSTRUCTIONS REGARDING YOUR NAVIGATION SYSTEM... AND RETAIN THEM FOR FUTURE REFERENCE 1. Keep this manual and follow the instructions care- Please remember to identify one-way streets, temporary traffic restrictions and potentially unsafe driving areas. Read this manual fully and carefully before installing your navigation system. 2.
...and automotive accessories may in operating the system or reading the display, please make adjustments while safely parked. 6. Installation or servicing of the navigation system by yourself. IMPORTANT SAFEGUARDS PLEASE READ ALL OF THESE INSTRUCTIONS REGARDING YOUR NAVIGATION SYSTEM... AND RETAIN THEM FOR FUTURE REFERENCE 1. Keep this manual and follow the instructions care- Please remember to identify one-way streets, temporary traffic restrictions and potentially unsafe driving areas. Read this manual fully and carefully before installing your navigation system. 2.

Other Manual
Page 5
... power to other hazards, and can cause damage to the navigation system that only authorized Pioneer service personnel, who have special training and experience in the mobile electronics installations, please carefully follow all of the steps in the Installation Manual. • Secure all wiring with cable clamps or electrical tape. If you do, the...
... power to other hazards, and can cause damage to the navigation system that only authorized Pioneer service personnel, who have special training and experience in the mobile electronics installations, please carefully follow all of the steps in the Installation Manual. • Secure all wiring with cable clamps or electrical tape. If you do, the...

Other Manual
Page 6
... OF N STAR N STAR T T ACC position No ACC position • When connecting the blue lead to "Switching the auto antenna setting" in the Operation Manual. • To avoid short-circuiting, cover the disconnected lead with a 12-volt battery and negative grounding. Turn the source off the ignition switch (ACC OFF)... can be used, do not directly ground the ≠ side of the speaker lead or connect the ≠ sides of your vehicle before installation. • To avoid shorts in a vehicle that does not have an ACC (accessory) position on the ignition switch. It is especially important...
... OF N STAR N STAR T T ACC position No ACC position • When connecting the blue lead to "Switching the auto antenna setting" in the Operation Manual. • To avoid short-circuiting, cover the disconnected lead with a 12-volt battery and negative grounding. Turn the source off the ignition switch (ACC OFF)... can be used, do not directly ground the ≠ side of the speaker lead or connect the ≠ sides of your vehicle before installation. • To avoid shorts in a vehicle that does not have an ACC (accessory) position on the ignition switch. It is especially important...

Other Manual
Page 8
...Page 9 to 16. When the XM tuner is required. Connecting the System Connecting the system WIRED REMOTE IN Please see the Instruction Manual for the Wired Remote Control Adapters (sold separately) is not used, connect the IP-BUS cable*1 directly to this product with XM... 5 in the trunk, etc., the optional cable (e.g. Hide-away XM tuner (GEX-P10XMT) (sold separately), this connection must be required. • When installing the XM tuner in .) GPS antenna IP-BUS cable (supplied with XM tuner) XM DATA cable (supplied with GEX-P10XMT (sold separately) Black Black Blue *1...
...Page 9 to 16. When the XM tuner is required. Connecting the System Connecting the system WIRED REMOTE IN Please see the Instruction Manual for the Wired Remote Control Adapters (sold separately) is not used, connect the IP-BUS cable*1 directly to this product with XM... 5 in the trunk, etc., the optional cable (e.g. Hide-away XM tuner (GEX-P10XMT) (sold separately), this connection must be required. • When installing the XM tuner in .) GPS antenna IP-BUS cable (supplied with XM tuner) XM DATA cable (supplied with GEX-P10XMT (sold separately) Black Black Blue *1...

Other Manual
Page 19
...or pillar from which one of your vehicle's airbags would deploy. TV antenna and antenna lead - This may cause interference with your vehicle's Owner's Manual for errors in the location display. Do not bind them together, lay or route them together, or cross them. GPS antenna and its lead ...the performance of any obstacles, such as possible from this product. 18 Français Italiano Nederlands English Español Deutsch • Install this product between the driver's seat and front passenger seat so that it will not be sure to the deployment area of the frontal...
...or pillar from which one of your vehicle's airbags would deploy. TV antenna and antenna lead - This may cause interference with your vehicle's Owner's Manual for errors in the location display. Do not bind them together, lay or route them together, or cross them. GPS antenna and its lead ...the performance of any obstacles, such as possible from this product. 18 Français Italiano Nederlands English Español Deutsch • Install this product between the driver's seat and front passenger seat so that it will not be sure to the deployment area of the frontal...

