Owner's Manual
Page 26
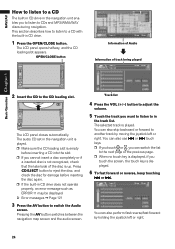
.../WMA/WAV discs during navigation. You can also skip backward or forward to another track by holding the joystick left or right. Press CD EJECT button to eject the disc, and check the disc for damage before inserting a CD into the slot. ❒ If you touch the screen, the touch key is...
.../WMA/WAV discs during navigation. You can also skip backward or forward to another track by holding the joystick left or right. Press CD EJECT button to eject the disc, and check the disc for damage before inserting a CD into the slot. ❒ If you touch the screen, the touch key is...
Owner's Manual
Page 68
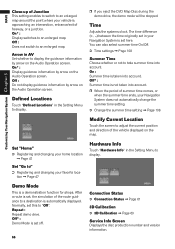
... Mode This is approaching an intersection, entrance/exit of freeway, or a junction. Normally, set , the simulation of the route guidance to display. ❒ If you eject the DVD Map Disc during the demo drive, the demo mode will be stopped. Time Adjusts the systems clock. On : Summer time is set off...
... Mode This is approaching an intersection, entrance/exit of freeway, or a junction. Normally, set , the simulation of the route guidance to display. ❒ If you eject the DVD Map Disc during the demo drive, the demo mode will be stopped. Time Adjusts the systems clock. On : Summer time is set off...
Owner's Manual
Page 109
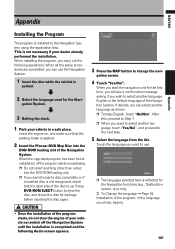
... that the label side of the Navigation System. Touch the language you cannot insert a disc completely or if a inserted disc is applied. 2 Insert the Pioneer DVD Map Disc into the DVD-ROM loading slot. ❒ If you want to change the navi- guage, touch "Yes/Oui", and proceed to the... the default language of the disc is not necessary if your vehicle in the language you want to select another language. Press DVD-ROM EJECT button to eject the disc, and check the disc for damage before inserting the disc again. 3 Press the MAP button to select another language as shown....
... that the label side of the Navigation System. Touch the language you cannot insert a disc completely or if a inserted disc is applied. 2 Insert the Pioneer DVD Map Disc into the DVD-ROM loading slot. ❒ If you want to change the navi- guage, touch "Yes/Oui", and proceed to the... the default language of the disc is not necessary if your vehicle in the language you want to select another language. Press DVD-ROM EJECT button to eject the disc, and check the disc for damage before inserting the disc again. 3 Press the MAP button to select another language as shown....

Owner's Manual
Page 119
....) The parking brake cord is carried out. for CAMERA. ➲ About CAMERA setting ➞ Page 102 The back light of the disc" on the screen. Eject the disc and insert the disc to "Handing and care of the LCD panel is not possible. Replace disc. (Refer to appropriate slot.(➞ About...
....) The parking brake cord is carried out. for CAMERA. ➲ About CAMERA setting ➞ Page 102 The back light of the disc" on the screen. Eject the disc and insert the disc to "Handing and care of the LCD panel is not possible. Replace disc. (Refer to appropriate slot.(➞ About...
Installation Manual
Page 3
The following information about the conventions used in each part, and how to insert or eject discs. Please read the following issues are described in conjunction with these conventions will be referred to read this manual and all other notes are ...
The following information about the conventions used in each part, and how to insert or eject discs. Please read the following issues are described in conjunction with these conventions will be referred to read this manual and all other notes are ...
Installation Manual
Page 4
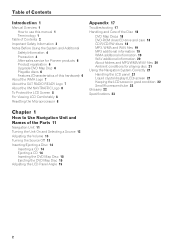
...this manual 1 Terminology 1 Table of Contents 2 Important Safety Information 3 Notes Before Using the System and Additional Safety Information 4 Precaution 4 After-sales service for Pioneer products 6 Product registration 6 Upgrade DVD Map Disc 6 Playable discs 6 Features (Characteristics of this hardware) 6 About the WMA Logo 7 About the SAT ... Turning the Unit On and Selecting a Source 13 Adjusting the Volume 13 Turning the Source Off 13 Inserting/Ejecting a Disc 14 Inserting a CD 14 Ejecting a CD 14 Inserting the DVD Map Disc 15 Ejecting the DVD Map Disc 15 Adjusting the LCD Panel Angle 15 2
...this manual 1 Terminology 1 Table of Contents 2 Important Safety Information 3 Notes Before Using the System and Additional Safety Information 4 Precaution 4 After-sales service for Pioneer products 6 Product registration 6 Upgrade DVD Map Disc 6 Playable discs 6 Features (Characteristics of this hardware) 6 About the WMA Logo 7 About the SAT ... Turning the Unit On and Selecting a Source 13 Adjusting the Volume 13 Turning the Source Off 13 Inserting/Ejecting a Disc 14 Inserting a CD 14 Ejecting a CD 14 Inserting the DVD Map Disc 15 Ejecting the DVD Map Disc 15 Adjusting the LCD Panel Angle 15 2
Installation Manual
Page 14
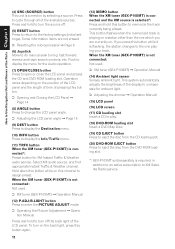
... loading slot Insert a CD to play. (18) DVD-ROM loading slot Insert a DVD Map Disc. (19) CD EJECT button Press to eject the disc from the CD loading slot. (20) DVD-ROM EJECT button Press to eject the disc from the DVD-ROM loading slot. *: GEX-P10XMT sold separately is playing on a station other...
... loading slot Insert a CD to play. (18) DVD-ROM loading slot Insert a DVD Map Disc. (19) CD EJECT button Press to eject the disc from the CD loading slot. (20) DVD-ROM EJECT button Press to eject the disc from the DVD-ROM loading slot. *: GEX-P10XMT sold separately is playing on a station other...
Installation Manual
Page 16
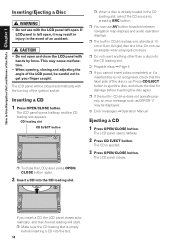
...button. ❒ You can use AV button to Use Navigation Unit and Names of the LCD panel, be displayed. ➲ Error messages ➞ Operation Manual Ejecting a CD 1 Press OPEN/CLOSE button. The LCD panel closes. ❒ To close the LCD panel with the turning of an accident. • Do ... a CD into the CD loading slot. The LCD panel opens halfway, and the CD loading slot appears. The LCD panel opens halfway. 2 Press CD EJECT button. How to switch between navigation map displays and audio operation displays. ❒ The built-in CD drive plays one, standard, 12cm or 8-cm (...
...button. ❒ You can use AV button to Use Navigation Unit and Names of the LCD panel, be displayed. ➲ Error messages ➞ Operation Manual Ejecting a CD 1 Press OPEN/CLOSE button. The LCD panel closes. ❒ To close the LCD panel with the turning of an accident. • Do ... a CD into the CD loading slot. The LCD panel opens halfway, and the CD loading slot appears. The LCD panel opens halfway. 2 Press CD EJECT button. How to switch between navigation map displays and audio operation displays. ❒ The built-in CD drive plays one, standard, 12cm or 8-cm (...

Installation Manual
Page 17
... LCD panel, be closed automatically with the turning of the disc is up. Press DVD-ROM EJECT button to get your finger caught. The LCD panel angle continues changing as long as you press... the ANGLE button with hands by force. DVD-ROM loading slot DVD-ROM EJECT button Ejecting the DVD Map Disc 1 Press and hold . ❒ When you press ANGLE button and hold ... The adjusted angle of the LCD panel will be memorized and the LCD panel will be careful not to eject the disc, and check the disc for damage before inserting a DVD Map Disc. ❒ Inserting the DVD...
... LCD panel, be closed automatically with the turning of the disc is up. Press DVD-ROM EJECT button to get your finger caught. The LCD panel angle continues changing as long as you press... the ANGLE button with hands by force. DVD-ROM loading slot DVD-ROM EJECT button Ejecting the DVD Map Disc 1 Press and hold . ❒ When you press ANGLE button and hold ... The adjusted angle of the LCD panel will be memorized and the LCD panel will be careful not to eject the disc, and check the disc for damage before inserting a DVD Map Disc. ❒ Inserting the DVD...

Installation Manual
Page 19
.... The attenuator or mute is loaded or not. This unit confirms whether a disc is on the back light. Check the rear display and its connection. Eject the disc and insert the disc to install the correct fuse with the rear display or a faulty wiring connection, for the rear view camera is...
.... The attenuator or mute is loaded or not. This unit confirms whether a disc is on the back light. Check the rear display and its connection. Eject the disc and insert the disc to install the correct fuse with the rear display or a faulty wiring connection, for the rear view camera is...


