Owner's Manual
Page 8
... - Contents Setting the beep sound 155 Adjusting the response positions of the touch panel (touch panel calibration) 156 Adjusting the picture 156 Displaying the firmware version 158 Updating firmware 158 Checking sensor learning status and driving status 159 Clearing the status 159 Checking the connections of DVDs 185 Setting the video signal for...
... - Contents Setting the beep sound 155 Adjusting the response positions of the touch panel (touch panel calibration) 156 Adjusting the picture 156 Displaying the firmware version 158 Updating firmware 158 Checking sensor learning status and driving status 159 Clearing the status 159 Checking the connections of DVDs 185 Setting the video signal for...
Owner's Manual
Page 116
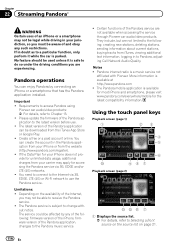
...feature should be able to Pandora, adjusting Cell Network Audio Quality. Certain functions of the Internet, you are not available when accessing the service through Pioneer car audio/video products. Limitations: ! If in to receive the Pandora service. ! Using the touch panel keys Playback screen (page 1) 1 ...The Pandora mobile application is safe to the Internet via 3G, EDGE and/or LTE (4G) networks. ! Important ! Please update the firmware of the Pandora application can enjoy Pandora by any such restrictions. If the Data Plan for your carrier may not be used unless...
...feature should be able to Pandora, adjusting Cell Network Audio Quality. Certain functions of the Internet, you are not available when accessing the service through Pioneer car audio/video products. Limitations: ! If in to receive the Pandora service. ! Using the touch panel keys Playback screen (page 1) 1 ...The Pandora mobile application is safe to the Internet via 3G, EDGE and/or LTE (4G) networks. ! Important ! Please update the firmware of the Pandora application can enjoy Pandora by any such restrictions. If the Data Plan for your carrier may not be used unless...
Owner's Manual
Page 123
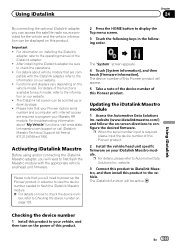
... Connect this product to iDatalink Maestro, and then install this Pioneer product. After installing the iDatalink adapter, be scrolled up the Pioneer product in the following order. The iDatalink list screen can be active. Updating the iDatalink Maestro module 1 Access the Automotive Data Solutions Inc...up or down by page. ! Important ! Functions and displays vary depending on your Pioneer radio's serial number and a computer with the appropriate vehicle and head unit firmware. Using iDatalink Chapter 24 Using iDatalink By connecting the optional iDatalink adapter, you can ...
... Connect this product to iDatalink Maestro, and then install this Pioneer product. After installing the iDatalink adapter, be scrolled up the Pioneer product in the following order. The iDatalink list screen can be active. Updating the iDatalink Maestro module 1 Access the Automotive Data Solutions Inc...up or down by page. ! Important ! Functions and displays vary depending on your Pioneer radio's serial number and a computer with the appropriate vehicle and head unit firmware. Using iDatalink Chapter 24 Using iDatalink By connecting the optional iDatalink adapter, you can ...
Owner's Manual
Page 158
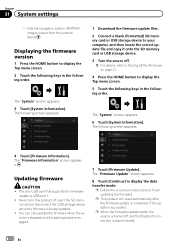
...USB storage device. 3 Turn the source off. = For details, refer to Turning off , eject the SD mem- p When the firmware update starts, the source is turned off and the Bluetooth connection is USB port 1. ! Chapter 31 System settings - The "System" screen ... display the data transfer mode. Updating firmware CAUTION ! p Follow the on page 21. 4 Press the HOME button to finish updating the firmware. You can only update the firmware when the vehicle is stopped and the parking brake is engaged. 7 Touch [Firmware Update]. The "Firmware Update" screen appears. 8 Touch [...
...USB storage device. 3 Turn the source off. = For details, refer to Turning off , eject the SD mem- p When the firmware update starts, the source is turned off and the Bluetooth connection is USB port 1. ! Chapter 31 System settings - The "System" screen ... display the data transfer mode. Updating firmware CAUTION ! p Follow the on page 21. 4 Press the HOME button to finish updating the firmware. You can only update the firmware when the vehicle is stopped and the parking brake is engaged. 7 Touch [Firmware Update]. The "Firmware Update" screen appears. 8 Touch [...

Owner's Manual
Page 201
Update the iPod version. is full. as the temporary storage area is connected. iPod full. tagged playlist. Action Turn the ignition switch to OFF and then ... OFF and then to the iPod. Tag store failed. Memory used Connect iPod. Action Disconnect the cable from the iPod. your dealer or an authorized Pioneer Service Station. The iPod firmware version is still displayed after performing the above action, please contact your iPod.
Update the iPod version. is full. as the temporary storage area is connected. iPod full. tagged playlist. Action Turn the ignition switch to OFF and then ... OFF and then to the iPod. Tag store failed. Memory used Connect iPod. Action Disconnect the cable from the iPod. your dealer or an authorized Pioneer Service Station. The iPod firmware version is still displayed after performing the above action, please contact your iPod.

Owner's Manual
Page 222
Appendix Appendix System Language Restore Settings Keyboard Beep Tone Picture Adjustment Touch panel calibration System Information Firmware Information Firmware Update 3D Calibration Status Connection Status OEM Settings Page 154 194 155 155 156 156 Theme menu 158 Background 158 Illumination 159 Theme 160 Clock 125 Splash Screen Export Page 175 176 177 177 178 179 222 En
Appendix Appendix System Language Restore Settings Keyboard Beep Tone Picture Adjustment Touch panel calibration System Information Firmware Information Firmware Update 3D Calibration Status Connection Status OEM Settings Page 154 194 155 155 156 156 Theme menu 158 Background 158 Illumination 159 Theme 160 Clock 125 Splash Screen Export Page 175 176 177 177 178 179 222 En


