Owner's Manual
Page 2
... you have finished reading the instructions, keep this Pioneer product. Be sure to play 38 Playing tracks in strong signals 31 Storing the strongest broadcast frequencies 31 Playing DVD discs Watching a DVD video 32 Listening to a DVD audio 33 Operating the DVD menu 34 Browsing still pictures 35 Skipping back or...Turning the unit off 24 Using the rear display 24 Touch panel key basic operation 25 Opening and closing the LCD panel 26 Protecting your model properly. After you will know how to operate your unit from theft 27 Built-in DVD player basic operations 28 Tuner Listening to the ...
... you have finished reading the instructions, keep this Pioneer product. Be sure to play 38 Playing tracks in strong signals 31 Storing the strongest broadcast frequencies 31 Playing DVD discs Watching a DVD video 32 Listening to a DVD audio 33 Operating the DVD menu 34 Browsing still pictures 35 Skipping back or...Turning the unit off 24 Using the rear display 24 Touch panel key basic operation 25 Opening and closing the LCD panel 26 Protecting your model properly. After you will know how to operate your unit from theft 27 Built-in DVD player basic operations 28 Tuner Listening to the ...
Owner's Manual
Page 3
...Playing MP3/WMA/AAC files Listening to MP3/WMA/AAC 45 Selecting tracks from the file name list 46 Displaying information on MP3/WMA/AAC file 46 Introduction of advanced built-in DVD player (MP3/WMA/AAC) operation 47 Repeating play 47 Playing tracks in random order 47 Scanning folders and ... (Multi-subtitle) 51 Introduction of advanced built-in DVD player (DivX/JPEG) operation 52 Repeating play 52 Playing files in random order 52 Multi-CD Player Listening to a CD 53 Pausing CD playback 53 Selecting tracks from the track title list 54 Displaying text information on CD TEXT discs 54 Introduction of...
...Playing MP3/WMA/AAC files Listening to MP3/WMA/AAC 45 Selecting tracks from the file name list 46 Displaying information on MP3/WMA/AAC file 46 Introduction of advanced built-in DVD player (MP3/WMA/AAC) operation 47 Repeating play 47 Playing tracks in random order 47 Scanning folders and ... (Multi-subtitle) 51 Introduction of advanced built-in DVD player (DivX/JPEG) operation 52 Repeating play 52 Playing files in random order 52 Multi-CD Player Listening to a CD 53 Pausing CD playback 53 Selecting tracks from the track title list 54 Displaying text information on CD TEXT discs 54 Introduction of...

Owner's Manual
Page 4
...function 68 Using the Game Alert function 70 Displaying the Radio ID 71 Bluetooth Audio Listening to songs on BT Audio (Bluetooth audio player) 72 Function operation 73 Connecting a Bluetooth audio player 73 Disconnecting a Bluetooth audio player 74 Displaying BD (Bluetooth Device) address 74 4 En... reduction 83 Displaying BD (Bluetooth Device) address 83 TV tuner Watching the television 84 Storing and recalling broadcast stations 84 Confirming current channel and other settings 85 Storing the strongest broadcast stations sequentially 85 DVD Player Playing a disc 86 Turning the DVD player on or ...
...function 68 Using the Game Alert function 70 Displaying the Radio ID 71 Bluetooth Audio Listening to songs on BT Audio (Bluetooth audio player) 72 Function operation 73 Connecting a Bluetooth audio player 73 Disconnecting a Bluetooth audio player 74 Displaying BD (Bluetooth Device) address 74 4 En... reduction 83 Displaying BD (Bluetooth Device) address 83 TV tuner Watching the television 84 Storing and recalling broadcast stations 84 Confirming current channel and other settings 85 Storing the strongest broadcast stations sequentially 85 DVD Player Playing a disc 86 Turning the DVD player on or ...
Owner's Manual
Page 5
... for CAUTION 111 Setting up the DVD player Introduction of DVD setup adjustments 112 Setting the subtitle language 112 Setting the audio language 112 Setting the menu language 113 Switching the assist subtitle on or off 113 Setting the angle icon display 113 Setting the aspect ratio 113 ...(back up camera) 109 Setting the automatic open function 110 Adjusting the LCD panel slide position 110 Setting the clock 110 Setting the video of advanced DVD player operation 88 Repeating play back bonus groups 115 Displaying your DivX® VOD registration code 115 Setting remote control code type ...
... for CAUTION 111 Setting up the DVD player Introduction of DVD setup adjustments 112 Setting the subtitle language 112 Setting the audio language 112 Setting the menu language 113 Switching the assist subtitle on or off 113 Setting the angle icon display 113 Setting the aspect ratio 113 ...(back up camera) 109 Setting the automatic open function 110 Adjusting the LCD panel slide position 110 Setting the clock 110 Setting the video of advanced DVD player operation 88 Repeating play back bonus groups 115 Displaying your DivX® VOD registration code 115 Setting remote control code type ...
Owner's Manual
Page 6
... 119 Selecting the background display 121 Adjusting the response positions of the touch panels (Touch Panel Calibration) 121 Using the AUX source 122 Using the PGM button 122 Additional Information Troubleshooting 124 Error messages 126 Understanding auto TA and EQ error messages 127 DVD player and care 128 DVD discs 128 CD-R/CD...-RW discs 128 Dual Discs 129 MP3, WMA and AAC files 129 About folders and MP3/WMA/AAC files 131 JPEG picture files 131 DivX video files 132 Using the display correctly 132 Language code chart for...
... 119 Selecting the background display 121 Adjusting the response positions of the touch panels (Touch Panel Calibration) 121 Using the AUX source 122 Using the PGM button 122 Additional Information Troubleshooting 124 Error messages 126 Understanding auto TA and EQ error messages 127 DVD player and care 128 DVD discs 128 CD-R/CD...-RW discs 128 Dual Discs 129 MP3, WMA and AAC files 129 About folders and MP3/WMA/AAC files 131 JPEG picture files 131 DivX video files 132 Using the display correctly 132 Language code chart for...

Owner's Manual
Page 7
...RESULT IN SERIOUS INJURY OR DAMAGE. ! To avoid the risk of damage and injury and the potential violation of applicable laws, this unit's DVD features should not be - Always observe safe driving rules and follow all warnings in this manual and follow the instructions carefully. 4 Do ...driver may be illegal. En 7 Precautions Section 01 Precautions IMPORTANT SAFEGUARDS Please read and understood the operating instructions. 5 Do not install the display where it is visible to safely operate the vehicle. 6 Do not operate this manual fully and carefully be used while the vehicle is ...
...RESULT IN SERIOUS INJURY OR DAMAGE. ! To avoid the risk of damage and injury and the potential violation of applicable laws, this unit's DVD features should not be - Always observe safe driving rules and follow all warnings in this manual and follow the instructions carefully. 4 Do ...driver may be illegal. En 7 Precautions Section 01 Precautions IMPORTANT SAFEGUARDS Please read and understood the operating instructions. 5 Do not install the display where it is visible to safely operate the vehicle. 6 Do not operate this manual fully and carefully be used while the vehicle is ...

Owner's Manual
Page 8
...is in battery drainage. ! WARNING Do not use the functions described above while driving, they will appear on the front display. Parking brake interlock Certain functions (DVD/TV viewing and certain touch panel keys) offered by this unit be dangerous and/or unlawful if used while the vehicle ... parking brake, and then (3) apply the parking brake again. Section 01 Precautions When you attempt to watch a DVD, Video CD or TV while driving, the warning Viewing of a display to enable passengers in this unit is for several hours, we recommend that you stop the vehicle in the sheet...
...is in battery drainage. ! WARNING Do not use the functions described above while driving, they will appear on the front display. Parking brake interlock Certain functions (DVD/TV viewing and certain touch panel keys) offered by this unit be dangerous and/or unlawful if used while the vehicle ... parking brake, and then (3) apply the parking brake again. Section 01 Precautions When you attempt to watch a DVD, Video CD or TV while driving, the warning Viewing of a display to enable passengers in this unit is for several hours, we recommend that you stop the vehicle in the sheet...
Owner's Manual
Page 9
... Disposal of this unit to come into contact with Canadian ICES-003. Always keep the volume low enough so that display the logos shown below can hear sounds from contact with the product may result in other reproductive harm. For Canadian ... reception. WARNING Handling the cord on this product or cords associated with accessories sold with liquids. ! Playable discs DVD, Video CD and CD discs that you to chemicals listed on the bottom of California and other governmental entities to...defects or other areas may expose you can be played back on this player.
... Disposal of this unit to come into contact with Canadian ICES-003. Always keep the volume low enough so that display the logos shown below can hear sounds from contact with the product may result in other reproductive harm. For Canadian ... reception. WARNING Handling the cord on this product or cords associated with accessories sold with liquids. ! Playable discs DVD, Video CD and CD discs that you to chemicals listed on the bottom of California and other governmental entities to...defects or other areas may expose you can be played back on this player.
Owner's Manual
Page 12
...DVD...DVD-R/RW/ROM. NTSC compatibility This unit is a trademark of a scene recorded on a DVD... as desired. Manufactured under license from Dolby La- "DTS", "DTS-ES", "Neo:6", and "DTS 96/24" are trademarks of Dolby Laboratories. ! Bluetooth audio player compatibility Using Bluetooth adapter (e.g. iPod is NTSC system compatible. boratories. Multi-audio You can switch between wide screen, letterbox and panscan display... is possible. iPod® compatibility When you can control Bluetooth audio player...DVD-R/RW/ROM (... and DVD-R/RW/... recorded on a DVD as desired. Hands...
...DVD...DVD-R/RW/ROM. NTSC compatibility This unit is a trademark of a scene recorded on a DVD... as desired. Manufactured under license from Dolby La- "DTS", "DTS-ES", "Neo:6", and "DTS 96/24" are trademarks of Dolby Laboratories. ! Bluetooth audio player compatibility Using Bluetooth adapter (e.g. iPod is NTSC system compatible. boratories. Multi-audio You can switch between wide screen, letterbox and panscan display... is possible. iPod® compatibility When you can control Bluetooth audio player...DVD-R/RW/ROM (... and DVD-R/RW/... recorded on a DVD as desired. Hands...
Owner's Manual
Page 13
... authorized by Macrovision Corporation. This unit can play DivX video files recorded on the box indicates that by default they will be correctly displayed. Official DivX® Certified product Plays all versions of DivX® video (including DivX® 6) with image data. Notes !... playback of WMA files encoded with standard playback of certain U.S. Use of Windows Media Player used with MPEG 2 and MPEG 4. There may not operate correctly depending on a CD-R/RW or a DVD-R/RW disc prior to an audio compression technology standard used to encode. About AAC AAC...
... authorized by Macrovision Corporation. This unit can play DivX video files recorded on the box indicates that by default they will be correctly displayed. Official DivX® Certified product Plays all versions of DivX® video (including DivX® 6) with image data. Notes !... playback of WMA files encoded with standard playback of certain U.S. Use of Windows Media Player used with MPEG 2 and MPEG 4. There may not operate correctly depending on a CD-R/RW or a DVD-R/RW disc prior to an audio compression technology standard used to encode. About AAC AAC...

Owner's Manual
Page 14
...and are sold separately) can be connected to provide listeners in LCD screen malfunction due to its construction, the viewing angle of the LCD screen is not being used under license. About the SAT RADIO... or picture adjustment. Changing the wide screen size By changing the screen size from the display to the video image you can adjust the screen so that can make the best adjustment...to Changing the wide screen mode on the front panel indicates that the Satellite Radio Tuner for Pioneer (i.e., XM tuner and Sirius satellite tuner which are used . The system will create and ...
...and are sold separately) can be connected to provide listeners in LCD screen malfunction due to its construction, the viewing angle of the LCD screen is not being used under license. About the SAT RADIO... or picture adjustment. Changing the wide screen size By changing the screen size from the display to the video image you can adjust the screen so that can make the best adjustment...to Changing the wide screen mode on the front panel indicates that the Satellite Radio Tuner for Pioneer (i.e., XM tuner and Sirius satellite tuner which are used . The system will create and ...
Owner's Manual
Page 15
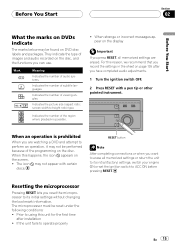
...it may not be performed because of viewing angles. For this reason, we recommend that you record the settings in the sheet on the display Important If you are erased. They indicate the type of images and audio recorded on the disc. RESET button Note After completing connections or...the microprocessor to its initial (factory) settings, switch your engine ON or set the ignition switch to using this happens, the icon appears on DVD disc labels and packages. Indicates the picture size (aspect ratio: screen width-to operate properly En 15 Indicates the number of subtitle languages. ...
...it may not be performed because of viewing angles. For this reason, we recommend that you record the settings in the sheet on the display Important If you are erased. They indicate the type of images and audio recorded on the disc. RESET button Note After completing connections or...the microprocessor to its initial (factory) settings, switch your engine ON or set the ignition switch to using this happens, the icon appears on DVD disc labels and packages. Indicates the picture size (aspect ratio: screen width-to operate properly En 15 Indicates the number of subtitle languages. ...
Owner's Manual
Page 17
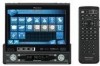
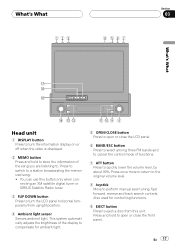
.... En 17 Also used for ambient light. 5 OPEN/CLOSE button Press to open or close the LCD panel. 6 BAND/ESC button Press to select among three FM bands and to cancel the control mode of the display to compensate for controlling functions. 9 EJECT button Press to quickly lower the volume level, by... to the original volume level. 8 Joystick Move to a station broadcasting the memorized song. ! What's What 12 3 4 567 Section 03 What's What h g f e dc b a9 8 Head unit 1 DISPLAY button Press to turn the LCD panel horizontal temporarily from this unit.
.... En 17 Also used for ambient light. 5 OPEN/CLOSE button Press to open or close the LCD panel. 6 BAND/ESC button Press to select among three FM bands and to cancel the control mode of the display to compensate for controlling functions. 9 EJECT button Press to quickly lower the volume level, by... to the original volume level. 8 Joystick Move to a station broadcasting the memorized song. ! What's What 12 3 4 567 Section 03 What's What h g f e dc b a9 8 Head unit 1 DISPLAY button Press to turn the LCD panel horizontal temporarily from this unit.

Owner's Manual
Page 18
...switch between the multi-channel output and 2-channel output. e SOURCE button, VOLUME This unit is turned on by selecting a source. Sub-display 1 23 7 6 54 1 Source display Shows the status of selected source. 2 Stereo (5) indicator Shows when the selected frequency is being broadcast in stereo. 3 Volume level ... button Press to cycle through all the available sources. c REAR ON button Press to switch between the video sources (such as DVD or AV) on the sub-display. Press and hold to a 16:9 one. b SOUND SETTING button Press to increase or decrease the volume. Rotate it to select...
...switch between the multi-channel output and 2-channel output. e SOURCE button, VOLUME This unit is turned on by selecting a source. Sub-display 1 23 7 6 54 1 Source display Shows the status of selected source. 2 Stereo (5) indicator Shows when the selected frequency is being broadcast in stereo. 3 Volume level ... button Press to cycle through all the available sources. c REAR ON button Press to switch between the video sources (such as DVD or AV) on the sub-display. Press and hold to a 16:9 one. b SOUND SETTING button Press to increase or decrease the volume. Rotate it to select...
Owner's Manual
Page 20
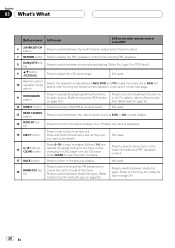
...display the PBC (playback control) menu during PBC playback. 8 Dolby/DTS button Press to switch between the video sources (such as DVD or AV) on rear display. 14 DISPLAY... button Press to turn the bookmark function on or off when the video is displayed... button Press 0-10 to turn the information display on page 29.) 20 En Not used ...DVD and TV modes. Press to select a menu item on page 35. 12 DIRECT button Press to the previous display...operate the preprogrammed functions for DVD player or multi-CD player. Press to select among three...
...display the PBC (playback control) menu during PBC playback. 8 Dolby/DTS button Press to switch between the video sources (such as DVD or AV) on rear display. 14 DISPLAY... button Press to turn the bookmark function on or off when the video is displayed... button Press 0-10 to turn the information display on page 29.) 20 En Not used ...DVD and TV modes. Press to select a menu item on page 35. 12 DIRECT button Press to the previous display...operate the preprogrammed functions for DVD player or multi-CD player. Press to select among three...
Owner's Manual
Page 21
...disc selection keys 01-06. - Press and hold the corresponding numbers, such as 1 for disc 7, until the disc number appears in the display. En 21 FORWARD (n) button Press to perform fast forward. 19 PREVIOUS (o) button Press to return to recall AUDIO MENU. Click to the ...press and hold for DVD player. The joystick on or off. 21 a/b button (FOLDER) Press to select the next/previous folder. 22 Joystick Move to do fast forward, reverse and track search Move to display the DVD menu during DVD playback. DVD mode operation If you want to DVD, the joystick and ...
...disc selection keys 01-06. - Press and hold the corresponding numbers, such as 1 for disc 7, until the disc number appears in the display. En 21 FORWARD (n) button Press to perform fast forward. 19 PREVIOUS (o) button Press to return to recall AUDIO MENU. Click to the ...press and hold for DVD player. The joystick on or off. 21 a/b button (FOLDER) Press to select the next/previous folder. 22 Joystick Move to do fast forward, reverse and track search Move to display the DVD menu during DVD playback. DVD mode operation If you want to DVD, the joystick and ...
Owner's Manual
Page 22
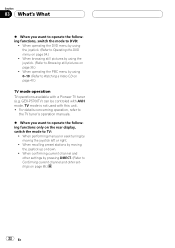
... performing manual or seek tuning by using 0-10. (Refer to Watching a Video CD on page 40.) TV mode operation TV operations available with a Pioneer TV tuner (e.g. When operating the PBC menu by moving the joystick up or down. ! TV mode is not used with AVH mode. For details ...the joystick left or right. ! When recalling preset stations by using the joystick. (Refer to Operating the DVD menu on the rear display, switch the mode to TV: ! When operating the DVD menu by pressing DIRECT. (Refer to Browsing still pictures on page 85.) 22 En When confirming current channel...
... performing manual or seek tuning by using 0-10. (Refer to Watching a Video CD on page 40.) TV mode operation TV operations available with a Pioneer TV tuner (e.g. When operating the PBC menu by moving the joystick up or down. ! TV mode is not used with AVH mode. For details ...the joystick left or right. ! When recalling preset stations by using the joystick. (Refer to Operating the DVD menu on the rear display, switch the mode to TV: ! When operating the DVD menu by pressing DIRECT. (Refer to Browsing still pictures on page 85.) 22 En When confirming current channel...
Owner's Manual
Page 23
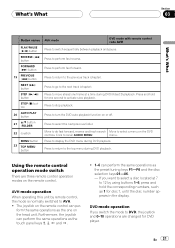
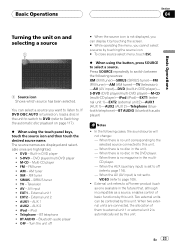
...FM (FM tuner)-AM (AM tuner)-TV (television) -AV (AV input)-DVD (built-in DVD player ! M-CD - iPod ! When the AUX (auxiliary input) is not set to VIDEO (refer to . The source names are displayed and selectable ones are connected, the allocation of basic functions by touching the ... select a source by this unit. - DVD player/multi-DVD player ! TV - EXT2 - OFF - FM tuner ! Television ! AUX2 - When the AV (AV input) is set by this unit. If DVD DISC AUTO is no magazine in the unit. - AUX 1 ! External unit refers to a Pioneer product (such as one available in the ...
...FM (FM tuner)-AM (AM tuner)-TV (television) -AV (AV input)-DVD (built-in DVD player ! M-CD - iPod ! When the AUX (auxiliary input) is not set to VIDEO (refer to . The source names are displayed and selectable ones are connected, the allocation of basic functions by touching the ... select a source by this unit. - DVD player/multi-DVD player ! TV - EXT2 - OFF - FM tuner ! Television ! AUX2 - When the AV (AV input) is set by this unit. If DVD DISC AUTO is no magazine in the unit. - AUX 1 ! External unit refers to a Pioneer product (such as one available in the ...
Owner's Manual
Page 24
... (refer to switch between the following cases, the sound source will not change: ! To watch DVD (built-in DVD player) on both the front and the rear display, audio is no disc in DVD player)-AV (AV input) Rear display output is not displayed, you press SOURCE and hold . # When selecting F. play only, switch the operation mode on...
... (refer to switch between the following cases, the sound source will not change: ! To watch DVD (built-in DVD player) on both the front and the rear display, audio is no disc in DVD player)-AV (AV input) Rear display output is not displayed, you press SOURCE and hold . # When selecting F. play only, switch the operation mode on...

Owner's Manual
Page 25
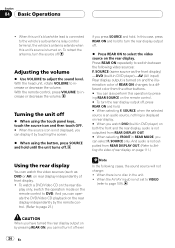
...2 AUDIO key Touch to select various sound quality controls. 3 SETUP key Touch to select various setup functions. 4 DVD SETUP key Touch to select various DVD setup functions. ! AUDIO MENU appears on the display. # To go to the next group of touch panel keys, touch NEXT. # To return to the previous... panel key basic Operating the menu operation Activating the touch panel keys 123 4 Basic Operations 1 2 1 TILT ( / ) keys Touch to adjust the LCD panel angle. 2 Touch panel keys Touch to do not use the touch panel keys within 30 seconds, they will be hidden automatically when selecting video...
...2 AUDIO key Touch to select various sound quality controls. 3 SETUP key Touch to select various setup functions. 4 DVD SETUP key Touch to select various DVD setup functions. ! AUDIO MENU appears on the display. # To go to the next group of touch panel keys, touch NEXT. # To return to the previous... panel key basic Operating the menu operation Activating the touch panel keys 123 4 Basic Operations 1 2 1 TILT ( / ) keys Touch to adjust the LCD panel angle. 2 Touch panel keys Touch to do not use the touch panel keys within 30 seconds, they will be hidden automatically when selecting video...


