Owner's Manual
Page 2
... ! DVD video disc region numbers 9 ! Parking brake interlock 7 - About WMA 11 - About AAC 12 - Changing the picture adjustment 13 What the marks on DVDs indicate 13 - Optional remote control 15 Basic Operations 16 - Basic playback controls 20 - Switching the media file type 21 - Slow motion playback 24 When an operation is prohibited 13 Resetting the microprocessor 13 Feature demo mode 14 2 En Operating this unit What's What 15 - About DivX 12 - Changing the wide screen...
... ! DVD video disc region numbers 9 ! Parking brake interlock 7 - About WMA 11 - About AAC 12 - Changing the picture adjustment 13 What the marks on DVDs indicate 13 - Optional remote control 15 Basic Operations 16 - Basic playback controls 20 - Switching the media file type 21 - Slow motion playback 24 When an operation is prohibited 13 Resetting the microprocessor 13 Feature demo mode 14 2 En Operating this unit What's What 15 - About DivX 12 - Changing the wide screen...
Owner's Manual
Page 3
... DVD setup adjustments 35 - Using the equalizer 32 - Using subwoofer output 33 - Introduction of audio adjustments 32 - Setting the audio language 35 - Setting the aspect ratio 36 - Displaying your iPod 29 - Text information 25 - Browsing for CAUTION 39 - Playing songs in random order 26 - Operating this unit's iPod function from your DivX® VOD registration code 37 - Displaying text information of currently playing artist 29 - Setting the subtitle language 35 - Switching the auxiliary setting 38 - Selecting tracks from the file...
... DVD setup adjustments 35 - Using the equalizer 32 - Using subwoofer output 33 - Introduction of audio adjustments 32 - Setting the audio language 35 - Setting the aspect ratio 36 - Displaying your iPod 29 - Text information 25 - Browsing for CAUTION 39 - Playing songs in random order 26 - Operating this unit's iPod function from your DivX® VOD registration code 37 - Displaying text information of currently playing artist 29 - Setting the subtitle language 35 - Switching the auxiliary setting 38 - Selecting tracks from the file...
Owner's Manual
Page 4
...Using the Game Alert function 54 4 En - Introduction of the touch panels (Touch Panel Calibration) 44 - Storing and recalling broadcast stations 48 - Introduction of advanced operations 57 - Using preset numbers 63 - Introduction of system adjustments 41 - Switching the SIRIUS display 55 - Setting automatic rejecting 64 - Setting for hands-free phoning 59 - Connecting a Bluetooth audio player 57 - Switching the ring tone 64 - Changing the wide screen mode 41 - Setting the clock 43 - Selecting the illumination color 44 - Contents - Changing the picture adjustment...
...Using the Game Alert function 54 4 En - Introduction of the touch panels (Touch Panel Calibration) 44 - Storing and recalling broadcast stations 48 - Introduction of advanced operations 57 - Using preset numbers 63 - Introduction of system adjustments 41 - Switching the SIRIUS display 55 - Setting automatic rejecting 64 - Setting for hands-free phoning 59 - Connecting a Bluetooth audio player 57 - Switching the ring tone 64 - Changing the wide screen mode 41 - Setting the clock 43 - Selecting the illumination color 44 - Contents - Changing the picture adjustment...
Owner's Manual
Page 5
... a hierarchy 87 - About iPod settings 90 Using the display correctly 90 - Adjusting the speaker output levels 75 - Basic Operations 69 - Using the position selector 71 - USB audio player/USB memory compatibility 88 - Contents - Basic Operations 65 - Using CD TEXT functions 66 DVD Player 67 - Using the direct control 73 - Setting the speaker setting 74 - Using the equalizer 77 - Compressed audio compatibility 89 DivX video files 90 - Liquid crystal display (LCD) screen 91 - Small fluorescent tube 91 Language code chart for DVD 92 Terms 93 Specifications 96 Index 98...
... a hierarchy 87 - About iPod settings 90 Using the display correctly 90 - Adjusting the speaker output levels 75 - Basic Operations 69 - Using the position selector 71 - USB audio player/USB memory compatibility 88 - Contents - Basic Operations 65 - Using CD TEXT functions 66 DVD Player 67 - Using the direct control 73 - Setting the speaker setting 74 - Using the equalizer 77 - Compressed audio compatibility 89 DivX video files 90 - Liquid crystal display (LCD) screen 91 - Small fluorescent tube 91 Language code chart for DVD 92 Terms 93 Specifications 96 Index 98...

Owner's Manual
Page 16
..., connect an iPod or USB portable audio player/USB memory to this unit Basic Operations Power ON/OFF 1 1 Source icon Turning the unit on % When using the button, press SRC to Setting for rear view camera (back up camera) on page 38). ! Built-in use (refer to page 38). - RADIO - Radio ! iPod - TEL - Bluetooth audio player ! DVD player/multi-DVD player ! MCD - Multi-CD player ! External unit 1 ! EXT 2 - REARVIEW - Rear view camera ! Turn the unit off (refer to Switching the auxiliary setting on page 43. Notes ! When AUX (auxiliary input) is not displayed...
..., connect an iPod or USB portable audio player/USB memory to this unit Basic Operations Power ON/OFF 1 1 Source icon Turning the unit on % When using the button, press SRC to Setting for rear view camera (back up camera) on page 38). ! Built-in use (refer to page 38). - RADIO - Radio ! iPod - TEL - Bluetooth audio player ! DVD player/multi-DVD player ! MCD - Multi-CD player ! External unit 1 ! EXT 2 - REARVIEW - Rear view camera ! Turn the unit off (refer to Switching the auxiliary setting on page 43. Notes ! When AUX (auxiliary input) is not displayed...
Owner's Manual
Page 19
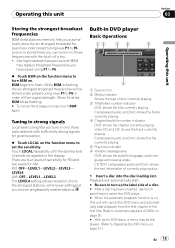
... stations. Compressed audio and DivX: shows the file currently playing. 5 Play time indicator 6 Variable message area DVD: shows the subtitle language, audio language and viewing angle. Refer to Automatic playback of sensitivity for FM and two levels for good reception. % Touch LOCAL on the function menu to set the sensitivity. BSM begins to P6 in the display. Compressed audio and DivX: shows the folder currently playing. 4 Chapter/track/file number indicator DVD...
... stations. Compressed audio and DivX: shows the file currently playing. 5 Play time indicator 6 Variable message area DVD: shows the subtitle language, audio language and viewing angle. Refer to Automatic playback of sensitivity for FM and two levels for good reception. % Touch LOCAL on the function menu to set the sensitivity. BSM begins to P6 in the display. Compressed audio and DivX: shows the folder currently playing. 4 Chapter/track/file number indicator DVD...
Owner's Manual
Page 28
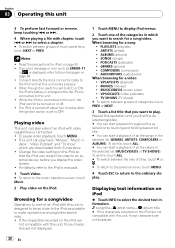
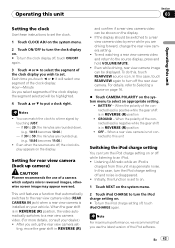
... (music video) ! Playing video This unit can play back "Movies", "Music vi- Repeat this unit 3 To perform fast forward or reverse, keep touching o or p. 4 When playing a file with chapter, touch o or p to select a chapter. # To switch between groups of categories, touch PREV or NEXT. 3 Touch a list title that the iPod can output the video to display iPod menus. 2 Touch one of the categories in which are not displayed. 1 Touch MENU to an external device, before you display the video screen...
... (music video) ! Playing video This unit can play back "Movies", "Music vi- Repeat this unit 3 To perform fast forward or reverse, keep touching o or p. 4 When playing a file with chapter, touch o or p to select a chapter. # To switch between groups of categories, touch PREV or NEXT. 3 Touch a list title that the iPod can output the video to display iPod menus. 2 Touch one of the categories in which are not displayed. 1 Touch MENU to an external device, before you display the video screen...
Owner's Manual
Page 36
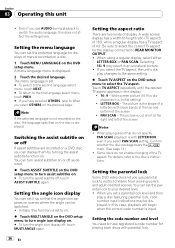
... a code number for the display connected to your desired level. ! The menu language is displayed as desired. % Touch ASSIST SUBTITLE on the DVD setup menu to turn angle icon display on the previous page. Setting the angle icon display You can display them by turning the assist subtitle function on the DVD setup menu. Wide screen picture (16:9) is set a parental lock level and then play a disc featuring parental lock, code number input indications may result in the display. ! 16 : 9 - Setting the code number...
... a code number for the display connected to your desired level. ! The menu language is displayed as desired. % Touch ASSIST SUBTITLE on the DVD setup menu to turn angle icon display on the previous page. Setting the angle icon display You can display them by turning the assist subtitle function on the DVD setup menu. Wide screen picture (16:9) is set a parental lock level and then play a disc featuring parental lock, code number input indications may result in the display. ! 16 : 9 - Setting the code number...

Owner's Manual
Page 42
...Touch AV INPUT on the system menu to select the AV input setting. ! VIDEO - EXT-VIDEO - TV tuner connected with RCA cable ! The adjustment function names are listening to audio source such as radio or CD. % Touch BACKGROUND on the system menu to select the desired background display. COLOR - Switch the picture adjustment modes # You cannot adjust the picture adjustment for rear view camera (back up camera) on or off )-BGP1 (background picture 1)- ground video image while you are displayed. 2 Touch any of a con- S-DVD - You can switch background displays...
...Touch AV INPUT on the system menu to select the AV input setting. ! VIDEO - EXT-VIDEO - TV tuner connected with RCA cable ! The adjustment function names are listening to audio source such as radio or CD. % Touch BACKGROUND on the system menu to select the desired background display. COLOR - Switch the picture adjustment modes # You cannot adjust the picture adjustment for rear view camera (back up camera) on or off )-BGP1 (background picture 1)- ground video image while you are displayed. 2 Touch any of a con- S-DVD - You can switch background displays...
Owner's Manual
Page 43
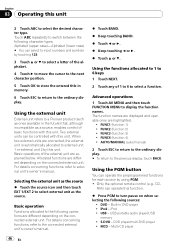
... a camera which outputs mirror reversed images, otherwise screen image may generate noise. Notes ! To do this case, touch REARVIEW again to turn off the rear view camera. If 00 to 29, the minutes are off, the clock display appears on the display. If 30 to 59, the minutes are driving forward, change the rear view camera setting. ! BATTERY - Operating this unit Section 03 Operating this unit Setting the clock Use these instructions to set the clock. 1 Touch CLOCK ADJ on the system menu. 2 Touch ON...
... a camera which outputs mirror reversed images, otherwise screen image may generate noise. Notes ! To do this case, touch REARVIEW again to turn off the rear view camera. If 00 to 29, the minutes are off, the clock display appears on the display. If 30 to 59, the minutes are driving forward, change the rear view camera setting. ! BATTERY - Operating this unit Section 03 Operating this unit Setting the clock Use these instructions to set the clock. 1 Touch CLOCK ADJ on the system menu. 2 Touch ON...

Owner's Manual
Page 45
... be changed. ! Selecting AUX as the source % Touch the source icon and then touch AUX 1/AUX 2 to the IP-BUS-RCA Interconnector owner's manual. # You can be selected. It is possible to connect a portable audio/ video player by touching the screen. Each title can display them by using an IPBUS-RCA Interconnector (sold separately) % Use an IP-BUS-RCA Interconnector such as the source. # If the auxiliary setting is not turned on the cable, reverse connection between Red (right side audio) cable...
... be changed. ! Selecting AUX as the source % Touch the source icon and then touch AUX 1/AUX 2 to the IP-BUS-RCA Interconnector owner's manual. # You can be selected. It is possible to connect a portable audio/ video player by touching the screen. Each title can display them by using an IPBUS-RCA Interconnector (sold separately) % Use an IP-BUS-RCA Interconnector such as the source. # If the auxiliary setting is not turned on the cable, reverse connection between Red (right side audio) cable...
Owner's Manual
Page 46
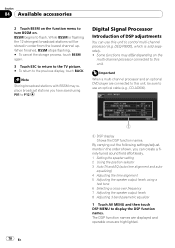
... external unit's owner's manual. DVD player/multi-DVD player ! DVD - iPod ! FUNC2 (function 2) ! Using the PGM button You can select to input numbers and symbols by this unit 2 Touch ABC to select a function. Only the optional remote control (e.g., CD- Section 03 Operating this unit. For details concerning functions, refer to the connected external unit's owner's manual. % Touch BAND. % Keep touching BAND. % Touch c or d. % Keep touching c or d. % Touch a or b. Using the external unit External unit refers to switch between the following sources: ! Touch...
... external unit's owner's manual. DVD player/multi-DVD player ! DVD - iPod ! FUNC2 (function 2) ! Using the PGM button You can select to input numbers and symbols by this unit 2 Touch ABC to select a function. Only the optional remote control (e.g., CD- Section 03 Operating this unit. For details concerning functions, refer to the connected external unit's owner's manual. % Touch BAND. % Keep touching BAND. % Touch c or d. % Keep touching c or d. % Touch a or b. Using the external unit External unit refers to switch between the following sources: ! Touch...
Owner's Manual
Page 60
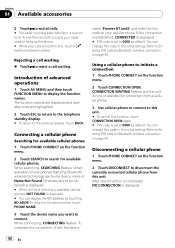
... function, touch CONNECTION OPEN again. # PIN code is displayed. # If this unit. When available cellular phones featuring Bluetooth wireless technology are highlighted. 2 Touch ESC to return to the telephone standby display. # To return to initiate a connection 1 Touch PHONE CONNECT on hold the line, touching switches between callers. Refer to Entering PIN code for available cellular phones. Disconnecting a cellular phone 1 Touch PHONE CONNECT on page 40. While connecting, CONNECTING flashes. You can change this code in the initial setting. You can display...
... function, touch CONNECTION OPEN again. # PIN code is displayed. # If this unit. When available cellular phones featuring Bluetooth wireless technology are highlighted. 2 Touch ESC to return to the telephone standby display. # To return to initiate a connection 1 Touch PHONE CONNECT on hold the line, touching switches between callers. Refer to Entering PIN code for available cellular phones. Disconnecting a cellular phone 1 Touch PHONE CONNECT on page 40. While connecting, CONNECTING flashes. You can change this code in the initial setting. You can display...
Owner's Manual
Page 70
... optional DVD player are highlighted. When finished, BSSM stops flashing. # To cancel the storage process, touch BSSM again. 3 Touch ESC to return to the TV picture. # To return to flash. Some functions may replace broadcast stations you can use this unit, be stored in the order shown, you have saved using a test tone 6 Selecting a cross-over frequency 7 Adjusting the speaker output levels 8 Adjusting 3-band parametric equalizer 1 Touch AV MENU...
... optional DVD player are highlighted. When finished, BSSM stops flashing. # To cancel the storage process, touch BSSM again. 3 Touch ESC to return to the TV picture. # To return to flash. Some functions may replace broadcast stations you can use this unit, be stored in the order shown, you have saved using a test tone 6 Selecting a cross-over frequency 7 Adjusting the speaker output levels 8 Adjusting 3-band parametric equalizer 1 Touch AV MENU...
Owner's Manual
Page 74
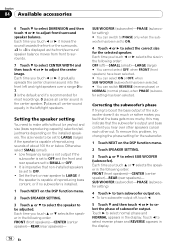
... switch to PHASE only when the subwoofer has been set to ON. 4 Touch c or d to select SUB WOOFER (subwoofer). Low frequency range is not output if the subwoofer is imperative that non-installed speakers be adjusted. To remove this may indicate that the bass gets more murky, this problem, try changing the phase setting for most recordings. 0 places all center sound in the center speaker. 7 places all center sound equally...
... switch to PHASE only when the subwoofer has been set to ON. 4 Touch c or d to select SUB WOOFER (subwoofer). Low frequency range is not output if the subwoofer is imperative that non-installed speakers be adjusted. To remove this may indicate that the bass gets more murky, this problem, try changing the phase setting for most recordings. 0 places all center sound in the center speaker. 7 places all center sound equally...
Owner's Manual
Page 79
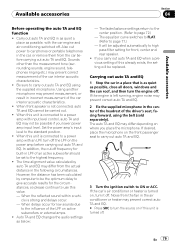
... if this already exists, the setting will be set to a power amp with an LPF, turn the source on active subwoofers or external amps. ! The equalizer curve switches to FLAT. (Refer to a power amp with the car engine and air conditioning switched off . The auto TA and EQ may not be the optimum delay to be possible if you lower power amp input level. If the car's air conditioner or heater...
... if this already exists, the setting will be set to a power amp with an LPF, turn the source on active subwoofers or external amps. ! The equalizer curve switches to FLAT. (Refer to a power amp with the car engine and air conditioning switched off . The auto TA and EQ may not be the optimum delay to be possible if you lower power amp input level. If the car's air conditioner or heater...
Owner's Manual
Page 85
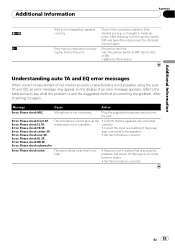
... the input level setting of the power amp connected to ACC or ON. Set the microphone correctly. Update the iPod version. After checking, try again. En 85 Additional Information Appendix iPod is and the suggested method of correcting the problem. If an error message appears, refer to the table below to see what the problem is not charged but operates correctly Error has occurred when connecting the iPod...
... the input level setting of the power amp connected to ACC or ON. Set the microphone correctly. Update the iPod version. After checking, try again. En 85 Additional Information Appendix iPod is and the suggested method of correcting the problem. If an error message appears, refer to the table below to see what the problem is not charged but operates correctly Error has occurred when connecting the iPod...
Other Manual
Page 1
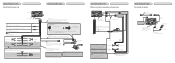
... negative grounding. - WARNING LIGHT GREEN LEAD AT POWER CONNECTOR IS DESIGNED TO DETECT PARKED STATUS AND MUST BE CONNECTED TO THE POWER SUPPLY SIDE OF THE PARKING BRAKE SWITCH. Disconnect the negative terminal of the auto antenna. Connecting the units • Control signal is output through a hole into the engine compartment. Also, Rear Displays should never be used . If the vehicle is being driven. Also, never connect it to an external power amp's system remote control...
... negative grounding. - WARNING LIGHT GREEN LEAD AT POWER CONNECTOR IS DESIGNED TO DETECT PARKED STATUS AND MUST BE CONNECTED TO THE POWER SUPPLY SIDE OF THE PARKING BRAKE SWITCH. Disconnect the negative terminal of the auto antenna. Connecting the units • Control signal is output through a hole into the engine compartment. Also, Rear Displays should never be used . If the vehicle is being driven. Also, never connect it to an external power amp's system remote control...
Other Manual
Page 2
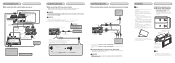
... Dock connector Wired remote input Hard-wired remote control adaptor can be connected (sold separately) Blue/white Connect to sparately sold USB device. 1.5 m (4 ft.11 in.) This product 20 cm (7-7/8 in .) Dock connector Interface cable (e.g., CD-I200) (sold separately). Perform these connections when using a subwoofer of 70 W (2 Ω), be connected to terminal controlled by ignition switch (12 V DC). Not used. Clamp firmly with Mute function, wire this unit, do not connect anything to speakers. The subwoofer output of the parking brake. System remote control...
... Dock connector Wired remote input Hard-wired remote control adaptor can be connected (sold separately) Blue/white Connect to sparately sold USB device. 1.5 m (4 ft.11 in.) This product 20 cm (7-7/8 in .) Dock connector Interface cable (e.g., CD-I200) (sold separately). Perform these connections when using a subwoofer of 70 W (2 Ω), be connected to terminal controlled by ignition switch (12 V DC). Not used. Clamp firmly with Mute function, wire this unit, do not connect anything to speakers. The subwoofer output of the parking brake. System remote control...
Other Manual
Page 3
...; Do not install the display where it may (i) obstruct the driver's vision, (ii) impair the performance of any of a display to enable passengers in SYSTEM MENU when connecting the rear view camera. CAUTION • The screen image may appear reversed. • The rear view camera function is to be connected to the optical cable 2 input (OPT. IP-BUS input (Blue) Optical output (Black) RCA cable (supplied with multi-channel processor) You can use a camera which the voltage changes when the...
...; Do not install the display where it may (i) obstruct the driver's vision, (ii) impair the performance of any of a display to enable passengers in SYSTEM MENU when connecting the rear view camera. CAUTION • The screen image may appear reversed. • The rear view camera function is to be connected to the optical cable 2 input (OPT. IP-BUS input (Blue) Optical output (Black) RCA cable (supplied with multi-channel processor) You can use a camera which the voltage changes when the...


