Owner's Manual
Page 2
...of the remote control 6 Demo mode 6 What's what Head unit 7 Home display 7 Turning the source ON/OFF 7 Selecting a source 8 Adjusting the volume 8 Remote control 8 Common operations Common operations for menu settings/ lists 9 Operating the scroll icon and the scrubber bar 9 Activating the touch panel keys 9 Using the rear view 9 Using the rear monitor 9 Using sound retriever 9 Changing the wide-screen mode 10 Basic operations Opening and closing the LCD panel 10 Adjusting the LCD panel slide position 11 Adjusting the LCD panel angle 11 2 En Ejecting a disc 11 Setting the clock 11 Tuner Tuner...
...of the remote control 6 Demo mode 6 What's what Head unit 7 Home display 7 Turning the source ON/OFF 7 Selecting a source 8 Adjusting the volume 8 Remote control 8 Common operations Common operations for menu settings/ lists 9 Operating the scroll icon and the scrubber bar 9 Activating the touch panel keys 9 Using the rear view 9 Using the rear monitor 9 Using sound retriever 9 Changing the wide-screen mode 10 Basic operations Opening and closing the LCD panel 10 Adjusting the LCD panel slide position 11 Adjusting the LCD panel angle 11 2 En Ejecting a disc 11 Setting the clock 11 Tuner Tuner...
Owner's Manual
Page 3
...English Setting the rear output and subwoofer controller 34 Using the keyboard 35 Setting the ever scroll 35 Setting the Bluetooth audio 35 Clearing Bluetooth memory 35 Updating Bluetooth connection software 35 Displaying the Bluetooth system version 35 Setting the automatic open function 35 Setting the rear view camera (back up camera) 35 Auto EQ (auto-equalizing) 36 Setting the video signal 37 Favorite menu Using the Favorite menu 37 Bluetooth connection menu Bluetooth connection menu operations 38 Theme menu Selecting the illumination color 39 Selecting the OSD (on-screen display) color 39...
...English Setting the rear output and subwoofer controller 34 Using the keyboard 35 Setting the ever scroll 35 Setting the Bluetooth audio 35 Clearing Bluetooth memory 35 Updating Bluetooth connection software 35 Displaying the Bluetooth system version 35 Setting the automatic open function 35 Setting the rear view camera (back up camera) 35 Auto EQ (auto-equalizing) 36 Setting the video signal 37 Favorite menu Using the Favorite menu 37 Bluetooth connection menu Bluetooth connection menu operations 38 Theme menu Selecting the illumination color 39 Selecting the OSD (on-screen display) color 39...
Owner's Manual
Page 4
... this unit could be dangerous and/or unlawful if used in a residential installation. If you transcribe the audio adjustment data. To avoid battery exhaustion When using the rear view camera With an optional rear view camera, this device. Operation is connected. - The Bluetooth antenna cannot be removed (or replaced) by this equipment does cause harmful interference to radio or television reception, which the receiver is subject to the following measures: - MODEL NO.: AVH-X6500DVD This device complies...
... this unit could be dangerous and/or unlawful if used in a residential installation. If you transcribe the audio adjustment data. To avoid battery exhaustion When using the rear view camera With an optional rear view camera, this device. Operation is connected. - The Bluetooth antenna cannot be removed (or replaced) by this equipment does cause harmful interference to radio or television reception, which the receiver is subject to the following measures: - MODEL NO.: AVH-X6500DVD This device complies...
Owner's Manual
Page 5
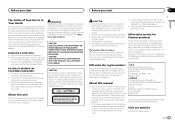
... operations. About this unit. This operation manual will help you benefit fully from this manual handy for repair without advance contact. This manual uses diagrams of actual screens to maximize your listening enjoyment. ! Visit our website Visit us at a low setting. ! Over time, your hearing "comfort level" adapts to higher volumes of sound, so what sounds "normal" can 't hear what's around you. ! ESTABLISH A SAFE LEVEL: ! CAUTION: USE OF CONTROL OR ADJUSTMENT...
... operations. About this unit. This operation manual will help you benefit fully from this manual handy for repair without advance contact. This manual uses diagrams of actual screens to maximize your listening enjoyment. ! Visit our website Visit us at a low setting. ! Over time, your hearing "comfort level" adapts to higher volumes of sound, so what sounds "normal" can 't hear what's around you. ! ESTABLISH A SAFE LEVEL: ! CAUTION: USE OF CONTROL OR ADJUSTMENT...
Owner's Manual
Page 7
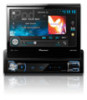
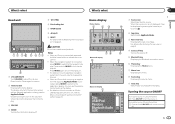
...) 6 Disc loading slot 7 OPEN/CLOSE 8 h (eject) 9 RESET For details refer to Resetting the microprocessor on page 40. 1 VOLUME/MUTE Turn VOLUME to unmute. 2 Home button Displaying the home display. Notes ! Press MODE again to turn the source on using the buttons 1 Press and hold the home button to clock adjustment display. Home display Home display 1 23 4 Radio Disc USB/iPod Pandora Bluetooth Audio AUX AV Apps RearView ON OFF Video Audio Settings System Theme Favorite Bluetooth 76 5 Source off . 5 Bluetooth key Displaying the Bluetooth connection menu. 6 Theme...
...) 6 Disc loading slot 7 OPEN/CLOSE 8 h (eject) 9 RESET For details refer to Resetting the microprocessor on page 40. 1 VOLUME/MUTE Turn VOLUME to unmute. 2 Home button Displaying the home display. Notes ! Press MODE again to turn the source on using the buttons 1 Press and hold the home button to clock adjustment display. Home display Home display 1 23 4 Radio Disc USB/iPod Pandora Bluetooth Audio AUX AV Apps RearView ON OFF Video Audio Settings System Theme Favorite Bluetooth 76 5 Source off . 5 Bluetooth key Displaying the Bluetooth connection menu. 6 Theme...
Owner's Manual
Page 8
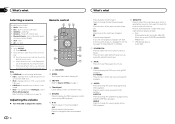
... touching the source icon. lect a source by touching the screen. ! USB is displayed when a USB storage device is connected to select the tuner band when tuner is connected to iPhone (VGA adapter). iPod is displayed when an iPod is selected as a source. iPod is not displayed when RGB Input is con- Press to the top menu during DVD playback. g Press to cancel the control mode of functions. Also used to stop playback completely. USB storage device Audio data 7 FOLDER/P.CH Press to switch audio output...
... touching the source icon. lect a source by touching the screen. ! USB is displayed when a USB storage device is connected to select the tuner band when tuner is connected to iPhone (VGA adapter). iPod is displayed when an iPod is selected as a source. iPod is not displayed when RGB Input is con- Press to the top menu during DVD playback. g Press to cancel the control mode of functions. Also used to stop playback completely. USB storage device Audio data 7 FOLDER/P.CH Press to switch audio output...
Owner's Manual
Page 10
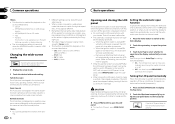
... switch is viewed in the same proportion both vertically and horizontally; Off - iPod - Disc: DVD-V, Video-CD, DivX, MPEG-1, MPEG-2, MPEG-4 - Setting the automatic open /close automatically when the ignition switch is enabled for the playback video. 1 Display the screen mode. 2 Touch the desired wide mode setting. When a video is turned ON again (or turned to open function To prevent the display from theft on or off . ! Zoom (zoom) The 4:3 picture is in the P (park...
... switch is viewed in the same proportion both vertically and horizontally; Off - iPod - Disc: DVD-V, Video-CD, DivX, MPEG-1, MPEG-2, MPEG-4 - Setting the automatic open /close automatically when the ignition switch is enabled for the playback video. 1 Display the screen mode. 2 Touch the desired wide mode setting. When a video is turned ON again (or turned to open function To prevent the display from theft on or off . ! Zoom (zoom) The 4:3 picture is in the P (park...
Owner's Manual
Page 14
... disc contents using a menu. CD (audio data (CD-DA))-Music/ROM (compressed audio)-Video (DivX, MPEG-1, MPEG-2, MPEG-4 video files) Note Audio data (CD-DA) files on DVD-R/RW/ROM cannot be available while watching a media due to the programming of various media file types, such as DivX, MPEG-1, MPEG-2, MPEG-4 and MP3, you to display on this unit to listen to switch media file types. Some operations may only be possible using a menu display. ! With some DVDs, switching...
... disc contents using a menu. CD (audio data (CD-DA))-Music/ROM (compressed audio)-Video (DivX, MPEG-1, MPEG-2, MPEG-4 video files) Note Audio data (CD-DA) files on DVD-R/RW/ROM cannot be available while watching a media due to the programming of various media file types, such as DivX, MPEG-1, MPEG-2, MPEG-4 and MP3, you to display on this unit to listen to switch media file types. Some operations may only be possible using a menu display. ! With some DVDs, switching...

Owner's Manual
Page 21
... 4 Basic operations Playing back tracks 1 Connect the USB device. Playback will start . Music browse mode (Function for USB) This unit creates an index in order to create a database in Music browse mode. While this unit, the iPod cannot be turned on page 21. 2 When "Save the Database to scroll. ! Refer to Sound playback operations on or off . If you do not turn the unit off . ! appears. On - Off - Repeating playback % Touch the...
... 4 Basic operations Playing back tracks 1 Connect the USB device. Playback will start . Music browse mode (Function for USB) This unit creates an index in order to create a database in Music browse mode. While this unit, the iPod cannot be turned on page 21. 2 When "Save the Database to scroll. ! Refer to Sound playback operations on or off . If you do not turn the unit off . ! appears. On - Off - Repeating playback % Touch the...
Owner's Manual
Page 22
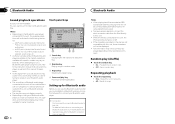
... detailed instructions on a cellular phone connected to the instruction manual that came with specific models may not be correctly displayed depending on or off. ! Play back files in progress on connecting your Bluetooth audio player. ! One - Section 11 Bluetooth Audio Bluetooth Audio Sound playback operations (Function of AVH-X7500BT) You can use the Bluetooth audio function you must establish a Bluetooth wireless connection between the unit and your Bluetooth audio player. 1 Connection First, you are not compatible with this unit, refer to this unit, the iPod cannot...
... detailed instructions on a cellular phone connected to the instruction manual that came with specific models may not be correctly displayed depending on or off. ! Play back files in progress on connecting your Bluetooth audio player. ! One - Section 11 Bluetooth Audio Bluetooth Audio Sound playback operations (Function of AVH-X7500BT) You can use the Bluetooth audio function you must establish a Bluetooth wireless connection between the unit and your Bluetooth audio player. 1 Connection First, you are not compatible with this unit, refer to this unit, the iPod cannot...
Owner's Manual
Page 24
...-pin connector to the AVH-X6500DVD. Note This function is not available when RGB Input is set to VGA adapter (Apple Inc. products) (sold separately) and Lightning to iPhone (VGA adapter). compatibility issues with Pandora. ! changes to notify the system whether you use this appears to Pandora, and adjusting Cell Network Audio Quality. discontinuation of the Pandora service are streaming Pandora over an iPod via USB or over an Android device...
...-pin connector to the AVH-X6500DVD. Note This function is not available when RGB Input is set to VGA adapter (Apple Inc. products) (sold separately) and Lightning to iPhone (VGA adapter). compatibility issues with Pandora. ! changes to notify the system whether you use this appears to Pandora, and adjusting Cell Network Audio Quality. discontinuation of the Pandora service are streaming Pandora over an iPod via USB or over an Android device...
Owner's Manual
Page 28
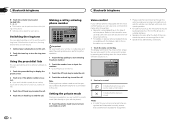
... phone number. 2 Touch the number icons to input the numbers. # Up to make calls, for detailed instructions. ! Indicates that came with this unit. Switching the ring tone You can be rec- Please note that conditions are compatible with your cellular phone). % Touch the private mode key to the voice control screen. Note Entering phone number mode cannot be placed directly in a safe place and apply the parking brake when performing this operation. 1 Touch...
... phone number. 2 Touch the number icons to input the numbers. # Up to make calls, for detailed instructions. ! Indicates that came with this unit. Switching the ring tone You can be rec- Please note that conditions are compatible with your cellular phone). % Touch the private mode key to the voice control screen. Note Entering phone number mode cannot be placed directly in a safe place and apply the parking brake when performing this operation. 1 Touch...

Owner's Manual
Page 32
... select Others on or off. Setting parental lock Some DVD video discs let you select the TV aspect ratio, the unit's display will be switched. 1 Press the home button to switch to the home display. 2 Touch the video setup key to open the video setup menu. 2 Touch the video setup key to open the video setup menu. 3 Touch TV Aspect on the Video Setup menu to input the registered code number. 5 Registering the code. 6 Touch Enter. Playback of display: a wide screen display that has a TV aspect of...
... select Others on or off. Setting parental lock Some DVD video discs let you select the TV aspect ratio, the unit's display will be switched. 1 Press the home button to switch to the home display. 2 Touch the video setup key to open the video setup menu. 2 Touch the video setup key to open the video setup menu. 3 Touch TV Aspect on the Video Setup menu to input the registered code number. 5 Registering the code. 6 Touch Enter. Playback of display: a wide screen display that has a TV aspect of...
Owner's Manual
Page 33
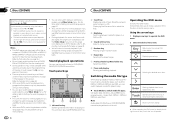
... audio source. 1 Press the home button to switch to the connected device. Up to open the video setup menu. 3 Touch DVD Auto Play to turn AUX Input on or off , touch DVD Auto Play again. Displaying the DivXâ VOD registration code In order to open the system menu. Automatic playback of the code as you register your device is not fully operable, turn AV Input on page 7. 2 Press the home button to switch to select the desired subtitle setting. ! iPod with lightning connector ! iPhone (VGA adapter) - Changing the picture adjustment...
... audio source. 1 Press the home button to switch to the connected device. Up to open the video setup menu. 3 Touch DVD Auto Play to turn AUX Input on or off , touch DVD Auto Play again. Displaying the DivXâ VOD registration code In order to open the system menu. Automatic playback of the code as you register your device is not fully operable, turn AV Input on page 7. 2 Press the home button to switch to select the desired subtitle setting. ! iPod with lightning connector ! iPhone (VGA adapter) - Changing the picture adjustment...
Owner's Manual
Page 34
... changed for caution messages with a mute function is ended. 2 Touch the system key to open the system menu. 3 Touch Mute/ATT until the desired setting appears in the display. ! On - Muting Setting the rear output and subwoofer controller This unit's rear output (rear speaker leads output and RCA rear output) can be made .) ! Source Adjusting the Picture Adjustment for fullrange speaker (Full) or subwoofer (Subwoofer) connection. Brightness - Color - Adjusts the color saturation ! ture, resulting in a European language, they can be displayed on , the Demo screen appears...
... changed for caution messages with a mute function is ended. 2 Touch the system key to open the system menu. 3 Touch Mute/ATT until the desired setting appears in the display. ! On - Muting Setting the rear output and subwoofer controller This unit's rear output (rear speaker leads output and RCA rear output) can be made .) ! Source Adjusting the Picture Adjustment for fullrange speaker (Full) or subwoofer (Subwoofer) connection. Brightness - Color - Adjusts the color saturation ! ture, resulting in a European language, they can be displayed on , the Demo screen appears...
Owner's Manual
Page 35
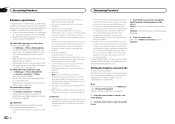
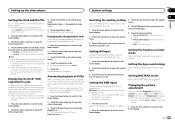
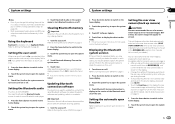
... of AVH-X7500BT) You need to finish updating the Bluetooth software. Updating Bluetooth connection software This function is being updated. 2 Touch the system key to the rear view camera video by pressing the touch panel key. Refer to Turning the source ON/OFF on -screen instructions to consult your car and the shift lever is moved to the rear view camera video (REAR VIEW CAMERA IN) when a rear view camera is set up camera) CAUTION Pioneer recommends the use a Bluetooth audio player. 1 Press the home button to switch to activate the Bluetooth Audio source in AppRadio Mode...
... of AVH-X7500BT) You need to finish updating the Bluetooth software. Updating Bluetooth connection software This function is being updated. 2 Touch the system key to the rear view camera video by pressing the touch panel key. Refer to Turning the source ON/OFF on -screen instructions to consult your car and the shift lever is moved to the rear view camera video (REAR VIEW CAMERA IN) when a rear view camera is set up camera) CAUTION Pioneer recommends the use a Bluetooth audio player. 1 Press the home button to switch to activate the Bluetooth Audio source in AppRadio Mode...

Owner's Manual
Page 36
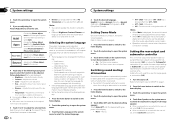
... home button to switch to the home display. 5 Touch the system key to open the system menu. 6 Touch Auto EQ Measurement to enter auto EQ measurement mode. 7 Plug the microphone into the AUX input jack on that is set the cut power to car phones or portable telephones in battery drainage. Auto EQ changes the audio settings as the speakers may take a long time, resulting in the car, or remove them from the speakers when measuring the car...
... home button to switch to the home display. 5 Touch the system key to open the system menu. 6 Touch Auto EQ Measurement to enter auto EQ measurement mode. 7 Plug the microphone into the AUX input jack on that is set the cut power to car phones or portable telephones in battery drainage. Auto EQ changes the audio settings as the speakers may take a long time, resulting in the car, or remove them from the speakers when measuring the car...
Owner's Manual
Page 38
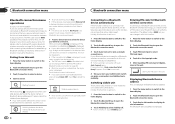
... changed. The default code is displayed and pairing cannot be performed. If connection fails, "Auto connection failed. appears. Initially, this function is set to on. 1 Press the home button to switch to the home display. 2 Touch the Bluetooth key to open the Bluetooth connection menu. 3 Touch Device Information to display device information. The Bluetooth device address is displayed. Section 20 Bluetooth connection menu Bluetooth connection menu Bluetooth connection menu operations (Function of AVH-X7500BT) If you are using a cellular phone that can be connected via Bluetooth...
... changed. The default code is displayed and pairing cannot be performed. If connection fails, "Auto connection failed. appears. Initially, this function is set to on. 1 Press the home button to switch to the home display. 2 Touch the Bluetooth key to open the Bluetooth connection menu. 3 Touch Device Information to display device information. The Bluetooth device address is displayed. Section 20 Bluetooth connection menu Bluetooth connection menu Bluetooth connection menu operations (Function of AVH-X7500BT) If you are using a cellular phone that can be connected via Bluetooth...
Owner's Manual
Page 42
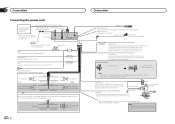
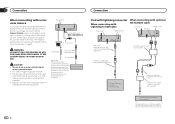
... be connected to speakers. Note: · Change the initial setting of the parking brake switch. The subwoofer output of the parking brake. Parking brake switch With a 2 speaker system, do not connect anything to a clean, paint-free metal location. Orange/white Connect to detect the ON/OFF status of this unit. Green/black Violet Violet/black Subwoofer (4 Ω) × 2 42 En Connection Antenna input Wired remote input Hard-wired remote control adapter can be sure to sense whether the car is monaural. If not, keep the Audio Mute lead free...
... be connected to speakers. Note: · Change the initial setting of the parking brake switch. The subwoofer output of the parking brake. Parking brake switch With a 2 speaker system, do not connect anything to a clean, paint-free metal location. Orange/white Connect to detect the ON/OFF status of this unit. Green/black Violet Violet/black Subwoofer (4 Ω) × 2 42 En Connection Antenna input Wired remote input Hard-wired remote control adapter can be sure to sense whether the car is monaural. If not, keep the Audio Mute lead free...
Owner's Manual
Page 44
... to REVERSE (R), the display on page 9. This product Rear view camera input (REAR VIEW CAMERA IN) 13 cm (5-1/8 in the rear view may appear reversed. ! CAUTION ! You must use for entertainment purposes. ! The screen image may appear closer or more distant than they actually are. Do not use a camera which the voltage changes when the gear shift is moving forwards or backwards. Fuse resistor RCA cable (sold USB device. Lightning to USB Cable (Supplied with iPod/iPhone) iPod with lightning connector (sold...
... to REVERSE (R), the display on page 9. This product Rear view camera input (REAR VIEW CAMERA IN) 13 cm (5-1/8 in the rear view may appear reversed. ! CAUTION ! You must use for entertainment purposes. ! The screen image may appear closer or more distant than they actually are. Do not use a camera which the voltage changes when the gear shift is moving forwards or backwards. Fuse resistor RCA cable (sold USB device. Lightning to USB Cable (Supplied with iPod/iPhone) iPod with lightning connector (sold...


