Owner's Manual
Page 3
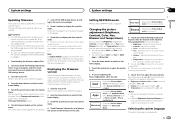
... background display 46 Other functions Adjusting the response positions of DVDs 39 System settings Switching the auxiliary setting 40 Setting AV input 40 Setting the navigation system 40 Setting the Pandora connect mode 40 Selecting MirrorLink Mode 40 Updating the firmware for DVD 68 Specifications 69 En 3 English
... background display 46 Other functions Adjusting the response positions of DVDs 39 System settings Switching the auxiliary setting 40 Setting AV input 40 Setting the navigation system 40 Setting the Pandora connect mode 40 Selecting MirrorLink Mode 40 Updating the firmware for DVD 68 Specifications 69 En 3 English
Owner's Manual
Page 7
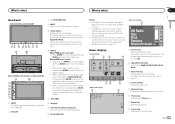
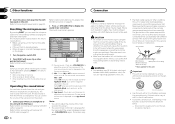
... how to operate a navigation system from this unit, refer to connect an auto EQ microphone. You can use the application by touching the display. ! a Disc loading slot Notes ! For details on . When the source icon is not used ! What's what What's what Section 03 English Head unit AVH-X5600BHS and AVH-X4600BT 3 +/- (VOLUME/VOL...
... how to operate a navigation system from this unit, refer to connect an auto EQ microphone. You can use the application by touching the display. ! a Disc loading slot Notes ! For details on . When the source icon is not used ! What's what What's what Section 03 English Head unit AVH-X5600BHS and AVH-X4600BT 3 +/- (VOLUME/VOL...
Owner's Manual
Page 40
...to open the system menu. 4 Touch Device connection on the system menu. 5 Touch NAVI to select. NAVI - Setting the navigation system Activate this setting when connecting a Pioneer Add-on page 8. 4 Press the home button to switch to the home display. 5 Touch the system key to specify the... Downloading the firmware update files. 2 Connect a blank (formatted) USB storage device to our website. Refer to Turning the source ON/OFF on Navigation system (sold separately). You can be asked to open the system menu. Perform the following conditions are met. - The USB storage device for ...
...to open the system menu. 4 Touch Device connection on the system menu. 5 Touch NAVI to select. NAVI - Setting the navigation system Activate this setting when connecting a Pioneer Add-on page 8. 4 Press the home button to switch to the home display. 5 Touch the system key to specify the... Downloading the firmware update files. 2 Connect a blank (formatted) USB storage device to our website. Refer to Turning the source ON/OFF on Navigation system (sold separately). You can be asked to open the system menu. Perform the following conditions are met. - The USB storage device for ...
Owner's Manual
Page 41
... can be adjusted from +1 to +48. # Temperature can adjust the Brightness (brightness), Contrast (contrast), Color (color) , Hue (hue), Dimmer (dimmer), and Temperature (temperature) for the Navigation system when Device connection is set - NAVI Apps MirrorLink Completing Picture Adjustment for each source and rear view camera. ! Completing Picture Adjustment for the audio...
... can be adjusted from +1 to +48. # Temperature can adjust the Brightness (brightness), Contrast (contrast), Color (color) , Hue (hue), Dimmer (dimmer), and Temperature (temperature) for the Navigation system when Device connection is set - NAVI Apps MirrorLink Completing Picture Adjustment for each source and rear view camera. ! Completing Picture Adjustment for the audio...
Owner's Manual
Page 48
... compart- ment to connect the yellow cable of the main sound. This unit cannot be reset in fire, generation of the vehicle, such as the navigation sound, from the passenger compartment into the engine compartment. To prevent a short-circuit, overheating or malfunction, be used. Note Switch your iPhone or smartphone simultaneously...
... compart- ment to connect the yellow cable of the main sound. This unit cannot be reset in fire, generation of the vehicle, such as the navigation sound, from the passenger compartment into the engine compartment. To prevent a short-circuit, overheating or malfunction, be used. Note Switch your iPhone or smartphone simultaneously...
Owner's Manual
Page 50
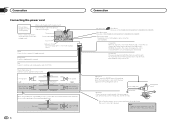
...be connected (sold separately) 26 pin cable (Supplied with Violet and Violet/black leads of AVH-X5600BHS/AVH-X4600BT/AVH-X3600BHS/AVH-X2600BT) Wired remote input Hard-wired remote control adapter can be sure to connect with navigation unit) Insert the 26 pin cable in the direction indicated in which the voltage changes ... lead wires connected to the back lamp, connect the one in the figure. Section 26 Connection Connecting the power cord Pioneer Add-on that are not connected to speakers. This connection enables the unit to sense whether the car is moving forwards or backwards...
...be connected (sold separately) 26 pin cable (Supplied with Violet and Violet/black leads of AVH-X5600BHS/AVH-X4600BT/AVH-X3600BHS/AVH-X2600BT) Wired remote input Hard-wired remote control adapter can be sure to connect with navigation unit) Insert the 26 pin cable in the direction indicated in which the voltage changes ... lead wires connected to the back lamp, connect the one in the figure. Section 26 Connection Connecting the power cord Pioneer Add-on that are not connected to speakers. This connection enables the unit to sense whether the car is moving forwards or backwards...


