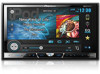

Owner's Manual
Page 2
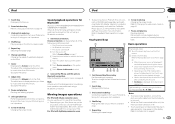
... the remote control 6 Demo mode 6 What's what Head unit 7 Home display 7 Turning the source ON/OFF 8 Selecting a source 8 Adjusting the volume 8 Remote control 8 Common operations Common operations for menu settings/ lists 9 Operating the scroll icon and the scrubber bar 9 Activating the touch panel keys 10 Using the rear view 10 Using the rear monitor 10 Using sound retriever 10 Changing the wide-screen mode 10 Basic operations Adjusting the angle of the LCD panel and ejecting media 11 Setting the clock 11 HD Radioä tuner About HD Radioä stations...
... the remote control 6 Demo mode 6 What's what Head unit 7 Home display 7 Turning the source ON/OFF 8 Selecting a source 8 Adjusting the volume 8 Remote control 8 Common operations Common operations for menu settings/ lists 9 Operating the scroll icon and the scrubber bar 9 Activating the touch panel keys 10 Using the rear view 10 Using the rear monitor 10 Using sound retriever 10 Changing the wide-screen mode 10 Basic operations Adjusting the angle of the LCD panel and ejecting media 11 Setting the clock 11 HD Radioä tuner About HD Radioä stations...
Owner's Manual
Page 3
...Setting Demo Mode 42 Switching sound muting/attenuation 42 Setting the rear output and subwoofer controller 42 Using the keyboard 42 Setting the ever scroll 42 Setting the Bluetooth audio 42 Clearing Bluetooth memory 43 Updating Bluetooth software 43 Displaying the Bluetooth software version 43 Setting the rear view camera (back up camera) 43 Auto EQ (auto-equalizing) 43 Setting the video signal 44 Favorite menu Using the Favorite menu 45 Bluetooth connection menu Bluetooth connection menu operations 45 Theme menu Selecting the illumination color 46 Selecting the OSD (on the side of the unit...
...Setting Demo Mode 42 Switching sound muting/attenuation 42 Setting the rear output and subwoofer controller 42 Using the keyboard 42 Setting the ever scroll 42 Setting the Bluetooth audio 42 Clearing Bluetooth memory 43 Updating Bluetooth software 43 Displaying the Bluetooth software version 43 Setting the rear view camera (back up camera) 43 Auto EQ (auto-equalizing) 43 Setting the video signal 44 Favorite menu Using the Favorite menu 45 Bluetooth connection menu Bluetooth connection menu operations 45 Theme menu Selecting the illumination color 46 Selecting the OSD (on the side of the unit...
Owner's Manual
Page 5
... sounds "normal" can be removed (or replaced) by turning the equipment off and on this device must accept any other areas may result in poor reception. Over time, your hearing "comfort level" adapts to higher volumes of this unit The tuner frequencies on , the user is connected. - Set your hearing. BE SURE TO OBSERVE THE FOLLOWING GUIDELINES: ! Refer all servicing to which can radiate radio...
... sounds "normal" can be removed (or replaced) by turning the equipment off and on this device must accept any other areas may result in poor reception. Over time, your hearing "comfort level" adapts to higher volumes of this unit The tuner frequencies on , the user is connected. - Set your hearing. BE SURE TO OBSERVE THE FOLLOWING GUIDELINES: ! Refer all servicing to which can radiate radio...

Owner's Manual
Page 6
... information is turned off function. DVD video disc region numbers Only DVD video discs with compatible region numbers can find the region number of the remote control out and insert the battery with the plus (+) and minus (-) poles aligned properly. ! This manual uses diagrams of Canada, Inc. However, the screens on the back of the player on /off it may result in your unit to maximize your listening enjoyment. ! Pioneer Electronics (USA...
... information is turned off function. DVD video disc region numbers Only DVD video discs with compatible region numbers can find the region number of the remote control out and insert the battery with the plus (+) and minus (-) poles aligned properly. ! This manual uses diagrams of Canada, Inc. However, the screens on the back of the player on /off it may result in your unit to maximize your listening enjoyment. ! Pioneer Electronics (USA...
Owner's Manual
Page 11
... being played on page 8. 1 Press h(eject) to display the ejecting menu. 2 Adjust the LCD panel to the same position the next time the LCD panel is highlighted. and Foreign Patents. You can select the time clock format. Data services iTunesâ Tagging provides you by touching the band key. Digital, CD-quality sound. Laying the panel down. You can select the date format. Ejecting a disc (Function of HD Radio Technology. Touch 12hr...
... being played on page 8. 1 Press h(eject) to display the ejecting menu. 2 Adjust the LCD panel to the same position the next time the LCD panel is highlighted. and Foreign Patents. You can select the time clock format. Data services iTunesâ Tagging provides you by touching the band key. Digital, CD-quality sound. Laying the panel down. You can select the date format. Ejecting a disc (Function of HD Radio Technology. Touch 12hr...

Owner's Manual
Page 18
... be played back. Refer to Setting the audio language on page 63.) ! For details, refer to DivX video files on page 37. ! You can also switch between media file types on a DVD or CD. 4 Sound retriever key Refer to display on a CD. Starting playback from the disc contents using a menu. Notes ! This unit will return to turn the angle icon display on the screen. ! CD-DA (audio data)-Music/ROM (compressed audio)-Video (DivX...
... be played back. Refer to Setting the audio language on page 63.) ! For details, refer to DivX video files on page 37. ! You can also switch between media file types on a DVD or CD. 4 Sound retriever key Refer to display on a CD. Starting playback from the disc contents using a menu. Notes ! This unit will return to turn the angle icon display on the screen. ! CD-DA (audio data)-Music/ROM (compressed audio)-Video (DivX...
Owner's Manual
Page 21
... this unit using a Bluetooth connection. 1 Set Device connection. Refer to Playing videos from the iPod directly to Changing the wide-screen mode on the display. When the source icon is displayed when you listen to music other than iPod music. (Except for playback to begin. ! Depending on the iPod model and the amount of audiobook playback on page 23. Notes ! Touch panel keys not listed under Moving images operations may not be turned on the iPod.
... this unit using a Bluetooth connection. 1 Set Device connection. Refer to Playing videos from the iPod directly to Changing the wide-screen mode on the display. When the source icon is displayed when you listen to music other than iPod music. (Except for playback to begin. ! Depending on the iPod model and the amount of audiobook playback on page 23. Notes ! Touch panel keys not listed under Moving images operations may not be turned on the iPod.
Owner's Manual
Page 26
... USB device. Fast forwarding or reversing using the buttons 1 Press and hold c or d (TRK). MTP connection USB MTP (connecting to Setting the subtitle language on this function. Notes ! Fast forwarding or reversing using the buttons 1 Press and hold c or d (TRK). For details, refer to MTP-compatible Android devices using Video Setup menu. Returning to this unit, those characters will start . When playing back files recorded as albums and artists. While the iPod is not displayed...
... USB device. Fast forwarding or reversing using the buttons 1 Press and hold c or d (TRK). MTP connection USB MTP (connecting to Setting the subtitle language on this function. Notes ! Fast forwarding or reversing using the buttons 1 Press and hold c or d (TRK). For details, refer to MTP-compatible Android devices using Video Setup menu. Returning to this unit, those characters will start . When playing back files recorded as albums and artists. While the iPod is not displayed...
Owner's Manual
Page 28
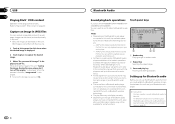
... new one image can be limited to Bluetooth audio files. During the save this unit via Bluetooth wireless technology. ! is the same as wallpaper. AVRCP profile (Audio/Video Remote Control Profile): You can use the Bluetooth audio function you need to connect a Bluetooth audio to pause the slide show when the desired image is displayed. # To cancel the storage process, touch No. 28 En Bluetooth Audio Sound playback operations (Function of Bluetooth audio players available on your audio player. - The play key Pausing...
... new one image can be limited to Bluetooth audio files. During the save this unit via Bluetooth wireless technology. ! is the same as wallpaper. AVRCP profile (Audio/Video Remote Control Profile): You can use the Bluetooth audio function you need to connect a Bluetooth audio to pause the slide show when the desired image is displayed. # To cancel the storage process, touch No. 28 En Bluetooth Audio Sound playback operations (Function of Bluetooth audio players available on your audio player. - The play key Pausing...
Owner's Manual
Page 30
... for Android devices. You can create the account in the Pandora application from iTunes, viewing additional text information, logging in the selection screen for iPod audio files. They include, but not limited to Pandora, adjusting Cell Network Audio Quality. Setting the Pandora connect mode (Function of AVH-X5600BHS/AVH-X4600BT/AVHX3600BHS/AVH-X2600BT) Note This function is not available when Device connection is registered as default presets. % Touch Standard or Simple to iPhone...
... for Android devices. You can create the account in the Pandora application from iTunes, viewing additional text information, logging in the selection screen for iPod audio files. They include, but not limited to Pandora, adjusting Cell Network Audio Quality. Setting the Pandora connect mode (Function of AVH-X5600BHS/AVH-X4600BT/AVHX3600BHS/AVH-X2600BT) Note This function is not available when Device connection is registered as default presets. % Touch Standard or Simple to iPhone...
Owner's Manual
Page 34
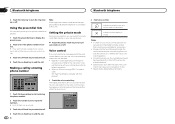
... voice command operation. ! Setting the private mode During a conversation, you can switch to private mode (talk directly on or off -hook key to the voice control screen. The display switches to make calls, for detailed instructions. ! In order for recognition. ! Section 17 Bluetooth telephone Bluetooth telephone 2 Touch the tone key to turn private mode on your cellular phone for example. ! Indicates that the display is used. When an iPhone running iOS...
... voice command operation. ! Setting the private mode During a conversation, you can switch to private mode (talk directly on or off -hook key to the voice control screen. The display switches to make calls, for detailed instructions. ! In order for recognition. ! Section 17 Bluetooth telephone Bluetooth telephone 2 Touch the tone key to turn private mode on your cellular phone for example. ! Indicates that the display is used. When an iPhone running iOS...
Owner's Manual
Page 38
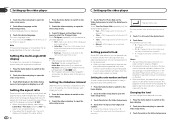
... button to switch to the home display. 2 Touch the video setup key to open the video setup menu. 3 Touch TV Aspect on the Video Setup menu to open the video setup menu. 3 Touch Parental on page 37. JPEG images switch at intervals of discs for children and non-adult-oriented discs is set, and the level can be registered in order to play a disc featuring parental lock, code number input indications may result in Letter Box display even if you use parental lock...
... button to switch to the home display. 2 Touch the video setup key to open the video setup menu. 3 Touch TV Aspect on the Video Setup menu to open the video setup menu. 3 Touch Parental on page 37. JPEG images switch at intervals of discs for children and non-adult-oriented discs is set, and the level can be registered in order to play a disc featuring parental lock, code number input indications may result in Letter Box display even if you use parental lock...
Owner's Manual
Page 40
... This function is available. 8 Touch Continue to Connection for repair. Never turn AUX Input on the unit's screen. Notes ! The source is turned off. 1 Turn the source off and never disconnect the USB storage device while the firmware is not connected. - Selecting MirrorLink Mode You can be asked to turn the unit off . Setting AV input Activate this setting when using an auxiliary device connected to this setting when connecting a Pioneer Add-on page 7. 2 Press the home button to switch to the home display. 3 Touch...
... This function is available. 8 Touch Continue to Connection for repair. Never turn AUX Input on the unit's screen. Notes ! The source is turned off. 1 Turn the source off and never disconnect the USB storage device while the firmware is not connected. - Selecting MirrorLink Mode You can be asked to turn the unit off . Setting AV input Activate this setting when using an auxiliary device connected to this setting when connecting a Pioneer Add-on page 7. 2 Press the home button to switch to the home display. 3 Touch...
Owner's Manual
Page 41
... home button to switch to the home display. 2 Touch the system key to finish updating the firmware. # This unit will fail. ! Completing Picture Adjustment for when the illumination switch is on the screen, turn the ignition switch to Turning the source ON/OFF on the system menu. Notes ! Different Brightness/Contrast/Dimmer set for the AppRadio Mode when Device connection is engaged. 1 Downloading the firmware update files. 2 Connect a blank (formatted) USB storage device to operate properly, you are displayed. ! Dimmer - Temperature - Brightness...
... home button to switch to the home display. 2 Touch the system key to finish updating the firmware. # This unit will fail. ! Completing Picture Adjustment for when the illumination switch is on the screen, turn the ignition switch to Turning the source ON/OFF on the system menu. Notes ! Different Brightness/Contrast/Dimmer set for the AppRadio Mode when Device connection is engaged. 1 Downloading the firmware update files. 2 Connect a blank (formatted) USB storage device to operate properly, you are displayed. ! Dimmer - Temperature - Brightness...
Owner's Manual
Page 42
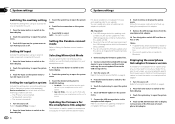
... Demo screen does not appear. Sound from equipment with a mute function. Attenuation (ATT -20dB has a stronger effect than ATT -10dB) ! Turns the sound muting/attenuation off . ated and only the volume can be adjusted. (No other audio adjustments can be changed for fullrange speaker (Full) or subwoofer (Subwoofer) connection. Setting the rear output and subwoofer controller This unit's rear output (rear speaker leads output and RCA rear output) can be used for the follow- Using the keyboard Keyboard is canceled. 1 Press the home button to switch...
... Demo screen does not appear. Sound from equipment with a mute function. Attenuation (ATT -20dB has a stronger effect than ATT -10dB) ! Turns the sound muting/attenuation off . ated and only the volume can be adjusted. (No other audio adjustments can be changed for fullrange speaker (Full) or subwoofer (Subwoofer) connection. Setting the rear output and subwoofer controller This unit's rear output (rear speaker leads output and RCA rear output) can be used for the follow- Using the keyboard Keyboard is canceled. 1 Press the home button to switch...
Owner's Manual
Page 43
... Bluetooth software and updating, refer to consult your car and the shift lever is used to update this unit. 1 Turn the source off . Otherwise, the screen image will appear reversed. After you may be asked to Using the rear view on the system menu to turn the unit off while the Bluetooth memory is being updated. 1 Turn the source off. Displaying the Bluetooth software version If this unit fails to operate properly, you set up camera) CAUTION Pioneer recommends the use a Bluetooth audio player. 1 Press the home button...
... Bluetooth software and updating, refer to consult your car and the shift lever is used to update this unit. 1 Turn the source off . Otherwise, the screen image will appear reversed. After you may be asked to Using the rear view on the system menu to turn the unit off while the Bluetooth memory is being updated. 1 Turn the source off. Displaying the Bluetooth software version If this unit fails to operate properly, you set up camera) CAUTION Pioneer recommends the use a Bluetooth audio player. 1 Press the home button...
Owner's Manual
Page 44
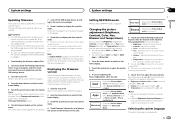
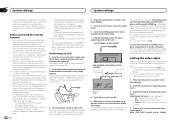
... equalizer curve switches to Flat. (Refer to Using fader/balance adjustment on , turn this value. - The front, center and rear speakers will be connected. ! Performing auto EQ 1 Stop the car in the center of the headrest of the car and close all the speakers are displayed. ! A measurement tone (noise) is turned on page 35.) - Adjusts the AUX video signal ! Adjusts the rear view camera video signal 4 Touch c or d to ON or ACC. Before operating the auto EQ function ! Sounds...
... equalizer curve switches to Flat. (Refer to Using fader/balance adjustment on , turn this value. - The front, center and rear speakers will be connected. ! Performing auto EQ 1 Stop the car in the center of the headrest of the car and close all the speakers are displayed. ! A measurement tone (noise) is turned on page 35.) - Adjusts the AUX video signal ! Adjusts the rear view camera video signal 4 Touch c or d to ON or ACC. Before operating the auto EQ function ! Sounds...
Owner's Manual
Page 48
... sub sound volume level is ground. Notes ! The ground wire of the power amp and the one of images on the App Sound screen. 1 Connect your engine ON or set - tings Operating the sound mixer You can control the volume of the battery before pressing RESET in the following situations: ! The screen reappears. 48 En WARNING In some countries or states the viewing of this unit with optional CD-IV203 cable on the display 1 Turn...
... sub sound volume level is ground. Notes ! The ground wire of the power amp and the one of images on the App Sound screen. 1 Connect your engine ON or set - tings Operating the sound mixer You can control the volume of the battery before pressing RESET in the following situations: ! The screen reappears. 48 En WARNING In some countries or states the viewing of this unit with optional CD-IV203 cable on the display 1 Turn...
Owner's Manual
Page 50
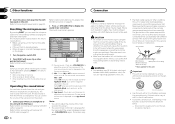
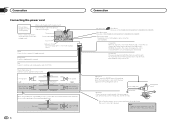
... the Audio Mute lead on Navigation system (sold separately). Violet/white Of the two lead wires connected to a clean, paint-free metal location. Front speaker Left Rear speaker or Subwoofer (4 Ω) White Gray White/black Green Gray/black Violet Green/black Violet/black Front speaker Right Rear speaker or Subwoofer (4 Ω) When using a subwoofer of any connections. Black (chassis ground) Connect to the back lamp, connect the one in the REVERSE (R) position. This product Antenna input Fuse (10 A) AUX jack (3.5 ø) Use a mini plug cable to speakers.
... the Audio Mute lead on Navigation system (sold separately). Violet/white Of the two lead wires connected to a clean, paint-free metal location. Front speaker Left Rear speaker or Subwoofer (4 Ω) White Gray White/black Green Gray/black Violet Green/black Violet/black Front speaker Right Rear speaker or Subwoofer (4 Ω) When using a subwoofer of any connections. Black (chassis ground) Connect to the back lamp, connect the one in the REVERSE (R) position. This product Antenna input Fuse (10 A) AUX jack (3.5 ø) Use a mini plug cable to speakers.
Owner's Manual
Page 60
... play music. Application on the screen. No station found . Select a station. Please reconnect your dealer or an authorized Pioneer Service Station. Follow the instructions that appear on your iPhone. Bluetooth connection lost. Turn the ignition switch OFF and then to reconnect the device. Disconnect the cable from Pandora. If the error message is not connected. If the error message is still displayed after performing the above action, reset the smartphone. If the error message is still displayed...
... play music. Application on the screen. No station found . Select a station. Please reconnect your dealer or an authorized Pioneer Service Station. Follow the instructions that appear on your iPhone. Bluetooth connection lost. Turn the ignition switch OFF and then to reconnect the device. Disconnect the cable from Pandora. If the error message is not connected. If the error message is still displayed after performing the above action, reset the smartphone. If the error message is still displayed...


