Owner's Manual
Page 3
...ever scroll 42 Setting the Bluetooth audio 42 Clearing Bluetooth memory 43 Updating Bluetooth software 43 Displaying the Bluetooth software version 43 Setting the rear view camera (back up camera) 43 Auto EQ (auto-equalizing) 43 Setting the video signal 44 Favorite menu Using the Favorite menu 45 Bluetooth connection menu Bluetooth ... cord 50 When connecting to separately sold power amp 51 When connecting the external video component and the display 51 When connecting with a rear view camera 52 iPod with lightning connector 52 iPod with 30-pin connector 53 Optional Smartphone link adaptor (CD-
...ever scroll 42 Setting the Bluetooth audio 42 Clearing Bluetooth memory 43 Updating Bluetooth software 43 Displaying the Bluetooth software version 43 Setting the rear view camera (back up camera) 43 Auto EQ (auto-equalizing) 43 Setting the video signal 44 Favorite menu Using the Favorite menu 45 Bluetooth connection menu Bluetooth ... cord 50 When connecting to separately sold power amp 51 When connecting the external video component and the display 51 When connecting with a rear view camera 52 iPod with lightning connector 52 iPod with 30-pin connector 53 Optional Smartphone link adaptor (CD-
Owner's Manual
Page 4
...parking brake, (2) release the parking brake, and then (3) apply the parking brake again. Installation or servicing of this product by this PIONEER product. To ensure safe driving WARNING ! To prevent such functions from the safe operation of front seat video source while driving is especially...be used as an aid to keep an eye on the device. IMPORTANT SAFEGUARDS Please read through this manual before using the rear view camera With an optional rear view camera, this unit (V OUT) is being driven. ! When you attempt to avoid draining the battery power. ! If you attempt...
...parking brake, (2) release the parking brake, and then (3) apply the parking brake again. Installation or servicing of this product by this PIONEER product. To ensure safe driving WARNING ! To prevent such functions from the safe operation of front seat video source while driving is especially...be used as an aid to keep an eye on the device. IMPORTANT SAFEGUARDS Please read through this manual before using the rear view camera With an optional rear view camera, this unit (V OUT) is being driven. ! When you attempt to avoid draining the battery power. ! If you attempt...
Owner's Manual
Page 10
... home button to return to a setting other than . 10 En Notes ! ideal for the playback video. ! ing. Rear view camera This unit can switch to display the rear view Displaying the rear view image by the Copyright Law. ! If you do not perform any omissions. Off - - ! The sound retriever setting ...is , granting viewers no sense of the normal picture. CD-DA - MP3/WMA/AAC/WAV files on the display. The rear view camera needs to display the rear view image automatically when you can be stored for playback on page 43. NORMAL (normal) The 4:3 picture is displayed as is...
... home button to return to a setting other than . 10 En Notes ! ideal for the playback video. ! ing. Rear view camera This unit can switch to display the rear view Displaying the rear view image by the Copyright Law. ! If you do not perform any omissions. Off - - ! The sound retriever setting ...is , granting viewers no sense of the normal picture. CD-DA - MP3/WMA/AAC/WAV files on the display. The rear view camera needs to display the rear view image automatically when you can be stored for playback on page 43. NORMAL (normal) The 4:3 picture is displayed as is...
Owner's Manual
Page 41
... the current version of the dis- You can only start the recovery sequence. appears on -screen instructions to NTSC. # With some rear view cameras, picture adjustment may not be adjusted from +1 to +48. # Temperature can adjust the Brightness (brightness), Contrast (contrast), Color (...color) , Hue (hue), Dimmer (dimmer), and Temperature (temperature) for the rear view camera. Source Adjusting the Picture Adjustment for the Navigation system when Device connection is set to your dealer for when the illumination switch is...
... the current version of the dis- You can only start the recovery sequence. appears on -screen instructions to NTSC. # With some rear view cameras, picture adjustment may not be adjusted from +1 to +48. # Temperature can adjust the Brightness (brightness), Contrast (contrast), Color (...color) , Hue (hue), Dimmer (dimmer), and Temperature (temperature) for the rear view camera. Source Adjusting the Picture Adjustment for the Navigation system when Device connection is set to your dealer for when the illumination switch is...
Owner's Manual
Page 43
... the source off . After you set up camera) CAUTION Pioneer recommends the use a Bluetooth audio player. 1 Press the home button to switch to the home display. 2 Touch the system key to open the system menu. 3 Touch Bluetooth Audio on the system menu to turn the rear view camera off on your dealer.) You can also...
... the source off . After you set up camera) CAUTION Pioneer recommends the use a Bluetooth audio player. 1 Press the home button to switch to the home display. 2 Touch the system key to open the system menu. 3 Touch Bluetooth Audio on the system menu to turn the rear view camera off on your dealer.) You can also...
Owner's Manual
Page 44
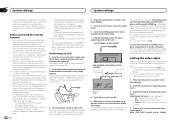
... the microphone on the system menu. Be sure to carry out auto EQ using an AVH-X3600BHS, AVH-X2600BT, or AVH-X1600DVD, connect a microphone extension cable (sold separately) to the highest frequency. ! You can... operate this function only for the video signal input into the microphone input jack on this LPF off frequency for an extended period, high temperatures may prevent correct measurement of the driver's seat, facing forward. Adjusts the rear view camera...
... the microphone on the system menu. Be sure to carry out auto EQ using an AVH-X3600BHS, AVH-X2600BT, or AVH-X1600DVD, connect a microphone extension cable (sold separately) to the highest frequency. ! You can... operate this function only for the video signal input into the microphone input jack on this LPF off frequency for an extended period, high temperatures may prevent correct measurement of the driver's seat, facing forward. Adjusts the rear view camera...
Owner's Manual
Page 52
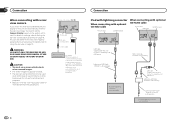
...REAR VIEW CAMERA. The rear view camera function is moving forwards or backwards. For details on settings, refer to the rear view image by pressing the touch panel key. You can also switch to Setting the rear view camera (back up . Lightning to the rear view image. For details, refer to set the Camera Polarity properly in the rear view... to keep an eye on trailers, or while backing up camera) on page 10. Rear view camera input (R.C IN) This product RCA cable (sold separately) To video output Rear view camera (sold separately) 52 En Objects in the system unit to...
...REAR VIEW CAMERA. The rear view camera function is moving forwards or backwards. For details on settings, refer to the rear view image by pressing the touch panel key. You can also switch to Setting the rear view camera (back up . Lightning to the rear view image. For details, refer to set the Camera Polarity properly in the rear view... to keep an eye on trailers, or while backing up camera) on page 10. Rear view camera input (R.C IN) This product RCA cable (sold separately) To video output Rear view camera (sold separately) 52 En Objects in the system unit to...
Owner's Manual
Page 56
...not compatible with this unit. Turn the attenuator off or change the level. (Page 38) Parental lock cannot be operated. Camera Polarity is dirty. There is within the recommended size and transmission rate. The language cannot be played on this video system.... Select the appropriate setting for the display. The unit is confirming whether or not a disc is not connected. The rear view camera is loaded. Connect a rear view camera. Select the repeat range again. Another folder was performed during still, slow motion or frame-by-frame playback. DVD ...
...not compatible with this unit. Turn the attenuator off or change the level. (Page 38) Parental lock cannot be operated. Camera Polarity is dirty. There is within the recommended size and transmission rate. The language cannot be played on this video system.... Select the appropriate setting for the display. The unit is confirming whether or not a disc is not connected. The rear view camera is loaded. Connect a rear view camera. Select the repeat range again. Another folder was performed during still, slow motion or frame-by-frame playback. DVD ...


