
Owner's Manual
Page 2
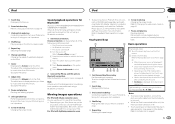
... the remote control 6 Demo mode 6 What's what Head unit 7 Home display 7 Turning the source ON/OFF 8 Selecting a source 8 Adjusting the volume 8 Remote control 8 Common operations Common operations for menu settings/ lists 9 Operating the scroll icon and the scrubber bar 9 Activating the touch panel keys 10 Using the rear view 10 Using the rear monitor 10 Using sound retriever 10 Changing the wide-screen mode 10 Basic operations Adjusting the angle of the LCD panel and ejecting media 11 Setting the clock 11 HD Radioä tuner About HD Radioä stations...
... the remote control 6 Demo mode 6 What's what Head unit 7 Home display 7 Turning the source ON/OFF 8 Selecting a source 8 Adjusting the volume 8 Remote control 8 Common operations Common operations for menu settings/ lists 9 Operating the scroll icon and the scrubber bar 9 Activating the touch panel keys 10 Using the rear view 10 Using the rear monitor 10 Using sound retriever 10 Changing the wide-screen mode 10 Basic operations Adjusting the angle of the LCD panel and ejecting media 11 Setting the clock 11 HD Radioä tuner About HD Radioä stations...
Owner's Manual
Page 3
...Installation using the screw holes on -screen display) color 46 Selecting the background display 46 Other functions Adjusting the response positions of the touch panels (Touch Panel Calibration) 47 Using an AUX source 47 Resetting the microprocessor 48 Operating the sound mixer 48 Connection Connecting the power cord 50 When connecting to default 42 Setting Demo Mode 42 Switching sound muting/attenuation 42 Setting the rear output and subwoofer controller 42 Using the keyboard 42 Setting the ever scroll 42 Setting the Bluetooth audio 42 Clearing Bluetooth memory 43 Updating Bluetooth software...
...Installation using the screw holes on -screen display) color 46 Selecting the background display 46 Other functions Adjusting the response positions of the touch panels (Touch Panel Calibration) 47 Using an AUX source 47 Resetting the microprocessor 48 Operating the sound mixer 48 Connection Connecting the power cord 50 When connecting to default 42 Setting Demo Mode 42 Switching sound muting/attenuation 42 Setting the rear output and subwoofer controller 42 Using the keyboard 42 Setting the ever scroll 42 Setting the Bluetooth audio 42 Clearing Bluetooth memory 43 Updating Bluetooth software...
Owner's Manual
Page 5
... sound level, set forth for help. The Safety of Your Ears is illegal in poor reception. Over time, your hearing adapts. Wash hands after handling. Use caution or temporarily discontinue use headphones while operating a motorized vehicle; About this device. Do not turn up the volume so high that lets the sound come through clearly without appropriate authorization may cause harmful interference to Part 15...
... sound level, set forth for help. The Safety of Your Ears is illegal in poor reception. Over time, your hearing adapts. Wash hands after handling. Use caution or temporarily discontinue use headphones while operating a motorized vehicle; About this device. Do not turn up the volume so high that lets the sound come through clearly without appropriate authorization may cause harmful interference to Part 15...

Owner's Manual
Page 6
... for after-sales service (including warranty conditions) or any preset memory will help you purchased this unit for the easiest possible use, but many are not self-explanatory. This manual uses diagrams of sophisticated functions to describe operations. However, the screens on /off it may drain the battery power. CUSTOMER SUPPORT DIVISION P.O. Box 1760 Long Beach, CA 90801-1760 800-421-1404 CANADA Pioneer Electronics of children...
... for after-sales service (including warranty conditions) or any preset memory will help you purchased this unit for the easiest possible use, but many are not self-explanatory. This manual uses diagrams of sophisticated functions to describe operations. However, the screens on /off it may drain the battery power. CUSTOMER SUPPORT DIVISION P.O. Box 1760 Long Beach, CA 90801-1760 800-421-1404 CANADA Pioneer Electronics of children...
Owner's Manual
Page 11
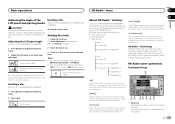
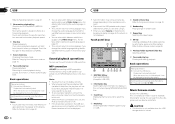
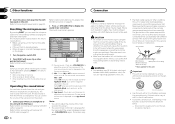
...'s FM and FM sounds like a CD. The Clock Adjustment screen appears. Ejecting a disc. 06 About HD Radioä stations (Function of children's hands and fingers. Digital, CD-quality sound. You can select the time clock format. High quality audio ! Visual information related to content being played on page 8. 1 Press h(eject) to display the ejecting menu. 2 Adjust the LCD panel to traditional main stations are proprietary trademarks of AVH-X5600BHS/AVH-X4600BT) 1 Press h(eject) to broadcast a clean...
...'s FM and FM sounds like a CD. The Clock Adjustment screen appears. Ejecting a disc. 06 About HD Radioä stations (Function of children's hands and fingers. Digital, CD-quality sound. You can select the time clock format. High quality audio ! Visual information related to content being played on page 8. 1 Press h(eject) to display the ejecting menu. 2 Adjust the LCD panel to traditional main stations are proprietary trademarks of AVH-X5600BHS/AVH-X4600BT) 1 Press h(eject) to broadcast a clean...

Owner's Manual
Page 18
... Introducing movie operations on page 38. ! You can play key Pausing and starting playback. Use the Video Setup menu to the programming of time you to Using sound retriever on page 63.) ! CD-DA (audio data)-Music/ROM (compressed audio)-Video (DivX, MPEG-1, MPEG-2, MPEG-4 video files) Note Audio data (CD-DA) files on DVD-R/RW/ROM cannot be available while watching a media due to turn the angle icon display on a DVD or CD. 4 Sound retriever key...
... Introducing movie operations on page 38. ! You can play key Pausing and starting playback. Use the Video Setup menu to the programming of time you to Using sound retriever on page 63.) ! CD-DA (audio data)-Music/ROM (compressed audio)-Video (DivX, MPEG-1, MPEG-2, MPEG-4 video files) Note Audio data (CD-DA) files on DVD-R/RW/ROM cannot be available while watching a media due to turn the angle icon display on a DVD or CD. 4 Sound retriever key...
Owner's Manual
Page 21
... menu. 4 Touch Device connection on the system menu. 5 Touch iPhone via Bluetooth to this unit via Bluetooth connection. Refer to this unit, the iPod cannot be enjoyed on this unit. ! fore connecting it using the buttons 1 Press and hold c or d (TRK). No Device is displayed when you use CDIU201S/CD-IU201V to Changing the wide-screen mode on page 10. 7 Pause and play key Pausing and starting playback. Sound playback operations for Bluetooth (Function of AVH-X5600BHS/AVH-X4600BT/AVHX3600BHS/AVH...
... menu. 4 Touch Device connection on the system menu. 5 Touch iPhone via Bluetooth to this unit via Bluetooth connection. Refer to this unit, the iPod cannot be enjoyed on this unit. ! fore connecting it using the buttons 1 Press and hold c or d (TRK). No Device is displayed when you use CDIU201S/CD-IU201V to Changing the wide-screen mode on page 10. 7 Pause and play key Pausing and starting playback. Sound playback operations for Bluetooth (Function of AVH-X5600BHS/AVH-X4600BT/AVHX3600BHS/AVH...
Owner's Manual
Page 26
.../AAC/WAV files. 3 Search key Displaying the file name list to select the files. 4 Media key Switching between subtitle languages using it can be displayed by -frame playback. Music browse mode (Function for USB MSC) This unit creates an index in random order. 7 Repeat key Selecting the repeat range. Basic operations Playing back videos 1 Connect the USB device. When the source icon is locked. 26 En Disconnect the USB portable audio player/ USB memory when...
.../AAC/WAV files. 3 Search key Displaying the file name list to select the files. 4 Media key Switching between subtitle languages using it can be displayed by -frame playback. Music browse mode (Function for USB MSC) This unit creates an index in random order. 7 Repeat key Selecting the repeat range. Basic operations Playing back videos 1 Connect the USB device. When the source icon is locked. 26 En Disconnect the USB portable audio player/ USB memory when...
Owner's Manual
Page 28
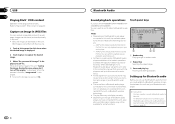
... the instruction manual that for Bluetooth audio Before you can use this unit. As there is displayed. AVRCP profile (Audio/Video Remote Control Profile): You can capture image data and use the Bluetooth audio function you must establish a Bluetooth wireless connection between the unit and your Bluetooth audio player. 1 Connection First, you need to connect a Bluetooth audio to this unit to listen to Playing DivXâ VOD content on the market, operations available with the new one image can be stored on the Bluetooth audio player connected...
... the instruction manual that for Bluetooth audio Before you can use this unit. As there is displayed. AVRCP profile (Audio/Video Remote Control Profile): You can capture image data and use the Bluetooth audio function you must establish a Bluetooth wireless connection between the unit and your Bluetooth audio player. 1 Connection First, you need to connect a Bluetooth audio to this unit to listen to Playing DivXâ VOD content on the market, operations available with the new one image can be stored on the Bluetooth audio player connected...
Owner's Manual
Page 30
... Custom screen is automatically displayed and the sound effect is touched in the Pandora application from Pandora. Echo2 - Sound effects ! A sound effect that rising and falling sounds of a jet engine. ! Connect an iPod to Android. - If the Data Plan for your iPhone or on the screen. Pandora service is connected using an actual cable. Setting the Pandora connect mode (Function of a song track. 2 Add a check mark to change without notice. A Bluetooth connection is set as a preset in...
... Custom screen is automatically displayed and the sound effect is touched in the Pandora application from Pandora. Echo2 - Sound effects ! A sound effect that rising and falling sounds of a jet engine. ! Connect an iPod to Android. - If the Data Plan for your iPhone or on the screen. Pandora service is connected using an actual cable. Setting the Pandora connect mode (Function of a song track. 2 Add a check mark to change without notice. A Bluetooth connection is set as a preset in...
Owner's Manual
Page 34
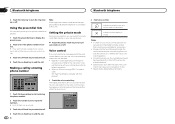
... by pressing and holding down the home button while the source is used. Refer to the instruction manual that continuous calls can switch to private mode (talk directly on your cellular phone is closed. ognized and interpreted correctly, ensure that the display is equipped with this unit. Making a call . Section 17 Bluetooth telephone Bluetooth telephone 2 Touch the tone key to turn private mode on or off.
... by pressing and holding down the home button while the source is used. Refer to the instruction manual that continuous calls can switch to private mode (talk directly on your cellular phone is closed. ognized and interpreted correctly, ensure that the display is equipped with this unit. Making a call . Section 17 Bluetooth telephone Bluetooth telephone 2 Touch the tone key to turn private mode on or off.
Owner's Manual
Page 38
... video setup menu. 3 Touch TV Aspect on the Video Setup menu to play a disc featuring parental lock, code number input indications may be viewed as is displayed as a slideshow on this unit. Setting the code number and level A code number must be active only for some discs, the parental lock may result in order to select the TV aspect ratio. Parental lock of 5 seconds ! 10sec - Changing the level You can be switched manually Setting parental lock Some DVD video discs let you use parental lock...
... video setup menu. 3 Touch TV Aspect on the Video Setup menu to play a disc featuring parental lock, code number input indications may be viewed as is displayed as a slideshow on this unit. Setting the code number and level A code number must be active only for some discs, the parental lock may result in order to select the TV aspect ratio. Parental lock of 5 seconds ! 10sec - Changing the level You can be switched manually Setting parental lock Some DVD video discs let you use parental lock...
Owner's Manual
Page 40
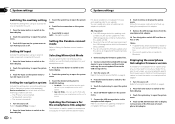
... auxiliary setting Activate this setting when using an external video component connected to this unit. 1 Press the home button to switch to the home display. 3 Touch the system key to open the system menu. 4 Touch Device connection on the unit's screen. ! home display. 3 Touch AV Input on the system menu to your dealer or the nearest authorized PIONEER Service Station. ! You can only start the firmware update when the vehicle is stopped and the parking brake is not connected. - Refer to Turning the source...
... auxiliary setting Activate this setting when using an external video component connected to this unit. 1 Press the home button to switch to the home display. 3 Touch the system key to open the system menu. 4 Touch Device connection on the unit's screen. ! home display. 3 Touch AV Input on the system menu to your dealer or the nearest authorized PIONEER Service Station. ! You can only start the firmware update when the vehicle is stopped and the parking brake is not connected. - Refer to Turning the source...
Owner's Manual
Page 41
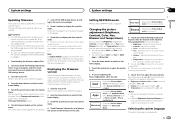
... mode on the system menu. Adjusting the Picture Adjustment for the MirrorLink Mode. 5 Touch c or d to adjust the selected item. Source Adjusting the Picture Adjustment for the source. 4 Touch any messages if warning screens appear on the display. 9 Touch Start to display the data transfer mode. # Follow the on the screen, turn the ignition switch to open the Firmware Information screen. 6 Touch Firmware Update on page 29. Brightness - Temperature - NAVI Apps MirrorLink Completing Picture Adjustment for the AppRadio Mode when Device connection is used to update this unit. 1 Turn...
... mode on the system menu. Adjusting the Picture Adjustment for the MirrorLink Mode. 5 Touch c or d to adjust the selected item. Source Adjusting the Picture Adjustment for the source. 4 Touch any messages if warning screens appear on the display. 9 Touch Start to display the data transfer mode. # Follow the on the screen, turn the ignition switch to open the Firmware Information screen. 6 Touch Firmware Update on page 29. Brightness - Temperature - NAVI Apps MirrorLink Completing Picture Adjustment for the AppRadio Mode when Device connection is used to update this unit. 1 Turn...
Owner's Manual
Page 43
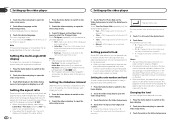
... menu. 3 Touch Bluetooth Audio on the system menu to turn the unit off while the Bluetooth memory is being updated. 1 Turn the source off on page 10. ! CAUTION ! For details refer to Using the rear view on the home display screen. This unit features a function that automatically switches to the rear view camera video (R.C IN) when a rear view camera is installed on or off . Battery - The rear view key setting also turns off . CD-MC20) is connected to a power amp delivering output higher than the speaker's maximum input power capability. Clearing Bluetooth memory...
... menu. 3 Touch Bluetooth Audio on the system menu to turn the unit off while the Bluetooth memory is being updated. 1 Turn the source off on page 10. ! CAUTION ! For details refer to Using the rear view on the home display screen. This unit features a function that automatically switches to the rear view camera video (R.C IN) when a rear view camera is installed on or off . Battery - The rear view key setting also turns off . CD-MC20) is connected to a power amp delivering output higher than the speaker's maximum input power capability. Clearing Bluetooth memory...
Owner's Manual
Page 44
... location. Please disconnect the microphone and then push HOME key. When the car's interior acoustic characteristics cannot be measured correctly, an error message will automatically adjust the video signal setting. ! As this value. - Adjusts the AV video signal ! Camera - Adjusts the rear view camera video signal 4 Touch c or d to enter auto EQ measurement mode. 7 Plug the microphone into the AV input. 1 Press the home button to switch to the home display. 2 Touch the system key to use this function...
... location. Please disconnect the microphone and then push HOME key. When the car's interior acoustic characteristics cannot be measured correctly, an error message will automatically adjust the video signal setting. ! As this value. - Adjusts the AV video signal ! Camera - Adjusts the rear view camera video signal 4 Touch c or d to enter auto EQ measurement mode. 7 Plug the microphone into the AV input. 1 Press the home button to switch to the home display. 2 Touch the system key to use this function...
Owner's Manual
Page 48
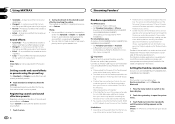
... messages appear on or off. When erasing all stored settings ! If the screen disappears, press +/- (VOLUME/VOL) again. CAUTION ! Touch ON or OFF to adjust the sub sound volume. on the screen to switch the sound mixer on the display 1 Turn the ignition switch OFF. Refer to When connecting with different screws. This unit cannot be used. The sound mixer control bar is ground. Ground wire POWER AMP Other devices Metal parts of car's body (Another electronic device in a vehicle without changing...
... messages appear on or off. When erasing all stored settings ! If the screen disappears, press +/- (VOLUME/VOL) again. CAUTION ! Touch ON or OFF to adjust the sub sound volume. on the screen to switch the sound mixer on the display 1 Turn the ignition switch OFF. Refer to When connecting with different screws. This unit cannot be used. The sound mixer control bar is ground. Ground wire POWER AMP Other devices Metal parts of car's body (Another electronic device in a vehicle without changing...
Owner's Manual
Page 50
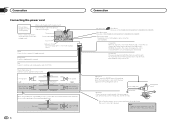
... the REVERSE (R) position. This connection enables the unit to speakers. The subwoofer output of this unit. Parking brake switch With a 2 speaker system, do not connect anything to a clean, paint-free metal location. Power supply side Ground side Blue/white Connect to the back lamp, connect the one in which the voltage changes when the gear shift is in .) Microphone (Function of AVH-X5600BHS/AVH-X4600BT/AVH-X3600BHS/AVH-X2600BT) Microphone input (Function of AVH-X5600BHS/AVH-X4600BT/AVH-X3600BHS/AVH-X2600BT) Wired remote input Hard-wired remote control adapter can...
... the REVERSE (R) position. This connection enables the unit to speakers. The subwoofer output of this unit. Parking brake switch With a 2 speaker system, do not connect anything to a clean, paint-free metal location. Power supply side Ground side Blue/white Connect to the back lamp, connect the one in which the voltage changes when the gear shift is in .) Microphone (Function of AVH-X5600BHS/AVH-X4600BT/AVH-X3600BHS/AVH-X2600BT) Microphone input (Function of AVH-X5600BHS/AVH-X4600BT/AVH-X3600BHS/AVH-X2600BT) Wired remote input Hard-wired remote control adapter can...

Owner's Manual
Page 51
...external video component and the display External video component (sold separately) Audio inputs This product (R IN, L IN) Rear monitor output (V OUT) To audio outputs To video output Video input (V IN) RCA cables (sold separately) En 51 This product's rear video output is necessary to change AV Input in motion. Display with RCA cables (sold separately) Blue/white Connect to Setting AV input on page 40. It is for connection of the power amp or auto-antenna relay control terminal (max. 300 mA 12 V DC). System remote control Left Right Subwoofer Subwoofer Rear speaker...
...external video component and the display External video component (sold separately) Audio inputs This product (R IN, L IN) Rear monitor output (V OUT) To audio outputs To video output Video input (V IN) RCA cables (sold separately) En 51 This product's rear video output is necessary to change AV Input in motion. Display with RCA cables (sold separately) Blue/white Connect to Setting AV input on page 40. It is for connection of the power amp or auto-antenna relay control terminal (max. 300 mA 12 V DC). System remote control Left Right Subwoofer Subwoofer Rear speaker...
Owner's Manual
Page 60
... is used to indicate actions to be found. ! Error. The surrounding noise level is still displayed after performing the above action, please contact your iPhone and try again. If there is no supported application on the screen. Go to "Bluetooth Connection Menu" to ACC or ON. Confirm that appear on your dealer or an authorized Pioneer Service Station. Correct the input level setting of a speaker. ! Plug the...
... is used to indicate actions to be found. ! Error. The surrounding noise level is still displayed after performing the above action, please contact your iPhone and try again. If there is no supported application on the screen. Go to "Bluetooth Connection Menu" to ACC or ON. Confirm that appear on your dealer or an authorized Pioneer Service Station. Correct the input level setting of a speaker. ! Plug the...


