
Owner's Manual
Page 7
...not allow other hazards. 8. Please remember to wear your seat belt is not properly buckled. 6 Keep this manual fully and carefully before making adjustments. 7. Do not install the display where it may be considerably more severe if your seat belt at all warnings in this system until...the vehicle's operating systems or safety features, including air bags, or (iii) impair the driver's ability to install or service your vehicle. Pay close attention to use this manual and follow the instructions carefully. 4. As with any of your display by yourself. Do not attempt to ...
...not allow other hazards. 8. Please remember to wear your seat belt is not properly buckled. 6 Keep this manual fully and carefully before making adjustments. 7. Do not install the display where it may be considerably more severe if your seat belt at all warnings in this system until...the vehicle's operating systems or safety features, including air bags, or (iii) impair the driver's ability to install or service your vehicle. Pay close attention to use this manual and follow the instructions carefully. 4. As with any of your display by yourself. Do not attempt to ...

Owner's Manual
Page 8
...user's right to operate the equipment. [For Canadian model] This Class B digital apparatus complies with the instructions, may result in a residential installation. This product features a "Virtual Theater" Graphical User Interface which the receiver is connected. - Reorient or relocate the receiving antenna. - ...Once you will not occur in this product are designed to correct the interference by turning the equipment off and on this manual as the "Center Room". (Refer to "Virtual Theater Quick Tour" on a circuit different from that interference will be performed...
...user's right to operate the equipment. [For Canadian model] This Class B digital apparatus complies with the instructions, may result in a residential installation. This product features a "Virtual Theater" Graphical User Interface which the receiver is connected. - Reorient or relocate the receiving antenna. - ...Once you will not occur in this product are designed to correct the interference by turning the equipment off and on this manual as the "Center Room". (Refer to "Virtual Theater Quick Tour" on a circuit different from that interference will be performed...

Owner's Manual
Page 140
...-antenna. Do not route wiring in the electrical system, be sure to disconnect the · battery cable before beginning installation. • Refer to each product's manual for vehicles with a 12-volt battery and negative grounding. Likewise, do , the protection circuit may result in the speakers...8226; When an external power amp is output through a hole into the lead. Especially, insulate the unused speaker leads without fail. Installation Installation Connecting the Units Note: • This unit is for details on the unit will not be used with this unit must be ...
...-antenna. Do not route wiring in the electrical system, be sure to disconnect the · battery cable before beginning installation. • Refer to each product's manual for vehicles with a 12-volt battery and negative grounding. Likewise, do , the protection circuit may result in the speakers...8226; When an external power amp is output through a hole into the lead. Especially, insulate the unused speaker leads without fail. Installation Installation Connecting the Units Note: • This unit is for details on the unit will not be used with this unit must be ...

Owner's Manual
Page 141
...terminal coupled with ignition switch ON/OFF operations. Please ground this lead separately from the vehicle for other products may be connected to the supplied Installation manuals of both products and connect cords that does not have an ACC (accessory) position on the ignition switch, the red lead of damage to... the products or fire. • Cords for this product and those for several hours. Installation N STAR N STAR • If this unit is ground. F ACC O F O OF OF T T ACC position No ACC position • The black lead...
...terminal coupled with ignition switch ON/OFF operations. Please ground this lead separately from the vehicle for other products may be connected to the supplied Installation manuals of both products and connect cords that does not have an ACC (accessory) position on the ignition switch, the red lead of damage to... the products or fire. • Cords for this product and those for several hours. Installation N STAR N STAR • If this unit is ground. F ACC O F O OF OF T T ACC position No ACC position • The black lead...

Owner's Manual
Page 142
... the parking brake switch power supply side lead. For details, consult the vehicle Owner's Manual or dealer. If not, keep the Audio Mute lead free of the parking brake. Connecting the Power Cord of AV Receiver Installation Parking brake switch Power supply side Ground side Light green Used to the power supply...
... the parking brake switch power supply side lead. For details, consult the vehicle Owner's Manual or dealer. If not, keep the Audio Mute lead free of the parking brake. Connecting the Power Cord of AV Receiver Installation Parking brake switch Power supply side Ground side Light green Used to the power supply...
Owner's Manual
Page 145
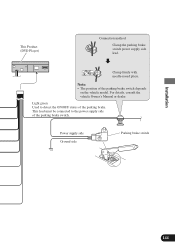
Installation This Product (DVD Player) Connection method Clamp the parking brake switch power supply side lead. Note: • The position of the parking brake. Light green Used to the power supply side of the parking brake switch. Clamp firmly with needle-nosed pliers. This lead must be connected to detect the ON/OFF status of the parking brake switch depends on the vehicle model. For details, consult the vehicle Owner's Manual or dealer. Power supply side Ground side Parking brake switch 144
Installation This Product (DVD Player) Connection method Clamp the parking brake switch power supply side lead. Note: • The position of the parking brake. Light green Used to the power supply side of the parking brake switch. Clamp firmly with needle-nosed pliers. This lead must be connected to detect the ON/OFF status of the parking brake switch depends on the vehicle model. For details, consult the vehicle Owner's Manual or dealer. Power supply side Ground side Parking brake switch 144


