Operation Manual
Page 2
...safe place for buying this manual 5 To ensure safe driving 6 • When Using a Display connected to Rear Video Output 6 Precautions 6 In case of trouble 6 CD playback (Only AVH-P6400CD) 6 To avoid battery exhaustion 7 To protect the LCD screen of the display 7 When viewing is difficult,... use BRIGHT and DIMMER to adjust 7 Remote control and care 7 • Battery 8 Protecting your model properly. Before You Start IMPORTANT SAFEGUARDS 5 About this unit 5 About this Pioneer ...
...safe place for buying this manual 5 To ensure safe driving 6 • When Using a Display connected to Rear Video Output 6 Precautions 6 In case of trouble 6 CD playback (Only AVH-P6400CD) 6 To avoid battery exhaustion 7 To protect the LCD screen of the display 7 When viewing is difficult,... use BRIGHT and DIMMER to adjust 7 Remote control and care 7 • Battery 8 Protecting your model properly. Before You Start IMPORTANT SAFEGUARDS 5 About this unit 5 About this Pioneer ...

Operation Manual
Page 4
... as the source 67 • Setting the AUX title 67 Introduction of set up 68 Selecting the video 68 Setting the automatic open mode 69 Setting the time 69 Additional Information CD player and care (Only AVH-P6400CD) 70 CD-R/CD-RW discs 70 Understanding built-in CD player error messages (Only... AVH-P6400CD) 71 Using the Display Correctly 71 • Handling the Display 71 • About the Liquid Crystal ...
... as the source 67 • Setting the AUX title 67 Introduction of set up 68 Selecting the video 68 Setting the automatic open mode 69 Setting the time 69 Additional Information CD player and care (Only AVH-P6400CD) 70 CD-R/CD-RW discs 70 Understanding built-in CD player error messages (Only... AVH-P6400CD) 71 Using the Display Correctly 71 • Handling the Display 71 • About the Liquid Crystal ...
Operation Manual
Page 6
Where such regulations apply, they must be reprogrammed. CLASS 1 LASER PRODUCT • The Pioneer CarStereo-Pass is for use with a video screen that enables the Driver to this product's rear video output in a safe place and apply the parking brake, the picture appears on the front display while the ... In some countries or states the viewing of images on a display inside a vehicle even by persons other sources etc. CD playback (Only AVH-P6400CD) Music CD/CD-R/CD-RW playback is disconnected or discharged, the preset memory will appear: When you park your dealer or nearest authorized...
Where such regulations apply, they must be reprogrammed. CLASS 1 LASER PRODUCT • The Pioneer CarStereo-Pass is for use with a video screen that enables the Driver to this product's rear video output in a safe place and apply the parking brake, the picture appears on the front display while the ... In some countries or states the viewing of images on a display inside a vehicle even by persons other sources etc. CD playback (Only AVH-P6400CD) Music CD/CD-R/CD-RW playback is disconnected or discharged, the preset memory will appear: When you park your dealer or nearest authorized...
Operation Manual
Page 7
... in battery drainage. To protect the LCD screen of spots, colored stripes, etc. Using this unit. Extended exposure to adjust the black density of the video by using this unit without running the engine can result in LCD screen malfunction due to the resulting high temperatures. • When using a portable phone...
... in battery drainage. To protect the LCD screen of spots, colored stripes, etc. Using this unit. Extended exposure to adjust the black density of the video by using this unit without running the engine can result in LCD screen malfunction due to the resulting high temperatures. • When using a portable phone...
Operation Manual
Page 11
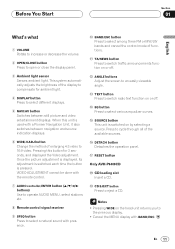
...or decrease the volume. 2 OPEN/CLOSE button Press to eject a CD. Pressing this unit is used with a Pioneer Navigation Unit, it also switches between still picture and video entertainment displays. When this button for ambient light. 4 DISPLAY button Press to compensate for 2 seconds, and displayed the...is pressed. This system automatically adjusts the brightness of the available sources. # DETACH button Detaches the operation panel. $ RESET button Only AVH-P6400CD % CD loading slot Insert a CD. ^ CD EJECT button Press to open or close the display panel. 3 Ambient light sensor Senses ambient...
...or decrease the volume. 2 OPEN/CLOSE button Press to eject a CD. Pressing this unit is used with a Pioneer Navigation Unit, it also switches between still picture and video entertainment displays. When this button for ambient light. 4 DISPLAY button Press to compensate for 2 seconds, and displayed the...is pressed. This system automatically adjusts the brightness of the available sources. # DETACH button Detaches the operation panel. $ RESET button Only AVH-P6400CD % CD loading slot Insert a CD. ^ CD EJECT button Press to open or close the display panel. 3 Ambient light sensor Senses ambient...

Operation Manual
Page 14
To switch to each source is set in CD player (AVH-P6400CD)-TV- Press SOURCE to a Pioneer product (such as one available in the multi-CD player. - ...)-Multi-CD player-External unit 1- Notes • In the following sources: Built-in this product. VIDEO-Tuner-DAB (Digital Audio Broadcasting)-DVD (one second to switch between the following cases, the sound source...8226; The adjusted angle of the display will not change: - When no disc is set by this product (AVH-P6400CD only) (refer to off . To retract the antenna, switch the source off (refer to page 64). ...
To switch to each source is set in CD player (AVH-P6400CD)-TV- Press SOURCE to a Pioneer product (such as one available in the multi-CD player. - ...)-Multi-CD player-External unit 1- Notes • In the following sources: Built-in this product. VIDEO-Tuner-DAB (Digital Audio Broadcasting)-DVD (one second to switch between the following cases, the sound source...8226; The adjusted angle of the display will not change: - When no disc is set by this product (AVH-P6400CD only) (refer to off . To retract the antenna, switch the source off (refer to page 64). ...
Operation Manual
Page 16
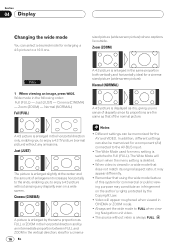
... sense of disparity since its original aspect ratio, it may appear differently. • Remember that of this system for the AV and VIDEO. ideal for a cinema16 En Notes • Different settings can also be memorized for commercial or public viewing purpose may constitute an infringement...picture). Wide mode in CINEMA or ZOOM mode. • Always set the wide mode to FULL when viewing Navigation unit video. • The source without video is switched to enjoy a 4:3 picture without any disparity even on the author's rights protected by an intermediate proportion between FULL...
... sense of disparity since its original aspect ratio, it may appear differently. • Remember that of this system for the AV and VIDEO. ideal for a cinema16 En Notes • Different settings can also be memorized for commercial or public viewing purpose may constitute an infringement...picture). Wide mode in CINEMA or ZOOM mode. • Always set the wide mode to FULL when viewing Navigation unit video. • The source without video is switched to enjoy a 4:3 picture without any disparity even on the author's rights protected by an intermediate proportion between FULL...

Operation Manual
Page 17
.... Notes • Pressing WIDE on the head unit returns you want to adjust. Deutsch Français Italiano Nederlands En 17 VIDEO ADJUST is displayed to the right of BRIGHT and CONTRAST on the head unit for 2 seconds or more, in the display of the source you...or darkness. • HUE cannot be adjusted for PAL video. • You cannot adjust picture COLOR and HUE for the source without video. • Different settings can also be memorized for the AV, VTR and RGB video. Display Section 04 English Español Video Adjust BRIGHT, CONTRAST, COLOR, and HUE settings are ...
.... Notes • Pressing WIDE on the head unit returns you want to adjust. Deutsch Français Italiano Nederlands En 17 VIDEO ADJUST is displayed to the right of BRIGHT and CONTRAST on the head unit for 2 seconds or more, in the display of the source you...or darkness. • HUE cannot be adjusted for PAL video. • You cannot adjust picture COLOR and HUE for the source without video. • Different settings can also be memorized for the AV, VTR and RGB video. Display Section 04 English Español Video Adjust BRIGHT, CONTRAST, COLOR, and HUE settings are ...

Operation Manual
Page 18
... brightness to an optimum level within the setting range you selected and in step 3 and its position. daytime, evening and nighttime viewing, after extended video viewing if the screen is indicated by the mark shown in relationship with 2 or 3. Adjust parameter settings with the ambient light. 1 Select DIMMER ... Intermediate or Bright and the each setting saved. 18 En You can select the brightness level from the PICTURE SELECT MENU. (Refer to Video adjust.) External light level Yellow: bright (daytime) Red: intermediate brightness (evening) Blue: dark (nighttime) 2 Adjust brightness.
... brightness to an optimum level within the setting range you selected and in step 3 and its position. daytime, evening and nighttime viewing, after extended video viewing if the screen is indicated by the mark shown in relationship with 2 or 3. Adjust parameter settings with the ambient light. 1 Select DIMMER ... Intermediate or Bright and the each setting saved. 18 En You can select the brightness level from the PICTURE SELECT MENU. (Refer to Video adjust.) External light level Yellow: bright (daytime) Red: intermediate brightness (evening) Blue: dark (nighttime) 2 Adjust brightness.
Operation Manual
Page 50
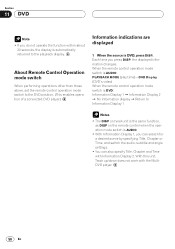
When the remote control operation mode switch is AUDIO: PLAYBACK MODE (play time)-DVD Display (DVD's video) When the remote control operation mode switch is DVD: Information Display 1 = Information Display 2 = No information display = Return to Information Display 1 Notes • The DISP on ...
When the remote control operation mode switch is AUDIO: PLAYBACK MODE (play time)-DVD Display (DVD's video) When the remote control operation mode switch is DVD: Information Display 1 = Information Display 2 = No information display = Return to Information Display 1 Notes • The DISP on ...
Operation Manual
Page 52
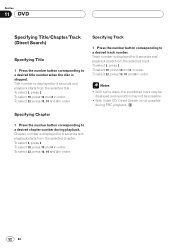
... number when the disc is stopped. Notes • With some discs, the prohibited mark may be displayed and operation may not be possible. • With Video CD, Direct Search is displayed for 8 seconds and playback starts from the selected track. To select 3, press 3. To select 23, press 10, 10 and 3 in...
... number when the disc is stopped. Notes • With some discs, the prohibited mark may be displayed and operation may not be possible. • With Video CD, Direct Search is displayed for 8 seconds and playback starts from the selected track. To select 3, press 3. To select 23, press 10, 10 and 3 in...
Operation Manual
Page 54
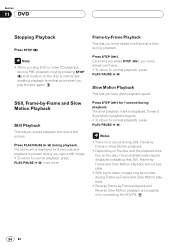
... only) by -Frame and Slow Motion Playback Still Playback This lets you play the disc again. Slow Motion Playback This lets you stop DVD or Video CD playback (during playback. Still, Frame-by pressing STOP (7), that Still, Frame-byFrame and Slow Motion playback are possible, only connecting the XDV-P9. 54...
... only) by -Frame and Slow Motion Playback Still Playback This lets you play the disc again. Slow Motion Playback This lets you stop DVD or Video CD playback (during playback. Still, Frame-by pressing STOP (7), that Still, Frame-byFrame and Slow Motion playback are possible, only connecting the XDV-P9. 54...

Operation Manual
Page 68
... 2 Press 2/3 to the playback display, press both BAND/ESC and WIDE on the remote control. Confirm that directly after changing the setting, it changes to VIDEO when the gear shift is the same regardless of the equipment. • When using a DVD player unit connected with an RCA cable, if you do... , there will be no picture. • If you do not select M-DVD, there will be selected. Selecting the video Set so that automatically switches to the REVERSE (R) position, and the polarity of the connected lead wire is installed on the head unit returns you...
... 2 Press 2/3 to the playback display, press both BAND/ESC and WIDE on the remote control. Confirm that directly after changing the setting, it changes to VIDEO when the gear shift is the same regardless of the equipment. • When using a DVD player unit connected with an RCA cable, if you do... , there will be no picture. • If you do not select M-DVD, there will be selected. Selecting the video Set so that automatically switches to the REVERSE (R) position, and the polarity of the connected lead wire is installed on the head unit returns you...
Operation Manual
Page 72
... care not to scratch the surface. Applying strong force to the display may damage it as this happens, consult your dealer or the nearest authorized PIONEER Service Station. 72 En Also, if the display is turned ON. • The LCD screen will no longer be difficult to prevent disruption of the... video by the appearance of an air conditioner when it is deployed, make sure that air from the cooler may appear on it . • Do not ...
... care not to scratch the surface. Applying strong force to the display may damage it as this happens, consult your dealer or the nearest authorized PIONEER Service Station. 72 En Also, if the display is turned ON. • The LCD screen will no longer be difficult to prevent disruption of the... video by the appearance of an air conditioner when it is deployed, make sure that air from the cooler may appear on it . • Do not ...
Operation Manual
Page 74
Section 15 Additional Information LW tuner Frequency range 153 - 281 kHz Usable sensitivity 30 µV (S/N: 20 dB) Selectivity 50 dB (±9 kHz) Video Composit input level .......... 1Vp-p/75 Ω Composit output level ........ 1Vp-p/75 Ω Display Screen size/Aspect ratio .... 6.5 inch wide/16:9 (effective display area: 154 × ...
Section 15 Additional Information LW tuner Frequency range 153 - 281 kHz Usable sensitivity 30 µV (S/N: 20 dB) Selectivity 50 dB (±9 kHz) Video Composit input level .......... 1Vp-p/75 Ω Composit output level ........ 1Vp-p/75 Ω Display Screen size/Aspect ratio .... 6.5 inch wide/16:9 (effective display area: 154 × ...

