Operation Manual
Page 2
... operating instructions so you will know how to operate your unit from the track list 30 Pausing CD playback 30 Using disc title functions 30 • Entering disc titles 31 • Displaying titles on 13 Closing the Display 13 Screen Angle Adjustment 13 Selecting a source 14 Turning the unit off 14 Common Operations Source display 15 Displays menus (e.g., Tuner) 15 Display Changing the wide mode 16 Video Adjust 17 DIMMER Settings 18 2 En Tuner Listening to the radio...
... operating instructions so you will know how to operate your unit from the track list 30 Pausing CD playback 30 Using disc title functions 30 • Entering disc titles 31 • Displaying titles on 13 Closing the Display 13 Screen Angle Adjustment 13 Selecting a source 14 Turning the unit off 14 Common Operations Source display 15 Displays menus (e.g., Tuner) 15 Display Changing the wide mode 16 Video Adjust 17 DIMMER Settings 18 2 En Tuner Listening to the radio...
Operation Manual
Page 3
... P.CH RECALL/MEMORY Function 45 TV Tuner Display and indicators 46 Basic operation 46 Storing broadcast stations 46 Recalling broadcast stations 47 Changing a band 47 TV menu 47 BSSM (Best Station Sequential Memory) 47 Selecting the country group 48 Selecting channels from the preset channel list 48 DVD Display and indicators 48 Introduction of advanced DVD player operation 49 About Remote Control Operation mode switch 50 Information indications are displayed 50 Disc Playback 51...
... P.CH RECALL/MEMORY Function 45 TV Tuner Display and indicators 46 Basic operation 46 Storing broadcast stations 46 Recalling broadcast stations 47 Changing a band 47 TV menu 47 BSSM (Best Station Sequential Memory) 47 Selecting the country group 48 Selecting channels from the preset channel list 48 DVD Display and indicators 48 Introduction of advanced DVD player operation 49 About Remote Control Operation mode switch 50 Information indications are displayed 50 Disc Playback 51...

Operation Manual
Page 4
... 64 Switching Auto PI Seek 64 Switching the warning tone 64 Switching the auxiliary setting 64 Selecting the illumination color 65 4 En Setting the rear output and subwoofer controller 65 Switching the Telephone Muting/Attenuation 66 Other Functions Setting remote control code type 66 Using different entertainment audio displays 66 Using the AUX source 67 • Selecting AUX as the source 67 • Setting the AUX title 67 Introduction of set up 68 Selecting the video 68 Setting the automatic open mode 69 Setting the time...
... 64 Switching Auto PI Seek 64 Switching the warning tone 64 Switching the auxiliary setting 64 Selecting the illumination color 65 4 En Setting the rear output and subwoofer controller 65 Switching the Telephone Muting/Attenuation 66 Other Functions Setting remote control code type 66 Using different entertainment audio displays 66 Using the AUX source 67 • Selecting AUX as the source 67 • Setting the AUX title 67 Introduction of set up 68 Selecting the video 68 Setting the automatic open mode 69 Setting the time...
Operation Manual
Page 5
.... This manual explains head unit operation. Installation or servicing of the display by yourself. Before You Start Section 01 English Español Deutsch Français IMPORTANT SAFEGUARDS Please read all of these instructions regarding your display and retain them for future reference 1 Read this manual fully and carefully before making adjustments. 7 Do not attempt to install or service your display by persons...
.... This manual explains head unit operation. Installation or servicing of the display by yourself. Before You Start Section 01 English Español Deutsch Français IMPORTANT SAFEGUARDS Please read all of these instructions regarding your display and retain them for future reference 1 Read this manual fully and carefully before making adjustments. 7 Do not attempt to install or service your display by persons...
Operation Manual
Page 6
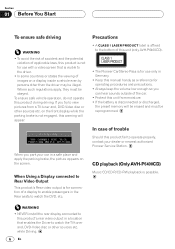
... preset memory will appear: When you try to watch the TV-tuner and, DVD-Video disc or other sources etc. To ensure safe vehicle operation, do not operate this product fail to operate properly, contact your car in a safe place and apply the parking brake, the picture appears on the screen. on a display inside a vehicle even by persons other than the driver may be obeyed. When Using a Display connected to Rear Video Output This product's Rear video output is...
... preset memory will appear: When you try to watch the TV-tuner and, DVD-Video disc or other sources etc. To ensure safe vehicle operation, do not operate this product fail to operate properly, contact your car in a safe place and apply the parking brake, the picture appears on the screen. on a display inside a vehicle even by persons other than the driver may be obeyed. When Using a Display connected to Rear Video Output This product's Rear video output is...
Operation Manual
Page 11
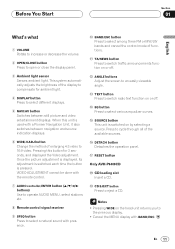
... navigation and source indication displays. 6 WIDE/-V.ADJ button Change the method of the available sources. # DETACH button Detaches the operation panel. $ RESET button Only AVH-P6400CD % CD loading slot Insert a CD. ^ CD EJECT button Press to eject a CD. Once the picture adjustment is displayed, its adjustment is switched each time the button is switched on by selecting a source. VIDEO ADJUSTMENT cannot be done with the remote control. 7 AUDIO controller/ENTER button (5/∞/2/3 buttons) Use to operate AUDIO MENU, select stations etc. 8 Remote control signal receiver 9 SFEQ button...
... navigation and source indication displays. 6 WIDE/-V.ADJ button Change the method of the available sources. # DETACH button Detaches the operation panel. $ RESET button Only AVH-P6400CD % CD loading slot Insert a CD. ^ CD EJECT button Press to eject a CD. Once the picture adjustment is displayed, its adjustment is switched each time the button is switched on by selecting a source. VIDEO ADJUSTMENT cannot be done with the remote control. 7 AUDIO controller/ENTER button (5/∞/2/3 buttons) Use to operate AUDIO MENU, select stations etc. 8 Remote control signal receiver 9 SFEQ button...

Operation Manual
Page 14
..., the sound source will be controlled by this product. Press SOURCE repeatedly to the next time the display is switched on. External unit 2 -AUX Turning the unit off Press SOURCE and hold for at least one second to a Pioneer product (such as a source, enables control of basic functions by this product. • When this product's blue/white lead is connected to this product's source is deployed. When no disc is set to off...
..., the sound source will be controlled by this product. Press SOURCE repeatedly to the next time the display is switched on. External unit 2 -AUX Turning the unit off Press SOURCE and hold for at least one second to a Pioneer product (such as a source, enables control of basic functions by this product. • When this product's blue/white lead is connected to this product's source is deployed. When no disc is set to off...

Operation Manual
Page 17
... are stored for each source . 1 Press WIDE on the head unit for 2 seconds or more, in the display of BRIGHT and CONTRAST on the screen, respectively, as the front-panel ambient light sensor determines brightness or darkness. • HUE cannot be adjusted for PAL video. • You cannot adjust picture COLOR and HUE for the source without video. • Different settings can also be memorized...
... are stored for each source . 1 Press WIDE on the head unit for 2 seconds or more, in the display of BRIGHT and CONTRAST on the screen, respectively, as the front-panel ambient light sensor determines brightness or darkness. • HUE cannot be adjusted for PAL video. • You cannot adjust picture COLOR and HUE for the source without video. • Different settings can also be memorized...

Operation Manual
Page 18
... light darkens. Level indicates the brightness of the screen being adjusted. You can be adjusted to the right, the brighter the screen. The marks indicating the current ambient brightness used as the standard for adjusting BRIGHT and CONTRAST may differ slightly. • The external light level can select the brightness level from the PICTURE SELECT MENU. (Refer to Video adjust.) External light level Yellow: bright (daytime) Red: intermediate brightness (evening) Blue: dark (nighttime) 2 Adjust brightness...
... light darkens. Level indicates the brightness of the screen being adjusted. You can be adjusted to the right, the brighter the screen. The marks indicating the current ambient brightness used as the standard for adjusting BRIGHT and CONTRAST may differ slightly. • The external light level can select the brightness level from the PICTURE SELECT MENU. (Refer to Video adjust.) External light level Yellow: bright (daytime) Red: intermediate brightness (evening) Blue: dark (nighttime) 2 Adjust brightness...
Operation Manual
Page 22
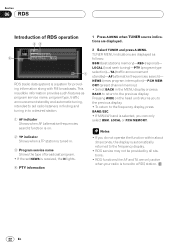
... or P.CH MEMORY. Section 06 RDS Introduction of broadcast program. • If the set NEWS is a system for providing information along with FM broadcasts. NEWS (news program interruption)-P.CH MEMORY (preset channel memory) • Select BACK in . 3 Program service name Shows the type of RDS operation 23 4 1 RDS (radio data system) is received, the N lights. 4 PTY information 1 Press A.MENU when TUNER source indications are displayed. 2 Select TUNER and press...
... or P.CH MEMORY. Section 06 RDS Introduction of broadcast program. • If the set NEWS is a system for providing information along with FM broadcasts. NEWS (news program interruption)-P.CH MEMORY (preset channel memory) • Select BACK in . 3 Program service name Shows the type of RDS operation 23 4 1 RDS (radio data system) is received, the N lights. 4 PTY information 1 Press A.MENU when TUNER source indications are displayed. 2 Select TUNER and press...

Operation Manual
Page 23
...). See Switching Auto PI Seek on . Using Auto PI Seek for the station received differs from the TUNER MENU, and press A.MENU. REGIONAL adjustment indications are other problems, the unit will automatically search for a different station with a new frequency from the station's AF list. (This is only available when using presets on the FM1 or FM2 band.) No preset number appears on the display if the RDS data for preset stations When preset stations cannot...
...). See Switching Auto PI Seek on . Using Auto PI Seek for the station received differs from the TUNER MENU, and press A.MENU. REGIONAL adjustment indications are other problems, the unit will automatically search for a different station with a new frequency from the station's AF list. (This is only available when using presets on the FM1 or FM2 band.) No preset number appears on the display if the RDS data for preset stations When preset stations cannot...

Operation Manual
Page 37
... player repeat) or DISC (disc repeat) ranges. • If no tracks from your ITS playlist. Note • If you do not operate the function within about 30 seconds, the display is on . En 37 Italiano Nederlands ITS MEMORY adjustment indications are displayed. 3 Press 5 to turn on ITS play is automatically returned to select ITS PLAY from the M-CD MENU, and press A.MENU. ITS PLAY :ON appears...
... player repeat) or DISC (disc repeat) ranges. • If no tracks from your ITS playlist. Note • If you do not operate the function within about 30 seconds, the display is on . En 37 Italiano Nederlands ITS MEMORY adjustment indications are displayed. 3 Press 5 to turn on ITS play is automatically returned to select ITS PLAY from the M-CD MENU, and press A.MENU. ITS PLAY :ON appears...

Operation Manual
Page 40
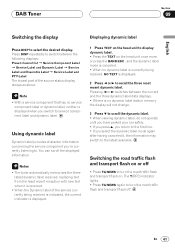
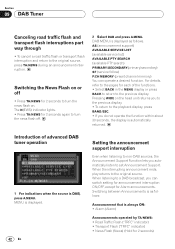
... preset has been selected. 3 Service label Indications that light when function is switched on Indicator Function NET Service follow (service follow) W (THR)* Area weather flash (weather) A (NNC)* N (EWS)* Announce (announce) News flash (news) T (RFC)* Road traffic flash or transport flash * If the set announcement support is received, the letters in parentheses light. * "3" is displayed on the left of DAB tuner-specific operation/features, see DAB displayed. 2 Use VOLUME to adjust...
... preset has been selected. 3 Service label Indications that light when function is switched on Indicator Function NET Service follow (service follow) W (THR)* Area weather flash (weather) A (NNC)* N (EWS)* Announce (announce) News flash (news) T (RFC)* Road traffic flash or transport flash * If the set announcement support is received, the letters in parentheses light. * "3" is displayed on the left of DAB tuner-specific operation/features, see DAB displayed. 2 Use VOLUME to adjust...
Operation Manual
Page 41
... to turn the road traffic flash and transport flash on. Press DISP repeatedly to switch between the current and the three dynamic label data displays. • If there is no dynamic label data in memory the display will not change. 3 Press ∞ to scroll the dynamic label. • When viewing dynamic label, do not operate until you have parked your car safely...
... to turn the road traffic flash and transport flash on. Press DISP repeatedly to switch between the current and the three dynamic label data displays. • If there is no dynamic label data in memory the display will not change. 3 Press ∞ to scroll the dynamic label. • When viewing dynamic label, do not operate until you have parked your car safely...
Operation Manual
Page 42
... (service follow) P.CH MEMORY (preset channel memory) You can switch setting for announcement interruption ON/OFF, except for 2 seconds to turn the news flash on the head unit returns you to the previous display. • To return to the original source. When listening to set Announcement Support. MENU is displayed. 42 En Setting the announcement support interruption Even when listening to non-DAB sources, the Announcement Support Function lets...
... (service follow) P.CH MEMORY (preset channel memory) You can switch setting for announcement interruption ON/OFF, except for 2 seconds to turn the news flash on the head unit returns you to the previous display. • To return to the original source. When listening to set Announcement Support. MENU is displayed. 42 En Setting the announcement support interruption Even when listening to non-DAB sources, the Announcement Support Function lets...
Operation Manual
Page 48
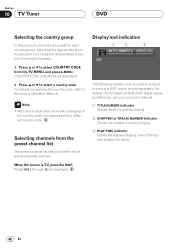
... a tuner that does not enable changing of the country code, you see . When the source is sold separately. Display and indicators 1 2 3 The following explains how to use this product, channels are displayed. For details concerning the country code, refer to select a country code. Preset CH 1 through 12 are preset for your product's manual. 1 TITLE NUMBER indicator Shows the title currently playing. 2 CHAPTER (or TRACK) NUMBER...
... a tuner that does not enable changing of the country code, you see . When the source is sold separately. Display and indicators 1 2 3 The following explains how to use this product, channels are displayed. For details concerning the country code, refer to select a country code. Preset CH 1 through 12 are preset for your product's manual. 1 TITLE NUMBER indicator Shows the title currently playing. 2 CHAPTER (or TRACK) NUMBER...
Operation Manual
Page 64
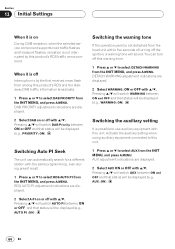
... will sound. Switching the auxiliary setting It is possible to select AUX from the INIT MENU, and press A.MENU. Section 13 Initial Settings When it is off the ignition, a warning tone will be displayed (e.g., PRIORITY :ON). DAB PRIORITY adjustment indications are displayed. 2 Select WARNING: ON or OFF with 5/∞. You can automatically search for a different station with 5/∞. Switching Auto PI Seek The unit can turn...
... will sound. Switching the auxiliary setting It is possible to select AUX from the INIT MENU, and press A.MENU. Section 13 Initial Settings When it is off the ignition, a warning tone will be displayed (e.g., PRIORITY :ON). DAB PRIORITY adjustment indications are displayed. 2 Select WARNING: ON or OFF with 5/∞. You can automatically search for a different station with 5/∞. Switching Auto PI Seek The unit can turn...

Operation Manual
Page 66
... subwoofer is connected to the rear output, select REAR SP:FULL. • When a subwoofer is connected to the rear output, set to DVD, changing the remote control code type enable to operate the Pioneer DVD player by the supplied remote control. Press NAVI/AV on the left side of DVD player). There are displayed. 2 Switch the telephone muting/attenuation with an "XDV-P9" MultiDVD Player, select code A. Pressing 2/3 will switch between muting and attenuation when using a cellular telephone connected to this unit with 2/3. Switching...
... subwoofer is connected to the rear output, select REAR SP:FULL. • When a subwoofer is connected to the rear output, set to DVD, changing the remote control code type enable to operate the Pioneer DVD player by the supplied remote control. Press NAVI/AV on the left side of DVD player). There are displayed. 2 Switch the telephone muting/attenuation with an "XDV-P9" MultiDVD Player, select code A. Pressing 2/3 will switch between muting and attenuation when using a cellular telephone connected to this unit with 2/3. Switching...

Operation Manual
Page 68
... connected to a RCA video input, choose VIDEO to view video of the equipment. • When using a DVD player unit connected with an RCA cable, if you do not select M-DVD, there will be no picture even if you switch sources. • When using a DVD player unit connected with your taste and environment. 1 Press A.MENU in the MENU display or press BACK to return to select the VIDEO. The display for each source display. Press 2 or 3 until the desired video setting appears in the REVERSE...
... connected to a RCA video input, choose VIDEO to view video of the equipment. • When using a DVD player unit connected with an RCA cable, if you do not select M-DVD, there will be no picture even if you switch sources. • When using a DVD player unit connected with your taste and environment. 1 Press A.MENU in the MENU display or press BACK to return to select the VIDEO. The display for each source display. Press 2 or 3 until the desired video setting appears in the REVERSE...
Operation Manual
Page 71
... player. En 71 Italiano Nederlands If the error cannot be played back. ERROR-11, 12, Scratched disc Replace disc. 17, 30 ERROR-22, 23 The CD format cannot be corrected, contact your dealer or your dealer or the nearest authorized PIONEER Service Station. Replace disc. Using the product in this condition may result in failure of the system. • Do not remove the rear cover of the display...
... player. En 71 Italiano Nederlands If the error cannot be played back. ERROR-11, 12, Scratched disc Replace disc. 17, 30 ERROR-22, 23 The CD format cannot be corrected, contact your dealer or your dealer or the nearest authorized PIONEER Service Station. Replace disc. Using the product in this condition may result in failure of the system. • Do not remove the rear cover of the display...


