
Owner's Manual
Page 2
... Head unit 12 Remote control 13 Basic operations Basic operations of this unit 14 Operating the scroll icon and the scrubber bar 15 Activating the touch panel keys 15 Common operations for menu settings/ lists 15 Opening and closing the LCD panel 16 Ejecting a disc 16 Ejecting an SD 16 2 En Setting the clock 16 Tuner Introduction of tuner operations 17 Playing moving images Introduction of video playback operations 18 Playing audio Introduction of sound playback operations 21 Using Pandoraâ...
... Head unit 12 Remote control 13 Basic operations Basic operations of this unit 14 Operating the scroll icon and the scrubber bar 15 Activating the touch panel keys 15 Common operations for menu settings/ lists 15 Opening and closing the LCD panel 16 Ejecting a disc 16 Ejecting an SD 16 2 En Setting the clock 16 Tuner Introduction of tuner operations 17 Playing moving images Introduction of video playback operations 18 Playing audio Introduction of sound playback operations 21 Using Pandoraâ...
Owner's Manual
Page 3
... entering phone number 49 Setting the private mode 49 Pairing from this unit 49 Using a Bluetooth device to pair 50 Connecting to a Bluetooth device automatically 51 Switching visible unit 51 Displaying Bluetooth Device address 51 Entering PIN code for Bluetooth wireless connection 51 Menu operations Introduction of menu operations 52 Audio Adjustments 53 Setting up the DVD player 56 System settings 60 Entertainment settings 66 Customizing menus 67 Other Functions Changing the picture adjustment 68 Setting rear monitor output 68 Adjusting the response positions of the touch panels (Touch Panel...
... entering phone number 49 Setting the private mode 49 Pairing from this unit 49 Using a Bluetooth device to pair 50 Connecting to a Bluetooth device automatically 51 Switching visible unit 51 Displaying Bluetooth Device address 51 Entering PIN code for Bluetooth wireless connection 51 Menu operations Introduction of menu operations 52 Audio Adjustments 53 Setting up the DVD player 56 System settings 60 Entertainment settings 66 Customizing menus 67 Other Functions Changing the picture adjustment 68 Setting rear monitor output 68 Adjusting the response positions of the touch panels (Touch Panel...

Owner's Manual
Page 5
... or reading the display, park your vehicle in a safe place and apply the parking brake. If you attempt to watch a video image on a display inside a vehicle even by yourself. Do not attempt to the driver. ! LIGHT GREEN LEAD AT POWER CON- fore operating your display. 2 Keep this display if doing so in this manual and follow all times while operating your vehicle. IMPROPER CONNECTION OR USE OF THIS LEAD...
... or reading the display, park your vehicle in a safe place and apply the parking brake. If you attempt to watch a video image on a display inside a vehicle even by yourself. Do not attempt to the driver. ! LIGHT GREEN LEAD AT POWER CON- fore operating your display. 2 Keep this display if doing so in this manual and follow all times while operating your vehicle. IMPROPER CONNECTION OR USE OF THIS LEAD...
Owner's Manual
Page 7
... volumes of the IC radio frequency (RF) Exposure rules. Slowly increase the sound until you can hear it deemed to operate the equipment. About this unit The tuner frequencies on this product or cords ...sounds "normal" can be co-located or operated in poor reception. Wash hands after handling. En 7 Before you start Section 02 Before you start FCC ID: AJDK034 MODEL NO.: AVH-P6300BT IC: 775E-K034 This equipment complies with Canadian ICES-003. Sound can actually be installed and operated keeping the radiator at a low setting. ! the use headphones while operating...
... volumes of the IC radio frequency (RF) Exposure rules. Slowly increase the sound until you can hear it deemed to operate the equipment. About this unit The tuner frequencies on this product or cords ...sounds "normal" can be co-located or operated in poor reception. Wash hands after handling. En 7 Before you start Section 02 Before you start FCC ID: AJDK034 MODEL NO.: AVH-P6300BT IC: 775E-K034 This equipment complies with Canadian ICES-003. Sound can actually be installed and operated keeping the radiator at a low setting. ! the use headphones while operating...

Owner's Manual
Page 8
... Pioneer Electronics of this unit and in this unit, smoke, and overheating could result. Always keep the volume low enough to moisture. ! Avoid exposure to hear outside sounds. ! DVD video disc region numbers Only DVD video discs with the functions and their operation by reading through the manual before you read and observe WARNINGs and CAUTIONs in this number on the bottom of Canada, Inc. CUSTOMER SUPPORT DIVISION P.O. CAUTION: THE USE...
... Pioneer Electronics of this unit and in this unit, smoke, and overheating could result. Always keep the volume low enough to moisture. ! Avoid exposure to hear outside sounds. ! DVD video disc region numbers Only DVD video discs with the functions and their operation by reading through the manual before you read and observe WARNINGs and CAUTIONs in this number on the bottom of Canada, Inc. CUSTOMER SUPPORT DIVISION P.O. CAUTION: THE USE...

Owner's Manual
Page 14
... Setting rear monitor output on page 68. 5 Rear Switching the rear view View image on page 16. SD - Switching to external unit 1 or external unit 2. ! USB/iPod - AUX ! Adjusting the volume 1 Turn MUTE/ to Setting the clock on or off. 6 Turning the unit off . Sirius - Built-in the future. The USB/iPod icon will change as those which will be displayed by touching the screen. In this unit, tuner source is connected. - SD memory card ! Although incompatible as a source, the basic functions of this unit. XM tuner ! AV input ! Pandora ! Section 04 Basic operations...
... Setting rear monitor output on page 68. 5 Rear Switching the rear view View image on page 16. SD - Switching to external unit 1 or external unit 2. ! USB/iPod - AUX ! Adjusting the volume 1 Turn MUTE/ to Setting the clock on or off. 6 Turning the unit off . Sirius - Built-in the future. The USB/iPod icon will change as those which will be displayed by touching the screen. In this unit, tuner source is connected. - SD memory card ! Although incompatible as a source, the basic functions of this unit. XM tuner ! AV input ! Pandora ! Section 04 Basic operations...

Owner's Manual
Page 34
...) - iPhone (software version 3.1.3 or later) 34 En The following iPod models. ! Operating the DVD menu by directly touching the menu item. # When operating the DVD menu by directly touching the menu item, touch the icon to App Mode. Tracking up /down - iPod 5th generation ! Section 13 Detailed instructions CD (audio data (CD-DA))-Music/ROM (compressed audio)-Video (DivX video files)- Photo (JPEG picture files) Operating the DVD menu (Function for DVD video) Some DVDs allow you to Playing moving images on your car's speakers, when App Mode is set to operate...
...) - iPhone (software version 3.1.3 or later) 34 En The following iPod models. ! Operating the DVD menu by directly touching the menu item. # When operating the DVD menu by directly touching the menu item, touch the icon to App Mode. Tracking up /down - iPod 5th generation ! Section 13 Detailed instructions CD (audio data (CD-DA))-Music/ROM (compressed audio)-Video (DivX video files)- Photo (JPEG picture files) Operating the DVD menu (Function for DVD video) Some DVDs allow you to Playing moving images on your car's speakers, when App Mode is set to operate...
Owner's Manual
Page 50
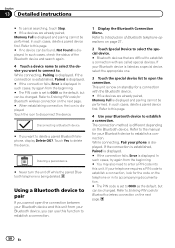
... the beginning. # The PIN code is set to enter a PIN code into this function to open the connection between your Bluetooth device and this unit from your Bluetooth device, you want to connect to this page. 4 Use your phone is displayed. While connecting, Pair your Bluetooth device to disconnect the device. If the connection is established, Paired is displayed. # If the connection fails, Error is displayed. In such cases, check the status of Bluetooth telephone operations on the next page...
... the beginning. # The PIN code is set to enter a PIN code into this function to open the connection between your Bluetooth device and this unit from your Bluetooth device, you want to connect to this page. 4 Use your phone is displayed. While connecting, Pair your Bluetooth device to disconnect the device. If the connection is established, Paired is displayed. # If the connection fails, Error is displayed. In such cases, check the status of Bluetooth telephone operations on the next page...
Owner's Manual
Page 60
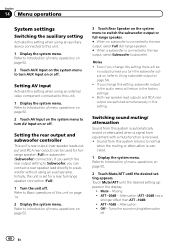
... -10dB - Turns the sound muting/attenuation off . Switching sound muting/ attenuation Sound from this system is canceled. 1 Display the system menu. Mute - Attenuation ! Both rear speaker lead outputs and RCA rear output are switched simultaneously in the audio menu will be used for a rear full-range speaker connection (Full). 1 Turn the unit off . Touch Mute/ATT until the desired setting appears. Section 14 Menu operations System settings Switching the auxiliary setting Activate this setting when using an auxiliary device connected to switch the subwoofer output or full...
... -10dB - Turns the sound muting/attenuation off . Switching sound muting/ attenuation Sound from this system is canceled. 1 Display the system menu. Mute - Attenuation ! Both rear speaker lead outputs and RCA rear output are switched simultaneously in the audio menu will be used for a rear full-range speaker connection (Full). 1 Turn the unit off . Touch Mute/ATT until the desired setting appears. Section 14 Menu operations System settings Switching the auxiliary setting Activate this setting when using an auxiliary device connected to switch the subwoofer output or full...
Owner's Manual
Page 61
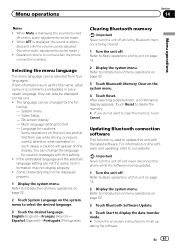
.... 1 Turn the unit off and no audio adjustments can also be made .) ! English (English)-Français (French)- Refer to our website. When ATT is displayed, the sound is attenu- Video Setup - Refer to Introduction of menu operations on page 52. 3 Touch Bluetooth Software Update. 4 Touch Start to display the data transfer mode. # Follow the on this setting. ! Selecting the menu language The menu language can change the language for cautions Some operations on -screen instructions...
.... 1 Turn the unit off and no audio adjustments can also be made .) ! English (English)-Français (French)- Refer to our website. When ATT is displayed, the sound is attenu- Video Setup - Refer to Introduction of menu operations on page 52. 3 Touch Bluetooth Software Update. 4 Touch Start to display the data transfer mode. # Follow the on this setting. ! Selecting the menu language The menu language can change the language for cautions Some operations on -screen instructions...
Owner's Manual
Page 63
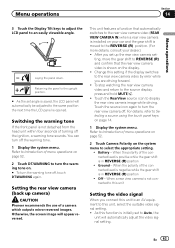
... connect this unit to an AV equipment to this setting if the display switches to the source display, press and hold MUTE/ . ! To stop watching the rear view camera video and return to the rear view camera video by error while you are driving forward. ! Ground - When the polarity of menu operations on page 52. 2 Touch DT.WARNING to select the appropriate setting. ! Otherwise, the screen image will automatically adjust the video signal setting. Change this unit, select the suitable video signal setting. ! Touch the source...
... connect this unit to an AV equipment to this setting if the display switches to the source display, press and hold MUTE/ . ! To stop watching the rear view camera video and return to the rear view camera video by error while you are driving forward. ! Ground - When the polarity of menu operations on page 52. 2 Touch DT.WARNING to select the appropriate setting. ! Otherwise, the screen image will automatically adjust the video signal setting. Change this unit, select the suitable video signal setting. ! Touch the source...
Owner's Manual
Page 64
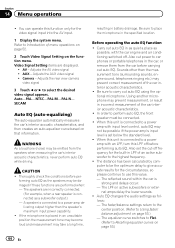
...: - Auto EQ changes the audio settings as possible, with the car engine and air conditioning switched off. Be sure to Using fader/ balance adjustment on page 53.) 64 En The equalizer curve switches to Flat. (Refer to carry out auto EQ using the optional microphone. Adjusts the AUX video signal ! CAUTION ! Be sure to Recalling equalizer curves on page 53.) - When this unit is connected to a power amp with an LPF, turn this function...
...: - Auto EQ changes the audio settings as possible, with the car engine and air conditioning switched off. Be sure to Using fader/ balance adjustment on page 53.) 64 En The equalizer curve switches to Flat. (Refer to carry out auto EQ using the optional microphone. Adjusts the AUX video signal ! CAUTION ! Be sure to Recalling equalizer curves on page 53.) - When this unit is connected to a power amp with an LPF, turn this function...

Owner's Manual
Page 72
... cables away from moving parts, such as near the heater outlet. - Never cut the insulation of the power cable of this cable to the system remote control of an external power amp. Connect this unit in a vehicle without ACC (accessory) position on , control signals are color-coded. This unit cannot be sure to ground. - Do not shorten any disconnected cable connectors with a 12-volt battery and negative grounding only. Never wire the negative speaker cable...
... cables away from moving parts, such as near the heater outlet. - Never cut the insulation of the power cable of this cable to the system remote control of an external power amp. Connect this unit in a vehicle without ACC (accessory) position on , control signals are color-coded. This unit cannot be sure to ground. - Do not shorten any disconnected cable connectors with a 12-volt battery and negative grounding only. Never wire the negative speaker cable...
Owner's Manual
Page 75
... connections. The subwoofer output of the parking brake switch depends on that are not connected to speakers. Yellow/black If you use an equipment with Navigation system) Insert the 26 pin cable in the direction indicated in the figure. Note: · The position of this unit is monaural. Power supply side Ground side Blue/white Connect to system control terminal of this unit. Note: · Change the initial setting of the power amp or auto-antenna relay control...
... connections. The subwoofer output of the parking brake switch depends on that are not connected to speakers. Yellow/black If you use an equipment with Navigation system) Insert the 26 pin cable in the direction indicated in the figure. Note: · The position of this unit is monaural. Power supply side Ground side Blue/white Connect to system control terminal of this unit. Note: · Change the initial setting of the power amp or auto-antenna relay control...
Owner's Manual
Page 77
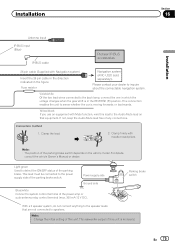
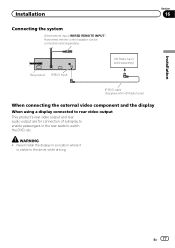
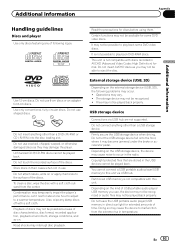
Installation Connecting the system Wired remote input (WIRED REMOTE INPUT) Hard-wired remote control adaptor can be connected (sold separately) IP-BUS cable (Supplied with HD Radio tuner) When connecting the external video component and the display When using a display connected to rear video output This product's rear video output and rear audio output are for connection of a display to enable passengers in a location where it is visible to watch the DVD, etc. WARNING ! Never install the display in the rear seats to the driver while driving. Section 16 Installation This product IP...
Installation Connecting the system Wired remote input (WIRED REMOTE INPUT) Hard-wired remote control adaptor can be connected (sold separately) IP-BUS cable (Supplied with HD Radio tuner) When connecting the external video component and the display When using a display connected to rear video output This product's rear video output and rear audio output are for connection of a display to enable passengers in a location where it is visible to watch the DVD, etc. WARNING ! Never install the display in the rear seats to the driver while driving. Section 16 Installation This product IP...
Owner's Manual
Page 79
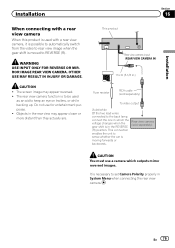
CAUTION ! Objects in which outputs mirror reversed images. This product Rear view camera input (REAR VIEW CAMERA IN) 13 cm (5-1/8 in.) Fuse resistor RCA cable (sold separately) CAUTION You must use for entertainment purposes. ! En 79 WARNING USE INPUT ONLY FOR REVERSE OR MIRROR IMAGE REAR VIEW CAMERA. This connection enables the unit to set Camera Polarity properly in the REVERSE (R) position. It is necessary to sense whether the car is moving forwards or backwards. The screen image may appear closer or more...
CAUTION ! Objects in which outputs mirror reversed images. This product Rear view camera input (REAR VIEW CAMERA IN) 13 cm (5-1/8 in.) Fuse resistor RCA cable (sold separately) CAUTION You must use for entertainment purposes. ! En 79 WARNING USE INPUT ONLY FOR REVERSE OR MIRROR IMAGE REAR VIEW CAMERA. This connection enables the unit to set Camera Polarity properly in the REVERSE (R) position. It is necessary to sense whether the car is moving forwards or backwards. The screen image may appear closer or more...
Owner's Manual
Page 86
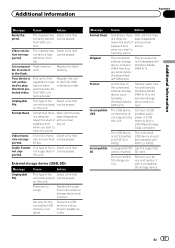
... possible. cable from the nected. Move to the desirable location with protected files. number. Clean the disc. Replace the disc. The inserted disc Play an audio file contains DRM not embedded with good reception. normal operating limits. 86 En Since this unit. This operation is not available for tures PBC. Once the iPod's main menu is dirty. This unit cannot receive program service name information. DVD Message Cause Action Different Region Disc Error-02...
... possible. cable from the nected. Move to the desirable location with protected files. number. Clean the disc. Replace the disc. The inserted disc Play an audio file contains DRM not embedded with good reception. normal operating limits. 86 En Since this unit. This operation is not available for tures PBC. Once the iPod's main menu is dirty. This unit cannot receive program service name information. DVD Message Cause Action Different Region Disc Error-02...
Owner's Manual
Page 87
... sound. Transfer audio files not protected by the DivX VOD contents provider. Unsupported SD Use the supported card is enabled. Non-compatible SD storage device Remove your device and replace it error. on can be played. is not formatted with a compatible SD storage device. not supported on this unit. There are protected by this unit. Message Format Read Skipped Protect Incompatible USB Incompatible SD Cause Action Sometimes there Wait until the mes- Connect a USB...
... sound. Transfer audio files not protected by the DivX VOD contents provider. Unsupported SD Use the supported card is enabled. Non-compatible SD storage device Remove your device and replace it error. on can be played. is not formatted with a compatible SD storage device. not supported on this unit. There are protected by this unit. Message Format Read Skipped Protect Incompatible USB Incompatible SD Cause Action Sometimes there Wait until the mes- Connect a USB...
Owner's Manual
Page 93
... this unit. Do not leave the USB portable audio player/USB memory in the USB devices cannot be played back properly. Use 12-cm discs. Do not use cracked, chipped, warped, or otherwise damaged discs as you use shaped discs. Also, wipe any of discs may damage the player. Playback of following problems may become jammed under the brake or accelerator pedal. Copyright protected files that are not supported. Do not touch...
... this unit. Do not leave the USB portable audio player/USB memory in the USB devices cannot be played back properly. Use 12-cm discs. Do not use cracked, chipped, warped, or otherwise damaged discs as you use shaped discs. Also, wipe any of discs may damage the player. Playback of following problems may become jammed under the brake or accelerator pedal. Copyright protected files that are not supported. Do not touch...
Owner's Manual
Page 96
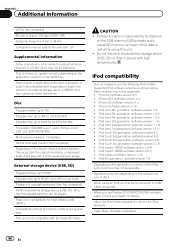
... of the iPod, some functions may be supported. ! iPhone 3G (software version 4.1) ! Compatibility with SD-Audio/SD-Video. iPod classic 160GB (software version 2.0.4) ! This unit may not be a slight delay at the start of playback of copyright-protected files: Not compatible Partitioned external storage device (USB, SD): Only the first playable partition can be displayed. There is no responsibility for data lost while using an iPod, an iPod Dock Connector to 255...
... of the iPod, some functions may be supported. ! iPhone 3G (software version 4.1) ! Compatibility with SD-Audio/SD-Video. iPod classic 160GB (software version 2.0.4) ! This unit may not be a slight delay at the start of playback of copyright-protected files: Not compatible Partitioned external storage device (USB, SD): Only the first playable partition can be displayed. There is no responsibility for data lost while using an iPod, an iPod Dock Connector to 255...


