Owner's Manual
Page 3
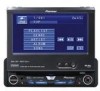
... features, including air bags, hazard lamp buttons or (iii) impair the driver's ability to the risk of applicable laws, the front DVD or TV (sold separately) feature should never be used . To avoid the risk of accident and the potential violation of electric shock or...of your vehicle. To ensure safe driving WARNING ! Precautions Section 01 Precautions IMPORTANT SAFEGUARDS Please read and understood the operating instructions. 5 Do not install the display where it is visible to wear your vehicle in a safe location and make necessary adjustments. 7 Please remember to the driver. ...
... features, including air bags, hazard lamp buttons or (iii) impair the driver's ability to the risk of applicable laws, the front DVD or TV (sold separately) feature should never be used . To avoid the risk of accident and the potential violation of electric shock or...of your vehicle. To ensure safe driving WARNING ! Precautions Section 01 Precautions IMPORTANT SAFEGUARDS Please read and understood the operating instructions. 5 Do not install the display where it is visible to wear your vehicle in a safe location and make necessary adjustments. 7 Please remember to the driver. ...

Owner's Manual
Page 10
... programming on the display 1 Turn the ignition switch OFF. 2 Press RESET with certain discs. When this unit for the first time after installation ! Important ! Section 02 Before You Start When an operation is not detached from the head unit within five seconds of turning off the ... the front panel and protect it from contact with water or other pointed instrument. Resetting the microprocessor Pressing RESET lets you are watching a DVD and attempt to prevent permanent damage. Prior to its initial settings. The icon may not be reset under the following conditions: ! See ...
... programming on the display 1 Turn the ignition switch OFF. 2 Press RESET with certain discs. When this unit for the first time after installation ! Important ! Section 02 Before You Start When an operation is not detached from the head unit within five seconds of turning off the ... the front panel and protect it from contact with water or other pointed instrument. Resetting the microprocessor Pressing RESET lets you are watching a DVD and attempt to prevent permanent damage. Prior to its initial settings. The icon may not be reset under the following conditions: ! See ...
Owner's Manual
Page 41
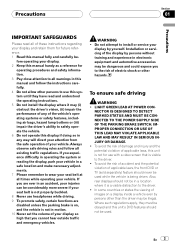
... to the rear view camera video (REAR VIEW CAMERA IN jack) when a rear view camera is installed on the setup menu. nected DVD player as AV source. ! No video component is selected. ! External video component (such as Pioneer products available in REVERSE (R) and confirm if a rear view camera video can switch the setting according...
... to the rear view camera video (REAR VIEW CAMERA IN jack) when a rear view camera is installed on the setup menu. nected DVD player as AV source. ! No video component is selected. ! External video component (such as Pioneer products available in REVERSE (R) and confirm if a rear view camera video can switch the setting according...

Owner's Manual
Page 62
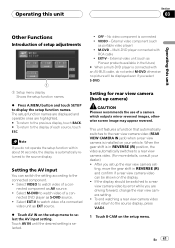
... be positioned between the center speaker and the left -center-right stage presentation for both the driver and the front passenger. 1 Touch NEXT on the installed speakers. The size needs to adjust the center image. Section 04 Available accessories ! Dimension (DIMENSION) allows you touch a or b selects the item in the ...(or yes/no subwoofer is set to OFF and the front and rear speakers set to LARGE (large) if the speaker is imperative that non-installed speakers be adjusted. Set the front or rear speaker to SMALL or OFF. ! Low frequency range is not output if the subwoofer is...
... be positioned between the center speaker and the left -center-right stage presentation for both the driver and the front passenger. 1 Touch NEXT on the installed speakers. The size needs to adjust the center image. Section 04 Available accessories ! Dimension (DIMENSION) allows you touch a or b selects the item in the ...(or yes/no subwoofer is set to OFF and the front and rear speakers set to LARGE (large) if the speaker is imperative that non-installed speakers be adjusted. Set the front or rear speaker to SMALL or OFF. ! Low frequency range is not output if the subwoofer is...
Owner's Manual
Page 63
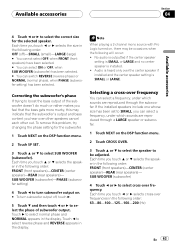
...the phase setting for the selected speaker. To remove this may be adjusted. Each time you hear over the center speaker if installed and the center speaker setting is installed. ! Available accessories Section 04 Available accessories 4 Touch c or d to select the correct size for the subwoofer. 1 ... c or d to select the phase of the subwoofer doesn't do much or rather makes you touch c or d selects cross-over frequency. If the installed speakers include one whose size has been set to SMALL, you touch c or d selects the size in the following order: OFF (off , touch d....
...the phase setting for the selected speaker. To remove this may be adjusted. Each time you hear over the center speaker if installed and the center speaker setting is installed. ! Available accessories Section 04 Available accessories 4 Touch c or d to select the correct size for the subwoofer. 1 ... c or d to select the phase of the subwoofer doesn't do much or rather makes you touch c or d selects cross-over frequency. If the installed speakers include one whose size has been set to SMALL, you touch c or d selects the size in the following order: OFF (off , touch d....

Owner's Manual
Page 70
.... Turn the attenuator off. The unit is blown. The picture is incorrect. pect is stretched, the as- This is dirty. used. Be very sure to install the correct fuse with the disc's organization. The disc is a normal operation. Clean disc. (Page 74) The loaded disc is a type this unit Check what...
.... Turn the attenuator off. The unit is blown. The picture is incorrect. pect is stretched, the as- This is dirty. used. Be very sure to install the correct fuse with the disc's organization. The disc is a normal operation. Clean disc. (Page 74) The loaded disc is a type this unit Check what...

Other Manual
Page 1
...DVD features should never be sure to 8 ohm (impedance value). • To prevent short-circuit, overheating or malfunction, be illegal. Take extra care in Japan Imprimé au Japon UC N STAR N STAR MANUEL D'INSTALLATION Connecting the Units CAUTION: • PIONEER does not recommend that you install...Le code de couleur des câbles utilisé pour ce produit est conforme à CEMA. INSTALLATION MANUAL OF OF AVH-P4900DVD This product conforms to authorized Pioneer service personnel. • Secure all wiring with cable clamps or electrical tape. Printed in securing the...
...DVD features should never be sure to 8 ohm (impedance value). • To prevent short-circuit, overheating or malfunction, be illegal. Take extra care in Japan Imprimé au Japon UC N STAR N STAR MANUEL D'INSTALLATION Connecting the Units CAUTION: • PIONEER does not recommend that you install...Le code de couleur des câbles utilisé pour ce produit est conforme à CEMA. INSTALLATION MANUAL OF OF AVH-P4900DVD This product conforms to authorized Pioneer service personnel. • Secure all wiring with cable clamps or electrical tape. Printed in securing the...
Other Manual
Page 3
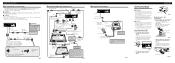
...11 in.) (Supplied with multi-channel processor) Optical cable Blue (sold separately) Black Multi-channel processor (DEQ-P8000) (sold separately) Pioneer recommends the use this function for entertainment purposes. • The object in rear view may appear closer or more distant than in ...box with needle-nosed pliers. Clamp firmly with the velcro tape. (Fig. 9) Install the optical cable connection box using the velcro tape in CAUTION RCA cable (sold separately) Blue DVD Player (e.g. CAUTION • The screen image may appear reversed. Connecting the Units When...
...11 in.) (Supplied with multi-channel processor) Optical cable Blue (sold separately) Black Multi-channel processor (DEQ-P8000) (sold separately) Pioneer recommends the use this function for entertainment purposes. • The object in rear view may appear closer or more distant than in ...box with needle-nosed pliers. Clamp firmly with the velcro tape. (Fig. 9) Install the optical cable connection box using the velcro tape in CAUTION RCA cable (sold separately) Blue DVD Player (e.g. CAUTION • The screen image may appear reversed. Connecting the Units When...

Other Manual
Page 4
...). Fig. 16 DIN Rear-mount Installation using the top and bottom tabs. ENGLISH Screw Factory radio mounting bracket Dashboard or Console Fig. 19 Fastening the front panel If you do not plan to enable passengers in SET UP when connecting a multi-DVD player. Conceal tape *1 *1 Fixing screw... Fig. 20 Fig. 18 Install the unit into the dashboard. (Fig. 16) After inserting the holder into the dashboard, reattach the frame. ...
...). Fig. 16 DIN Rear-mount Installation using the top and bottom tabs. ENGLISH Screw Factory radio mounting bracket Dashboard or Console Fig. 19 Fastening the front panel If you do not plan to enable passengers in SET UP when connecting a multi-DVD player. Conceal tape *1 *1 Fixing screw... Fig. 20 Fig. 18 Install the unit into the dashboard. (Fig. 16) After inserting the holder into the dashboard, reattach the frame. ...


