
Owner's Manual
Page 11
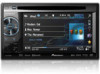
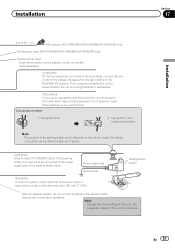
... 4 8 3ab9 5 1 Part 1 SRC/OFF 2 +/- (VOLUME/ VOL) 3 MUTE Part 7 h (eject) 8 Disc loading slot Auto EQ microphone input jack 9 Use to operate a navigation system from the unit and may be dangerous. ! Notes ! CAUTION ! (AVH-P3400BH/AVH-P2400BT/AVHP1400DVD) Use an optional Pioneer USB cable (CD-U50E) to connect the USB audio player/USB memory as any device... . 6 c/d (TRK) Part USB port a When connecting, open the USB con- Press MODE and hold to turn the display on how to connect an auto EQ microphone. En 11
... 4 8 3ab9 5 1 Part 1 SRC/OFF 2 +/- (VOLUME/ VOL) 3 MUTE Part 7 h (eject) 8 Disc loading slot Auto EQ microphone input jack 9 Use to operate a navigation system from the unit and may be dangerous. ! Notes ! CAUTION ! (AVH-P3400BH/AVH-P2400BT/AVHP1400DVD) Use an optional Pioneer USB cable (CD-U50E) to connect the USB audio player/USB memory as any device... . 6 c/d (TRK) Part USB port a When connecting, open the USB con- Press MODE and hold to turn the display on how to connect an auto EQ microphone. En 11
Owner's Manual
Page 58
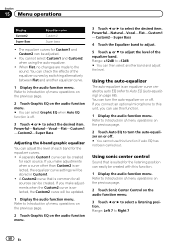
... the audio function menu. 3 Touch c or d to Introduction of the equalizer curves by auto EQ (refer to select a listening position. If you connect an optional microphone to this unit, you can check the effects of menu operations on the previous page. 2 Touch Graphic EQ on the audio function menu. # You can...
... the audio function menu. 3 Touch c or d to Introduction of the equalizer curves by auto EQ (refer to select a listening position. If you connect an optional microphone to this unit, you can check the effects of menu operations on the previous page. 2 Touch Graphic EQ on the audio function menu. # You can...
Owner's Manual
Page 69
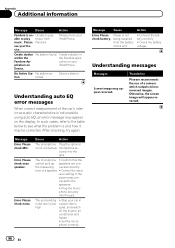
...car phones or portable telephones in the air conditioner or heater may prevent correct auto EQ. If desired, place the microphone on page 57.) - If the microphone is set the cut power to a power amp with input level control, auto EQ may not be possible if the... frequency. ! The speakers are incorrectly connected. (For example, when a rear speaker is connected to place the microphone in LPF of the car interior acoustic characteristics. ! Using another microphone may differ depending on page 57.) - Be sure to a power amp with the car engine and air conditioning...
...car phones or portable telephones in the air conditioner or heater may prevent correct auto EQ. If desired, place the microphone on page 57.) - If the microphone is set the cut power to a power amp with input level control, auto EQ may not be possible if the... frequency. ! The speakers are incorrectly connected. (For example, when a rear speaker is connected to place the microphone in LPF of the car interior acoustic characteristics. ! Using another microphone may differ depending on page 57.) - Be sure to a power amp with the car engine and air conditioning...

Owner's Manual
Page 70
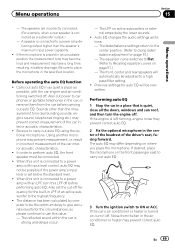
... the microphone input jack on page 57. 5 Touch Auto EQ Measurement to be completed when all the speakers are connected. # To stop auto EQ, touch Stop. 70 En Refer to Introduction of the car and close the panel. (AVH-P4400BH only) (AVH-P4400BH) 7 Touch Start to start ...auto EQ. 8 When the 10-second countdown starts, get out of menu operations on this unit. (AVH-P3400BH/AVH-P2400BT/AVHP1400DVD) 9 Store the microphone carefully in the glove compartment or another safe place. When the car's interior acoustic characteristics cannot be measured correctly, an error message...
... the microphone input jack on page 57. 5 Touch Auto EQ Measurement to be completed when all the speakers are connected. # To stop auto EQ, touch Stop. 70 En Refer to Introduction of the car and close the panel. (AVH-P4400BH only) (AVH-P4400BH) 7 Touch Start to start ...auto EQ. 8 When the 10-second countdown starts, get out of menu operations on this unit. (AVH-P3400BH/AVH-P2400BT/AVHP1400DVD) 9 Store the microphone carefully in the glove compartment or another safe place. When the car's interior acoustic characteristics cannot be measured correctly, an error message...
Owner's Manual
Page 77
... remain exposed. ! Secure all installation and servicing of images on a display inside a vehicle even by persons other device must be connected to authorized Pioneer service personnel. ! Make sure that the ground cable is extremely dangerous to allow any cables. Make sure that cables will not obstruct driving. ! ... unit in such a way that you in fire, generation of this unit or power amp (sold commercially. Do not allow the microphone lead to work properly. Do not drill a hole into the engine compartment. Do not use 1 W to 8 W (impedance value).
... remain exposed. ! Secure all installation and servicing of images on a display inside a vehicle even by persons other device must be connected to authorized Pioneer service personnel. ! Make sure that the ground cable is extremely dangerous to allow any cables. Make sure that cables will not obstruct driving. ! ... unit in such a way that you in fire, generation of this unit or power amp (sold commercially. Do not allow the microphone lead to work properly. Do not drill a hole into the engine compartment. Do not use 1 W to 8 W (impedance value).
Owner's Manual
Page 81
.... Note: · The position of any connections. Power supply side Ground side Blue/white Connect to sense whether the car is in .) Microphone (AVH-P4400BH/AVH-P3400BH/AVH-P2400BT only) Microphone input (AVH-P4400BH/AVH-P3400BH/AVH-P2400BT only) Wired remote input Hard-wired remote control adaptor can be connected to detect the ON/OFF status of this unit. The...
.... Note: · The position of any connections. Power supply side Ground side Blue/white Connect to sense whether the car is in .) Microphone (AVH-P4400BH/AVH-P3400BH/AVH-P2400BT only) Microphone input (AVH-P4400BH/AVH-P3400BH/AVH-P2400BT only) Wired remote input Hard-wired remote control adaptor can be connected to detect the ON/OFF status of this unit. The...
Owner's Manual
Page 83
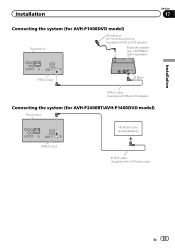
Installation Connecting the system (for AVH-P1400DVD model) This product Microphone for AVH-P2400BT/AVH-P1400DVD model) This product HD Radio tuner (sold separately) IP-BUS input IP-BUS cable (Supplied with Bluetooth adapter) Bluetooth adapter (e.g. CD-BTB200) (sold separately) Section 17 Installation IP-BUS input Black IP-BUS cable (Supplied with Bluetooth adapter) Connecting the system (for hands-free phoning (supplied with HD Radio tuner) En 83
Installation Connecting the system (for AVH-P1400DVD model) This product Microphone for AVH-P2400BT/AVH-P1400DVD model) This product HD Radio tuner (sold separately) IP-BUS input IP-BUS cable (Supplied with Bluetooth adapter) Bluetooth adapter (e.g. CD-BTB200) (sold separately) Section 17 Installation IP-BUS input Black IP-BUS cable (Supplied with Bluetooth adapter) Connecting the system (for hands-free phoning (supplied with HD Radio tuner) En 83

Owner's Manual
Page 88
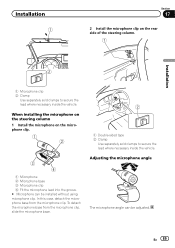
If this happens, use the supplied frame to fill the gap. 5 Dashboard or console Installing the microphone (For AVH-P4400BH/AVH-P3400BH/ AVH-P2400BT model) CAUTION It is extremely dangerous to allow the microphone lead to install the unit in such a way that will not obstruct driving. With the sun visor up the voice of vehicles, discrepancy...
If this happens, use the supplied frame to fill the gap. 5 Dashboard or console Installing the microphone (For AVH-P4400BH/AVH-P3400BH/ AVH-P2400BT model) CAUTION It is extremely dangerous to allow the microphone lead to install the unit in such a way that will not obstruct driving. With the sun visor up the voice of vehicles, discrepancy...
Owner's Manual
Page 89
... the microphone base from the microphone clip. En 89 Adjusting the microphone angle The microphone angle can be adjusted. Installation 1 Section 17 2 Install the microphone clip on the microphone clip. 1 2 3 4 1 Microphone 2 Microphone base 3 Microphone clip 4 Fit the microphone lead into the groove. # Microphone can be installed without using microphone clip. In this case, detach the microphone base from the microphone clip, slide the microphone base...
... the microphone base from the microphone clip. En 89 Adjusting the microphone angle The microphone angle can be adjusted. Installation 1 Section 17 2 Install the microphone clip on the microphone clip. 1 2 3 4 1 Microphone 2 Microphone base 3 Microphone clip 4 Fit the microphone lead into the groove. # Microphone can be installed without using microphone clip. In this case, detach the microphone base from the microphone clip, slide the microphone base...
Owner's Manual
Page 96
.../iPhone. tion lected. Select a station. In such cases, refer to the table below to this unit. ! After checking, try again. Please check xxxx speaker. microphone se- Confirm that is quiet, and switch off the engine, air conditioner and heater. ! tone of a camera which outputs mirrorreversed images. The surrounding noise level.... Message Cause Action Error. Please check battery. Power is too high. ! Check the battery voltage. Understanding messages Messages Screen image may appear reversed. Translation Pioneer recommends the use of a speaker. !
.../iPhone. tion lected. Select a station. In such cases, refer to the table below to this unit. ! After checking, try again. Please check xxxx speaker. microphone se- Confirm that is quiet, and switch off the engine, air conditioner and heater. ! tone of a camera which outputs mirrorreversed images. The surrounding noise level.... Message Cause Action Error. Please check battery. Power is too high. ! Check the battery voltage. Understanding messages Messages Screen image may appear reversed. Translation Pioneer recommends the use of a speaker. !


