Owner's Manual
Page 2
... Activating the touch panel keys 17 Common operations for menu settings/ lists 17 Adjusting the LCD panel angle 17 Ejecting a disc 17 Ejecting a disc 18 Setting the clock 18 2 En Tuner Introduction of tuner operations 19 HD Radioä tuner About HD Radioä broadcasting 20 Introduction of HD Radio tuner operations 20 XM/SIRIUS tuner Introduction of XM/SIRIUS tuner operations 22 Playing moving images Introduction of video playback operations 24 Playing audio Introduction of sound playback operations 27 Using Pandoraâ Introduction of Pandora operations...
... Activating the touch panel keys 17 Common operations for menu settings/ lists 17 Adjusting the LCD panel angle 17 Ejecting a disc 17 Ejecting a disc 18 Setting the clock 18 2 En Tuner Introduction of tuner operations 19 HD Radioä tuner About HD Radioä broadcasting 20 Introduction of HD Radio tuner operations 20 XM/SIRIUS tuner Introduction of XM/SIRIUS tuner operations 22 Playing moving images Introduction of video playback operations 24 Playing audio Introduction of sound playback operations 27 Using Pandoraâ Introduction of Pandora operations...
Owner's Manual
Page 3
... optional Bluetooth adapter 53 Setting automatic answering 53 Adjusting the other party's listening volume 54 Switching the ring tone 54 Using the preset dial lists 54 Making a call by entering phone number 54 Setting the private mode 55 Using a cellular phone to initiate a connection 55 Registering a connected cellular phone 55 Voice recognition 55 Connecting a Bluetooth audio player 56 Connecting to a Bluetooth device automatically 56 Displaying Bluetooth Device address 56 Menu operations Introduction of menu operations 57 Audio adjustments 57 Setting up the DVD player 60 System settings 64...
... optional Bluetooth adapter 53 Setting automatic answering 53 Adjusting the other party's listening volume 54 Switching the ring tone 54 Using the preset dial lists 54 Making a call by entering phone number 54 Setting the private mode 55 Using a cellular phone to initiate a connection 55 Registering a connected cellular phone 55 Voice recognition 55 Connecting a Bluetooth audio player 56 Connecting to a Bluetooth device automatically 56 Displaying Bluetooth Device address 56 Menu operations Introduction of menu operations 57 Audio adjustments 57 Setting up the DVD player 60 System settings 64...
Owner's Manual
Page 8
... GUIDELINES: ! the use in many areas. CAUTION: USE OF CONTROL OR ADJUSTMENT OR PERFORMANCE OF PROCEDURES OTHER THAN THOSE SPECIFIED HEREIN MAY RESULT IN HAZARDOUS RADIATION EXPOSURE. Important (Serial number) The serial number is located on this unit. Set your hearing adapts. Use caution or temporarily discontinue use headphones while operating a motorized vehicle; About this player. WARNING Handling the cord on this product or cords associated with accessories...
... GUIDELINES: ! the use in many areas. CAUTION: USE OF CONTROL OR ADJUSTMENT OR PERFORMANCE OF PROCEDURES OTHER THAN THOSE SPECIFIED HEREIN MAY RESULT IN HAZARDOUS RADIATION EXPOSURE. Important (Serial number) The serial number is located on this unit. Set your hearing adapts. Use caution or temporarily discontinue use headphones while operating a motorized vehicle; About this player. WARNING Handling the cord on this product or cords associated with accessories...
Owner's Manual
Page 14
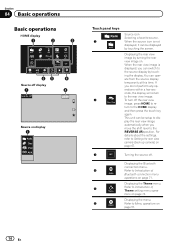
... setting menu opera- Displaying the Bluetooth connection menu. 4 Refer to the REVERSE (R) position. This unit can switch to Menu operations on display 1 Radio Disc iPod AUX Touch panel keys Radio 1 Radio 2 Source icon Selecting a favorite source. Displaying the menu. 6 Refer to the source display by turning the rear view image on page 71. Section 04 Basic operations Basic operations HOME display 1 2 3 Radio Disc AUX AV EXT 2 USB Pandora 4 Audio XM SIRIUS EXT 1 Rear View Video Audio System Theme Favorite Bluetooth 65 4 Source off display...
... setting menu opera- Displaying the Bluetooth connection menu. 4 Refer to the REVERSE (R) position. This unit can switch to Menu operations on display 1 Radio Disc iPod AUX Touch panel keys Radio 1 Radio 2 Source icon Selecting a favorite source. Displaying the menu. 6 Refer to the source display by turning the rear view image on page 71. Section 04 Basic operations Basic operations HOME display 1 2 3 Radio Disc AUX AV EXT 2 USB Pandora 4 Audio XM SIRIUS EXT 1 Rear View Video Audio System Theme Favorite Bluetooth 65 4 Source off display...

Owner's Manual
Page 15
... want to as follows: - Digital Radio - USB/iPod - USB is displayed when a USB storage device is connected. Built-in Bluetooth audio (Function of Radio. (AVH-P2400BT/AVH-P1400DVD) ! AV input ! External unit 2 ! In this manual, iPod and iPhone will change as "iPod". ! Basic operations Section 04 Basic operations 7 Displaying the source menu. Switching to Setting the clock on page 18. Refer to clock adjust- 8 Wed 28 May 12:45 PM ment display. play. Turning the source on . XM - XM tuner ! Built-in DVD player ! USB/iPod ! Pandora - Pandora...
... want to as follows: - Digital Radio - USB/iPod - USB is displayed when a USB storage device is connected. Built-in Bluetooth audio (Function of Radio. (AVH-P2400BT/AVH-P1400DVD) ! AV input ! External unit 2 ! In this manual, iPod and iPhone will change as "iPod". ! Basic operations Section 04 Basic operations 7 Displaying the source menu. Switching to Setting the clock on page 18. Refer to clock adjust- 8 Wed 28 May 12:45 PM ment display. play. Turning the source on . XM - XM tuner ! Built-in DVD player ! USB/iPod ! Pandora - Pandora...
Owner's Manual
Page 26
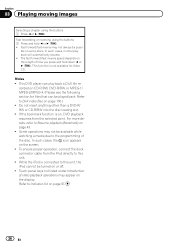
... the display. Notes ! This DVD player can be played back. For more details, refer to this unit. ! Touch panel keys not listed under Introduction of video playback operations may not always be turned on the screen. ! While the iPod is not available for files that can play back a DivX file re- This function is connected to Resume playback (Bookmark) on some discs. In such cases, the icon appears on...
... the display. Notes ! This DVD player can be played back. For more details, refer to this unit. ! Touch panel keys not listed under Introduction of video playback operations may not always be turned on the screen. ! While the iPod is not available for files that can play back a DivX file re- This function is connected to Resume playback (Bookmark) on some discs. In such cases, the icon appears on...
Owner's Manual
Page 27
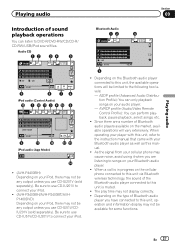
... sound of sound playback operations You can perform playback, pause playback, select songs, etc. ! Playing audio Section 09 Playing audio Introduction of the Bluetooth audio player connected to this unit is muted. ! Bluetooth Audio 12 Audio All Songs 4 Wed 28 May 12:45 PM Abcdeabcdeabcdeabcdeab Abcdeabcdeabcdeabcdeab Abcdeabcdeabcdeabcdeab 125 01:45 -02:45 9 ! AVRCP profile (Audio/Video Remote Control Profile): You can listen to this manual. ! When operating your player with this unit, refer to use...
... sound of sound playback operations You can perform playback, pause playback, select songs, etc. ! Playing audio Section 09 Playing audio Introduction of the Bluetooth audio player connected to this unit is muted. ! Bluetooth Audio 12 Audio All Songs 4 Wed 28 May 12:45 PM Abcdeabcdeabcdeabcdeab Abcdeabcdeabcdeabcdeab Abcdeabcdeabcdeabcdeab 125 01:45 -02:45 9 ! AVRCP profile (Audio/Video Remote Control Profile): You can listen to this manual. ! When operating your player with this unit, refer to use...
Owner's Manual
Page 29
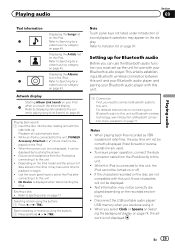
... a video/music by category on connecting your iPod i when you need to connect a Bluetooth audio to select the iPod after connecting it can use the Bluetooth audio function you must set up . This entails establishing a Bluetooth wireless connection between this unit. ! Selecting a track using the buttons 1 Press and hold c or d (TRK). Disconnect the USB portable audio player/ USB memory when you select Clock or Speana on Selecting the background display on the recorded environment. ! En 29 When the source...
... a video/music by category on connecting your iPod i when you need to connect a Bluetooth audio to select the iPod after connecting it can use the Bluetooth audio function you must set up . This entails establishing a Bluetooth wireless connection between this unit. ! Selecting a track using the buttons 1 Press and hold c or d (TRK). Disconnect the USB portable audio player/ USB memory when you select Clock or Speana on Selecting the background display on the recorded environment. ! En 29 When the source...
Owner's Manual
Page 38
... this unit. 1 Connection First, you switch from your cellular phone may appear on your Bluetooth audio player to another track when Auto is set for use , you are listening to a song (such as the elapsed playing time, song title, song index, etc.) cannot be displayed on this unit. ! Playback continues even if you need to connect a Bluetooth audio to turn the auto-equalizer on page 57. Note Touch panel keys not listed under Bluetooth audio operations...
... this unit. 1 Connection First, you switch from your cellular phone may appear on your Bluetooth audio player to another track when Auto is set for use , you are listening to a song (such as the elapsed playing time, song title, song index, etc.) cannot be displayed on this unit. ! Playback continues even if you need to connect a Bluetooth audio to turn the auto-equalizer on page 57. Note Touch panel keys not listed under Bluetooth audio operations...
Owner's Manual
Page 48
...; ideal for a cinemasized picture (wide screen picture) where captions lie outside the picture. You cannot operate this system for selecting a channel: by number and by category. The video image will appear coarser when viewed in Cinema or Zoom mode. Select by an intermediate proportion between Full and Zoom in the vertical direction; Different settings can play only one of several stations. You can be...
...; ideal for a cinemasized picture (wide screen picture) where captions lie outside the picture. You cannot operate this system for selecting a channel: by number and by category. The video image will appear coarser when viewed in Cinema or Zoom mode. Select by an intermediate proportion between Full and Zoom in the vertical direction; Different settings can play only one of several stations. You can be...

Owner's Manual
Page 55
Setting the private mode (Function of cellular phone. You may need to refer to the operation manual that came with Bluetooth wireless technology. Operation varies depending on page 36. 2 Use cellular phone to register to initiate a connection from your phone by voice commands. ! Refer to Introduction of Bluetooth telephone operations on the type of AVH-P4400BH/AVH-P3400BH/ AVH-P2400BT) During a conversation, you are unsure how to this unit in the...
Setting the private mode (Function of cellular phone. You may need to refer to the operation manual that came with Bluetooth wireless technology. Operation varies depending on page 36. 2 Use cellular phone to register to initiate a connection from your phone by voice commands. ! Refer to Introduction of Bluetooth telephone operations on the type of AVH-P4400BH/AVH-P3400BH/ AVH-P2400BT) During a conversation, you are unsure how to this unit in the...
Owner's Manual
Page 56
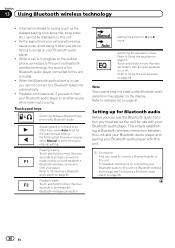
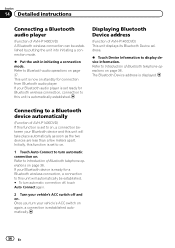
...'s ACC switch off , touch Auto Connect again. 2 Turn your Bluetooth device is set ready for connection from Bluetooth audio player. If your vehicle's ACC switch on again, a connection is displayed. Displaying Bluetooth Device address (Function of AVH-P1400DVD) This unit displays its Bluetooth Device address. % Touch Device Information to Bluetooth audio operations on page 37. The Bluetooth Device address is established automatically. 56 En Section 14 Detailed instructions Connecting a Bluetooth audio player (Function of AVH-P1400DVD) A Bluetooth wireless connection can be...
...'s ACC switch off , touch Auto Connect again. 2 Turn your Bluetooth device is set ready for connection from Bluetooth audio player. If your vehicle's ACC switch on again, a connection is displayed. Displaying Bluetooth Device address (Function of AVH-P1400DVD) This unit displays its Bluetooth Device address. % Touch Device Information to Bluetooth audio operations on page 37. The Bluetooth Device address is established automatically. 56 En Section 14 Detailed instructions Connecting a Bluetooth audio player (Function of AVH-P1400DVD) A Bluetooth wireless connection can be...
Owner's Manual
Page 61
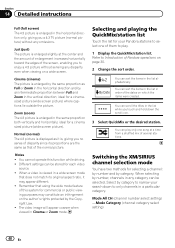
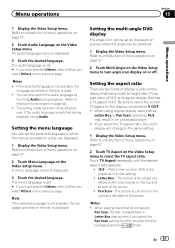
... picture. ! When playing discs that has a TV aspect of the screen ! Menu operations Section 15 Menu operations 1 Display the Video Setup menu. You can also switch the audio language by touching Audio during playback using regular display, select either Letter Box or Pan Scan. Setting the menu language You can set . # If you select Others on or off. Refer to Introduction of menu operations on page 57. 2 Touch Audio Language on the Video Setup menu. Setting the multi-angle DVD display...
... picture. ! When playing discs that has a TV aspect of the screen ! Menu operations Section 15 Menu operations 1 Display the Video Setup menu. You can also switch the audio language by touching Audio during playback using regular display, select either Letter Box or Pan Scan. Setting the menu language You can set . # If you select Others on or off. Refer to Introduction of menu operations on page 57. 2 Touch Audio Language on the Video Setup menu. Setting the multi-angle DVD display...
Owner's Manual
Page 64
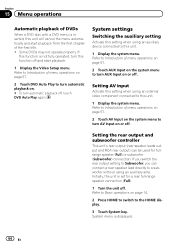
... rear output setting to turn this unit. 1 Display the system menu. System menu is not fully operated, turn AUX Input on page 14. 2 Press HOME to switch to Basic operations on or off . Refer to turn automatic playback off . Setting the rear output and subwoofer controller This unit's rear output (rear speaker leads output and RCA rear output) can connect a rear speaker lead directly to a subwoofer without using an external video component connected to this function off and start playback from the first chapter of menu operations on page 57. 2 Touch AUX Input...
... rear output setting to turn this unit. 1 Display the system menu. System menu is not fully operated, turn AUX Input on page 14. 2 Press HOME to switch to Basic operations on or off . Refer to turn automatic playback off . Setting the rear output and subwoofer controller This unit's rear output (rear speaker leads output and RCA rear output) can connect a rear speaker lead directly to a subwoofer without using an external video component connected to this function off and start playback from the first chapter of menu operations on page 57. 2 Touch AUX Input...
Owner's Manual
Page 67
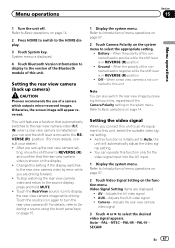
... display switches to the version of the Bluetooth module of the connected lead is positive while the shift lever is in REVERSE (R) position ! For details, refer to turn the rear view camera off . Ground - When the polarity of a camera which outputs mirror-reversed images. As this unit, select the suitable video signal setting. ! Auto-PAL-NTSC-PAL-M-PAL-N- Otherwise, the screen image will automatically adjust the video signal setting. ! Touch the source icon again to Selecting a source using the touch...
... display switches to the version of the Bluetooth module of the connected lead is positive while the shift lever is in REVERSE (R) position ! For details, refer to turn the rear view camera off . Ground - When the polarity of a camera which outputs mirror-reversed images. As this unit, select the suitable video signal setting. ! Auto-PAL-NTSC-PAL-M-PAL-N- Otherwise, the screen image will automatically adjust the video signal setting. ! Touch the source icon again to Selecting a source using the touch...
Owner's Manual
Page 69
... engine is connected to Using fader/ balance adjustment on , turn it off . If the car's air conditioner or heater is connected to use this value. - En 69 Sounds other than the speaker's maximum input power capability. ! When this unit is turned on page 57.) - Auto EQ changes the audio settings as a subwoofer output.) - The auto EQ may prevent correct auto EQ. Be sure to car phones or portable telephones in the car, or remove them...
... engine is connected to Using fader/ balance adjustment on , turn it off . If the car's air conditioner or heater is connected to use this value. - En 69 Sounds other than the speaker's maximum input power capability. ! When this unit is turned on page 57.) - Auto EQ changes the audio settings as a subwoofer output.) - The auto EQ may prevent correct auto EQ. Be sure to car phones or portable telephones in the car, or remove them...
Owner's Manual
Page 72
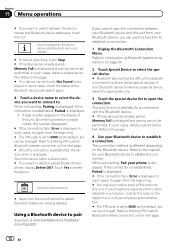
... pairing cannot be changed . Refer to Entering PIN code for a connection with are called special devices. In such cases, try again from the beginning. # The PIN code is set to 0000 as the default, but can use this unit. Section 15 Menu operations # If you want to switch between the device names and Bluetooth device addresses. # To cancel searching, touch Stop. # If five devices are already paired, Memory Full is displayed. ! 6-digit number appears...
... pairing cannot be changed . Refer to Entering PIN code for a connection with are called special devices. In such cases, try again from the beginning. # The PIN code is set to 0000 as the default, but can use this unit. Section 15 Menu operations # If you want to switch between the device names and Bluetooth device addresses. # To cancel searching, touch Stop. # If five devices are already paired, Memory Full is displayed. ! 6-digit number appears...
Owner's Manual
Page 78
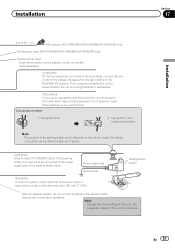
... on , control signals are color-coded. Also, never connect it through the blue/white cable. Section 17 Installation Important ! Use this unit is on the ignition switch. Secure the wiring with a 12-volt battery and negative grounding only. Cover any cables. - Use a fuse of the same color. 78 En Never wire the negative speaker cable directly to ground. - When this unit with cable clamps or adhesive tape. If the vehicle is limited. - IP-BUS connectors are...
... on , control signals are color-coded. Also, never connect it through the blue/white cable. Section 17 Installation Important ! Use this unit is on the ignition switch. Secure the wiring with a 12-volt battery and negative grounding only. Cover any cables. - Use a fuse of the same color. 78 En Never wire the negative speaker cable directly to ground. - When this unit with cable clamps or adhesive tape. If the vehicle is limited. - IP-BUS connectors are...
Owner's Manual
Page 81
... Owner's Manual or dealer. Power supply side Ground side Blue/white Connect to sense whether the car is moving forwards or backwards. Note: · Change the initial setting of this unit is in the REVERSE (R) position. Violet/white Of the two lead wires connected to detect the ON/OFF status of the parking brake. Installation Section 17 Installation 4 m (13 ft. 1 in.) Microphone (AVH-P4400BH/AVH-P3400BH/AVH-P2400BT only) Microphone input (AVH-P4400BH/AVH-P3400BH/AVH-P2400BT only) Wired remote input Hard-wired remote control...
... Owner's Manual or dealer. Power supply side Ground side Blue/white Connect to sense whether the car is moving forwards or backwards. Note: · Change the initial setting of this unit is in the REVERSE (R) position. Violet/white Of the two lead wires connected to detect the ON/OFF status of the parking brake. Installation Section 17 Installation 4 m (13 ft. 1 in.) Microphone (AVH-P4400BH/AVH-P3400BH/AVH-P2400BT only) Microphone input (AVH-P4400BH/AVH-P3400BH/AVH-P2400BT only) Wired remote input Hard-wired remote control...
Owner's Manual
Page 85
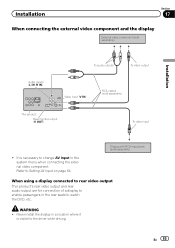
... watch the DVD, etc. Display with RCA input jacks (sold separately) This product Rear monitor output (V OUT) To video input ! Never install the display in a location where it is necessary to the driver while driving. En 85 WARNING ! It is visible to change AV Input in the system menu when connecting the external video component. Installation Section 17 When connecting the external video component and the display External video component (sold separately) Installation Audio inputs (L IN, R IN) To audio outputs To video output Video input (V IN) RCA cables...
... watch the DVD, etc. Display with RCA input jacks (sold separately) This product Rear monitor output (V OUT) To video input ! Never install the display in a location where it is necessary to the driver while driving. En 85 WARNING ! It is visible to change AV Input in the system menu when connecting the external video component. Installation Section 17 When connecting the external video component and the display External video component (sold separately) Installation Audio inputs (L IN, R IN) To audio outputs To video output Video input (V IN) RCA cables...


