Owner's Manual
Page 10
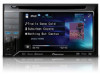
...c jack) Use to turn the display off . Auto EQ microphone input jack d Use to the unit will protrude out from this unit, refer to the normal display. CAUTION ! (AVH-P3200DVD/AVH-P3200BT) Use an optional Pioneer USB cable (CD-U50E) to connect the USB audio player/USB... memory as any device connected directly to connect an auto EQ microphone. a SD memory card slot Part 4 +/- (VOLUME/ VOL) 5 ...
...c jack) Use to turn the display off . Auto EQ microphone input jack d Use to the unit will protrude out from this unit, refer to the normal display. CAUTION ! (AVH-P3200DVD/AVH-P3200BT) Use an optional Pioneer USB cable (CD-U50E) to connect the USB audio player/USB... memory as any device connected directly to connect an auto EQ microphone. a SD memory card slot Part 4 +/- (VOLUME/ VOL) 5 ...
Owner's Manual
Page 56
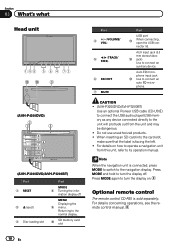
... the selected range are outputted from the subwoofer. 56 En Range: Left:7 to select a desired level. Powerful-Natural-Vocal-Custom1- If you connect an optional microphone to this unit, you can use this function. 1 Display the audio function menu. Refer to Introduction of menu operations on page 54. 2 Touch Auto EQ...
... the selected range are outputted from the subwoofer. 56 En Range: Left:7 to select a desired level. Powerful-Natural-Vocal-Custom1- If you connect an optional microphone to this unit, you can use this function. 1 Display the audio function menu. Refer to Introduction of menu operations on page 54. 2 Touch Auto EQ...

Owner's Manual
Page 65
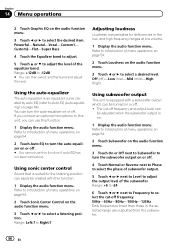
... distance has been calculated by computer to be the optimum delay to give accurate results for the circumstances, so please continue to place the microphone in the car, or remove them from the speakers when measuring the car's interior acoustic characteristics, never perform auto TA or auto EQ ...be emitted from the car before carrying out auto EQ. Before operating the auto EQ function ! The LPF on where you place the microphone. En 65 If the microphone is connected to perform auto EQ, the front speaker must be overwritten. Auto EQ changes the audio settings as a subwoofer output.) ...
... distance has been calculated by computer to be the optimum delay to give accurate results for the circumstances, so please continue to place the microphone in the car, or remove them from the speakers when measuring the car's interior acoustic characteristics, never perform auto TA or auto EQ ...be emitted from the car before carrying out auto EQ. Before operating the auto EQ function ! The LPF on where you place the microphone. En 65 If the microphone is connected to perform auto EQ, the front speaker must be overwritten. Auto EQ changes the audio settings as a subwoofer output.) ...

Owner's Manual
Page 66
... period, high temperatures may prevent correct auto EQ. 4 Display the system menu. Canceling auto EQ measurement mode. 9 Store the microphone carefully in the air conditioner or heater may cause distortion, color change or malfunction. 10 Press h(eject) to close the panel...to be completed when all the speakers are using the microphone. (AVH-P3200DVD/AVH-P3200BT) 7 Touch Start to enter auto EQ measurement mode. 6 Plug the microphone into the microphone input jack on , turn it off. Refer to ON or ACC. If the microphone is displayed. Section 14 Menu operations 3 Turn the ...
... period, high temperatures may prevent correct auto EQ. 4 Display the system menu. Canceling auto EQ measurement mode. 9 Store the microphone carefully in the air conditioner or heater may cause distortion, color change or malfunction. 10 Press h(eject) to close the panel...to be completed when all the speakers are using the microphone. (AVH-P3200DVD/AVH-P3200BT) 7 Touch Start to enter auto EQ measurement mode. 6 Plug the microphone into the microphone input jack on , turn it off. Refer to ON or ACC. If the microphone is displayed. Section 14 Menu operations 3 Turn the ...

Owner's Manual
Page 77
...and how it may appear on the iPod is still displayed after performing the above action, please contact your dealer or an authorized Pioneer Service Station. Stop There are version. Memory full. Check the iPod formation cannot and try again. iPod. Turn the ignition ...transfer. There are no songs. Tags not stored. This unit's tag in the cur- Tag information Try again. Cause Action The microphone Plug the optional is complete. contains songs. iTunes tagging Message Cause Action iPod full. Understanding auto EQ error messages When correct measurement of...
...and how it may appear on the iPod is still displayed after performing the above action, please contact your dealer or an authorized Pioneer Service Station. Stop There are version. Memory full. Check the iPod formation cannot and try again. iPod. Turn the ignition ...transfer. There are no songs. Tags not stored. This unit's tag in the cur- Tag information Try again. Cause Action The microphone Plug the optional is complete. contains songs. iTunes tagging Message Cause Action iPod full. Understanding auto EQ error messages When correct measurement of...
Owner's Manual
Page 78
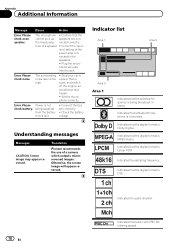
... the battery correctly. ! Translation Pioneer recommends the use of the power amp connected to this unit. ! Indicates that the digital format is being played. tone of a speaker. ! Indicator list Area 1 Area 2 Area 3 Area 1 Indicates that the cannot pick up speakers are conthe measuring nected correctly. Plug the microphone securely into the jack...
... the battery correctly. ! Translation Pioneer recommends the use of the power amp connected to this unit. ! Indicates that the digital format is being played. tone of a speaker. ! Indicator list Area 1 Area 2 Area 3 Area 1 Indicates that the cannot pick up speakers are conthe measuring nected correctly. Plug the microphone securely into the jack...
Installation Manual
Page 2
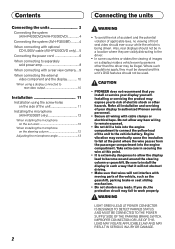
... a hole into the engine compartment. If you to risk of electric shock or other than the driver may be illegal. CAUTION • PIONEER does not recommend that wires will not obstruct driving. • Make sure that you install or service your display to authorized... output 10 Installation 11 Installation using the screw holes on the side of the unit 11 Installing the microphone (AVH-P3200BT only 12 When installing the microphone on the sun visor 12 When installing the microphone on a display inside a vehicle even by persons other hazards. IMPROPER CONNECTION OR USE OF THIS LEAD...
... a hole into the engine compartment. If you to risk of electric shock or other than the driver may be illegal. CAUTION • PIONEER does not recommend that wires will not obstruct driving. • Make sure that you install or service your display to authorized... output 10 Installation 11 Installation using the screw holes on the side of the unit 11 Installing the microphone (AVH-P3200BT only 12 When installing the microphone on the sun visor 12 When installing the microphone on a display inside a vehicle even by persons other hazards. IMPROPER CONNECTION OR USE OF THIS LEAD...
Installation Manual
Page 4
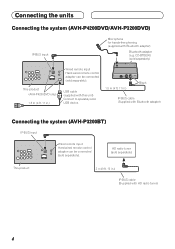
.... 1.5 m (4 ft. 11 in .) IP-BUS cable (Supplied with HD radio tuner) 4 Connecting the units Connecting the system (AVH-P4200DVD/AVH-P3200DVD) IP-BUS input Microphone for hands-free phoning (supplied with Bluetooth adapter) Connecting the system (AVH-P3200BT) IP-BUS input Wired remote input Hard-wired remote control adaptor can be connected (sold separately). HD...
.... 1.5 m (4 ft. 11 in .) IP-BUS cable (Supplied with HD radio tuner) 4 Connecting the units Connecting the system (AVH-P4200DVD/AVH-P3200DVD) IP-BUS input Microphone for hands-free phoning (supplied with Bluetooth adapter) Connecting the system (AVH-P3200BT) IP-BUS input Wired remote input Hard-wired remote control adaptor can be connected (sold separately). HD...
Installation Manual
Page 5
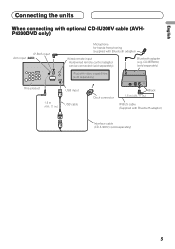
English Connecting the units When connecting with optional CD-IU200V cable (AVHP4200DVD only) IP-BUS input AUX input (AUX) Microphone for hands-free phoning (supplied with Bluetooth adapter) Interface cable (CD-IU200V) (sold separately). Bluetooth adapter (e.g. CD-BTB200) (sold separately) iPod with video capabilities (sold separately) This product USB input 1.5 m (4 ft. 11 in.) USB cable Dock connector Black 1.5 m (4 ft. 11 in.) IP-BUS cable (Supplied with Bluetooth adapter) Wired remote input Hard-wired remote control adaptor can be connected (sold separately) 5
English Connecting the units When connecting with optional CD-IU200V cable (AVHP4200DVD only) IP-BUS input AUX input (AUX) Microphone for hands-free phoning (supplied with Bluetooth adapter) Interface cable (CD-IU200V) (sold separately). Bluetooth adapter (e.g. CD-BTB200) (sold separately) iPod with video capabilities (sold separately) This product USB input 1.5 m (4 ft. 11 in.) USB cable Dock connector Black 1.5 m (4 ft. 11 in.) IP-BUS cable (Supplied with Bluetooth adapter) Wired remote input Hard-wired remote control adaptor can be connected (sold separately) 5
Installation Manual
Page 6
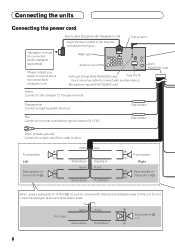
Microphone input (AVH-P3200BT only) (AVHP4200DVD only) Yellow Connect to terminal controlled by ignition switch (12 V DC). Fuse resistor Red Connect to the constant 12 V supply terminal. Orange/white ... (chassis ground) Connect to lighting switch terminal. Green Green/black Violet Violet/black Subwoofer (4 Ω) × 2 6 RGB input This product Antenna input AUX jack (3.5 ø) (AVH-P4200DVD only) Fuse (10 A) Use a mini plug cable to connect with Violet and Violet/black leads of 70 W (2 Ω), be connected (AVIC-U220(sold separately...
Microphone input (AVH-P3200BT only) (AVHP4200DVD only) Yellow Connect to terminal controlled by ignition switch (12 V DC). Fuse resistor Red Connect to the constant 12 V supply terminal. Orange/white ... (chassis ground) Connect to lighting switch terminal. Green Green/black Violet Violet/black Subwoofer (4 Ω) × 2 6 RGB input This product Antenna input AUX jack (3.5 ø) (AVH-P4200DVD only) Fuse (10 A) Use a mini plug cable to connect with Violet and Violet/black leads of 70 W (2 Ω), be connected (AVIC-U220(sold separately...
Installation Manual
Page 7
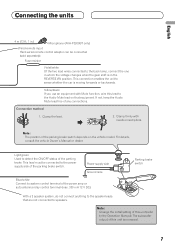
... (sold separately). Connection method 1. Light green Used to the back lamp, connect the one in which the voltage changes when the gear shift is in .) Microphone (AVH-P3200BT only) Wired remote input Hard-wired remote control adaptor can be connected to the Operation Manual). Fuse resistor Violet/white Of the two lead wires...
... (sold separately). Connection method 1. Light green Used to the back lamp, connect the one in which the voltage changes when the gear shift is in .) Microphone (AVH-P3200BT only) Wired remote input Hard-wired remote control adaptor can be connected to the Operation Manual). Fuse resistor Violet/white Of the two lead wires...

Installation Manual
Page 12
... Use separately sold clamps to become wound around the steering column or gearstick. Installation Installing the microphone (AVH-P3200BT only) Installation notes Install the microphone in such a way that will enable it will not obstruct driving. When installing the microphone on the sun visor. • With the sun visor up the voice of the person...
... Use separately sold clamps to become wound around the steering column or gearstick. Installation Installing the microphone (AVH-P3200BT only) Installation notes Install the microphone in such a way that will enable it will not obstruct driving. When installing the microphone on the sun visor. • With the sun visor up the voice of the person...
Installation Manual
Page 13
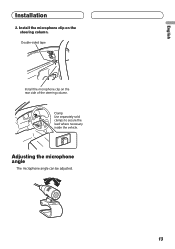
Adjusting the microphone angle The microphone angle can be adjusted. 13 Clamp Use separately sold clamps to secure the lead where necessary inside the vehicle. Double-sided tape Install the microphone clip on the steering column. English Installation 2. Install the microphone clip on the rear side of the steering column.
Adjusting the microphone angle The microphone angle can be adjusted. 13 Clamp Use separately sold clamps to secure the lead where necessary inside the vehicle. Double-sided tape Install the microphone clip on the steering column. English Installation 2. Install the microphone clip on the rear side of the steering column.


