Owner's Manual
Page 2
... unit 10 Optional remote control 10 Basic Operations Basic Operations 11 Operating the scroll bar and the scrubber bar 12 Activating the touch panel keys 12 Common operations for menu settings/ lists 13 Adjusting the LCD panel angle 13 Ejecting a disc 13 Ejecting a disc 13 Ejecting an SD 13 2 En Ejecting an SD 14 Setting the clock 14 Tuner Introduction of tuner operations 15 Playing moving images Introduction of video playback operations 16 Playing audio Introduction of sound playback operations 19 Playing still images...
... unit 10 Optional remote control 10 Basic Operations Basic Operations 11 Operating the scroll bar and the scrubber bar 12 Activating the touch panel keys 12 Common operations for menu settings/ lists 13 Adjusting the LCD panel angle 13 Ejecting a disc 13 Ejecting a disc 13 Ejecting an SD 13 2 En Ejecting an SD 14 Setting the clock 14 Tuner Introduction of tuner operations 15 Playing moving images Introduction of video playback operations 16 Playing audio Introduction of sound playback operations 19 Playing still images...

Owner's Manual
Page 3
... phone number 48 Setting the private mode 49 Pairing from this unit 49 Using a Bluetooth device to pair 50 Connecting to a Bluetooth device automatically 50 Switching visible unit 51 Displaying BD (Bluetooth Device) address 51 Entering PIN code for Bluetooth wireless connection 51 Using a cellular phone to initiate a connection 51 Registering a connected cellular phone 52 Voice recognition 52 Connecting a Bluetooth audio player 52 Connecting to a Bluetooth device automatically 52 Displaying BD (Bluetooth Device) address 52 Menu operations Introduction of menu operations 54 Audio Adjustments...
... phone number 48 Setting the private mode 49 Pairing from this unit 49 Using a Bluetooth device to pair 50 Connecting to a Bluetooth device automatically 50 Switching visible unit 51 Displaying BD (Bluetooth Device) address 51 Entering PIN code for Bluetooth wireless connection 51 Using a cellular phone to initiate a connection 51 Registering a connected cellular phone 52 Voice recognition 52 Connecting a Bluetooth audio player 52 Connecting to a Bluetooth device automatically 52 Displaying BD (Bluetooth Device) address 52 Menu operations Introduction of menu operations 54 Audio Adjustments...
Owner's Manual
Page 4
... Other Functions Changing the picture adjustment 69 Setting rear monitor output 69 Adjusting the response positions of the touch panels (Touch Panel Calibration) 70 Using an AUX source 70 Using an external unit 71 Additional Information Troubleshooting 72 Error messages 74 Understanding auto EQ error messages 77 Understanding messages 78 Indicator list 78 Handling guideline 80 Compressed audio compatibility (disc, USB, SD) 83 iPod compatibility 84 Sequence of audio files 84 Using the display correctly 85 Copyright and trademark 86 Language code chart for DVD 89 Specifications...
... Other Functions Changing the picture adjustment 69 Setting rear monitor output 69 Adjusting the response positions of the touch panels (Touch Panel Calibration) 70 Using an AUX source 70 Using an external unit 71 Additional Information Troubleshooting 72 Error messages 74 Understanding auto EQ error messages 77 Understanding messages 78 Indicator list 78 Handling guideline 80 Compressed audio compatibility (disc, USB, SD) 83 iPod compatibility 84 Sequence of audio files 84 Using the display correctly 85 Copyright and trademark 86 Language code chart for DVD 89 Specifications...

Owner's Manual
Page 6
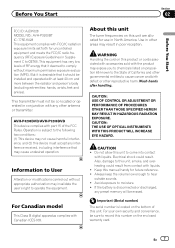
... you transcribe the audio adjustment data. Please keep the brake pedal pushed down before releasing the parking brake. SCREEN IMAGE MAY APPEAR RE- To prevent such functions from being replaced, the microcomputer of this unit to avoid draining the battery power. ! Section 01 Precautions Parking brake interlock Certain functions (Video viewing and certain touch panel keys) offered by this unit can watch the DVD or Video CD. When using a display connected to V OUT This unit's V OUT is an...
... you transcribe the audio adjustment data. Please keep the brake pedal pushed down before releasing the parking brake. SCREEN IMAGE MAY APPEAR RE- To prevent such functions from being replaced, the microcomputer of this unit to avoid draining the battery power. ! Section 01 Precautions Parking brake interlock Certain functions (Video viewing and certain touch panel keys) offered by this unit can watch the DVD or Video CD. When using a display connected to V OUT This unit's V OUT is an...
Owner's Manual
Page 7
... North America. Always keep the volume low enough to moisture. ! Do not allow this device must not be erased. Operation is located on this unit, smoke, and overheating could result. Also, damage to this unit are allocated for use in other antenna or transmitter. Avoid exposure to hear outside sounds. ! Important (Serial number) The serial number is subject to the following...
... North America. Always keep the volume low enough to moisture. ! Do not allow this device must not be erased. Operation is located on this unit, smoke, and overheating could result. Also, damage to this unit are allocated for use in other antenna or transmitter. Avoid exposure to hear outside sounds. ! Important (Serial number) The serial number is subject to the following...
Owner's Manual
Page 10
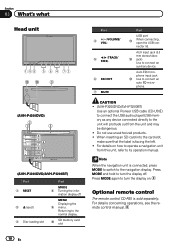
...operations, see the remote control manual. 10 En For details on . a SD memory card slot Part 4 +/- (VOLUME/ VOL) 5 c/d (TRACK/ SEEK) 6 SRC/OFF 7 MUTE Part USB port b When connecting, open the USB con- mation display off . AUX input jack (3.5 mm stereo/video c jack) Use to connect an auto EQ microphone. Press MODE and hold to turn the display on how to the navigation display. Auto EQ microphone input jack d Use to connect an auxiliary device. CAUTION ! (AVH-P3200DVD/AVH-P3200BT) Use an optional Pioneer USB cable (CD-U50E) to connect the USB audio player/USB memory...
...operations, see the remote control manual. 10 En For details on . a SD memory card slot Part 4 +/- (VOLUME/ VOL) 5 c/d (TRACK/ SEEK) 6 SRC/OFF 7 MUTE Part USB port b When connecting, open the USB con- mation display off . AUX input jack (3.5 mm stereo/video c jack) Use to connect an auto EQ microphone. Press MODE and hold to turn the display on how to the navigation display. Auto EQ microphone input jack d Use to connect an auxiliary device. CAUTION ! (AVH-P3200DVD/AVH-P3200BT) Use an optional Pioneer USB cable (CD-U50E) to connect the USB audio player/USB memory...
Owner's Manual
Page 11
..., iPod and iPhone will change as those which will be displayed by touching the screen. ! Turning the unit on using the touch panel keys 1 Touch the source icon and then touch the desired source name. ! Radio/Digital Radio tuner ! Built-in the future. USB/iPod ! SD - External unit 1 ! External unit 2 ! When appropriately set up, the image from the rear view camera can be available in DVD player ! Although incompatible as "iPod". ! When two external units are connected, the external units are automatically allocated to adjust the volume. Switching the output source 4 Rear...
..., iPod and iPhone will change as those which will be displayed by touching the screen. ! Turning the unit on using the touch panel keys 1 Touch the source icon and then touch the desired source name. ! Radio/Digital Radio tuner ! Built-in the future. USB/iPod ! SD - External unit 1 ! External unit 2 ! When appropriately set up, the image from the rear view camera can be available in DVD player ! Although incompatible as "iPod". ! When two external units are connected, the external units are automatically allocated to adjust the volume. Switching the output source 4 Rear...
Owner's Manual
Page 13
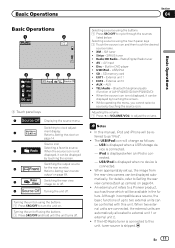
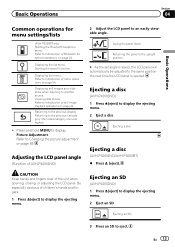
... opened. Adjusting the LCD panel angle (Function of the unit when opening, closing, or adjusting the LCD panel. Laying the panel down. Displaying still images as a slide show when listening to an easily viewable angle. Returning to the previous display Returning to eject. Basic Operations Section 04 Basic Operations Common operations for menu settings/lists (AVH-P3200BT only) Starting the Bluetooth telephone menu. Ejecting an SD (AVH-P4200DVD) 1 Press h(eject) to display the ejecting menu. 2 Eject an SD Ejecting...
... opened. Adjusting the LCD panel angle (Function of the unit when opening, closing, or adjusting the LCD panel. Laying the panel down. Displaying still images as a slide show when listening to an easily viewable angle. Returning to the previous display Returning to eject. Basic Operations Section 04 Basic Operations Common operations for menu settings/lists (AVH-P3200BT only) Starting the Bluetooth telephone menu. Ejecting an SD (AVH-P4200DVD) 1 Press h(eject) to display the ejecting menu. 2 Eject an SD Ejecting...
Owner's Manual
Page 30
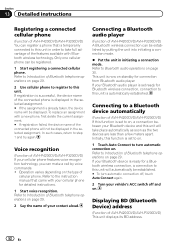
... your cellular phone. Make sure to adjust the volume to AVHP4200DVD/AVH-P3200DVD, you connect a Bluetooth adapter (e.g. tage of cellular phone. ! Refer to Voice recognition on the type of the features available with your phone. tooth wireless connection from the unit. Turning the ring tone for use the hands-free phoning function you need to connect a Bluetooth telephone to Registering a connected cellular phone on page 51. coming calls on the Bluetooth audio player connected to start...
... your cellular phone. Make sure to adjust the volume to AVHP4200DVD/AVH-P3200DVD, you connect a Bluetooth adapter (e.g. tage of cellular phone. ! Refer to Voice recognition on the type of the features available with your phone. tooth wireless connection from the unit. Turning the ring tone for use the hands-free phoning function you need to connect a Bluetooth telephone to Registering a connected cellular phone on page 51. coming calls on the Bluetooth audio player connected to start...

Owner's Manual
Page 31
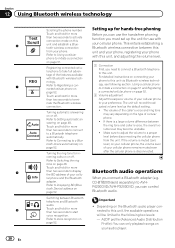
... Touch and hold for more than two seconds to this unit and establish a Bluetooth wireless connection from your Bluetooth audio player. ! Auto Setting the action for more than two seconds to Using the equalizer on page 56. Refer to terminate the Blue- Setting up the unit for the Auto/ manual setting. Using Bluetooth wireless technology En 31 AVRCP profile (Audio/Video Remote Control Profile): You can use the Bluetooth audio function you must set for use , you are a number of...
... Touch and hold for more than two seconds to this unit and establish a Bluetooth wireless connection from your Bluetooth audio player. ! Auto Setting the action for more than two seconds to Using the equalizer on page 56. Refer to terminate the Blue- Setting up the unit for the Auto/ manual setting. Using Bluetooth wireless technology En 31 AVRCP profile (Audio/Video Remote Control Profile): You can use the Bluetooth audio function you must set for use , you are a number of...
Owner's Manual
Page 49
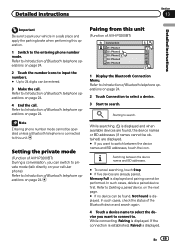
... your vehicle in a safe place and apply the parking brake when performing this unit (Function of AVH-P3200BT) Connection 01: Phone1 02: Phone2 03: Phone3 04: Phone4 05: Phone5 1 Display the Bluetooth Connection Menu. In such cases, delete a paired device first. Refer to search. Refer to Introduction of Bluetooth telephone operations on page 24. 2 Touch the number icons to input the numbers. # Up to 24 digits can be found...
... your vehicle in a safe place and apply the parking brake when performing this unit (Function of AVH-P3200BT) Connection 01: Phone1 02: Phone2 03: Phone3 04: Phone4 05: Phone5 1 Display the Bluetooth Connection Menu. In such cases, delete a paired device first. Refer to search. Refer to Introduction of Bluetooth telephone operations on page 24. 2 Touch the number icons to input the numbers. # Up to 24 digits can be found...

Owner's Manual
Page 50
...a connection. Using a Bluetooth device to pair (Function of Bluetooth telephone operations on page 24. 2 Touch Special Device to select the special device. # Bluetooth devices that are called special devices. Refer to Introduction of AVH-P3200BT) If you cannot open the connection. Connecting to a Bluetooth device automatically (Function of Bluetooth telephone operations on page 24. 2 Touch Auto Connect to establish a connection. 1 Display the Bluetooth Connection Menu. In such cases, try again from the beginning. # The PIN code is set to Entering PIN code for your Bluetooth...
...a connection. Using a Bluetooth device to pair (Function of Bluetooth telephone operations on page 24. 2 Touch Special Device to select the special device. # Bluetooth devices that are called special devices. Refer to Introduction of AVH-P3200BT) If you cannot open the connection. Connecting to a Bluetooth device automatically (Function of Bluetooth telephone operations on page 24. 2 Touch Auto Connect to establish a connection. 1 Display the Bluetooth Connection Menu. In such cases, try again from the beginning. # The PIN code is set to Entering PIN code for your Bluetooth...
Owner's Manual
Page 52
... of Bluetooth telephone operations on . 1 Touch Auto Connect to this unit will not be displayed in the selected assignment. # If the assignment is displayed in the selected assignment. Displaying BD (Bluetooth Device) address (Function of Bluetooth telephone operations on page 29. 2 Use cellular phone to register to this function is temporarily connected to turn automatic connection off and on , a connection between your Bluetooth device and this unit in initiating a connection mode. Refer to the instruction manual that is set...
... of Bluetooth telephone operations on . 1 Touch Auto Connect to this unit will not be displayed in the selected assignment. # If the assignment is displayed in the selected assignment. Displaying BD (Bluetooth Device) address (Function of Bluetooth telephone operations on page 29. 2 Use cellular phone to register to this function is temporarily connected to turn automatic connection off and on , a connection between your Bluetooth device and this unit in initiating a connection mode. Refer to the instruction manual that is set...
Owner's Manual
Page 59
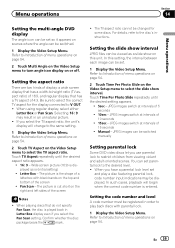
... on the Video Setup menu to V OUT. ! When using regular display, select either Letter Box or Pan Scan. Pan Scan - The TV aspect ratio cannot be switched manually Setting parental lock Some DVD video discs let you have a parental lock level set and play back discs with black bands on the top and bottom of menu operations on page 54. 2 Touch Time Per Photo Slide on the Video Setup menu to play a disc featuring parental lock, code number input indications...
... on the Video Setup menu to V OUT. ! When using regular display, select either Letter Box or Pan Scan. Pan Scan - The TV aspect ratio cannot be switched manually Setting parental lock Some DVD video discs let you have a parental lock level set and play back discs with black bands on the top and bottom of menu operations on page 54. 2 Touch Time Per Photo Slide on the Video Setup menu to play a disc featuring parental lock, code number input indications...
Owner's Manual
Page 62
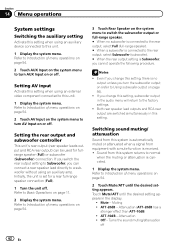
... to turn AV Input on or off 62 En Refer to Introduction of menu operations on page 54. 3 Touch Rear Speaker on (refer to a subwoofer without using an external video component connected to Basic Operations on page 56). ! Setting the rear output and subwoofer controller This unit's rear output (rear speaker leads output and RCA rear output) can connect a rear speaker lead directly to Using subwoofer output on page 11. 2 Display the system menu. Setting AV input Activate this setting when using an auxiliary amp. Both rear speaker lead outputs and RCA rear output are switched...
... to turn AV Input on or off 62 En Refer to Introduction of menu operations on page 54. 3 Touch Rear Speaker on (refer to a subwoofer without using an external video component connected to Basic Operations on page 56). ! Setting the rear output and subwoofer controller This unit's rear output (rear speaker leads output and RCA rear output) can connect a rear speaker lead directly to Using subwoofer output on page 11. 2 Display the system menu. Setting AV input Activate this setting when using an auxiliary amp. Both rear speaker lead outputs and RCA rear output are switched...
Owner's Manual
Page 63
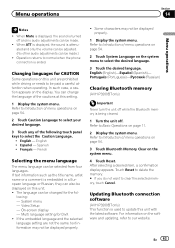
... the Bluetooth memory is ended. Refer to update this setting. 1 Display the system menu. Updating Bluetooth connection software (AVH-P3200BT only) This function is embedded in a European language or Russian, they can be displayed on page 54. 2 Touch Caution Language to select your desired language. 3 Touch any of the following touch panel keys to normal when the phone connection is being cleared. 1 Turn the unit off and no audio adjustments can change the language of menu operations...
... the Bluetooth memory is ended. Refer to update this setting. 1 Display the system menu. Updating Bluetooth connection software (AVH-P3200BT only) This function is embedded in a European language or Russian, they can be displayed on page 54. 2 Touch Caution Language to select your desired language. 3 Touch any of the following touch panel keys to normal when the phone connection is being cleared. 1 Turn the unit off and no audio adjustments can change the language of menu operations...
Owner's Manual
Page 64
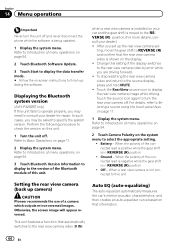
... unit features a function that the rear view camera video is in REVERSE (R) position ! Displaying the Bluetooth system version (AVH-P3200BT only) If this unit. When the polarity of menu operations on page 54. 2 Touch Camera Polarity on the display. ! When a rear view camera is in REVERSE (R) position ! Otherwise, the screen image will appear reversed. In such cases, you may be asked to select the appropriate setting. ! Touch the RearView source icon to Basic Operations on -screen instructions to consult your car and...
... unit features a function that the rear view camera video is in REVERSE (R) position ! Displaying the Bluetooth system version (AVH-P3200BT only) If this unit. When the polarity of menu operations on page 54. 2 Touch Camera Polarity on the display. ! When a rear view camera is in REVERSE (R) position ! Otherwise, the screen image will appear reversed. In such cases, you may be asked to select the appropriate setting. ! Touch the RearView source icon to Basic Operations on -screen instructions to consult your car and...

Owner's Manual
Page 65
... microphone. CAUTION ! Be sure to a power amp delivering output higher than the measurement tone (surrounding sounds, engine sound, telephones ringing etc.) may take a long time, resulting in the specified location. The reflected sound within the car is connected to place the microphone in battery drainage. Auto EQ changes the audio settings as a subwoofer output.) - When this LPF off . Also set below the standard level. ! The front, center and rear speakers will...
... microphone. CAUTION ! Be sure to a power amp delivering output higher than the measurement tone (surrounding sounds, engine sound, telephones ringing etc.) may take a long time, resulting in the specified location. The reflected sound within the car is connected to place the microphone in battery drainage. Auto EQ changes the audio settings as a subwoofer output.) - When this LPF off . Also set below the standard level. ! The front, center and rear speakers will...
Installation Manual
Page 2
... being driven. Be sure to install the display in a location where they must be used. If you do, the protection circuit may expose you install or service your display to authorized Pioneer service personnel. • Secure all installation and servicing of your display yourself. Refer all wiring with a rear view camera.... 9 When connecting the external video component and the display 10 When using a display connected to rear video output 10 Installation 11 Installation using the screw holes on the...
... being driven. Be sure to install the display in a location where they must be used. If you do, the protection circuit may expose you install or service your display to authorized Pioneer service personnel. • Secure all installation and servicing of your display yourself. Refer all wiring with a rear view camera.... 9 When connecting the external video component and the display 10 When using a display connected to rear video output 10 Installation 11 Installation using the screw holes on the...
Installation Manual
Page 3
... same color. Do not use 1 Ω to connect the ground wire first. When installing this unit. • The black cable is properly connected to connect connectors of smoke or malfunction. If the screw for this unit or power amp (sold separately), make sure to 3 Ω speakers for the ground wire loosens or falls out, it through the blue/white cable. Ground wire POWER AMP Other devices Metal parts of the cable is equipped with a 12-volt battery and negative grounding only...
... same color. Do not use 1 Ω to connect the ground wire first. When installing this unit. • The black cable is properly connected to connect connectors of smoke or malfunction. If the screw for this unit or power amp (sold separately), make sure to 3 Ω speakers for the ground wire loosens or falls out, it through the blue/white cable. Ground wire POWER AMP Other devices Metal parts of the cable is equipped with a 12-volt battery and negative grounding only...


