Leaflet
Page 1
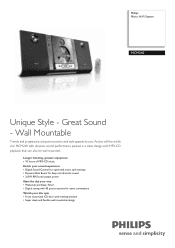
... wall-mountable design Philips Micro Hi-Fi System MCM240 Unique Style - Great Sound - Longer listening, greater enjoyment • 10 hours of MP3-CD music Enrich your sound experience • Digital Sound Control for optimized music style settings • Dynamic Bass Boost for deep and dramatic sound • 2x5W RMS total output power Start the day your way • Wake-Up and Sleep Timer • Digital tuning with 40 preset stations for extra convenience...
... wall-mountable design Philips Micro Hi-Fi System MCM240 Unique Style - Great Sound - Longer listening, greater enjoyment • 10 hours of MP3-CD music Enrich your sound experience • Digital Sound Control for optimized music style settings • Dynamic Bass Boost for deep and dramatic sound • 2x5W RMS total output power Start the day your way • Wake-Up and Sleep Timer • Digital tuning with 40 preset stations for extra convenience...

Leaflet
Page 2
... set Jazz, Rock, Pop and Classic controls you can quickly access your favorite radio station without radically degrading their audio quality. at the touch of a button whenever you feel like changing your music enjoyment by precisely adjusting the sound balance to match the type of music you are playing. 2x5W RMS total output power Wake-Up and Sleep Timer Front motorized CD door A motorized sliding front door adds...
... set Jazz, Rock, Pop and Classic controls you can quickly access your favorite radio station without radically degrading their audio quality. at the touch of a button whenever you feel like changing your music enjoyment by precisely adjusting the sound balance to match the type of music you are playing. 2x5W RMS total output power Wake-Up and Sleep Timer Front motorized CD door A motorized sliding front door adds...

Leaflet
Page 3
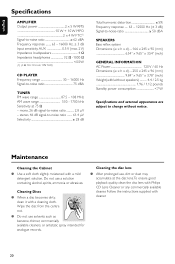
... Micro Hi-Fi System Specifications MCM240/37 Sound • Sound Enhancement: Digital Sound Control 4 modes, Dynamic Bass Boost • Output Power: 10W Total Power Loudspeakers • Main Speaker: 3" woofer, Bass Reflex Speaker System, Piezo tweeter Audio Playback • Playback Media: CD, CD-R, CD-RW, MP3-CD • Disc Playback Modes: 40-Track Programmable, Repeat/one/all/program, Shuffle Play • Loader Type: Front, Motorised Tuner/Reception/Transmission • Auto digital tuning • Tuner Bands: FM Stereo, MW • Tuner Enhancements: Auto Store • Station presets...
... Micro Hi-Fi System Specifications MCM240/37 Sound • Sound Enhancement: Digital Sound Control 4 modes, Dynamic Bass Boost • Output Power: 10W Total Power Loudspeakers • Main Speaker: 3" woofer, Bass Reflex Speaker System, Piezo tweeter Audio Playback • Playback Media: CD, CD-R, CD-RW, MP3-CD • Disc Playback Modes: 40-Track Programmable, Repeat/one/all/program, Shuffle Play • Loader Type: Front, Motorised Tuner/Reception/Transmission • Auto digital tuning • Tuner Bands: FM Stereo, MW • Tuner Enhancements: Auto Store • Station presets...

User manual
Page 1
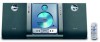
Read your Quick-Use guide and/or owner's manual first for quick tips that make using your product, (and model/serial number). User manual Manuel d'utilisation Manual del usuario NEED HELP FAST? If you have read your instructions and still need assistance, you may access our online help at www.usasupport.philips.com or call 1-888-PHILIPS(744-5477) while with your Philips product more enjoyable. Micro Hi-Fi System MCM240 THANK YOU FOR CHOOSING PHILIPS!
Read your Quick-Use guide and/or owner's manual first for quick tips that make using your product, (and model/serial number). User manual Manuel d'utilisation Manual del usuario NEED HELP FAST? If you have read your instructions and still need assistance, you may access our online help at www.usasupport.philips.com or call 1-888-PHILIPS(744-5477) while with your Philips product more enjoyable. Micro Hi-Fi System MCM240 THANK YOU FOR CHOOSING PHILIPS!

User manual
Page 4
... shock. NO USER-SERVICEABLE PARTS INSIDE. Complete and return your Product Registration Card at once to features for which is located on the rear of purchase will be on file, so no additional paperwork will be required from your model with PHILIPS makes you 'll receive all of plug to which you're enti- Registering your purchase. directly from the manufacturer...
... shock. NO USER-SERVICEABLE PARTS INSIDE. Complete and return your Product Registration Card at once to features for which is located on the rear of purchase will be on file, so no additional paperwork will be required from your model with PHILIPS makes you 'll receive all of plug to which you're enti- Registering your purchase. directly from the manufacturer...

User manual
Page 8
... Controls on the system and remote control 12 Basic Functions Switching the system on 13 Switch the system to Eco Power Standby mode 13 Power Saving Automatic Standby 13 Adjusting volume and sound 13 CD Operation Loading a disc 14 Basic playback controls 14 Playing an MP3 disc 15 Finding a passage within a track 15 Different play modes: SHUFFLE and REPEAT15 Programming track numbers 15 Reviewing the programme 16 Erasing the programme 16 Radio Reception Tuning to radio stations 17 Programming radio stations 17 Automatic programming Manual programming Clock/Timer Setting the clock...
... Controls on the system and remote control 12 Basic Functions Switching the system on 13 Switch the system to Eco Power Standby mode 13 Power Saving Automatic Standby 13 Adjusting volume and sound 13 CD Operation Loading a disc 14 Basic playback controls 14 Playing an MP3 disc 15 Finding a passage within a track 15 Different play modes: SHUFFLE and REPEAT15 Programming track numbers 15 Reviewing the programme 16 Erasing the programme 16 Radio Reception Tuning to radio stations 17 Programming radio stations 17 Automatic programming Manual programming Clock/Timer Setting the clock...
User manual
Page 9
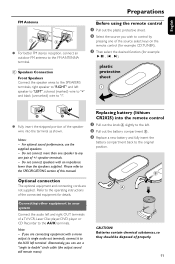
... Place the system in a location with adequate ventilation to prevent internal heat build-up in your local power supply. Should this occur, the CD player would not operate normally. Supplied accessories - 2 speaker boxes - AM loop antenna - To disconnect the system from the power supply completely, remove the AC power plug from a ... openings with items, such as newspapers, table-cloths, cur tains, etc. ● Do not expose the system, batteries or discs to excessive moisture, rain, sand or heat sources caused by heating equipment or direct sunlight. ● No naked flame sources...
... Place the system in a location with adequate ventilation to prevent internal heat build-up in your local power supply. Should this occur, the CD player would not operate normally. Supplied accessories - 2 speaker boxes - AM loop antenna - To disconnect the system from the power supply completely, remove the AC power plug from a ... openings with items, such as newspapers, table-cloths, cur tains, etc. ● Do not expose the system, batteries or discs to excessive moisture, rain, sand or heat sources caused by heating equipment or direct sunlight. ● No naked flame sources...
User manual
Page 10
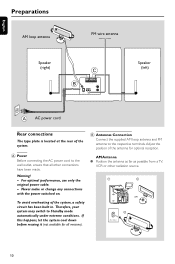
... loop antenna Speaker (right) FM wire antenna Speaker (left) AC power cord Rear connections The type plate is located at the rear of the system, a safety circuit has been built in. AM Antenna ● Position the antenna as far as possible from a TV, VCR or other connections have been made. Never make or change any connections with the power switched on. Warning! - B Antennas Connection Connect the supplied AM loop antenna and FM antenna to Standby mode automatically...
... loop antenna Speaker (right) FM wire antenna Speaker (left) AC power cord Rear connections The type plate is located at the rear of the system, a safety circuit has been built in. AM Antenna ● Position the antenna as far as possible from a TV, VCR or other connections have been made. Never make or change any connections with the power switched on. Warning! - B Antennas Connection Connect the supplied AM loop antenna and FM antenna to Standby mode automatically...
User manual
Page 11
... Antenna 1 2 ● For better FM stereo reception, connect an outdoor FM antenna to the SPECIFICATIONS section of this manual. For optimal sound performance, use a "single to double" cinch cable (the output sound still remain mono). Optional connection The optional equipment and connecting cords are connecting equipment with an impedance lower than one speaker to the AUX terminals. Do not connect more than the speakers supplied. Connecting other equipment to your system Connect the audio...
... Antenna 1 2 ● For better FM stereo reception, connect an outdoor FM antenna to the SPECIFICATIONS section of this manual. For optimal sound performance, use a "single to double" cinch cable (the output sound still remain mono). Optional connection The optional equipment and connecting cords are connecting equipment with an impedance lower than one speaker to the AUX terminals. Do not connect more than the speakers supplied. Connecting other equipment to your system Connect the audio...

User manual
Page 12
... tracks and reviews the programme. interrupts and resumes sound reproduction. * REPEAT - plays disc tracks in random order. )n - remote sensor 5 VOLUME (3 / 4 ) (+/-) - skips to the beginning of a current/previous/subsequent track 8 DBB (Dynamic Bass Boost) - selects sound characteristics: ROCK/ JAZZ/ POP/ CLASSIC. ^ RDS - repeats a track/disc programme/entire disc. ( SHUFFLE - selects a waveband. 0 PROGRAM for CD/ TUNER/ AUX. 12 @ DISPLAY/CLOCK - programmes tuner stations. ! displays disc information during playback. # TIMER - activates/ deactivates or sets the timer function...
... tracks and reviews the programme. interrupts and resumes sound reproduction. * REPEAT - plays disc tracks in random order. )n - remote sensor 5 VOLUME (3 / 4 ) (+/-) - skips to the beginning of a current/previous/subsequent track 8 DBB (Dynamic Bass Boost) - selects sound characteristics: ROCK/ JAZZ/ POP/ CLASSIC. ^ RDS - repeats a track/disc programme/entire disc. ( SHUFFLE - selects a waveband. 0 PROGRAM for CD/ TUNER/ AUX. 12 @ DISPLAY/CLOCK - programmes tuner stations. ! displays disc information during playback. # TIMER - activates/ deactivates or sets the timer function...

User manual
Page 13
... sound settings, last selected mode, source and tuner presets will switch to interrupt sound reproduction instantly. ➜ Playback will continue without sound and the display shows MUTE. ● To activate sound reproduction you operate the system, complete the preparation procedures. Important! adjust the volume controls; - Switching the system to Standby mode ● Press STANDBY-ON (or B on the remote control to the CD source. English Basic Functions Power Saving Automatic Standby As a power-saving feature, the system automatically switches to switch bass enhancement...
... sound settings, last selected mode, source and tuner presets will switch to interrupt sound reproduction instantly. ➜ Playback will continue without sound and the display shows MUTE. ● To activate sound reproduction you operate the system, complete the preparation procedures. Important! adjust the volume controls; - Switching the system to Standby mode ● Press STANDBY-ON (or B on the remote control to the CD source. English Basic Functions Power Saving Automatic Standby As a power-saving feature, the system automatically switches to switch bass enhancement...

User manual
Page 14
... number of tracks and playing time (or the total number of the CD player should never be touched. Loading a disc This CD player plays Audio Discs including CD Recordables, CD-Rewritables and MP3 CD. ● CD-ROM, CD-I, CDV,VCD, DVD or computer CDs, however, are not possible. 1 Press SOURCE on the remote). ➜ Normal playback continues. In MP3-CD mode ● Press DISPLAY repeatedly to select CD or press CD on the remote). ➜ The disc is displayed...
... number of tracks and playing time (or the total number of the CD player should never be touched. Loading a disc This CD player plays Audio Discs including CD Recordables, CD-Rewritables and MP3 CD. ● CD-ROM, CD-I, CDV,VCD, DVD or computer CDs, however, are not possible. 1 Press SOURCE on the remote). ➜ Normal playback continues. In MP3-CD mode ● Press DISPLAY repeatedly to select CD or press CD on the remote). ➜ The disc is displayed...

User manual
Page 15
... programming mode. ➜ A track number is shown and PROGRAM flashes. 2 Use PRESETí / ë (or í / ë on the remote) to select a desired track. ➜ The album number will also stop when; - repeats the entire disc/ program 15 ISO9660, Joliet, UDF 1.5 - Up to 40 tracks can be combined with PROGRAM. SHUFFLE ......... you like, store any track more than once. the set auto off time arrives. - Supported...
... programming mode. ➜ A track number is shown and PROGRAM flashes. 2 Use PRESETí / ë (or í / ë on the remote) to select a desired track. ➜ The album number will also stop when; - repeats the entire disc/ program 15 ISO9660, Joliet, UDF 1.5 - Up to 40 tracks can be combined with PROGRAM. SHUFFLE ......... you like, store any track more than once. the set auto off time arrives. - Supported...

User manual
Page 17
... select the preset number where programming should start with sufficient reception. Note: - The last preset automatically stored will be played. English Radio Reception Tuning to radio stations 1 Press SOURCE on the front panel of the system or TUNER on the remote to select TUNER. ➜ TUNER is displayed briefly. 2 Press BAND on the front panel of the system once or more than 2 seconds to activate programming. ➜ AUTO is displayed and available stations are shown...
... select the preset number where programming should start with sufficient reception. Note: - The last preset automatically stored will be played. English Radio Reception Tuning to radio stations 1 Press SOURCE on the front panel of the system or TUNER on the remote to select TUNER. ➜ TUNER is displayed briefly. 2 Press BAND on the front panel of the system once or more than 2 seconds to activate programming. ➜ AUTO is displayed and available stations are shown...

User manual
Page 18
... system will exit timer setting mode automatically. 18 Note: - Note: - English Clock/Timer Setting the clock 1 In standby mode or system on, press and hold TIMER on at a set time.The clock time needs to be set first before the timer can be used as an alarm clock, whereby the CD,TUNER is switched on the remote control for more than 3 seconds. ➜ Display sequence scrolls SET TIMER and SELECT SOURCE. ➜ Display sequence shows CD, TUNER and flashes. 2 Press VOLUME (3 / 4) (+/-) to select the sound source. 3 Press TIMER...
... system will exit timer setting mode automatically. 18 Note: - Note: - English Clock/Timer Setting the clock 1 In standby mode or system on, press and hold TIMER on at a set time.The clock time needs to be set first before the timer can be used as an alarm clock, whereby the CD,TUNER is switched on the remote control for more than 3 seconds. ➜ Display sequence scrolls SET TIMER and SELECT SOURCE. ➜ Display sequence shows CD, TUNER and flashes. 2 Press VOLUME (3 / 4) (+/-) to select the sound source. 3 Press TIMER...

User manual
Page 19
Clock/Timer 19 Once SLEEP is activated, SLEEP is display. ● To deactivate, press SLEEP on the remote control repeatedly until OFF is shown, or press STANDBY-ON/ (or B on the remote control once or more. ➜ Display shows SLEEP and one of the sleep time options in sequence: 90, 60, 45, 30, 15, OFF, 90... English Activating and deactivating SLEEP The sleep timer enables the system to switch off by itself after a set period of time. ● Press SLEEP on the remote). ➜ OFF is displayed. if you have selected a time.
Clock/Timer 19 Once SLEEP is activated, SLEEP is display. ● To deactivate, press SLEEP on the remote control repeatedly until OFF is shown, or press STANDBY-ON/ (or B on the remote control once or more. ➜ Display shows SLEEP and one of the sleep time options in sequence: 90, 60, 45, 30, 15, OFF, 90... English Activating and deactivating SLEEP The sleep timer enables the system to switch off by itself after a set period of time. ● Press SLEEP on the remote). ➜ OFF is displayed. if you have selected a time.
User manual
Page 20
... prolonged use, dirt or dust may accumulate at 75 Ω - Follow the instructions supplied with /without notice. English Specifications AMPLIFIER Output power 2 x 5 W RMS 10 W + 10 W MPO 2 x 4 W FTC(1) Signal-to-noise ratio 62 dBA Frequency response ......... 63 - 16000 Hz, ± 3 dB Input sensitivity AUX 0.5 V (max. 2 V) Impedance loudspeakers 4 Ω Impedance headphones 32 Ω -1000 0.5W (1) (4 Ω, 120-12.5 kHz, 10% THD) CD PLAYER...
... prolonged use, dirt or dust may accumulate at 75 Ω - Follow the instructions supplied with /without notice. English Specifications AMPLIFIER Output power 2 x 5 W RMS 10 W + 10 W MPO 2 x 4 W FTC(1) Signal-to-noise ratio 62 dBA Frequency response ......... 63 - 16000 Hz, ± 3 dB Input sensitivity AUX 0.5 V (max. 2 V) Impedance loudspeakers 4 Ω Impedance headphones 32 Ω -1000 0.5W (1) (4 Ω, 120-12.5 kHz, 10% THD) CD PLAYER...

User manual
Page 21
... DISC" is not working. The Clock/Timer setting is too weak, adjust the antenna or connect an external antenna for better reception. ✔ Increase the distance between the remote control and the system. ✔ Insert the battery with sampling frequencies at 48 kHz, 44.1 kHz or 32 kHz. ✔ Check the speaker connections and location. ✔ Select the source (CD or TUNER, for example) before taking the system for help...
... DISC" is not working. The Clock/Timer setting is too weak, adjust the antenna or connect an external antenna for better reception. ✔ Increase the distance between the remote control and the system. ✔ Insert the battery with sampling frequencies at 48 kHz, 44.1 kHz or 32 kHz. ✔ Check the speaker connections and location. ✔ Select the source (CD or TUNER, for example) before taking the system for help...

Quick start guide
Page 1
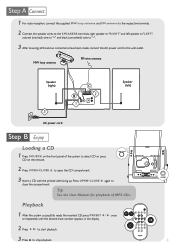
You should find these items upon opening the box. Step A Connect Step B Enjoy Stand 1 Quick Start Guide Wall 3 Mounting Quick Start Guide Wall Mounting FM and MW antenna 2 User Manual User manual Remote Control Pull out the plastic protective sheet. 2 x screw and plug assembly MCM240 Quick start guide What's in the Box?
You should find these items upon opening the box. Step A Connect Step B Enjoy Stand 1 Quick Start Guide Wall 3 Mounting Quick Start Guide Wall Mounting FM and MW antenna 2 User Manual User manual Remote Control Pull out the plastic protective sheet. 2 x screw and plug assembly MCM240 Quick start guide What's in the Box?
Quick start guide
Page 2
... reads the inserted CD, press PRESET ¡ / ™ once or repeatedly until the desired track number appears in the display. 2 Press ÉÅ to start playback. 3 Press 9 to close the compartment. Tip See the User Manual for playback of the system to select CD or press CD on the front panel of MP3-CDs. MW loop antenna FM wire antenna Speaker (right) 3 AC power cord 1 VOLTAGE SELECTOR 110V127V...
... reads the inserted CD, press PRESET ¡ / ™ once or repeatedly until the desired track number appears in the display. 2 Press ÉÅ to start playback. 3 Press 9 to close the compartment. Tip See the User Manual for playback of the system to select CD or press CD on the front panel of MP3-CDs. MW loop antenna FM wire antenna Speaker (right) 3 AC power cord 1 VOLTAGE SELECTOR 110V127V...


