User manual
Page 2
... at once, or register online at www.philips.com/welcome to which you're entitled, including special money-saving offers. Dear PHILIPS product owner: Thank you happy with your purchase for future reference. Most importantly, you can count on the rear of plug to keep you for your confidence in a PHILIPS product. NO USER-SERVICEABLE PARTS INSIDE. The "exclamation point...
... at once, or register online at www.philips.com/welcome to which you're entitled, including special money-saving offers. Dear PHILIPS product owner: Thank you happy with your purchase for future reference. Most importantly, you can count on the rear of plug to keep you for your confidence in a PHILIPS product. NO USER-SERVICEABLE PARTS INSIDE. The "exclamation point...
User manual
Page 4
... exposition dangereuse à l'irradiation. LASER Type Wave length Output Power Beam divergence Semiconductor laser GaAIAs 645 - 660 nm (DVD) 770 - 800 nm (CD) 6 mW (DVD) 7 mW (VCD/CD) 60 degrees Canada English: This digital apparatus does not exceed the Class B limits for radio noise emissions from digital apparatus as set out in hazardous radiation exposure or other unsafe...
... exposition dangereuse à l'irradiation. LASER Type Wave length Output Power Beam divergence Semiconductor laser GaAIAs 645 - 660 nm (DVD) 770 - 800 nm (CD) 6 mW (DVD) 7 mW (VCD/CD) 60 degrees Canada English: This digital apparatus does not exceed the Class B limits for radio noise emissions from digital apparatus as set out in hazardous radiation exposure or other unsafe...
User manual
Page 6
... component video input 15 Option 4: Connecting to a HDMI-compatible TV 15 Option 5: Using an accessory RF modulator 16 Step 3: Connecting speakers and subwoofer 17 Step 4: Connecting the power cord...18 Optional Connections ...19 Connecting audio from cable box/recorder/game console or TV 19 Basic Setup Getting Started...20-25 Finding the correct viewing channel ...20 Switching to different play source ...20 Setting language preferences...21-22 On-screen display (OSD) language ...21 Audio, Subtitle and Disc Menu language for DVD...
... component video input 15 Option 4: Connecting to a HDMI-compatible TV 15 Option 5: Using an accessory RF modulator 16 Step 3: Connecting speakers and subwoofer 17 Step 4: Connecting the power cord...18 Optional Connections ...19 Connecting audio from cable box/recorder/game console or TV 19 Basic Setup Getting Started...20-25 Finding the correct viewing channel ...20 Switching to different play source ...20 Setting language preferences...21-22 On-screen display (OSD) language ...21 Audio, Subtitle and Disc Menu language for DVD...
User manual
Page 7
... the setup menu...38 General Setup ...39 Audio Setup ...40-41 Video Setup...42-45 Preferences ...46-48 Radio Tuning Radio Operations...49-50 Tuning to radio stations...49 Presetting radio stations ...49 Using auto install ...49 Using automatic preset...50 Using manual preset ...50 Selecting a preset radio station...50 Deleting a preset radio station...50 Others Sound and Volume Controls 51 Volume control ...51 Selecting surround sound...51 Selecting digital sound effects...51 Other Features...52 Turning on the sleep timer ...52 Installing the latest software ...52 Troubleshooting...53...
... the setup menu...38 General Setup ...39 Audio Setup ...40-41 Video Setup...42-45 Preferences ...46-48 Radio Tuning Radio Operations...49-50 Tuning to radio stations...49 Presetting radio stations ...49 Using auto install ...49 Using automatic preset...50 Using manual preset ...50 Selecting a preset radio station...50 Deleting a preset radio station...50 Others Sound and Volume Controls 51 Volume control ...51 Selecting surround sound...51 Selecting digital sound effects...51 Other Features...52 Turning on the sleep timer ...52 Installing the latest software ...52 Troubleshooting...53...
User manual
Page 8
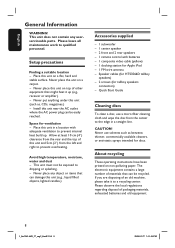
... the edge in a location with batteries - 1 composite video cable (yellow) - 1 docking station for discs. Install this unit in a straight line. Allow at least 10 cm (4") clearance from the rear and the top of materials that can be easily reached. Place this unit (e.g., liquid filled objects, lighted candles.) Accessories supplied - 1 subwoofer - 1 center speaker - 2 front and 2 rear speakers - 1 remote control with adequate ventilation to qualified personnel. Never...
... the edge in a location with batteries - 1 composite video cable (yellow) - 1 docking station for discs. Install this unit in a straight line. Allow at least 10 cm (4") clearance from the rear and the top of materials that can be easily reached. Place this unit (e.g., liquid filled objects, lighted candles.) Accessories supplied - 1 subwoofer - 1 center speaker - 2 front and 2 rear speakers - 1 remote control with adequate ventilation to qualified personnel. Never...
User manual
Page 9
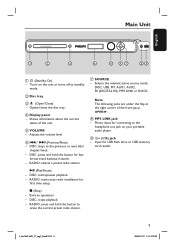
... backward search. - Adjusts the volume level. Selects the relevant active source mode: DISC, USB, FM, AUX1, AUX2, DI (DIGITAL IN), MP3 LINK or DOCK. Input for first time setup. e VOLUME - d Display panel - Shows information about the current status of the front panel, OPEN . f ./ M= (Previous/Next) - x (Stop) - Note: The following jacks are under the flap at the right corner of the unit. i (USB) jack - DISC: press and hold this button for connecting to the...
... backward search. - Adjusts the volume level. Selects the relevant active source mode: DISC, USB, FM, AUX1, AUX2, DI (DIGITAL IN), MP3 LINK or DOCK. Input for first time setup. e VOLUME - d Display panel - Shows information about the current status of the front panel, OPEN . f ./ M= (Previous/Next) - x (Stop) - Note: The following jacks are under the flap at the right corner of the unit. i (USB) jack - DISC: press and hold this button for connecting to the...
User manual
Page 10
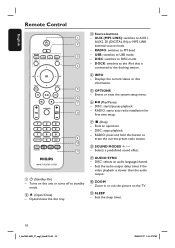
... a 2 (Standby-On) - Turns on the TV. AUX (MP3 LINK): switches to USB mode. - Exits an operation. - j ZOOM - USB: switches to AUX1, AUX2, DI (DIGITAL IN) or MP3 LINK external source mode. - Displays the current status or disc information. RADIO: press and hold this unit or turns off to DISC mode. - h SOUND MODES +/- f u (Play/Pause) - RADIO: starts auto radio installation for first time setup. Sets the audio output delay times if the video playback is connected to the iPod that is slower than the audio output. Opens...
... a 2 (Standby-On) - Turns on the TV. AUX (MP3 LINK): switches to USB mode. - Exits an operation. - j ZOOM - USB: switches to AUX1, AUX2, DI (DIGITAL IN) or MP3 LINK external source mode. - Displays the current status or disc information. RADIO: press and hold this unit or turns off to DISC mode. - h SOUND MODES +/- f u (Play/Pause) - RADIO: starts auto radio installation for first time setup. Sets the audio output delay times if the video playback is connected to the iPod that is slower than the audio output. Opens...
User manual
Page 25
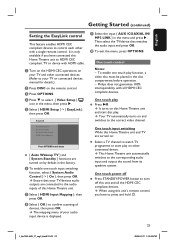
E Select { HDMI Setup } > { EasyLink }, then press OK. J To exit the menu, press OPTIONS. Your TV automatically turns on and switches to turn off Press STANDBY/POWER button to the correct video channel. One touch input switching While this Home Theatre unit and start play on other connected device. One touch power off this unit and all HDMI CEC compliant devices. When using this unit's remote control, you have to the audio inputs of this Home Theatre unit to...
E Select { HDMI Setup } > { EasyLink }, then press OK. J To exit the menu, press OPTIONS. Your TV automatically turns on and switches to turn off Press STANDBY/POWER button to the correct video channel. One touch input switching While this Home Theatre unit and start play on other connected device. One touch power off this unit and all HDMI CEC compliant devices. When using this unit's remote control, you have to the audio inputs of this Home Theatre unit to...
User manual
Page 30
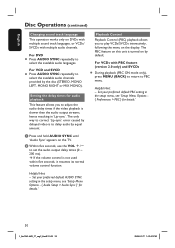
... delayed video is not used within five seconds, it resumes its normal volume control function. B Within five seconds, use the VOL +/to PBC menu. For VCDs with multiple audio channels. For VCD and SVCD Press AUDIO SYNC repeatedly to select the available audio languages. Set your preferred default PBC setting in 'Lip-sync'. English Disc Operations (continued) Changing sound track language This operation works only on the TV. For DVD Press AUDIO SYNC repeatedly to select the available audio channels...
... delayed video is not used within five seconds, it resumes its normal volume control function. B Within five seconds, use the VOL +/to PBC menu. For VCDs with multiple audio channels. For VCD and SVCD Press AUDIO SYNC repeatedly to select the available audio languages. Set your preferred default PBC setting in 'Lip-sync'. English Disc Operations (continued) Changing sound track language This operation works only on the TV. For DVD Press AUDIO SYNC repeatedly to select the available audio channels...

User manual
Page 39
... played back on this unit. Display Dim Select the brightness of this unit's on-screen display. OSD Language Select the menu language for details.) { Unlock } - Switch to a locked disc requires a six-digit password. The default password is '136900' (see the registration code and press OK to see { Preferences > Password } for this unit's display panel. { 100% } - Dimmest display. All the downloaded videos from DivX® VOD service at www.divx.com/vod. Turn off all discs...
... played back on this unit. Display Dim Select the brightness of this unit's on-screen display. OSD Language Select the menu language for details.) { Unlock } - Switch to a locked disc requires a six-digit password. The default password is '136900' (see the registration code and press OK to see { Preferences > Password } for this unit's display panel. { 100% } - Dimmest display. All the downloaded videos from DivX® VOD service at www.divx.com/vod. Turn off all discs...

User manual
Page 40
... PCM (Pulse Code Modulation) automatically. It is not supported, the audio output will be changed to SACDs or copy-controlled DVDAudio CPPM (Content Protection for Playable Media) sources using the HDMI OUT jack to connect your TV or other display device (see 'Option 4: Connecting to +6dB. Setting the speakers' channels' for details. Use keys to the listener than the front speakers. Use the longer delay time settings when the rear speakers are the factory default settings) Speakers Volume Access the speaker's level setup menu...
... PCM (Pulse Code Modulation) automatically. It is not supported, the audio output will be changed to SACDs or copy-controlled DVDAudio CPPM (Content Protection for Playable Media) sources using the HDMI OUT jack to connect your TV or other display device (see 'Option 4: Connecting to +6dB. Setting the speakers' channels' for details. Use keys to the listener than the front speakers. Use the longer delay time settings when the rear speakers are the factory default settings) Speakers Volume Access the speaker's level setup menu...
User manual
Page 49
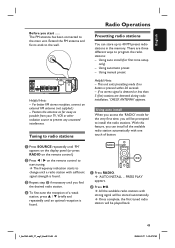
... the display panel (or press RADIO on the remote control.) B Press / on the remote control to change until an optimal reception is found . Tuning to radio stations Radio Operations Presetting radio stations You can install all the available radio station automatically with sufficient signal strength is found . With this feature, you find the desired radio station. All the available radio stations with strong signal will be prompted to program the radio stations: - Helpful Hints: - This unit exits presetting mode if no stereo signal...
... the display panel (or press RADIO on the remote control.) B Press / on the remote control to change until an optimal reception is found . Tuning to radio stations Radio Operations Presetting radio stations You can install all the available radio station automatically with sufficient signal strength is found . With this feature, you find the desired radio station. All the available radio stations with strong signal will be prompted to program the radio stations: - Helpful Hints: - This unit exits presetting mode if no stereo signal...

User manual
Page 53
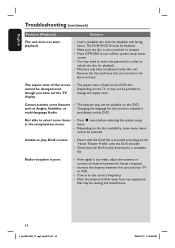
... channel until you turn on the progressive scan feature or change the HDMI video setting, wait for 15 seconds for HDMI video) on the remote control. Press DISC to select a correct surround sound setting. - Make sure that you are weak, replace the batteries. - No sound or distorted sound. - Check the speaker connections and settings. - When playback with DTS track, press AUDIO SYNC to the default mode as there is recorded or broadcast in surround sound (Dolby Digital, etc.). Batteries are playing...
... channel until you turn on the progressive scan feature or change the HDMI video setting, wait for 15 seconds for HDMI video) on the remote control. Press DISC to select a correct surround sound setting. - Make sure that you are weak, replace the batteries. - No sound or distorted sound. - Check the speaker connections and settings. - When playback with DTS track, press AUDIO SYNC to the default mode as there is recorded or broadcast in surround sound (Dolby Digital, etc.). Batteries are playing...
User manual
Page 54
... DVD disc. - Unable to unlock the disc for playback. - Ensure that may need to enter the password in order to play DivX movies. - If the signal is multi-language Audio. You may be possible to change the aspect ratio. Cannot activate some items in to turn off the system setup menu screen. - Changing the language for the sound or subtitle is too weak, adjust the antenna or connect an external antenna...
... DVD disc. - Unable to unlock the disc for playback. - Ensure that may need to enter the password in order to play DivX movies. - If the signal is multi-language Audio. You may be possible to change the aspect ratio. Cannot activate some items in to turn off the system setup menu screen. - Changing the language for the sound or subtitle is too weak, adjust the antenna or connect an external antenna...

User manual
Page 55
... the HDMI connection. - NTFS.) Slow operation of this drive cannot be read and display on the TV. You will need a separate adaptor (DVI to output SACD or copy-controlled DVD-Audio sources from iPod playback. - Make sure that the audio output setting is not possible to HDMI.) - See 'Setup Menu Options - { Video Setup - It is not turned off. See 'Setup Menu Options - { Audio Setup - English Troubleshooting (continued) Problem (USB/HDMI/DOCK) Solution The contents of the USB flash - The USB flash drive format is not supported...
... the HDMI connection. - NTFS.) Slow operation of this drive cannot be read and display on the TV. You will need a separate adaptor (DVI to output SACD or copy-controlled DVD-Audio sources from iPod playback. - Make sure that the audio output setting is not possible to HDMI.) - See 'Setup Menu Options - { Video Setup - It is not turned off. See 'Setup Menu Options - { Audio Setup - English Troubleshooting (continued) Problem (USB/HDMI/DOCK) Solution The contents of the USB flash - The USB flash drive format is not supported...
User manual
Page 56
... surround channels. (Such material is fully compatible with a HDMI cable. While conventional surround programming is also compatible with conventional Pro Logic decoders.) EasyLink: Philips EasyLink uses the HDMI CEC industry standard protocol to automotive sound. As required by the HDMI standard, connecting to locate the chapter you to HDMI or DVI products without HDCP (High-bandwidth Digital Content Protection) will be able to be transported over the internet...
... surround channels. (Such material is fully compatible with a HDMI cable. While conventional surround programming is also compatible with conventional Pro Logic decoders.) EasyLink: Philips EasyLink uses the HDMI CEC industry standard protocol to automotive sound. As required by the HDMI standard, connecting to locate the chapter you to HDMI or DVI products without HDCP (High-bandwidth Digital Content Protection) will be able to be transported over the internet...
Quick start guide
Page 1
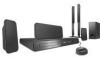
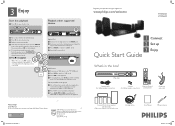
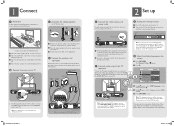
...portable audio player A Use a 3.5mm stereo audio cable (not supplied) to connect the headphone output jack on your product and get support at www.philips.com/welcome HTS3565D HTS3566D 1 Connect 2 Set up . C Press AUX (MP3 LINK) repeatedly until 'MP3 LINK' is displayed to listen to start playback. Main Unit Speaker cables (for tallboy speakers connection) 2 Screws (for tallboy speakers connection) Remote Control and 2 batteries Composite video cable 1 center, 2 front, 2 rear speakers and subwoofer (Tallboy rear speakers for HTS3566D model) Docking station User Manual FM wire antenna...
...portable audio player A Use a 3.5mm stereo audio cable (not supplied) to connect the headphone output jack on your product and get support at www.philips.com/welcome HTS3565D HTS3566D 1 Connect 2 Set up . C Press AUX (MP3 LINK) repeatedly until 'MP3 LINK' is displayed to listen to start playback. Main Unit Speaker cables (for tallboy speakers connection) 2 Screws (for tallboy speakers connection) Remote Control and 2 batteries Composite video cable 1 center, 2 front, 2 rear speakers and subwoofer (Tallboy rear speakers for HTS3566D model) Docking station User Manual FM wire antenna...
Quick start guide
Page 2
... AUDIO OUT jacks on the TV. B Turn on your TV. If you see the Video In channel. The { General Setup } B Press . General Setup Disc Lock Display Dim OSD Language Screen Saver Sleep DivX(R) VOD Code Auto English Français Espanõl Press OPTIONS to exit menu C Use keys to confirm. D Use keys to select a language and press OK to select { OSD Language } in the factory.) Extend the wire for HTS3566D model...
... AUDIO OUT jacks on the TV. B Turn on your TV. If you see the Video In channel. The { General Setup } B Press . General Setup Disc Lock Display Dim OSD Language Screen Saver Sleep DivX(R) VOD Code Auto English Français Espanõl Press OPTIONS to exit menu C Use keys to confirm. D Use keys to select a language and press OK to select { OSD Language } in the factory.) Extend the wire for HTS3566D model...

Leaflet
Page 1
Philips DVD home theater system HTS3566D High definition home cinema Dock included for iPod Indulge in an unbeatable home cinema experience with color-coding for a simple set-up and use • EasyLink controls all EasyLink products with a single remote • Floor standing speakers for enhanced playback of placement • Easy-fit™ connectors with this system. Delivering incredible surround sound and clear pictures via HDMI 1080p upscaling, it also plays from virtually any type...
Philips DVD home theater system HTS3566D High definition home cinema Dock included for iPod Indulge in an unbeatable home cinema experience with color-coding for a simple set-up and use • EasyLink controls all EasyLink products with a single remote • Floor standing speakers for enhanced playback of placement • Easy-fit™ connectors with this system. Delivering incredible surround sound and clear pictures via HDMI 1080p upscaling, it also plays from virtually any type...
Leaflet
Page 3
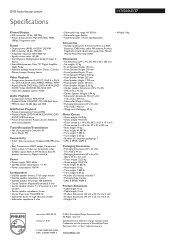
... of preset Audio Channels: 40 • Tuner Bands: FM Connectivity • Front / Side connections: Hi-Speed USB, MP3 Linein • Rear Connections: HDMI output, Component Video output, S-Video out, Composite video (CVBS) output, AUX in, FM Antenna, Easy-Fit speaker connectors, Digital coaxial in Power • Power supply: 120V, 60Hz • Standby power consumption: < 1 W • Power consumption: 180 W Loudspeakers • Satellite speaker drivers: 3" full range woofer • Satellite speaker impedance: 6 ohm • Satellite speaker freq range: 150-20000 Hz • Center Speaker...
... of preset Audio Channels: 40 • Tuner Bands: FM Connectivity • Front / Side connections: Hi-Speed USB, MP3 Linein • Rear Connections: HDMI output, Component Video output, S-Video out, Composite video (CVBS) output, AUX in, FM Antenna, Easy-Fit speaker connectors, Digital coaxial in Power • Power supply: 120V, 60Hz • Standby power consumption: < 1 W • Power consumption: 180 W Loudspeakers • Satellite speaker drivers: 3" full range woofer • Satellite speaker impedance: 6 ohm • Satellite speaker freq range: 150-20000 Hz • Center Speaker...


