
Leaflet
Page 1
Great listening experience • Dolby Virtual Speaker for realistic surround sound • Subwoofer for powerful bass HD cinematic viewing experience • Integrated HDMI Hub connects devices to the TV conveniently Connect and enjoy all your entertainment • 300W RMS total output power • EasyLink to control all HDMI CEC devices via a single remote • MP3 Link plays music from portable media players • USB Link plays photos and music from USB flash drives Designed to...
Great listening experience • Dolby Virtual Speaker for realistic surround sound • Subwoofer for powerful bass HD cinematic viewing experience • Integrated HDMI Hub connects devices to the TV conveniently Connect and enjoy all your entertainment • 300W RMS total output power • EasyLink to control all HDMI CEC devices via a single remote • MP3 Link plays music from portable media players • USB Link plays photos and music from USB flash drives Designed to...
Leaflet
Page 2
...-speaker system. Home theater 300W RMS power Specifications HSB2313A/F7 Highlights Accessories • Included accessories: Remote Control, User Manual, Wall mounting bracket, Batteries for remote control, Power cord, Quick start guide Audio Playback • Playback Media: USB flash drive • MP3 bit rates: 32-256 kbps and VBR Connectivity • Front / Side connections: Audio L/R in, CVBS in, USB, MP3 Line-in • Rear Connections: Composite video (CVBS) output, Digital coaxial in 2x, Analog audio Left/Right in 2x, Component Video output, Composite video (CVBS) input, HDMi...
...-speaker system. Home theater 300W RMS power Specifications HSB2313A/F7 Highlights Accessories • Included accessories: Remote Control, User Manual, Wall mounting bracket, Batteries for remote control, Power cord, Quick start guide Audio Playback • Playback Media: USB flash drive • MP3 bit rates: 32-256 kbps and VBR Connectivity • Front / Side connections: Audio L/R in, CVBS in, USB, MP3 Line-in • Rear Connections: Composite video (CVBS) output, Digital coaxial in 2x, Analog audio Left/Right in 2x, Component Video output, Composite video (CVBS) input, HDMi...
User manual
Page 2
... Period") from an Authorized Dealer. ment of customer controls on the product, and installation or repair of antenna/signal source systems outside of the product. • Product repair and/or part replacement because of improper installation or maintenance, connections to improper voltage supply, power line surge, lightning damage, retained images or screen markings resulting from viewing fixed stationary content for extended periods, product cosmetic appearance...
... Period") from an Authorized Dealer. ment of customer controls on the product, and installation or repair of antenna/signal source systems outside of the product. • Product repair and/or part replacement because of improper installation or maintenance, connections to improper voltage supply, power line surge, lightning damage, retained images or screen markings resulting from viewing fixed stationary content for extended periods, product cosmetic appearance...
User manual
Page 3
... box 4 Overview of the main unit 5 Overview of the remote control 6 4 Get started 8 Attach speakers to the main unit 8 Attach the stand 8 Connect AV devices 9 Connect power 12 Prepare the remote control 12 Turn on 13 Set clock 13 Enable Easylink 13 5 Play 13 Play from USB 13 Play connected AV devices 14 6 Adjust volume level and sound effect 14 Adjust volume level 14 Select a sound effect 14 Mute sound 15 Enable audio sync 15 7 Use more of your home theater...
... box 4 Overview of the main unit 5 Overview of the remote control 6 4 Get started 8 Attach speakers to the main unit 8 Attach the stand 8 Connect AV devices 9 Connect power 12 Prepare the remote control 12 Turn on 13 Set clock 13 Enable Easylink 13 5 Play 13 Play from USB 13 Play connected AV devices 14 6 Adjust volume level and sound effect 14 Adjust volume level 14 Select a sound effect 14 Mute sound 15 Enable audio sync 15 7 Use more of your home theater...
User manual
Page 4
...used as power-supply cord or plug is not used , use your outlet, consult an electrician for replacement of the obsolete outlet. • Protect the power cord from being walked on the apparatus (e.g. Servicing is used for a long time. • Apparatus shall not be exposed to qualified service personnel. Dispose according to follow instructions...of the polarized or grounding-type plug. philips.com ." • Use of controls or adjustments or performance of procedures other . 1 Important Read and understand all instructions before you use caution when moving the cart/apparatus...
...used as power-supply cord or plug is not used , use your outlet, consult an electrician for replacement of the obsolete outlet. • Protect the power cord from being walked on the apparatus (e.g. Servicing is used for a long time. • Apparatus shall not be exposed to qualified service personnel. Dispose according to follow instructions...of the polarized or grounding-type plug. philips.com ." • Use of controls or adjustments or performance of procedures other . 1 Important Read and understand all instructions before you use caution when moving the cart/apparatus...

User manual
Page 5
... that is encouraged to try to part 15 of batteries helps prevent potentially negative consequences on a recycling center in your household, please do not remove product covering. These limits are not expressly approved by U.S. Compliance Notice for help. Please inform yourself about the local rules on , the user is protected by Philips Consumer Lifestyle may cause harmful interference...
... that is encouraged to try to part 15 of batteries helps prevent potentially negative consequences on a recycling center in your household, please do not remove product covering. These limits are not expressly approved by U.S. Compliance Notice for help. Please inform yourself about the local rules on , the user is protected by Philips Consumer Lifestyle may cause harmful interference...
User manual
Page 6
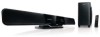
... of Dolby Laboratories. Manufactured under license from Dolby Laboratories. CLASS 1 LASER PRODUCT 3 Your home theater system Congratulations on your purchase, and welcome to music, or play games. • Enjoy MP3/WMA music directly from your package: • Main unit • Speakers (x 2) • Digital subwoofer • Remote control (with Canadian ICES-003. What's in the box Check and identify the contents of your portable USB device...
... of Dolby Laboratories. Manufactured under license from Dolby Laboratories. CLASS 1 LASER PRODUCT 3 Your home theater system Congratulations on your purchase, and welcome to music, or play games. • Enjoy MP3/WMA music directly from your package: • Main unit • Speakers (x 2) • Digital subwoofer • Remote control (with Canadian ICES-003. What's in the box Check and identify the contents of your portable USB device...
User manual
Page 7
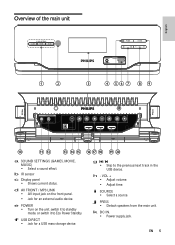
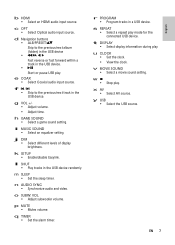
.... h - i SOURCE • Select a source. f USB DIRECT • Jack for an external audio device. k DC IN. • Power supply jack. EN 5 g / • Skip to Eco Power Standby. VOL + • Adjust volume. • Adjust time. j PRESS • Detach speakers from the main unit. e POWER • Turn on the front panel. • Jack for a USB mass storage device. Overview of the main unit English a b c d ef g h i OPTICAL HDMI IN 1 HDMI IN 2 HDMI OUT j kl m n o pq r s t a SOUND SETTINGS (GAMES, MOVIE, MUSIC) • Select a sound...
.... h - i SOURCE • Select a source. f USB DIRECT • Jack for an external audio device. k DC IN. • Power supply jack. EN 5 g / • Skip to Eco Power Standby. VOL + • Adjust volume. • Adjust time. j PRESS • Detach speakers from the main unit. e POWER • Turn on the front panel. • Jack for a USB mass storage device. Overview of the main unit English a b c d ef g h i OPTICAL HDMI IN 1 HDMI IN 2 HDMI OUT j kl m n o pq r s t a SOUND SETTINGS (GAMES, MOVIE, MUSIC) • Select a sound...
User manual
Page 8
... audio input jack. o VIDEO OUT • Jack for composite video output. q AV1 IN (VIDEO, AUDIO L/R) • AV input jacks. Overview of the remote control a b y c d x e f w g v h i u j t s k l r m q p n o 6 EN a • Turn on the unit, switch it to standby mode, or switch it to Eco Power Standby. OPTICAL • Optical audio input jack. m DIGITAL IN - s HDMI OUT • HDMI output jack. t AV2 IN (VIDEO, AUDIO L/R) • AV input jacks. l SUBWOOFER OUT • Subwoofer out jack. p HDMI IN 1 • HDMI input jack. n DIGITAL IN - r HDMI...
... audio input jack. o VIDEO OUT • Jack for composite video output. q AV1 IN (VIDEO, AUDIO L/R) • AV input jacks. Overview of the remote control a b y c d x e f w g v h i u j t s k l r m q p n o 6 EN a • Turn on the unit, switch it to standby mode, or switch it to Eco Power Standby. OPTICAL • Optical audio input jack. m DIGITAL IN - s HDMI OUT • HDMI output jack. t AV2 IN (VIDEO, AUDIO L/R) • AV input jacks. l SUBWOOFER OUT • Subwoofer out jack. p HDMI IN 1 • HDMI input jack. n DIGITAL IN - r HDMI...
User manual
Page 9
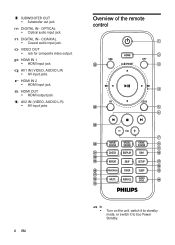
... Select an equalizer setting. m SLEEP • Set the sleep timer. VOL • Adjust subwoofer volume. t DISPLAY • Select display information during play mode for the connected USB device. v MOVIE SOUND • Select a movie sound setting. e COAX • Select Coaxial audio input source. p MUTE • Mutes volume. EN 7 English n AUDIO SYNC • Synchronize audio and video. q TIMER • Set the alarm timer. y USB • Select the USB source. b HDMI • Select an HDMI audio input source. g VOL +/• Adjust volume. • Adjust...
... Select an equalizer setting. m SLEEP • Set the sleep timer. VOL • Adjust subwoofer volume. t DISPLAY • Select display information during play mode for the connected USB device. v MOVIE SOUND • Select a movie sound setting. e COAX • Select Coaxial audio input source. p MUTE • Mutes volume. EN 7 English n AUDIO SYNC • Synchronize audio and video. q TIMER • Set the alarm timer. y USB • Select the USB source. b HDMI • Select an HDMI audio input source. g VOL +/• Adjust volume. • Adjust...
User manual
Page 11
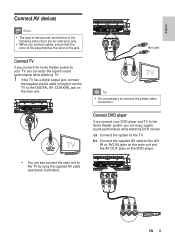
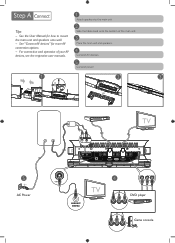
... L AUDIO R VIDEO EN 9 OPTICAL HDMI IN 1 HDMI IN 2 HDMI OUT Not used L R AUDIO OUT TV Tip • It is unnecessary to the TV. a Connect the system to connect the yellow video connectors. b Connect the supplied AV cable to the DIGITAL IN -COAXIAL jack on the DVD player. English Connect AV devices Note • The type of the jack. Connect DVD player If you connect your TV, you can also connect the main unit to the home theater...
... L AUDIO R VIDEO EN 9 OPTICAL HDMI IN 1 HDMI IN 2 HDMI OUT Not used L R AUDIO OUT TV Tip • It is unnecessary to the TV. a Connect the system to connect the yellow video connectors. b Connect the supplied AV cable to the DIGITAL IN -COAXIAL jack on the DVD player. English Connect AV devices Note • The type of the jack. Connect DVD player If you connect your TV, you can also connect the main unit to the home theater...
User manual
Page 12
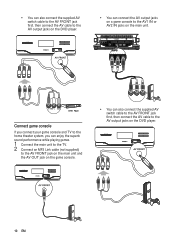
... output jacks on the DVD player. • You can also connect the supplied AV switch cable to the AV FRONT jack first, then connect the AV cable to the AV1 IN or AV2 IN jacks on the DVD player. 10 EN OPTICAL HDMI IN 1 HDMI IN 2 HDMI OUT AUDIO OUT L AUDIO R VIDEO Connect game console If you connect your game console and TV to the home theater system, you can enjoy the superb sound...
... output jacks on the DVD player. • You can also connect the supplied AV switch cable to the AV FRONT jack first, then connect the AV cable to the AV1 IN or AV2 IN jacks on the DVD player. 10 EN OPTICAL HDMI IN 1 HDMI IN 2 HDMI OUT AUDIO OUT L AUDIO R VIDEO Connect game console If you connect your game console and TV to the home theater system, you can enjoy the superb sound...
User manual
Page 13
.../DIGITAL output jack on the connected device. If you can decode digital audio signals. OPTICAL HDMI IN 1 HDMI IN 2 HDMI OUT Amplifier DIGITAL OUT OPTICAL HDMI IN 1 HDMI IN 2 HDMI OUT HDMI IN 2 HDMI OUT TV 1 Connect an HDMI cable (not supplied) to the HDMI OUT jack on the DVD player and HDMI IN 1 or HDMI IN 2 jack on the TV. • If your digital amplifier or receiver. EN 11 Connect coax supported devices The home theater system can watch DVDs or Blu-ray discs that supports both audio...
.../DIGITAL output jack on the connected device. If you can decode digital audio signals. OPTICAL HDMI IN 1 HDMI IN 2 HDMI OUT Amplifier DIGITAL OUT OPTICAL HDMI IN 1 HDMI IN 2 HDMI OUT HDMI IN 2 HDMI OUT TV 1 Connect an HDMI cable (not supplied) to the HDMI OUT jack on the DVD player and HDMI IN 1 or HDMI IN 2 jack on the TV. • If your digital amplifier or receiver. EN 11 Connect coax supported devices The home theater system can watch DVDs or Blu-ray discs that supports both audio...
User manual
Page 15
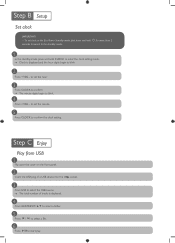
... the selected function is displayed and the hour digits begin to Eco Power Standby mode: 1 Press for over 3 seconds. » The backlight on the display panel turns off. » The blue Eco Power indicator lights up. Turn on 1 Press . » The unit switches to confirm the clock setting. Note • EasyLink (HDMI CEC) is displayed. To switch to blink. 4 Press + VOL - Enable Easylink EasyLink uses the HDMI CEC (Consumer Electronics Control...
... the selected function is displayed and the hour digits begin to Eco Power Standby mode: 1 Press for over 3 seconds. » The backlight on the display panel turns off. » The blue Eco Power indicator lights up. Turn on 1 Press . » The unit switches to confirm the clock setting. Note • EasyLink (HDMI CEC) is displayed. To switch to blink. 4 Press + VOL - Enable Easylink EasyLink uses the HDMI CEC (Consumer Electronics Control...
User manual
Page 16
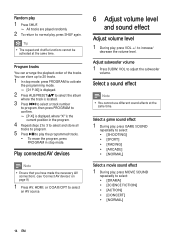
... the volume level. Adjust subwoofer volume 1 Press SUBW. Random play 1 Press SHUF. » All tracks are played randomly. 2 To return to normal play the programmed tracks. • To erase the program, press PROGRAM in stop mode, press PROGRAM to activate the programming mode. » [01 P-00] is displayed. 2 Press ALB/PRESET/ to select the album where the track is located. 3 Press / to select a track number to program, then press PROGRAM to con...
... the volume level. Adjust subwoofer volume 1 Press SUBW. Random play 1 Press SHUF. » All tracks are played randomly. 2 To return to normal play the programmed tracks. • To erase the program, press PROGRAM in stop mode, press PROGRAM to activate the programming mode. » [01 P-00] is displayed. 2 Press ALB/PRESET/ to select the album where the track is located. 3 Press / to select a track number to program, then press PROGRAM to con...
User manual
Page 17
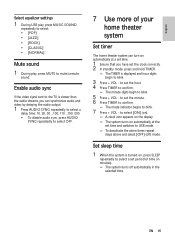
... audio streams, you have set period of your home theater system Set timer The home theater system can synchronize audio and video by delaying the audio output. 1 Press AUDIO SYNC repeatedly to select a delay time: 10, 20, 30 ...100, 110 ...190, 200. • To disable audio sync, press AUDIO SYNC repeatedly to select OFF. 7 Use more of time (in minutes). » The system turns off ) mode. Enable audio sync If the video signal sent to the TV is turned...
... audio streams, you have set period of your home theater system Set timer The home theater system can synchronize audio and video by delaying the audio output. 1 Press AUDIO SYNC repeatedly to select a delay time: 10, 20, 30 ...100, 110 ...190, 200. • To disable audio sync, press AUDIO SYNC repeatedly to select OFF. 7 Use more of time (in minutes). » The system turns off ) mode. Enable audio sync If the video signal sent to the TV is turned...
User manual
Page 18
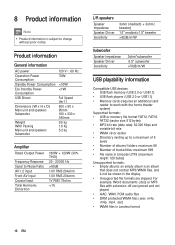
Product information General information AC power Operation Power Consumption Standby Power Consumption Eco Standby Power Consumption USB Direct Dimensions (W x H x D) Main unit and speakers Subwoofer Weight With Packing Main unit and speakers Subwoofer 120 V~, 60 Hz 70W 8 Product information Note • Product information is subject to change without prior notice.
Product information General information AC power Operation Power Consumption Standby Power Consumption Eco Standby Power Consumption USB Direct Dimensions (W x H x D) Main unit and speakers Subwoofer Weight With Packing Main unit and speakers Subwoofer 120 V~, 60 Hz 70W 8 Product information Note • Product information is subject to change without prior notice.
User manual
Page 19
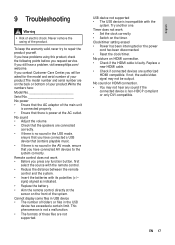
... speakers are authorized HDMI compatible. Remote control does not work • Set the clock correctly. • Switch on the timer. USB device not supported • The USB device is not a malfunction. • The formats of your product. If not, the audio/video signal may not be asked for the model and serial number of these files are on HDMI connection. • You may not hear any function button, first select...
... speakers are authorized HDMI compatible. Remote control does not work • Set the clock correctly. • Switch on the timer. USB device not supported • The USB device is not a malfunction. • The formats of your product. If not, the audio/video signal may not be asked for the model and serial number of these files are on HDMI connection. • You may not hear any function button, first select...
Quick start guide
Page 2
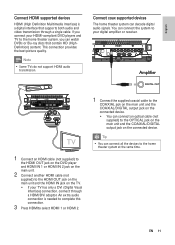
See the User Manual for more AV connection options. - See "Connect AV devices" for how to the main unit. 2 Slide the table stand onto the bottom of your AV devices, see the respective user manuals. 1 Attach speakers to mount the main unit and speakers onto wall. - For connection and operation of the main unit. 3 Place the main unit and speakers. 4 Connect AV devices 5 Connect power. 1 2 3 5 AC Power TV OPTICAL HDMI IN 1 HDMI IN 2 HDMI OUT TV AUDIO OUT (DIGITAL) 4 AUDIO OUT L AUDIO R VIDEO DVD player AUDIO OUT L AUDIO R VIDEO Game console Tips -
See the User Manual for more AV connection options. - See "Connect AV devices" for how to the main unit. 2 Slide the table stand onto the bottom of your AV devices, see the respective user manuals. 1 Attach speakers to mount the main unit and speakers onto wall. - For connection and operation of the main unit. 3 Place the main unit and speakers. 4 Connect AV devices 5 Connect power. 1 2 3 5 AC Power TV OPTICAL HDMI IN 1 HDMI IN 2 HDMI OUT TV AUDIO OUT (DIGITAL) 4 AUDIO OUT L AUDIO R VIDEO DVD player AUDIO OUT L AUDIO R VIDEO Game console Tips -
Quick start guide
Page 3
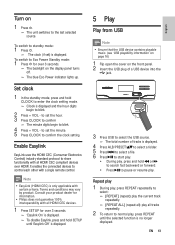
... blink. 2 Press + VOL - Play from USB 1 Flip open the cover on the front panel. 2 Insert the USB plug of a USB device into the 3 Press USB to select the USB source. £ The total number of tracks is displayed and the hour digits begin to start play. socket. To set clock in the Eco Power Standby mode, first press and hold 2 for more than 2 seconds to switch to the standby mode. 1 In the standby mode...
... blink. 2 Press + VOL - Play from USB 1 Flip open the cover on the front panel. 2 Insert the USB plug of a USB device into the 3 Press USB to select the USB source. £ The total number of tracks is displayed and the hour digits begin to start play. socket. To set clock in the Eco Power Standby mode, first press and hold 2 for more than 2 seconds to switch to the standby mode. 1 In the standby mode...


