
Leaflet
Page 2
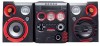
Mini Hi-Fi System with 5 CD Tray Changer standard product information FW C557 game port • Front game port connection • Game volume control • 3 game sound modes (speed, punch & blast) • MIX-IT disc player • 5 CD ... : 3.5mm stereo jack • Antenna : FM click-fit, AM Loop general • FTD display • Dim mode • Clock, Alarm & Sleep timer • 32 key Remote Control • Eco power standby mode (
Mini Hi-Fi System with 5 CD Tray Changer standard product information FW C557 game port • Front game port connection • Game volume control • 3 game sound modes (speed, punch & blast) • MIX-IT disc player • 5 CD ... : 3.5mm stereo jack • Antenna : FM click-fit, AM Loop general • FTD display • Dim mode • Clock, Alarm & Sleep timer • 32 key Remote Control • Eco power standby mode (
User manual
Page 8
...Contents General Information Supplied accessories 9 Environmental information 9 Care and safety information 9 Functional Overview Main unit and remote control 10-11 Control buttons available on the remote only 11 Connections Step 1: Connecting FM/AM antennas 13 Step 2: Connecting the speakers 13 Step 3: ...Connecting to game console 13 Step 4: Connecting the AC power cord ........ 13 Step 5: Inserting batteries into the remote control 14 Using the remote control to operate the system 14 Gameport Operations About Gameport 15 Preparation before use 15 Start operating 15 Basic ...
...Contents General Information Supplied accessories 9 Environmental information 9 Care and safety information 9 Functional Overview Main unit and remote control 10-11 Control buttons available on the remote only 11 Connections Step 1: Connecting FM/AM antennas 13 Step 2: Connecting the speakers 13 Step 3: ...Connecting to game console 13 Step 4: Connecting the AC power cord ........ 13 Step 5: Inserting batteries into the remote control 14 Using the remote control to operate the system 14 Gameport Operations About Gameport 15 Preparation before use 15 Start operating 15 Basic ...
User manual
Page 9
... and old equipment. Use a soft cloth slightly moistened with a soft felt-tipped pen. - Built-in the warm environment until the moisture evaporates. Supplied accessories (page 3 - Remote control and two AA batteries. - FM wire antenna - General Information Care and safety information (page 3 - In a cabinet, allows about 10cm (4 inches) of the system for...
... and old equipment. Use a soft cloth slightly moistened with a soft felt-tipped pen. - Built-in the warm environment until the moisture evaporates. Supplied accessories (page 3 - Remote control and two AA batteries. - FM wire antenna - General Information Care and safety information (page 3 - In a cabinet, allows about 10cm (4 inches) of the system for...
User manual
Page 10
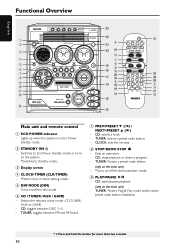
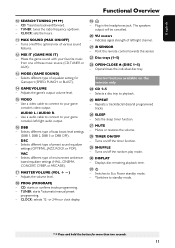
... DIM SLEEP CLK/TIMER TIMER ON/OFF DSC VAC MUTE MAX ON/OFF GAME GAME SOUND MIX-IT º ª • 4 ! ≥ @ Main unit and remote control 1 ECO POWER indicator - CD: selects a track. - PLAY • PAUSE T English Functional Overview 1 2 3 4 5 6 7 8 9 0 ! @ # ECO POWER DISC1 DISC2 DISC3 DISC4 DISC5 DISC 1 DISC 2 DISC 3 DISC 4 DISC...
... DIM SLEEP CLK/TIMER TIMER ON/OFF DSC VAC MUTE MAX ON/OFF GAME GAME SOUND MIX-IT º ª • 4 ! ≥ @ Main unit and remote control 1 ECO POWER indicator - CD: selects a track. - PLAY • PAUSE T English Functional Overview 1 2 3 4 5 6 7 8 9 0 ! @ # ECO POWER DISC1 DISC2 DISC3 DISC4 DISC5 DISC 1 DISC 2 DISC 3 DISC 4 DISC...
User manual
Page 11
... playback time. ⁄B - CD: *searches backward/forward. - Selects different type of preset sound equalizer settings (OPTIMAL, JAZZ, ROCK or POP). CLOCK: selects 12- Point the remote control towards this sensor. ™ Disc trays (1~5) £ OPEN•CLOSE 0 (DISC 1~5) - Adjusts the game's output volume level. % VIDEO - Selects different type of environment ambience... of equalizer setting for more than two seconds. 11 Selects a disc tray to your game console's left /right channel. ¡ iR SENSOR - Turns on the remote only ≤ CD 1~5 -
... playback time. ⁄B - CD: *searches backward/forward. - Selects different type of preset sound equalizer settings (OPTIMAL, JAZZ, ROCK or POP). CLOCK: selects 12- Point the remote control towards this sensor. ™ Disc trays (1~5) £ OPEN•CLOSE 0 (DISC 1~5) - Adjusts the game's output volume level. % VIDEO - Selects different type of environment ambience... of equalizer setting for more than two seconds. 11 Selects a disc tray to your game console's left /right channel. ¡ iR SENSOR - Turns on the remote only ≤ CD 1~5 -
User manual
Page 14
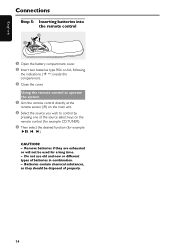
... contain chemical substances, so they are exhausted or will not be disposed of properly. 14 Using the remote control to operate the system 1 Aim the remote control directly at the remote sensor (iR) on the main unit. 2 Select the source you wish to control by pressing one... of batteries in combination. - Remove batteries if they should be used for example CAUTION! - English Connections Step 5: Inserting batteries into the remote control 3 1 2 1 Open the battery compartment cover. 2 Insert two batteries type R06 or AA, following the indications (+-) inside the compar tment. ...
... contain chemical substances, so they are exhausted or will not be disposed of properly. 14 Using the remote control to operate the system 1 Aim the remote control directly at the remote sensor (iR) on the main unit. 2 Select the source you wish to control by pressing one... of batteries in combination. - Remove batteries if they should be used for example CAUTION! - English Connections Step 5: Inserting batteries into the remote control 3 1 2 1 Open the battery compartment cover. 2 Insert two batteries type R06 or AA, following the indications (+-) inside the compar tment. ...
User manual
Page 15
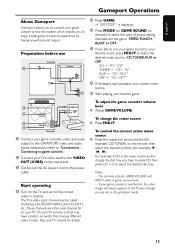
...Connecting to the power outlet. Start operating 4 Turn on the rear panel. 3 Connect all the AC power cord to game console). 2 Connect your TV remote control may be called AUX(iliary) IN, AUDIO/VIDEO (A/V) IN, EXT 1, etc. To control the current active mixer source Press the respective source button... (for example, CD,TUNER) on the remote, then select the desired function (for details. You can only activate GAME VOLUME and MIX-IT while in the gameport mode. 15 UDIO R. Or,...
...Connecting to the power outlet. Start operating 4 Turn on the rear panel. 3 Connect all the AC power cord to game console). 2 Connect your TV remote control may be called AUX(iliary) IN, AUDIO/VIDEO (A/V) IN, EXT 1, etc. To control the current active mixer source Press the respective source button... (for example, CD,TUNER) on the remote, then select the desired function (for details. You can only activate GAME VOLUME and MIX-IT while in the gameport mode. 15 UDIO R. Or,...
User manual
Page 17
...switch off dim mode. ➜ DIM is generated automatically for the display panel. To switch off the volume temporarily Press MUTE on the remote. ➜ Playback will be switched off automatically Digital Sound Control DSC provides a different type of preset sound equalizer setting. Virtual Ambience Control... environment. 17 In any active mode, press DIM MODE (or DIM on remote) repeatedly to turn on remote) to select : DBB 1, DBB 2, DBB 3 or DBB OFF. ➜ Some discs might be activated on remote). ➜ If activated, the MAX SOUND button lights up. Volume control Adjust...
...switch off dim mode. ➜ DIM is generated automatically for the display panel. To switch off the volume temporarily Press MUTE on the remote. ➜ Playback will be switched off automatically Digital Sound Control DSC provides a different type of preset sound equalizer setting. Virtual Ambience Control... environment. 17 In any active mode, press DIM MODE (or DIM on remote) repeatedly to turn on remote) to select : DBB 1, DBB 2, DBB 3 or DBB OFF. ➜ Some discs might be activated on remote). ➜ If activated, the MAX SOUND button lights up. Volume control Adjust...
User manual
Page 18
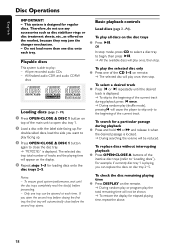
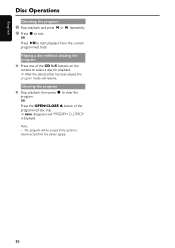
... stop mode, press CD to select a disc tray to close before the second tray opens. To check the disc remaining playing time Press DISPLAY on remote. ➜ The selected disc will not be shown. ➜ To restore the display for regular discs. English Disc Operations IMPORTANT! - This system is...(page 3 - The selected disc tray, total number of the current track. Only one tray can replace the discs on top of the CD 1~5 on the remote. ➜ During random play or program play, the total remaining time will play once, then stop . To select a desired track Press í or ...
... stop mode, press CD to select a disc tray to close before the second tray opens. To check the disc remaining playing time Press DISPLAY on remote. ➜ The selected disc will not be shown. ➜ To restore the display for regular discs. English Disc Operations IMPORTANT! - This system is...(page 3 - The selected disc tray, total number of the current track. Only one tray can replace the discs on top of the CD 1~5 on the remote. ➜ During random play or program play, the total remaining time will play once, then stop . To select a desired track Press í or ...
User manual
Page 19
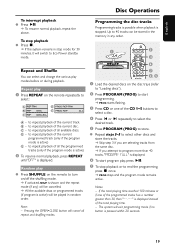
... track. Note: - Programming the disc tracks Programming tracks is possible when playback is pressed within 20 seconds. 19 Repeat play 1 Press REPEAT on the remote repeatedly to repeat playback of the current disc. to select : A D B E C A - Repeat steps 3-5 to select other discs and store the...available discs or programmed tracks (if program is displayed. to Eco Power standby mode. Up to store. Random play Press SHUFFLE on the remote to turn on the disc trays (refer to "Loading discs"). 2 Press PROGRAM (PROG) to start program play modes before or during...
... track. Note: - Programming the disc tracks Programming tracks is possible when playback is pressed within 20 seconds. 19 Repeat play 1 Press REPEAT on the remote repeatedly to repeat playback of the current disc. to select : A D B E C A - Repeat steps 3-5 to select other discs and store the...available discs or programmed tracks (if program is displayed. to Eco Power standby mode. Up to store. Random play Press SHUFFLE on the remote to turn on the disc trays (refer to "Loading discs"). 2 Press PROGRAM (PROG) to start program play modes before or during...
User manual
Page 20
... the programmed disc tray. ➜ PROG disappears and "PROGRAM CLEARED" is displayed. OR Press the OPEN•CLOSE 0 button of the CD 1~5 buttons on the remote to start playback from the power supply. 20 Note: - English Disc Operations Checking the program 1 Stop playback and press í or ë repeatedly. 2 Press Ç...
... the programmed disc tray. ➜ PROG disappears and "PROGRAM CLEARED" is displayed. OR Press the OPEN•CLOSE 0 button of the CD 1~5 buttons on the remote to start playback from the power supply. 20 Note: - English Disc Operations Checking the program 1 Stop playback and press í or ë repeatedly. 2 Press Ç...
User manual
Page 22
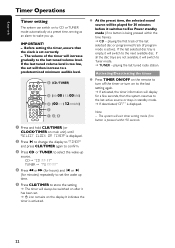
... will exit timer setting mode if no button is being pressed within 90 seconds. 22 Activating/Deactivating the timer Press TIMER ON/OFF on the remote to select the wake-up . Before setting the timer, ensure that the clock is set . ➜ icon remains on main unit) until "SELECT CLOCK OR...
... will exit timer setting mode if no button is being pressed within 90 seconds. 22 Activating/Deactivating the timer Press TIMER ON/OFF on the remote to select the wake-up . Before setting the timer, ensure that the clock is set . ➜ icon remains on main unit) until "SELECT CLOCK OR...
User manual
Page 25
...following these hints, please call 1-800-531-0039 for better reception. ✔ Increase the distance between the remote control and the system. ✔ Replace the battery. ✔ Point the remote control directly toward the IR sensor. "DISC NOT FINALIZED" is not working. ✔ Set the clock ... The system displays features automatically and ✔ Press and hold DEMO STOP on the main unit to switch on the system again. The remote control does not function properly. ✔ Select the source (CD or TUNER, for repair. off the demonstration mode. 25 The timer...
...following these hints, please call 1-800-531-0039 for better reception. ✔ Increase the distance between the remote control and the system. ✔ Replace the battery. ✔ Point the remote control directly toward the IR sensor. "DISC NOT FINALIZED" is not working. ✔ Set the clock ... The system displays features automatically and ✔ Press and hold DEMO STOP on the main unit to switch on the system again. The remote control does not function properly. ✔ Select the source (CD or TUNER, for repair. off the demonstration mode. 25 The timer...


