
Leaflet
Page 2
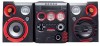
...; 3-step Dynamic Bass Boost amplifier • 2 x 140 watts RMS • 280 watts Total Power loudspeaker boxes • 3 way Bass Reflex speaker system • 6.5" woofer • Detachable grilles connections • Audio Input Analog : AUX (cinch) & Game Port • Video Input : composite cinch • Video Output : composite cinch • Stereo headphones : 3.5mm stereo jack • Antenna : FM click-fit, AM Loop general • FTD display • Dim mode • Clock, Alarm & Sleep timer • 32 key Remote Control • Eco power standby mode (
...; 3-step Dynamic Bass Boost amplifier • 2 x 140 watts RMS • 280 watts Total Power loudspeaker boxes • 3 way Bass Reflex speaker system • 6.5" woofer • Detachable grilles connections • Audio Input Analog : AUX (cinch) & Game Port • Video Input : composite cinch • Video Output : composite cinch • Stereo headphones : 3.5mm stereo jack • Antenna : FM click-fit, AM Loop general • FTD display • Dim mode • Clock, Alarm & Sleep timer • 32 key Remote Control • Eco power standby mode (

User manual
Page 1
T! Call us on the web at www.philips.com IM E PORTAN Return your Warranty Registration Card within 10 days EE WHY INSID 1 Philips representatives are ready to start enjoying your new product.We can guide you to help ? CALL US BEFORE YOU CONSIDER RETURNING THE PRODUCT! 1-800-531-0039 or Visit us ! S Mini Hi-Fi System FW-C557 Need help you with any of the Features. We want you through Connections, First-time Setup, or any questions about your new product right away!
T! Call us on the web at www.philips.com IM E PORTAN Return your Warranty Registration Card within 10 days EE WHY INSID 1 Philips representatives are ready to start enjoying your new product.We can guide you to help ? CALL US BEFORE YOU CONSIDER RETURNING THE PRODUCT! 1-800-531-0039 or Visit us ! S Mini Hi-Fi System FW-C557 Need help you with any of the Features. We want you through Connections, First-time Setup, or any questions about your new product right away!
User manual
Page 2
...ón. This system complies with the FCC rules, Part 15 and with 21 CFR 1040.10. AVOID DIRECT EXPOSURE TO BEAM. This device must accept any interference received, including interference that this laser product. Operation is located on the rearside and inside this product meets the ENERGY STARR guidelines for radio noise emissions from digital apparatus as set out in hazardous...
...ón. This system complies with the FCC rules, Part 15 and with 21 CFR 1040.10. AVOID DIRECT EXPOSURE TO BEAM. This device must accept any interference received, including interference that this laser product. Operation is located on the rearside and inside this product meets the ENERGY STARR guidelines for radio noise emissions from digital apparatus as set out in hazardous...
User manual
Page 3
...; DEMO STOP PR PLAY • PAUSE SEARCH• TUNING MMAAXX SSOOUUNNDD MIX-IT VOLUM E GAM E GGAAMMEESSOOUUNNDD SPEED PUNCH BLAST MMOODDEE MAX SOUND• DIGITAL SOUND CONTROL VIRTUAL AMBIENCE CONTROL • DYNAMIC BASS BOOST A A V IDEO UDIO UDIO LEFT RIGHT DISC1 DISC2 DISC3 DISC4 DISC 1 DISC 2 DISC 3 DDIISSCC41 DISC5 1, 3 CD /CD-RR/CD-RRW COMPPATIIBBLELE 3 3 P1 P2 CD TUNER AUX GAME CD1 CD2 CD3 CD4 CD5 VOL TITLE ALBUM REPEAT PROGRAM SHUFFLE DISPLAY...
...; DEMO STOP PR PLAY • PAUSE SEARCH• TUNING MMAAXX SSOOUUNNDD MIX-IT VOLUM E GAM E GGAAMMEESSOOUUNNDD SPEED PUNCH BLAST MMOODDEE MAX SOUND• DIGITAL SOUND CONTROL VIRTUAL AMBIENCE CONTROL • DYNAMIC BASS BOOST A A V IDEO UDIO UDIO LEFT RIGHT DISC1 DISC2 DISC3 DISC4 DISC 1 DISC 2 DISC 3 DDIISSCC41 DISC5 1, 3 CD /CD-RR/CD-RRW COMPPATIIBBLELE 3 3 P1 P2 CD TUNER AUX GAME CD1 CD2 CD3 CD4 CD5 VOL TITLE ALBUM REPEAT PROGRAM SHUFFLE DISPLAY...
User manual
Page 4
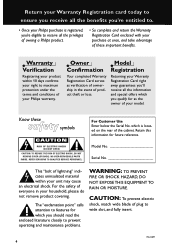
... rear of the cabinet. Know these important benefits. NO USER-SERVICEABLE PARTS INSIDE. Warranty Verification Registering your product within your Philips warranty. For the safety of everyone in the event of your household, please do not remove product covering. Owner Confirmation Your completed Warranty Registration Card serves as the owner of product theft or loss. MAC5097 4 For Customer Use Enter below the Serial...
... rear of the cabinet. Know these important benefits. NO USER-SERVICEABLE PARTS INSIDE. Warranty Verification Registering your product within your Philips warranty. For the safety of everyone in the event of your household, please do not remove product covering. Owner Confirmation Your completed Warranty Registration Card serves as the owner of product theft or loss. MAC5097 4 For Customer Use Enter below the Serial...
User manual
Page 8
... Dimming system's display screen 17 Volume control 17 Sound control 17 MAX sound 17 Digital Sound Control 17 Virtual Ambience Control 17 Dynamic Bass Boost 17 Disc Operations Playable discs 18 Loading discs 18 Basic playback controls 18-19 Repeat and Shuffle 19 Repeat play 19 Random play 19 Programming the disc tracks 19 Checking the program 20 Playing a disc without clearing the program 20 Clearing the program 20 Tuner Operations Tuning to radio stations 21 Presetting radio stations 21 Using the Plug and Play 21 Automatic presetting 21 Manual presetting...
... Dimming system's display screen 17 Volume control 17 Sound control 17 MAX sound 17 Digital Sound Control 17 Virtual Ambience Control 17 Dynamic Bass Boost 17 Disc Operations Playable discs 18 Loading discs 18 Basic playback controls 18-19 Repeat and Shuffle 19 Repeat play 19 Random play 19 Programming the disc tracks 19 Checking the program 20 Playing a disc without clearing the program 20 Clearing the program 20 Tuner Operations Tuning to radio stations 21 Presetting radio stations 21 Using the Plug and Play 21 Automatic presetting 21 Manual presetting...
User manual
Page 9
... - If this system may switch to standby mode automatically. FM wire antenna - Video cinch cable (yellow) - To clean a CD, wipe it impossible to play a disc. Write only on the lens. Place the system on a flat, hard, stable surface. This system is suddenly moved from cold to warm surroundings, making it in a straight line from the power outlet when not in use. 9 Supplied accessories (page 3 - Your system consists of materials...
... - If this system may switch to standby mode automatically. FM wire antenna - Video cinch cable (yellow) - To clean a CD, wipe it impossible to play a disc. Write only on the lens. Place the system on a flat, hard, stable surface. This system is suddenly moved from cold to warm surroundings, making it in a straight line from the power outlet when not in use. 9 Supplied accessories (page 3 - Your system consists of materials...
User manual
Page 10
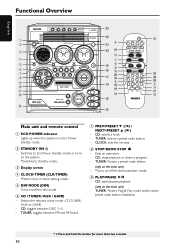
...Selects the relevant active mode : CD,TUNER, AUX or GAME. - CD: selects a track. - CLOCK: sets the minutes. 8 STOP•DEMO STOP Ç - CD: starts/pauses playback. (only on the system. - *Switches to Eco Power standby mode or turns on the main unit) TUNER: *enters Plug & Play mode and/or starts preset radio station installation. * = Press and hold the button for more than two seconds. 10 Switches to standby mode. 3 Display screen 4 CLOCK•TIMER (CLK/TIMER) - *Enters clock or timer setting mode. 5 DIM MODE (DIM) - TUNER: *erases a preset radio station. (only on...
...Selects the relevant active mode : CD,TUNER, AUX or GAME. - CD: selects a track. - CLOCK: sets the minutes. 8 STOP•DEMO STOP Ç - CD: starts/pauses playback. (only on the system. - *Switches to Eco Power standby mode or turns on the main unit) TUNER: *enters Plug & Play mode and/or starts preset radio station installation. * = Press and hold the button for more than two seconds. 10 Switches to standby mode. 3 Display screen 4 CLOCK•TIMER (CLK/TIMER) - *Enters clock or timer setting mode. 5 DIM MODE (DIM) - TUNER: *erases a preset radio station. (only on...
User manual
Page 11
... VOLUME - based equalizer settings (HALL, CINEMA, CONCERT, CYBER or ARCADE). & MASTER VOLUME (VOL +-) - Plug in the headphones jack. Repeats a track/disc/all discs/all programmed tracks. § SLEEP - Sets the sleep timer function. ≥ MUTE - English Functional Overview 0 SEARCH•TUNING (à á) - CLOCK: sets the hours. ! Selects different type of these music source (CD,TUNER or AUX). # MODE (GAME SOUND) - Opens/closes the individual disc tray. Turns on the remote only ≤ CD 1~5 - Switches to Eco Power standby mode. - *Switches...
... VOLUME - based equalizer settings (HALL, CINEMA, CONCERT, CYBER or ARCADE). & MASTER VOLUME (VOL +-) - Plug in the headphones jack. Repeats a track/disc/all discs/all programmed tracks. § SLEEP - Sets the sleep timer function. ≥ MUTE - English Functional Overview 0 SEARCH•TUNING (à á) - CLOCK: sets the hours. ! Selects different type of these music source (CD,TUNER or AUX). # MODE (GAME SOUND) - Opens/closes the individual disc tray. Turns on the remote only ≤ CD 1~5 - Switches to Eco Power standby mode. - *Switches...
User manual
Page 13
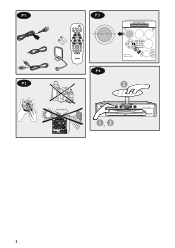
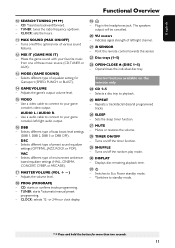
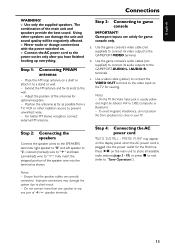
... PLAY" may damage the system due to "-". Ensure that the speaker cables are solely for the first time. English Connections WARNING! - Step 1: Connecting FM/AM antennas - Gameport inputs are correctly connected. Improper connections may appear on . - Adjust the position of the speaker wire into the power outlet for game console only. Use the game console's video cable (not supplied) to connect its video output to your TV. On the TV, the Video Input jack is plugged...
... PLAY" may damage the system due to "-". Ensure that the speaker cables are solely for the first time. English Connections WARNING! - Step 1: Connecting FM/AM antennas - Gameport inputs are correctly connected. Improper connections may appear on . - Adjust the position of the speaker wire into the power outlet for game console only. Use the game console's video cable (not supplied) to connect its video output to your TV. On the TV, the Video Input jack is plugged...
User manual
Page 15
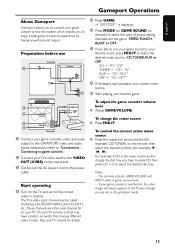
...-TU" AUX ™ "MIX-AUX" OFF ™ "MIX-OFF" 8 If necessary, start playback your chosen mixer source. 9 Start playing your favorite music, press MIX-IT to select the desired music source : CD,TUNER,AUX or OFF. Preparation before use rear panel 2 3 5 Press GAME. ➜ "GAMEPORT" is displayed. 6 Press MODE (or GAME SOUND on remote) to select the type of sound setting that chooses different video modes. To change the disc tray, you have a button or switch that best suit...
...-TU" AUX ™ "MIX-AUX" OFF ™ "MIX-OFF" 8 If necessary, start playback your chosen mixer source. 9 Start playing your favorite music, press MIX-IT to select the desired music source : CD,TUNER,AUX or OFF. Preparation before use rear panel 2 3 5 Press GAME. ➜ "GAMEPORT" is displayed. 6 Press MODE (or GAME SOUND on remote) to select the type of sound setting that chooses different video modes. To change the disc tray, you have a button or switch that best suit...
User manual
Page 16
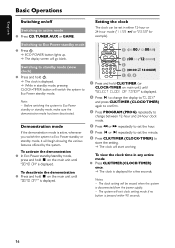
... exit clock setting mode if no button is displayed for example). To view the clock time in either 12-hour or 24-hour mode ("11:59 PM" or "23:59" for a few seconds. English Basic Operations Switching on/off Switching to Eco Power standby mode Press B. ➜ ECO POWER button lights up. ➜ The display screen will go blank. Setting the clock The clock can be erased when the system is displayed. Switching to active mode Press CD, TUNER, AUX...
... exit clock setting mode if no button is displayed for example). To view the clock time in either 12-hour or 24-hour mode ("11:59 PM" or "23:59" for a few seconds. English Basic Operations Switching on/off Switching to Eco Power standby mode Press B. ➜ ECO POWER button lights up. ➜ The display screen will go blank. Setting the clock The clock can be erased when the system is displayed. Switching to active mode Press CD, TUNER, AUX...
User manual
Page 17
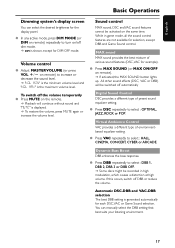
... system's display screen You can manually select the DBB setting that best suits your listening environment. 17 on remote) to select : DBB 1, DBB 2, DBB 3 or DBB OFF. ➜ Some discs might be recorded in game mode, all the sound control features are not available for each DSC,VAC or Game Sound selection. Basic Operations Sound control MAX sound, DSC and VAC sound features cannot be switched off automatically Digital Sound Control...
... system's display screen You can manually select the DBB setting that best suits your listening environment. 17 on remote) to select : DBB 1, DBB 2, DBB 3 or DBB OFF. ➜ Some discs might be recorded in game mode, all the sound control features are not available for each DSC,VAC or Game Sound selection. Basic Operations Sound control MAX sound, DSC and VAC sound features cannot be switched off automatically Digital Sound Control...
User manual
Page 18
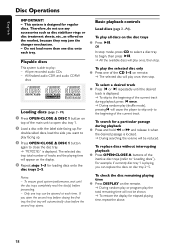
... passage is displayed. Playable discs This system is playing, you want to play facing up . P4) 1 Press OPEN•CLOSE 0 DISC 1 button on the disc trays Press ÉÅ. Only one tray can replace the discs on the remote. ➜ During random play or program play once, then stop mode, press CD to select a disc tray to open the second tray before proceeding. - To check the disc remaining playing time Press DISPLAY on disc tray 2~5. Therefore, do not use any...
... passage is displayed. Playable discs This system is playing, you want to play facing up . P4) 1 Press OPEN•CLOSE 0 DISC 1 button on the disc trays Press ÉÅ. Only one tray can replace the discs on the remote. ➜ During random play or program play once, then stop mode, press CD to select a disc tray to open the second tray before proceeding. - To check the disc remaining playing time Press DISPLAY on disc tray 2~5. Therefore, do not use any...
User manual
Page 19
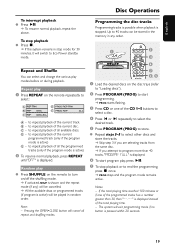
... repeat playback of the CD 1~5 buttons to select a disc. 4 Press í or ë repeatedly to select the desired track. 5 Press PROGRAM (PROG) to end the programming, press Ç once. ➜ PROG stays and the program mode remains active. The system will cancel all available discs. Repeat play 1 Press REPEAT on the disc trays (refer to "Loading discs"). 2 Press PROGRAM (PROG) to start program play, press ÉÅ. 7 To...
... repeat playback of the CD 1~5 buttons to select a disc. 4 Press í or ë repeatedly to select the desired track. 5 Press PROGRAM (PROG) to end the programming, press Ç once. ➜ PROG stays and the program mode remains active. The system will cancel all available discs. Repeat play 1 Press REPEAT on the disc trays (refer to "Loading discs"). 2 Press PROGRAM (PROG) to start program play, press ÉÅ. 7 To...
User manual
Page 21
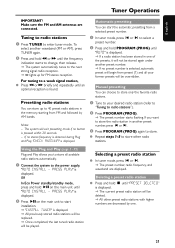
... system to store. OR In Eco Power standby/standby mode, press and hold à or á until "AUTO INSTALL - Make sure the FM and AM antennas are decreased by AM bands. If no stereo frequency is detected during Plug and Play, "CHECK ANTENNA" is displayed. ➜ All previously stored radio stations will be replaced. ➜ Once completed, the last tuned radio station will be overridden. Using the Plug and Play (page 3 - English Tuner Operations IMPORTANT! Presetting radio stations...
... system to store. OR In Eco Power standby/standby mode, press and hold à or á until "AUTO INSTALL - Make sure the FM and AM antennas are decreased by AM bands. If no stereo frequency is detected during Plug and Play, "CHECK ANTENNA" is displayed. ➜ All previously stored radio stations will be replaced. ➜ Once completed, the last tuned radio station will be overridden. Using the Plug and Play (page 3 - English Tuner Operations IMPORTANT! Presetting radio stations...
User manual
Page 22
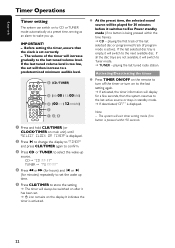
... up . The system will exit timer setting mode if no button is set will be switched on the display. If the last tuned volume level is too low, the set correctly. - At the preset time, the selected sound source will then increase to the next available disc. If the last selected disc tray is displayed. Activating/Deactivating the timer Press TIMER ON/OFF on the remote to turn off the timer or turn on to the...
... up . The system will exit timer setting mode if no button is set will be switched on the display. If the last tuned volume level is too low, the set correctly. - At the preset time, the selected sound source will then increase to the next available disc. If the last selected disc tray is displayed. Activating/Deactivating the timer Press TIMER ON/OFF on the remote to turn off the timer or turn on to the...
User manual
Page 23
.... 2 Before the system switches to Eco Power standby mode, a countdown of the other equipment for complete connection and use a "single to double" cinch cable, but the output sounds still remain monaural. 2 Press AUX. ➜ "AUX" is displayed. 3 Press PLAY on the other audio/visual device (such as a TV,VCR, Laser Disc player, DVD player or CD recorder) ➜ If the connecting device has only a a single audio out terminal, connect it reaches the desired preset turn-off time. ➜...
.... 2 Before the system switches to Eco Power standby mode, a countdown of the other equipment for complete connection and use a "single to double" cinch cable, but the output sounds still remain monaural. 2 Press AUX. ➜ "AUX" is displayed. 3 Press PLAY on the other audio/visual device (such as a TV,VCR, Laser Disc player, DVD player or CD recorder) ➜ If the connecting device has only a a single audio out terminal, connect it reaches the desired preset turn-off time. ➜...
User manual
Page 25
...; Remove and reconnect the AC power cord and switch on the main unit to switch buttons start flashing. Problem Solution Radio reception is poor. ✔ If the signal is connected properly. "DISC NOT FINALIZED" is displayed or the disc cannot be heard or is not working. ✔ Set the clock correctly. ✔ Press TIMER ON/OFF to repair the system yourself, as there is a risk of poor quality. ✔ Adjust the volume...
...; Remove and reconnect the AC power cord and switch on the main unit to switch buttons start flashing. Problem Solution Radio reception is poor. ✔ If the signal is connected properly. "DISC NOT FINALIZED" is displayed or the disc cannot be heard or is not working. ✔ Set the clock correctly. ✔ Press TIMER ON/OFF to repair the system yourself, as there is a risk of poor quality. ✔ Adjust the volume...
User manual
Page 26
... express warranty. LIMITED WARRANTY AUDIO SYSTEM One Year Free Labor One Year Free Service on Parts This product must be carried in for the original warranty period.When the warranty on the product expires, the warranty on all replaced and repaired parts also expires. Philips is not limited to receive warranty service. It will be easier for us at the center. A sales receipt or other warranties...
... express warranty. LIMITED WARRANTY AUDIO SYSTEM One Year Free Labor One Year Free Service on Parts This product must be carried in for the original warranty period.When the warranty on the product expires, the warranty on all replaced and repaired parts also expires. Philips is not limited to receive warranty service. It will be easier for us at the center. A sales receipt or other warranties...


