
Leaflet
Page 2
... Loading • Container 20 feet: 900 • Container 40 feet: 1800 • Container 40 feet (HC): 2000 • Progressive Scan Progressive Scan doubles the vertical resolution of the image resulting in , Composite video (CVBS) input Convenience • Programming/Timer Enhancements: Daily/Weekly Repeat Program, One Touch Recording Power • Power supply: 120V, 60Hz • Power consumption: 21 W • Standby power consumption: 3.8 W Accessories • Included accessories: 2 x AA Batteries, Audio/Video cable, Quick start guide, Remote Control, User Manual, Warranty...
... Loading • Container 20 feet: 900 • Container 40 feet: 1800 • Container 40 feet (HC): 2000 • Progressive Scan Progressive Scan doubles the vertical resolution of the image resulting in , Composite video (CVBS) input Convenience • Programming/Timer Enhancements: Daily/Weekly Repeat Program, One Touch Recording Power • Power supply: 120V, 60Hz • Power consumption: 21 W • Standby power consumption: 3.8 W Accessories • Included accessories: 2 x AA Batteries, Audio/Video cable, Quick start guide, Remote Control, User Manual, Warranty...
User manual
Page 4
... Notice: The making of unauthorized copies of copy-protected material,including computer programs,files,broadcasts and sound recordings,may cause harmful interference to Part 15 of copyrights and constitute a criminal offence. Notice for Radiation (CFR) chapter 1 subchapter J applicable at time of Dolby Laboratories. This equipment should remove the cover or attempt to service this device,due to comply with 525 (480) progressive scan output,it . •...
... Notice: The making of unauthorized copies of copy-protected material,including computer programs,files,broadcasts and sound recordings,may cause harmful interference to Part 15 of copyrights and constitute a criminal offence. Notice for Radiation (CFR) chapter 1 subchapter J applicable at time of Dolby Laboratories. This equipment should remove the cover or attempt to service this device,due to comply with 525 (480) progressive scan output,it . •...
User manual
Page 6
... Timer • Repeat Playback • Satellite Link • Searching:Time,Index,Forward and Reverse • Slow Motion • Still Picture • Tape Counter • Tracking Adjustment Disc Features • Audio Language choices * • Camera Angles * • DVD menus in the top right corner of Audio (red and white tips) and Video (yellow tips) cables • This Owner's Manual and Quick Start Guide DVD Disc Menus... Some instructions explain how to use the DVD player's Setup Menu...
... Timer • Repeat Playback • Satellite Link • Searching:Time,Index,Forward and Reverse • Slow Motion • Still Picture • Tape Counter • Tracking Adjustment Disc Features • Audio Language choices * • Camera Angles * • DVD menus in the top right corner of Audio (red and white tips) and Video (yellow tips) cables • This Owner's Manual and Quick Start Guide DVD Disc Menus... Some instructions explain how to use the DVD player's Setup Menu...
User manual
Page 7
... (MBR:a file that are NTSC, which provides a better picture when you cannot play the DVD in a specific region format can be labeled for ALL regions or for other formats. Windows Media is a trademark of this player. Only the sound on the CD layer can only play on the video heads, which may be covered by the warranty if damage occurs. This DVD player will play Digital Video Discs (DVDs);finalized Digital Video Discs Recordable (DVD+R,DVD-R); Region Codes DVDs must...
... (MBR:a file that are NTSC, which provides a better picture when you cannot play the DVD in a specific region format can be labeled for ALL regions or for other formats. Windows Media is a trademark of this player. Only the sound on the CD layer can only play on the video heads, which may be covered by the warranty if damage occurs. This DVD player will play Digital Video Discs (DVDs);finalized Digital Video Discs Recordable (DVD+R,DVD-R); Region Codes DVDs must...
User manual
Page 8
...),use the yellow DVD/VCR VIDEO OUT jack for excellent picture quality.If you use the S-VIDEO OUT jack for good picture quality. SCAN) to the lowest TV channel (01 or 02) and change connections with a Coaxial Digital Audio In jack,this audio connection,only disc sound (no disc in DVD mode. To see the DVD or VCR picture on the TV,go to page 14 to your TV manual for both the DVD player and the VCR. English...
...),use the yellow DVD/VCR VIDEO OUT jack for excellent picture quality.If you use the S-VIDEO OUT jack for good picture quality. SCAN) to the lowest TV channel (01 or 02) and change connections with a Coaxial Digital Audio In jack,this audio connection,only disc sound (no disc in DVD mode. To see the DVD or VCR picture on the TV,go to page 14 to your TV manual for both the DVD player and the VCR. English...
User manual
Page 9
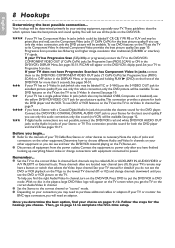
... Signal 1 RF coaxial cable (not supplied) RF coaxial cable (not supplied) 2 ANT. Helpful Hints • If your TV has antenna in jack only,it to the correct Video In channel. 8 You are ready to turn on the DVD/VCR. English Hookups (cont'd) 9 DVD/VCR to An External Tuner This DVD/VCR does not have a tuner input jack.To record TV programs on your DVD/VCR, you need to connect this DVD/VCR to an external tuner device (e.g., set...
... Signal 1 RF coaxial cable (not supplied) RF coaxial cable (not supplied) 2 ANT. Helpful Hints • If your TV has antenna in jack only,it to the correct Video In channel. 8 You are ready to turn on the DVD/VCR. English Hookups (cont'd) 9 DVD/VCR to An External Tuner This DVD/VCR does not have a tuner input jack.To record TV programs on your DVD/VCR, you need to connect this DVD/VCR to an external tuner device (e.g., set...
User manual
Page 11
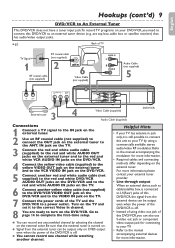
... Audio Cable (supplied) Video Cable (supplied) 1 AUDIO (LEFT) IN AUDIO (RIGHT) IN Stereo 1 Connect the supplied red and white audio cable to the red and white DVD/VCR AUDIO OUT jacks on the DVD/VCR and to the VIDEO IN jack on the DVD/VCR. With no disc in DVD mode. Turn on the DVD/VCR. Go to page 14 before turning on the Stereo. To help you see page 10. To use Component Video cable or S-Video cable instead for the DVD player, see VCR...
... Audio Cable (supplied) Video Cable (supplied) 1 AUDIO (LEFT) IN AUDIO (RIGHT) IN Stereo 1 Connect the supplied red and white audio cable to the red and white DVD/VCR AUDIO OUT jacks on the DVD/VCR and to the VIDEO IN jack on the DVD/VCR. With no disc in DVD mode. Turn on the DVD/VCR. Go to page 14 before turning on the Stereo. To help you see page 10. To use Component Video cable or S-Video cable instead for the DVD player, see VCR...
User manual
Page 12
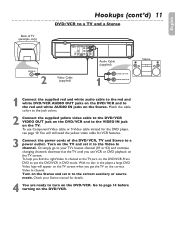
... DVD or VCR material on the TV screen. To use the VCR features,connect the supplied red/white audio cable. Turn on the disc,you get the TV on the DVD/VCR's display panel. Go to use component video cable or S-Video cable instead for VCR features. 3 Plug in the DVD Disc Menu.If Dolby Digital Surround Sound is not recorded on the Stereo and select its Auxiliary IN channel. Some DVDs are recorded in Dolby Digital Multi-channel Surround Sound.Select Dolby Digital Multi-channel Surround Sound in the power cords of the Stereo, TV and DVD/VCR. Make sure Progressive Scan...
... DVD or VCR material on the TV screen. To use the VCR features,connect the supplied red/white audio cable. Turn on the disc,you get the TV on the DVD/VCR's display panel. Go to use component video cable or S-Video cable instead for VCR features. 3 Plug in the DVD Disc Menu.If Dolby Digital Surround Sound is not recorded on the Stereo and select its Auxiliary IN channel. Some DVDs are recorded in Dolby Digital Multi-channel Surround Sound.Select Dolby Digital Multi-channel Surround Sound in the power cords of the Stereo, TV and DVD/VCR. Make sure Progressive Scan...
User manual
Page 17
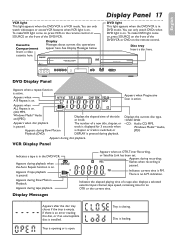
... the DVD/VCR. To make DVD light come on, press VCR on the remote control or SOURCE on the front of a new title, chapter, or track is displayed for an OTR or the current time. DVD V DEO PLAYER VIDEO L AUD O R REW F FWD STOP/EJECT PLAY REC VCR DVD SOURCE STOP PLAY DVD DVD Display Panel Appears when a repeat function is P.M. GROUP P.SCAN DVD Appears when ALL Repeat is in VCR mode. Appears during Slow Motion Playback (DVD). Displays the current disc type. • DVD: DVD • CD: Audio CD...
... the DVD/VCR. To make DVD light come on, press VCR on the remote control or SOURCE on the front of a new title, chapter, or track is displayed for an OTR or the current time. DVD V DEO PLAYER VIDEO L AUD O R REW F FWD STOP/EJECT PLAY REC VCR DVD SOURCE STOP PLAY DVD DVD Display Panel Appears when a repeat function is P.M. GROUP P.SCAN DVD Appears when ALL Repeat is in VCR mode. Appears during Slow Motion Playback (DVD). Displays the current disc type. • DVD: DVD • CD: Audio CD...
User manual
Page 18
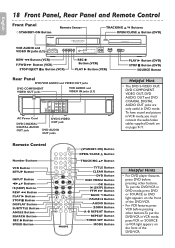
.... Remote Control Number Buttons VCR Button SETUP Button INPUT Button sBKL Buttons (SKIP) Button REW h Button PLAY B Button STOP C Button DISPLAY Button SUBTITLE Button ANGLE Button SEARCH Button REC I Button (VCR) PLAY B Button (VCR) PLAY B Button (DVD) STOP C Button (DVD) SOURCE Button Rear Panel DVD/VCR AUDIO and VIDEO OUT jacks DVD COMPONENT VIDEO OUT jacks VCR AUDIO and VIDEO IN jacks (L1) DIGITAL AUD O OUT DVD AUDIO OUT S V DEO OUT COMPONENT VID UT Y DVD/V R VCR AUDIO OUT AUD O IN L L L COAX A R CB PB R R V DEO OUT VIDEO IN CR PR AC Power Cord DVD COAXIAL DIGITAL AUDIO...
.... Remote Control Number Buttons VCR Button SETUP Button INPUT Button sBKL Buttons (SKIP) Button REW h Button PLAY B Button STOP C Button DISPLAY Button SUBTITLE Button ANGLE Button SEARCH Button REC I Button (VCR) PLAY B Button (VCR) PLAY B Button (DVD) STOP C Button (DVD) SOURCE Button Rear Panel DVD/VCR AUDIO and VIDEO OUT jacks DVD COMPONENT VIDEO OUT jacks VCR AUDIO and VIDEO IN jacks (L1) DIGITAL AUD O OUT DVD AUDIO OUT S V DEO OUT COMPONENT VID UT Y DVD/V R VCR AUDIO OUT AUD O IN L L L COAX A R CB PB R R V DEO OUT VIDEO IN CR PR AC Power Cord DVD COAXIAL DIGITAL AUDIO...
User manual
Page 21
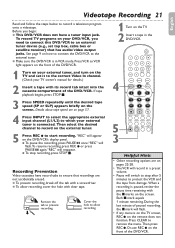
... DVD/VCR. 4 OPEN/CLOSE 1 2 3 4 5 6 TRACKING 7 8 9 CLEAR TITLE +10 0 VCR INPUT SETUP DVD DISC MENU OK 5 3 REW PLAY FFW STOP PAUSE BACK DISPLAY SUBTITLE ZOOM AUDIO ANGLE SEARCH REPEAT REPEAT AB REC SPEED MODE TIMER SET Helpful Hints • Other recording options are on page 57. 4 Press INPUT to select the appropriate external input channel (L1/L2) to which your TV owner's manual for details.) 2 Insert a tape with a screwdriver. ● To allow recording. 1 Turn on the TV. 2 Insert a tape in a preset volume...
... DVD/VCR. 4 OPEN/CLOSE 1 2 3 4 5 6 TRACKING 7 8 9 CLEAR TITLE +10 0 VCR INPUT SETUP DVD DISC MENU OK 5 3 REW PLAY FFW STOP PAUSE BACK DISPLAY SUBTITLE ZOOM AUDIO ANGLE SEARCH REPEAT REPEAT AB REC SPEED MODE TIMER SET Helpful Hints • Other recording options are on page 57. 4 Press INPUT to select the appropriate external input channel (L1/L2) to which your TV owner's manual for details.) 2 Insert a tape with a screwdriver. ● To allow recording. 1 Turn on the TV. 2 Insert a tape in a preset volume...
User manual
Page 22
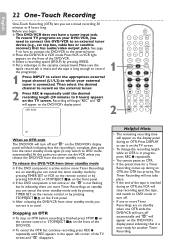
... has priority. To record TV programs on your external tuner is connected. OTR (0:30) 2 OPEN/CLOSE 1 2 3 4 5 6 TRACKING 7 8 9 CLEAR TITLE +10 0 VCR INPUT SETUP DVD DISC MENU OK REW PLAY FFW STOP PAUSE BACK DISPLAY SUBTITLE ZOOM AUDIO ANGLE SEARCH REPEAT REPEAT AB REC SPEED MODE TIMER SET SP When an OTR ends The DVD/VCR will turn off and " " on the DVD/VCR's display panel will appear on the display panel during an OTR. Helpful Hints • The remaining recording time will flash indicating...
... has priority. To record TV programs on your external tuner is connected. OTR (0:30) 2 OPEN/CLOSE 1 2 3 4 5 6 TRACKING 7 8 9 CLEAR TITLE +10 0 VCR INPUT SETUP DVD DISC MENU OK REW PLAY FFW STOP PAUSE BACK DISPLAY SUBTITLE ZOOM AUDIO ANGLE SEARCH REPEAT REPEAT AB REC SPEED MODE TIMER SET SP When an OTR ends The DVD/VCR will turn off and " " on the DVD/VCR's display panel will appear on the display panel during an OTR. Helpful Hints • The remaining recording time will flash indicating...
User manual
Page 47
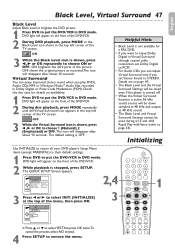
... DVD player's Setup Menu items (except PARENTAL) to their default settings. 1 Press DVD to put the DVD/VCR in DVD mode. OPEN/CLOSE 1 2 3 4 5 6 TRACKING 7 8 9 CLEAR TITLE +10 0 VCR INPUT SETUP DVD DISC MENU OK REW PLAY FFW STOP PAUSE BACK DISPLAY SUBTITLE ZOOM AUDIO ANGLE SEARCH REPEAT REPEAT AB REC SPEED MODE TIMER SET 1 OFF 3 While the Virtual Surround icon is active, 96 kHz sound source will appear on the front of the TV screen. QU CK SETUP OSD LANGUAGE TV ASPECT PROG SCAN DOLBY DIGITAL ENGL SH 4:3 LETTER BOX...
... DVD player's Setup Menu items (except PARENTAL) to their default settings. 1 Press DVD to put the DVD/VCR in DVD mode. OPEN/CLOSE 1 2 3 4 5 6 TRACKING 7 8 9 CLEAR TITLE +10 0 VCR INPUT SETUP DVD DISC MENU OK REW PLAY FFW STOP PAUSE BACK DISPLAY SUBTITLE ZOOM AUDIO ANGLE SEARCH REPEAT REPEAT AB REC SPEED MODE TIMER SET 1 OFF 3 While the Virtual Surround icon is active, 96 kHz sound source will appear on the front of the TV screen. QU CK SETUP OSD LANGUAGE TV ASPECT PROG SCAN DOLBY DIGITAL ENGL SH 4:3 LETTER BOX...
User manual
Page 50
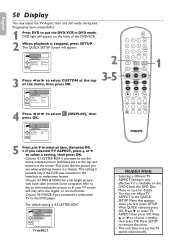
... B to select press OK. (DISPLAY), then OPEN/CLOSE 1 2 3 4 56 TRACKING 7 8 9 CLEAR TITLE +10 0 VCR INPUT SETUP DVD DISC MENU OK 1 REW PLAY FFW STOP PAUSE BACK DISPLAY SUBTITLE ZOOM AUDIO ANGLE SEARCH REPEAT REPEAT AB REC SPEED MODE TIMER SET DISPLAY TV ASPECT ST LL MODE PROG SCAN 4 3 LETTER BOX AUTO OFF OK 5 Press K or L to remove the menu. • This unit does not set the TV aspect automatically. The QUICK SETUP Screen will appear on the DVD. This setting is 4:3 LETTER BOX. The default setting is...
... B to select press OK. (DISPLAY), then OPEN/CLOSE 1 2 3 4 56 TRACKING 7 8 9 CLEAR TITLE +10 0 VCR INPUT SETUP DVD DISC MENU OK 1 REW PLAY FFW STOP PAUSE BACK DISPLAY SUBTITLE ZOOM AUDIO ANGLE SEARCH REPEAT REPEAT AB REC SPEED MODE TIMER SET DISPLAY TV ASPECT ST LL MODE PROG SCAN 4 3 LETTER BOX AUTO OFF OK 5 Press K or L to remove the menu. • This unit does not set the TV aspect automatically. The QUICK SETUP Screen will appear on the DVD. This setting is 4:3 LETTER BOX. The default setting is...
User manual
Page 52
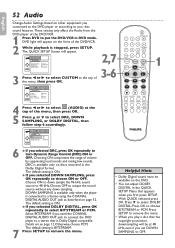
... 0 VCR INPUT SETUP DVD DISC MENU OK REW PLAY FFW STOP PAUSE BACK DISPLAY SUBTITLE ZOOM AUDIO ANGLE SEARCH REPEAT REPEAT AB REC SPEED MODE TIMER SET 1 AUDIO DRC ON DOWN SAMPLING ON DOLBY DIGITAL BITSTREAM OK 6 7 ● If you selected DOLBY DIGITAL, press OK repeatedly to remove the menu. • When you first press SETUP. DVD light will appear. Press SETUP to select BITSTREAM or PCM. The default setting is Dolby Digital compatible. Choosing ON compresses the range of the DVD/VCR. 2 While playback is BITSTREAM. Press SETUP to output the sound...
... 0 VCR INPUT SETUP DVD DISC MENU OK REW PLAY FFW STOP PAUSE BACK DISPLAY SUBTITLE ZOOM AUDIO ANGLE SEARCH REPEAT REPEAT AB REC SPEED MODE TIMER SET 1 AUDIO DRC ON DOWN SAMPLING ON DOLBY DIGITAL BITSTREAM OK 6 7 ● If you selected DOLBY DIGITAL, press OK repeatedly to remove the menu. • When you first press SETUP. DVD light will appear. Press SETUP to select BITSTREAM or PCM. The default setting is Dolby Digital compatible. Choosing ON compresses the range of the DVD/VCR. 2 While playback is BITSTREAM. Press SETUP to output the sound...
User manual
Page 53
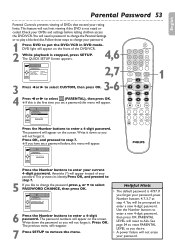
... 0 VCR INPUT SETUP DVD DISC MENU OK REW PLAY FFW STOP PAUSE BACK DISPLAY SUBTITLE ZOOM AUDIO ANGLE SEARCH REPEAT REPEAT AB REC SPEED MODE TIMER SET 1 Press the Number buttons to enter a 4-digit password. Press OK, and proceed to enter a new 4-digit password. Write down so you will be prompted to step 7. ● If you desire. • A power failure will not forget it. See page 54 to change your rating limits. DVD light will need a password to change...
... 0 VCR INPUT SETUP DVD DISC MENU OK REW PLAY FFW STOP PAUSE BACK DISPLAY SUBTITLE ZOOM AUDIO ANGLE SEARCH REPEAT REPEAT AB REC SPEED MODE TIMER SET 1 Press the Number buttons to enter a 4-digit password. Press OK, and proceed to enter a new 4-digit password. Write down so you will be prompted to step 7. ● If you desire. • A power failure will not forget it. See page 54 to change your rating limits. DVD light will need a password to change...
User manual
Page 58
... the Parental Controls,enter the password or change the camera angle of the DVD/VCR. • Check if Progressive Scan is set correctly according to your TV is NTSC or PAL compatible.Details are on page 8.Enable Progressive Scan at the DVD player only if you used the Component Video connection to a TV that the user switch the connection to the 'standard definition' output. Or, press SOURCE to switch between the remote control and the DVD/VCR. •...
... the Parental Controls,enter the password or change the camera angle of the DVD/VCR. • Check if Progressive Scan is set correctly according to your TV is NTSC or PAL compatible.Details are on page 8.Enable Progressive Scan at the DVD player only if you used the Component Video connection to a TV that the user switch the connection to the 'standard definition' output. Or, press SOURCE to switch between the remote control and the DVD/VCR. •...
User manual
Page 59
... DVD/VCR. A maximum of 999 MP3/Windows MediaTM Audio/JPEG files can be accessed only if playback is not available on the disc.Some features are only available during a VCR Timer Recording or while " " appears on the display panel. • Press y to the disc case or DVD Disc Menu.Details are on page 21. The DVD/VCR switches from DVD mode to VCR mode if disc playback stops for more than 30 minutes and you . • Make...
... DVD/VCR. A maximum of 999 MP3/Windows MediaTM Audio/JPEG files can be accessed only if playback is not available on the disc.Some features are only available during a VCR Timer Recording or while " " appears on the display panel. • Press y to the disc case or DVD Disc Menu.Details are on page 21. The DVD/VCR switches from DVD mode to VCR mode if disc playback stops for more than 30 minutes and you . • Make...
User manual
Page 62
... sold and identified as based on the product, and installation or repair of antenna/signal source systems outside of the product. • Product repair and/or part replacement because of improper installation or maintenance, connections to improper voltage supply, power line surge, lightning damage, retained images or screen markings resulting from viewing fixed stationary content for extended periods, product cosmetic appearance items...
... sold and identified as based on the product, and installation or repair of antenna/signal source systems outside of the product. • Product repair and/or part replacement because of improper installation or maintenance, connections to improper voltage supply, power line surge, lightning damage, retained images or screen markings resulting from viewing fixed stationary content for extended periods, product cosmetic appearance items...
User manual
Page 63
... mode button 18,42 mp3 display 46 mp3 playback 43 44 number buttons 18 ok button 18 on screen status displays (vcr) . . . . .20 one touch recording 22 open/close A button 16,18 osd language 48 49 parental 53 54 parental password 53 pause button 18,31,36,41 play button 15-16,18 playing discs 16 playing tapes 15 power cord 18 on light 18 program 42 progressive scan 51 quick setup 48 52 random 42 rapid play with voice 33 rear panel 18...
... mode button 18,42 mp3 display 46 mp3 playback 43 44 number buttons 18 ok button 18 on screen status displays (vcr) . . . . .20 one touch recording 22 open/close A button 16,18 osd language 48 49 parental 53 54 parental password 53 pause button 18,31,36,41 play button 15-16,18 playing discs 16 playing tapes 15 power cord 18 on light 18 program 42 progressive scan 51 quick setup 48 52 random 42 rapid play with voice 33 rear panel 18...


