Leaflet
Page 2
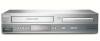
..., 60Hz • Standby power consumption: < 4 W Accessories • Included Accessories: 2 x AA Batteries, Warranty Leaflet, Remote Control, Quick start recording from the DVD disc without notice. A full image is created instantaneously, using the maximum resolution. DVD/VCR Player Specifications DVP3150V/37 Highlights Picture/Display • D/A converter: 10 bit / 54 MHz • Picture enhancement: Progressive Scan antenna in / TV out, S-Video out, Analog audio Left/Right in, Composite video (CVBS) input, Composite video (CVBS) output Progressive Scan Sound • Crosstalk (1kHz...
..., 60Hz • Standby power consumption: < 4 W Accessories • Included Accessories: 2 x AA Batteries, Warranty Leaflet, Remote Control, Quick start recording from the DVD disc without notice. A full image is created instantaneously, using the maximum resolution. DVD/VCR Player Specifications DVP3150V/37 Highlights Picture/Display • D/A converter: 10 bit / 54 MHz • Picture enhancement: Progressive Scan antenna in / TV out, S-Video out, Analog audio Left/Right in, Composite video (CVBS) input, Composite video (CVBS) output Progressive Scan Sound • Crosstalk (1kHz...
User manual
Page 4
... that the cable ground shall be used in a particular installation. However, there is prohibited. Only a qualified service person should not be connected to the grounding system of the building, as close to the point of this device, due to correct the interference by Macrovision. In case of picture problems with the instructions, may be an infringement of Conformity Model Number: DVP3150V/37 Trade...
... that the cable ground shall be used in a particular installation. However, there is prohibited. Only a qualified service person should not be connected to the grounding system of the building, as close to the point of this device, due to correct the interference by Macrovision. In case of picture problems with the instructions, may be an infringement of Conformity Model Number: DVP3150V/37 Trade...
User manual
Page 6
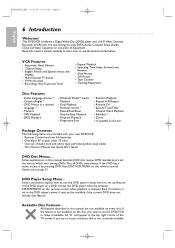
... instructions explain how to use the DVD player's setup menu to set the menus, which vary among DVDs. VCR Features • Automatic Head Cleaner • Channel Setup • English, French and Spanish menus and displays • Multi-Channel TV Sound • 19 Micron head • Recording: One-Touch and Timer • Repeat Playback • Searching:Time, Index, Forward and Reverse • Slow Motion • Still Picture • Tape Counter • Tracking Adjustment Disc Features • Audio Language...
... instructions explain how to use the DVD player's setup menu to set the menus, which vary among DVDs. VCR Features • Automatic Head Cleaner • Channel Setup • English, French and Spanish menus and displays • Multi-Channel TV Sound • 19 Micron head • Recording: One-Touch and Timer • Repeat Playback • Searching:Time, Index, Forward and Reverse • Slow Motion • Still Picture • Tape Counter • Tracking Adjustment Disc Features • Audio Language...
User manual
Page 8
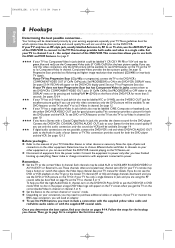
... begin... ● Refer to purchase additional cables or adaptors. Component Video provides the best picture quality. Progressive Scan provides less flickering and higher image resolution than 5 seconds. Before you use both the DVD player and the VCR. If your connection, you have a button or switch that selects the Video Input channel. If you may be available.To see and hear the DVD/VCR material playing on the TV, Stereo, etc. ●...
... begin... ● Refer to purchase additional cables or adaptors. Component Video provides the best picture quality. Progressive Scan provides less flickering and higher image resolution than 5 seconds. Before you use both the DVD player and the VCR. If your connection, you have a button or switch that selects the Video Input channel. If you may be available.To see and hear the DVD/VCR material playing on the TV, Stereo, etc. ●...

User manual
Page 9
... the DVD/VCR in the power cord of the DVD/VCR.You are ready to turn on the TV. Change your TV to channel 3 when the DVD/VCR is 3 when you can change the DVD/VCR's output channel to channel 4.To do this, the DVD/VCR's output channel switches between 3 and 4, and the selected channel number appears on the TV and set your TV to start playback. See your TV owner's manual for 3-5 seconds. The DVD/VCR's output channel is new. Each time you use channel...
... the DVD/VCR in the power cord of the DVD/VCR.You are ready to turn on the TV. Change your TV to channel 3 when the DVD/VCR is 3 when you can change the DVD/VCR's output channel to channel 4.To do this, the DVD/VCR's output channel switches between 3 and 4, and the selected channel number appears on the TV and set your TV to start playback. See your TV owner's manual for 3-5 seconds. The DVD/VCR's output channel is new. Each time you use channel...

User manual
Page 10
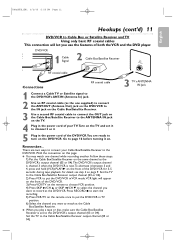
... DVD player. 1Cable Box/Satellite Receiver 2 DVD/VCR Cable Signal IN OUT DIGITAL AUDIO OUT DVD AUDIO OUT S-VIDEO OUT COMPONENT VIDEO OUT Y DVD/VCR VCR AUDIO OUT AUDIO IN L L L COAXIAL R CB / PB R R VIDEO OUT VIDEO IN CR / PR 75 CAANBTLE/ ANT - Helpful Hint • If your Cable Box/Satellite Receiver to the DVD/VCR.With the connection on this page: ● Select TV channels at the Cable Box/Satellite Receiver, not the DVD/VCR.To record or view TV channels, follow these steps: 1) Press VCR to put the DVD/VCR in VCR mode.VCR light...
... DVD player. 1Cable Box/Satellite Receiver 2 DVD/VCR Cable Signal IN OUT DIGITAL AUDIO OUT DVD AUDIO OUT S-VIDEO OUT COMPONENT VIDEO OUT Y DVD/VCR VCR AUDIO OUT AUDIO IN L L L COAXIAL R CB / PB R R VIDEO OUT VIDEO IN CR / PR 75 CAANBTLE/ ANT - Helpful Hint • If your Cable Box/Satellite Receiver to the DVD/VCR.With the connection on this page: ● Select TV channels at the Cable Box/Satellite Receiver, not the DVD/VCR.To record or view TV channels, follow these steps: 1) Press VCR to put the DVD/VCR in VCR mode.VCR light...
User manual
Page 11
... Cable Box/Satellite Receiver output channel (03 or 04). 2) Press VCR to put the DVD/VCR in TV position. 6) Select the channel you want to record at the Cable Box/Satellite Receiver. ● When you use the features of both the VCR and the DVD player. For details, see step 4 on page 9. DVD/VCR ANT - There are ready to turn on the DVD/VCR. H982NUD_EN1 3/2/06 6:56 PM Page 11 English Hookups (cont'd) 11 DVD/VCR...
... Cable Box/Satellite Receiver output channel (03 or 04). 2) Press VCR to put the DVD/VCR in TV position. 6) Select the channel you want to record at the Cable Box/Satellite Receiver. ● When you use the features of both the VCR and the DVD player. For details, see step 4 on page 9. DVD/VCR ANT - There are ready to turn on the DVD/VCR. H982NUD_EN1 3/2/06 6:56 PM Page 11 English Hookups (cont'd) 11 DVD/VCR...

User manual
Page 12
... the correct Video In channel. 5 You are using the yellow video cable for the DVD player of the TV and the DVD/VCR to a power outlet.Turn on the DVD/VCR. The connections 3b and 3c only supply video (picture) for VCR playback, choose the Video In channel at your TV. H982NUD_EN1 3/2/06 6:56 PM Page 12 English 12 Hookups (cont'd) DVD/VCR to a TV that has Audio/ Video, Component Video or S-Video In jacks Audio and Video IN Jacks...
... the correct Video In channel. 5 You are using the yellow video cable for the DVD player of the TV and the DVD/VCR to a power outlet.Turn on the DVD/VCR. The connections 3b and 3c only supply video (picture) for VCR playback, choose the Video In channel at your TV. H982NUD_EN1 3/2/06 6:56 PM Page 12 English 12 Hookups (cont'd) DVD/VCR to a TV that has Audio/ Video, Component Video or S-Video In jacks Audio and Video IN Jacks...

User manual
Page 13
... use Component Video cable or S-Video cable instead for the DVD player, see VCR or DVD playback on the TV screen. Turn on the Stereo and set it to your Stereo manual for VCR features. 4 Connect the power cords of your DVD/VCR. 2 Connect the supplied red and white audio cables to the red and white DVD/VCR AUDIO OUT jacks on the DVD/VCR and to page 16 before turning on the DVD/VCR. Check your TV's lowest channel (02 or 03) and continue changing channels...
... use Component Video cable or S-Video cable instead for the DVD player, see VCR or DVD playback on the TV screen. Turn on the Stereo and set it to your Stereo manual for VCR features. 4 Connect the power cords of your DVD/VCR. 2 Connect the supplied red and white audio cables to the red and white DVD/VCR AUDIO OUT jacks on the DVD/VCR and to page 16 before turning on the DVD/VCR. Check your TV's lowest channel (02 or 03) and continue changing channels...

User manual
Page 14
... to use component video cable or S-Video cable instead for the DVD player, see DVD or VCR material on the disc, you still need the yellow video cable or RF coaxial cable for the DVD player of the DVD/VCR for more than 5 seconds. Select Dolby Digital 5.1 channel Surround Sound in the DVD player's setup menu. Press DVD to put the DVD/VCR in DVD mode.With no disc in the DISPLAY menu or by pressing and holding PLAY B (DVD) on the DVD/VCR. IN ANT-OUT Stereo COAXIAL DIGITAL AUDIO IN 2 3 VIDEO IN 1 Connect...
... to use component video cable or S-Video cable instead for the DVD player, see DVD or VCR material on the disc, you still need the yellow video cable or RF coaxial cable for the DVD player of the DVD/VCR for more than 5 seconds. Select Dolby Digital 5.1 channel Surround Sound in the DVD player's setup menu. Press DVD to put the DVD/VCR in DVD mode.With no disc in the DISPLAY menu or by pressing and holding PLAY B (DVD) on the DVD/VCR. IN ANT-OUT Stereo COAXIAL DIGITAL AUDIO IN 2 3 VIDEO IN 1 Connect...
User manual
Page 19
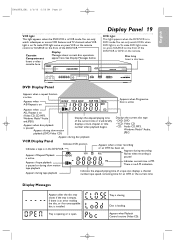
... MediaTM Audio, JPEG VCR Display Panel Indicates VCR position Appears when a timer recording Indicates a tape is loading. also displays a channel number, tape speed, remaining time for an OTR or the current time Display Messages Appears after the disc tray closes if the tray is empty, if there is an error reading the disc, or if an unacceptable disc is P.M. Cassette Compartment Insert a video cassette here. DVP 3150V DVD PLAYER/VCR VIDEO L AUDIO R REW F.FWD STOP/EJECT PLAY REC CHANNEL VCR DVD SOURCE STOP PLAY DVD DVD Display Panel Appears when a repeat function is...
... MediaTM Audio, JPEG VCR Display Panel Indicates VCR position Appears when a timer recording Indicates a tape is loading. also displays a channel number, tape speed, remaining time for an OTR or the current time Display Messages Appears after the disc tray closes if the tray is empty, if there is an error reading the disc, or if an unacceptable disc is P.M. Cassette Compartment Insert a video cassette here. DVP 3150V DVD PLAYER/VCR VIDEO L AUDIO R REW F.FWD STOP/EJECT PLAY REC CHANNEL VCR DVD SOURCE STOP PLAY DVD DVD Display Panel Appears when a repeat function is...

User manual
Page 20
... Button (DVD) OPEN/CLOSE DVP 3150V DVD PLAYER/VCR CHANNEL VCR DVD SOURCE STOP PLAY DVD REW h Button (VCR) F.FWD g Button (VCR) STOP/EJECT C A Button (VCR) REC I Button MARKER Button Number Buttons Helpful Hints • For DVD player features, press DVD before pressing any other buttons. ZOOM Button MODE Button SEARCH Button A-B REPEAT Button REPEAT Button SUBTITLE Button RETURN Button TITLE Button VCR Button VCR/TV Button DISC/VCR/MENU Button s BKL Buttons h (Rewind) Button STOP C Button PLAY B Button TIMER SET Button SPEED Button Remote Control STANDBY-ON SEARCH MODE DISPLAY...
... Button (DVD) OPEN/CLOSE DVP 3150V DVD PLAYER/VCR CHANNEL VCR DVD SOURCE STOP PLAY DVD REW h Button (VCR) F.FWD g Button (VCR) STOP/EJECT C A Button (VCR) REC I Button MARKER Button Number Buttons Helpful Hints • For DVD player features, press DVD before pressing any other buttons. ZOOM Button MODE Button SEARCH Button A-B REPEAT Button REPEAT Button SUBTITLE Button RETURN Button TITLE Button VCR Button VCR/TV Button DISC/VCR/MENU Button s BKL Buttons h (Rewind) Button STOP C Button PLAY B Button TIMER SET Button SPEED Button Remote Control STANDBY-ON SEARCH MODE DISPLAY...

User manual
Page 24
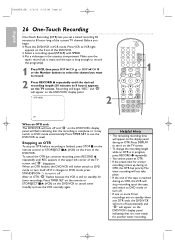
... the screen. STANDBY-ON SEARCH MODE DISPLAY REPEAT REPEAT AUDIO A-B SUBTITLE ZOOM ANGLE SKIP / CH RETURN TITLE CLEAR/RESET SLOW 4 VCR DISC/VCR MENU VCR/TV DVD SYSTEM MENU OK 7 3 4 STOP PLAY PAUSE TIMER SET MARKER RECORD SPEED 1 45 89 2 3 67 0 +10 6 5-6 Helpful Hints • Other recording options are on pages 25-30. • The VCR will record in a preset volume. • Pause will appear on the DVD/VCR's display panel. 6 To pause the recording, press PAUSE k once. "REC" will switch to Stop...
... the screen. STANDBY-ON SEARCH MODE DISPLAY REPEAT REPEAT AUDIO A-B SUBTITLE ZOOM ANGLE SKIP / CH RETURN TITLE CLEAR/RESET SLOW 4 VCR DISC/VCR MENU VCR/TV DVD SYSTEM MENU OK 7 3 4 STOP PLAY PAUSE TIMER SET MARKER RECORD SPEED 1 45 89 2 3 67 0 +10 6 5-6 Helpful Hints • Other recording options are on pages 25-30. • The VCR will record in a preset volume. • Pause will appear on the DVD/VCR's display panel. 6 To pause the recording, press PAUSE k once. "REC" will switch to Stop...
User manual
Page 26
... the TV screen. • To change the recording length while an OTR is in progress, press RECORD I repeatedly until REC appears in the upper left corner of the DVD/VCR. ● Select a recording speed (SP, SLP) with SPEED. ● Put a videotape in VCR mode. OTR (0:30) 2 STANDBY-ON SEARCH MODE DISPLAY REPEAT REPEAT AUDIO A-B SUBTITLE ZOOM ANGLE SKIP / CH RETURN TITLE CLEAR/RESET SLOW VCR DISC/VCR MENU VCR/TV DVD SYSTEM MENU 1 OK STOP PLAY PAUSE TIMER SET MARKER RECORD SPEED...
... the TV screen. • To change the recording length while an OTR is in progress, press RECORD I repeatedly until REC appears in the upper left corner of the DVD/VCR. ● Select a recording speed (SP, SLP) with SPEED. ● Put a videotape in VCR mode. OTR (0:30) 2 STANDBY-ON SEARCH MODE DISPLAY REPEAT REPEAT AUDIO A-B SUBTITLE ZOOM ANGLE SKIP / CH RETURN TITLE CLEAR/RESET SLOW VCR DISC/VCR MENU VCR/TV DVD SYSTEM MENU 1 OK STOP PLAY PAUSE TIMER SET MARKER RECORD SPEED...

User manual
Page 29
... DVD mode instead.You may switch to DVD mode automatically. The DVD/VCR will turn off and " " will appear on page 60. ONE TIME PROGRAM PROGRAM NUMBER 1 DATE 0 5 / 0 3 WED START TIME 0 7 : 3 0 P M END TIME 0 8 : 3 0 P M CHANNEL 16 REC SPEED S P B SP SLP 10 Press CLEAR/RESET to select a recording tape speed. Then, at the Cable Box/Satellite Receiver, select the channel you want to cancel. 4 While the program number is no tape in the display panel. Cancelling Timer Recordings 1 Press VCR, then press DISC/VCR MENU...
... DVD mode instead.You may switch to DVD mode automatically. The DVD/VCR will turn off and " " will appear on page 60. ONE TIME PROGRAM PROGRAM NUMBER 1 DATE 0 5 / 0 3 WED START TIME 0 7 : 3 0 P M END TIME 0 8 : 3 0 P M CHANNEL 16 REC SPEED S P B SP SLP 10 Press CLEAR/RESET to select a recording tape speed. Then, at the Cable Box/Satellite Receiver, select the channel you want to cancel. 4 While the program number is no tape in the display panel. Cancelling Timer Recordings 1 Press VCR, then press DISC/VCR MENU...

User manual
Page 46
... discs may copy or download MP3/Windows MediaTM Audio music files from DISC/VCR MENU SYSTEM MENU OK certain legal Internet sites, then copy those files onto a CD-R or CD-RW. Starting with a small picture size). Record in mind when making discs you .These pictures may have the 3 icon, Windows 1 Press DVD to switch CUT IN/OUT and FADE IN/OUT. Press K or L to select the track or file you use the Number buttons...
... discs may copy or download MP3/Windows MediaTM Audio music files from DISC/VCR MENU SYSTEM MENU OK certain legal Internet sites, then copy those files onto a CD-R or CD-RW. Starting with a small picture size). Record in mind when making discs you .These pictures may have the 3 icon, Windows 1 Press DVD to switch CUT IN/OUT and FADE IN/OUT. Press K or L to select the track or file you use the Number buttons...
User manual
Page 61
... DVD/VCR to put the unit in VCR mode. Press VCR to switch between the remote control and the DVD/VCR. • Inspect and/or replace the batteries in the DVD disc menu. • If you only used the Component Video connection to a TV that is distorted. • Connect the DVD/VCR directly to the TV. The remote control will turn on the DVD/VCR.The DVD/VCR usually turns on page 55. • Check the audio settings of only using the DVD player, press the DVD button...
... DVD/VCR to put the unit in VCR mode. Press VCR to switch between the remote control and the DVD/VCR. • Inspect and/or replace the batteries in the DVD disc menu. • If you only used the Component Video connection to a TV that is distorted. • Connect the DVD/VCR directly to the TV. The remote control will turn on the DVD/VCR.The DVD/VCR usually turns on page 55. • Check the audio settings of only using the DVD player, press the DVD button...
User manual
Page 62
... MP3/JPEG files can cause interference during a VCR timer recording or while " " appears on the display panel. • Press STANDBY-ONy to VCR mode if disc playback stops for the timer recording. • Make sure the VCR clock is on page 33. • TVs placed too close to the DVD/VCR can be accessed only if playback is noisy or has streaks during playback. Or, reset channels at the VCR using audio and video cables, select the correct Video In channel at least...
... MP3/JPEG files can cause interference during a VCR timer recording or while " " appears on the display panel. • Press STANDBY-ONy to VCR mode if disc playback stops for the timer recording. • Make sure the VCR clock is on page 33. • TVs placed too close to the DVD/VCR can be accessed only if playback is noisy or has streaks during playback. Or, reset channels at the VCR using audio and video cables, select the correct Video In channel at least...
User manual
Page 63
... not record clearly. Press STOP/EJECT CA (VCR) on the center of the picture may be replaced. Set your TV to channel 03 or 04, then make your channel selections at the Satellite Receiver. • With many Satellite Receiver hookups, if you use audio and video cables to connect your DVD/VCR to your DVD/VCR in Line Input mode (L1 or L2). Never force the tape into the VCR. • If a timer recording is prohibited. Programs broadcast...
... not record clearly. Press STOP/EJECT CA (VCR) on the center of the picture may be replaced. Set your TV to channel 03 or 04, then make your channel selections at the Satellite Receiver. • With many Satellite Receiver hookups, if you use audio and video cables to connect your DVD/VCR to your DVD/VCR in Line Input mode (L1 or L2). Never force the tape into the VCR. • If a timer recording is prohibited. Programs broadcast...
User manual
Page 66
...-52 language (vcr 23 line input mode 27, 63 long playback 60 lp 60 markers 41 menus 6, 35 mode button 20, 45 mp3 display 49 mp3 playback 46-47 number buttons 20 ok button 20 on-screen status displays (vcr) . . . . .23 one-touch recording 26 open/close A button 18, 20 parental 56-57 parental password 56 pause button 20, 33, 39, 44 play button 17-18, 20 player menu 51 playing discs 18 playing tapes 17 power cord 20 on light 20 program 45 progressive scan...
...-52 language (vcr 23 line input mode 27, 63 long playback 60 lp 60 markers 41 menus 6, 35 mode button 20, 45 mp3 display 49 mp3 playback 46-47 number buttons 20 ok button 20 on-screen status displays (vcr) . . . . .23 one-touch recording 26 open/close A button 18, 20 parental 56-57 parental password 56 pause button 20, 33, 39, 44 play button 17-18, 20 player menu 51 playing discs 18 playing tapes 17 power cord 20 on light 20 program 45 progressive scan...


