Leaflet
Page 1
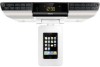
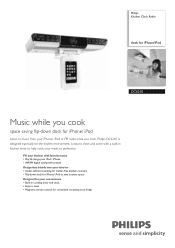
Fill your kitchen with favorite tunes • Play & charge your iPod / iPhone • AM/FM digital tuning with a built-in cooking timer and clock • Easy to music from your meals to perfection. Philips Kitchen Clock Radio dock for iPhone/iPod DC6210 Music while you cook space saving flip-down dock for iPhone/ iPod to save counter space Designed for convenient mounting onto fridge Philips DC6210 is designed especially for the kitchen environment...
Fill your kitchen with favorite tunes • Play & charge your iPod / iPhone • AM/FM digital tuning with a built-in cooking timer and clock • Easy to music from your meals to perfection. Philips Kitchen Clock Radio dock for iPhone/iPod DC6210 Music while you cook space saving flip-down dock for iPhone/ iPod to save counter space Designed for convenient mounting onto fridge Philips DC6210 is designed especially for the kitchen environment...
Leaflet
Page 2
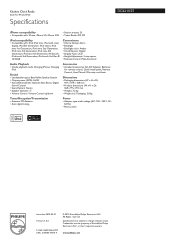
...: Digital • Display Type: LCD • Height Adjustment: 3-step spacer • Remote Control: Multi-functional Audio Playback • Cradle playback mode: Charging iPhone, Charging iPod Sound • Loudspeaker types: Bass Reflex Speaker System • Output power (RMS): 2x2W • Sound Enhancement: Dynamic Bass Boost, Digital Sound Control • Sound System: Stereo • Speaker diameter: 2" • Volume Control: Volume Control up/down Accessories • Included accessories: AC-DC Adapter, Batteries for remote control, Quick install guide, Remote Control, User Manual...
...: Digital • Display Type: LCD • Height Adjustment: 3-step spacer • Remote Control: Multi-functional Audio Playback • Cradle playback mode: Charging iPhone, Charging iPod Sound • Loudspeaker types: Bass Reflex Speaker System • Output power (RMS): 2x2W • Sound Enhancement: Dynamic Bass Boost, Digital Sound Control • Sound System: Stereo • Speaker diameter: 2" • Volume Control: Volume Control up/down Accessories • Included accessories: AC-DC Adapter, Batteries for remote control, Quick install guide, Remote Control, User Manual...
User manual
Page 3
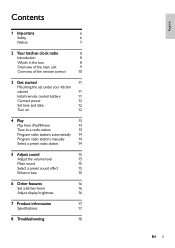
... of the remote control 10 3 Get started 11 Mounting the set under your kitchen cabinet 11 Install remote control battery 11 Connect power 12 Set time and date 12 Turn on 12 4 Play 13 Play from iPod/iPhone 13 Tune to a radio station 13 Program radio stations automatically 14 Program radio stations manually 14 Select a preset radio station 14 5 Adjust sound 15 Adjust the volume level 15 Mute sound 15 Select a preset sound effect 15 Enhance bass 15 6 Other features 16 Set a kitchen timer 16 Adjust display brightness 16 7 Product information 17 Speci...
... of the remote control 10 3 Get started 11 Mounting the set under your kitchen cabinet 11 Install remote control battery 11 Connect power 12 Set time and date 12 Turn on 12 4 Play 13 Play from iPod/iPhone 13 Tune to a radio station 13 Program radio stations automatically 14 Program radio stations manually 14 Select a preset radio station 14 5 Adjust sound 15 Adjust the volume level 15 Mute sound 15 Select a preset sound effect 15 Enhance bass 15 6 Other features 16 Set a kitchen timer 16 Adjust display brightness 16 7 Product information 17 Speci...
User manual
Page 5
... repair of the product, adjust- F !roduct repair and/or part replacement because of improper installation or maintenance, connections to improper voltage supply, power line surge, lightning damage, retained images or screen markings resulting from new, or serviceable used for lost data or lost in materials and workmanship as based on the product, and installation or repair of antenna/signal source systems outside of programs, data or other than Philips or Philips Authorized Service...
... repair of the product, adjust- F !roduct repair and/or part replacement because of improper installation or maintenance, connections to improper voltage supply, power line surge, lightning damage, retained images or screen markings resulting from new, or serviceable used for lost data or lost in materials and workmanship as based on the product, and installation or repair of antenna/signal source systems outside of programs, data or other than Philips or Philips Authorized Service...
User manual
Page 6
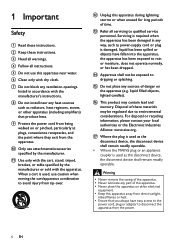
... product may be exposed to environmental considerations. q Where the plug is used as the disconnect device, the disconnect device shall remain readily operable. • Where the MAINS plug or an appliance coupler is used as power-supply cord or plug is damaged, liquid has been spilled or objects have easy access to the power cord, plug or adaptor to qualified service personnel. c Heed all instructions. Install...
... product may be exposed to environmental considerations. q Where the plug is used as the disconnect device, the disconnect device shall remain readily operable. • Where the MAINS plug or an appliance coupler is used as power-supply cord or plug is damaged, liquid has been spilled or objects have easy access to the power cord, plug or adaptor to qualified service personnel. c Heed all instructions. Install...
User manual
Page 7
... center in a particular installation. Please inform yourself about the local rules on the separate collection of batteries. If this device that to radio or television reception, which cannot be determined by turning the equipment off and on, the user is encouraged to try to correct the interference by Philips Consumer Lifestyle may void the user's authority to part 15 of batteries helps prevent...
... center in a particular installation. Please inform yourself about the local rules on the separate collection of batteries. If this device that to radio or television reception, which cannot be determined by turning the equipment off and on, the user is encouraged to try to correct the interference by Philips Consumer Lifestyle may void the user's authority to part 15 of batteries helps prevent...

User manual
Page 8
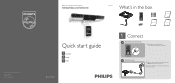
... Check and identify the contents of your product at www.philips.com/welcome. 2 Your kitchen clock radio Congratulations on your purchase, and welcome to FM/AM radio stations • know the time • set a kitchen timer You can : • enjoy audio from the support that Philips offers, register your package: • Main unit • Remote control • 1 x AC adapter • Mounting kit • User manual • Quick start guide 8 EN
... Check and identify the contents of your product at www.philips.com/welcome. 2 Your kitchen clock radio Congratulations on your purchase, and welcome to FM/AM radio stations • know the time • set a kitchen timer You can : • enjoy audio from the support that Philips offers, register your package: • Main unit • Remote control • 1 x AC adapter • Mounting kit • User manual • Quick start guide 8 EN
User manual
Page 9
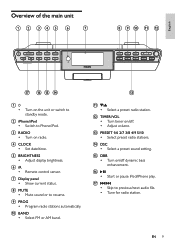
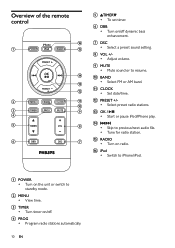
b iPhone/iPod • Switch to standby mode. f iR • Remote control sensor. m k / • Select a preset radio station. p • Start or pause iPod/iPhone play. i PROG • Program radio stations automatically. EN 9 m PRESET 1/6 2/7 3/8 4/9 5/10 • Select preset radio stations. e BRIGHTNESS • Adjust display brightness. n DSC • Select a preset sound setting. o DBB • Turn on /off dynamic bass enhancement. j BAND • Select FM or AM band. l TIMER/VOL • Turn timer on /off . • Adjust volume. English ...
b iPhone/iPod • Switch to standby mode. f iR • Remote control sensor. m k / • Select a preset radio station. p • Start or pause iPod/iPhone play. i PROG • Program radio stations automatically. EN 9 m PRESET 1/6 2/7 3/8 4/9 5/10 • Select preset radio stations. e BRIGHTNESS • Adjust display brightness. n DSC • Select a preset sound setting. o DBB • Turn on /off dynamic bass enhancement. j BAND • Select FM or AM band. l TIMER/VOL • Turn timer on /off . • Adjust volume. English ...
User manual
Page 10
.... k CLOCK • Set date/time. m OK / • Start or pause iPod/iPhone play. a POWER • Turn on radio. b MENU • View time. n / • Skip to resume. d PROG • Program radio stations automatically. 10 EN g DSC • Select a preset sound setting. o RADIO • Turn on the unit or switch to iPhone/iPod. i MUTE • Mute sound or to previous/next audio file. • Tune for radio station. p iPod • Switch to standby mode. c TIMER • Turn timer on /off . f DBB • Turn on /off dynamic bass enhancement.
.... k CLOCK • Set date/time. m OK / • Start or pause iPod/iPhone play. a POWER • Turn on radio. b MENU • View time. n / • Skip to resume. d PROG • Program radio stations automatically. 10 EN g DSC • Select a preset sound setting. o RADIO • Turn on the unit or switch to iPhone/iPod. i MUTE • Mute sound or to previous/next audio file. • Tune for radio station. p iPod • Switch to standby mode. c TIMER • Turn timer on /off . f DBB • Turn on /off dynamic bass enhancement.
User manual
Page 11
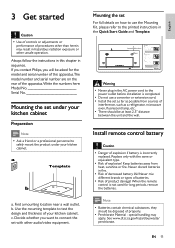
... to your set, do not use a converter or extension cord. • Install the set with / without an overhang), these notch lengths correspond to the 4 notch height in this apparatus.The model number and serial number are 4 pairs of decreased battery life! Keep batteries away from sources of the cabinet bottom and/overhang. & Turn the spacer counterclockwise to help you want to connect the set as far...
... to your set, do not use a converter or extension cord. • Install the set with / without an overhang), these notch lengths correspond to the 4 notch height in this apparatus.The model number and serial number are 4 pairs of decreased battery life! Keep batteries away from sources of the cabinet bottom and/overhang. & Turn the spacer counterclockwise to help you want to connect the set as far...
User manual
Page 12
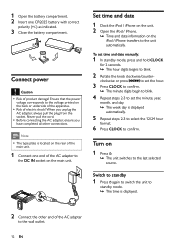
.... » The minute digits begin to blink. 4 Repeat steps 2-3 to set time and date manually: 1 In standby mode, press and hold CLOCK for 2 seconds. » The hour digits begins to blink. 2 Rotate the knob clockwise/counter- Set time and date 1 Dock the iPod / iPhone on the unit. 2 Open the iPod / iPhone. » Time and date information on the iPod / iPhone transfers to the wall outlet. 12 EN 1 Open the battery compartment. 2 Insert one...
.... » The minute digits begin to blink. 4 Repeat steps 2-3 to set time and date manually: 1 In standby mode, press and hold CLOCK for 2 seconds. » The hour digits begins to blink. 2 Rotate the knob clockwise/counter- Set time and date 1 Dock the iPod / iPhone on the unit. 2 Open the iPod / iPhone. » Time and date information on the iPod / iPhone transfers to the wall outlet. 12 EN 1 Open the battery compartment. 2 Insert one...
User manual
Page 13
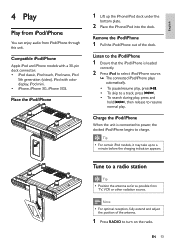
...; To search during play . EN 13 Remove the iPod/iPhone 1 Pull the iPod/iPhone out of the antenna. 1 Press RADIO to a radio station Tip • Position the antenna as far as possible from iPod/iPhone through this unit. Listen to the iPod/iPhone 1 Ensure that the iPod/iPhone is connected to power, the docked iPod/iPhone begins to resume normal play , press and hold / , then release to charge. Tune to turn on the radio. Note •...
...; To search during play . EN 13 Remove the iPod/iPhone 1 Pull the iPod/iPhone out of the antenna. 1 Press RADIO to a radio station Tip • Position the antenna as far as possible from iPod/iPhone through this unit. Listen to the iPod/iPhone 1 Ensure that the iPod/iPhone is connected to power, the docked iPod/iPhone begins to resume normal play , press and hold / , then release to charge. Tune to turn on the radio. Note •...

User manual
Page 14
... a radio station. 4 PressPROG . » The number begins to a weak station, press / repeatedly until you find optimal reception. Tip • Your can program a maximum of 20 preset FM/ AM radio stations. 1 Press RADIO to turn on the radio. 2 Press BAND to select FM/AM tuner. 3 Press and hold PROG for 2 seconds. » [Auto] (auto) is displayed. » The radio tunes to a station with strong reception automatically. 4 To tune to blink...
... a radio station. 4 PressPROG . » The number begins to a weak station, press / repeatedly until you find optimal reception. Tip • Your can program a maximum of 20 preset FM/ AM radio stations. 1 Press RADIO to turn on the radio. 2 Press BAND to select FM/AM tuner. 3 Press and hold PROG for 2 seconds. » [Auto] (auto) is displayed. » The radio tunes to a station with strong reception automatically. 4 To tune to blink...
User manual
Page 15
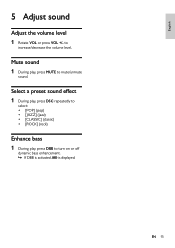
to mute/unmute sound. Mute sound 1 During play , press DBB to turn on or off dynamic bass enhancement. » If DBB is activated, is displayed. Select a preset sound effect 1 During play, press DSC repeatedly to select: • [POP] (pop) • [JAZZ] (jazz) • [CLASSIC] (classic) • [ROCK] (rock) Enhance bass 1 During play , press MUTE to increase/decrease the volume level. English 5 Adjust sound Adjust the volume level 1 Rotate VOL or press VOL +/- EN 15
to mute/unmute sound. Mute sound 1 During play , press DBB to turn on or off dynamic bass enhancement. » If DBB is activated, is displayed. Select a preset sound effect 1 During play, press DSC repeatedly to select: • [POP] (pop) • [JAZZ] (jazz) • [CLASSIC] (classic) • [ROCK] (rock) Enhance bass 1 During play , press MUTE to increase/decrease the volume level. English 5 Adjust sound Adjust the volume level 1 Rotate VOL or press VOL +/- EN 15
User manual
Page 16
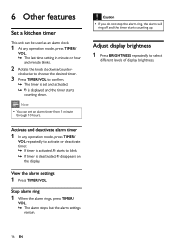
... can be used as an alarm clock. 1 At any operation mode, press TIMER/ VOL repeatedly to activate or deactivate timer. » If timer is activated, starts to blink. » If timer is set an alarm timer from 1 minute through 10 hours. clockwise to choose the desired timer. 3 Press TIMER/VOL to select different levels of display brightness. Activate and deactivate alarm timer 1 In any operation mode, press TIMER/ VOL. » The last time setting in minute or...
... can be used as an alarm clock. 1 At any operation mode, press TIMER/ VOL repeatedly to activate or deactivate timer. » If timer is activated, starts to blink. » If timer is set an alarm timer from 1 minute through 10 hours. clockwise to choose the desired timer. 3 Press TIMER/VOL to select different levels of display brightness. Activate and deactivate alarm timer 1 In any operation mode, press TIMER/ VOL. » The last time setting in minute or...
User manual
Page 17
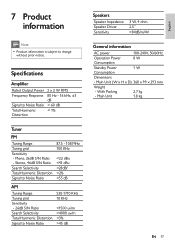
Specifications Amplifier Rated Output Power Frequency Response Signal to change without prior notice. 7 Product information Note • Product information is subject to Noise Ratio Total Harmonic Distor tion 2 x 2 W RMS 80 Hz - 16 kHz, ±3 dB > 60 dB < 1% Tuner FM Tuning Range Tuning grid Sensitivity - Stereo, 46dB S/N Ratio Search Selectivity Total Harmonic Distortion Signal to Noise Ratio 87.5 - 108 MHz 100 KHz Mono, 26dB S/N Ratio -
Specifications Amplifier Rated Output Power Frequency Response Signal to change without prior notice. 7 Product information Note • Product information is subject to Noise Ratio Total Harmonic Distor tion 2 x 2 W RMS 80 Hz - 16 kHz, ±3 dB > 60 dB < 1% Tuner FM Tuning Range Tuning grid Sensitivity - Stereo, 46dB S/N Ratio Search Selectivity Total Harmonic Distortion Signal to Noise Ratio 87.5 - 108 MHz 100 KHz Mono, 26dB S/N Ratio -
User manual
Page 18
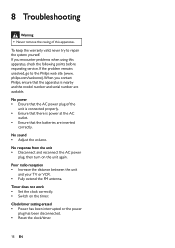
... power plug has been disconnected. • Reset the clock/timer. 18 EN 8 Troubleshooting Warning • Never remove the casing of the unit is connected properly. • Ensure that there is power at the AC outlet. • Ensure that the apparatus is nearby and the model number and serial number are inserted correctly. philips.com/welcome). No sound • Adjust the volume. No power • Ensure that the AC power plug...
... power plug has been disconnected. • Reset the clock/timer. 18 EN 8 Troubleshooting Warning • Never remove the casing of the unit is connected properly. • Ensure that there is power at the AC outlet. • Ensure that the apparatus is nearby and the model number and serial number are inserted correctly. philips.com/welcome). No sound • Adjust the volume. No power • Ensure that the AC power plug...

User manual
Page 19
All rights reserved. Philips Consumer Lifestyle A division of Philips Electronics North America Corporation P.O. Printed in China DC6210_37_UM_V1.0 Box 10313 Stamford, CT 06904 Phone: 1-888-PHILIPS (744-5477) Meet Philips at the Internet http://www.philips.com/welcome © 2010 Koninklijke Philips Electronics N.V.
All rights reserved. Philips Consumer Lifestyle A division of Philips Electronics North America Corporation P.O. Printed in China DC6210_37_UM_V1.0 Box 10313 Stamford, CT 06904 Phone: 1-888-PHILIPS (744-5477) Meet Philips at the Internet http://www.philips.com/welcome © 2010 Koninklijke Philips Electronics N.V.
Quick start guide
Page 1
© 2010 Koninklijke Philips Electronics N.V. B Connect power 1 Connect one end of the AC adapter to the DC IN socket on the main unit. 2 Connect the other end of the AC adapter to activate the remote control battery. Printed in China DC6210_37_QSG_V1.0 Register your product and get support at www.philips.com/welcome DC6210 What's in the box Mounting Template User Manual Quick Start Guide Quick start guide 1 Connect 2 Setup 3 Enjoy 1 Connect A Remove the protective tab 1 Remove the protective tab to the wall outlet. All rights reserved.
© 2010 Koninklijke Philips Electronics N.V. B Connect power 1 Connect one end of the AC adapter to the DC IN socket on the main unit. 2 Connect the other end of the AC adapter to activate the remote control battery. Printed in China DC6210_37_QSG_V1.0 Register your product and get support at www.philips.com/welcome DC6210 What's in the box Mounting Template User Manual Quick Start Guide Quick start guide 1 Connect 2 Setup 3 Enjoy 1 Connect A Remove the protective tab 1 Remove the protective tab to the wall outlet. All rights reserved.
Quick start guide
Page 2
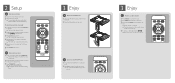
... CLOCK to confirm. » The minute digits begin to blink. 4 Repeat steps 2-3 to the iPod/iPhone 1 Ensure that the iPod/iPhone is displayed and the timer starts counting down. 3 Enjoy A Play from iPod/iPhone 1 Lift up the iPhone/iPod dock under the bot- rectly. 2 Press iPod to select iPod/iPhone source. » The connected iPod/iPhone plays automatically. 3 Enjoy C Tune to a radio station A 1 Press RADIO to turn on the iPod/ iPhone transfers to confirm. 2 Setup A Set time and date 1 Dock the iPod / iPhone...
... CLOCK to confirm. » The minute digits begin to blink. 4 Repeat steps 2-3 to the iPod/iPhone 1 Ensure that the iPod/iPhone is displayed and the timer starts counting down. 3 Enjoy A Play from iPod/iPhone 1 Lift up the iPhone/iPod dock under the bot- rectly. 2 Press iPod to select iPod/iPhone source. » The connected iPod/iPhone plays automatically. 3 Enjoy C Tune to a radio station A 1 Press RADIO to turn on the iPod/ iPhone transfers to confirm. 2 Setup A Set time and date 1 Dock the iPod / iPhone...


