
User manual
Page 2
... AND INST ALLAT ION 8 2.1 Unpacking 8 2.2 Package Contents 8 2.3 Installation Notes 9 PA RT S A N D FU N C T IO N S 10 3.1 Front View 10 3.2 Rear View 11 3.3 Remote Control 12 3.3.1 General Functions 12 3.3.2 Inserting the batteries in the remote control 13 C O N N EC T IO N S T O EX T ERN A L EQ U IPMEN T 14 4.1 Connecting external equipment (VCR, DVD, camcorder, satellite receiver 14 4.1.1 Using S-Video...
... AND INST ALLAT ION 8 2.1 Unpacking 8 2.2 Package Contents 8 2.3 Installation Notes 9 PA RT S A N D FU N C T IO N S 10 3.1 Front View 10 3.2 Rear View 11 3.3 Remote Control 12 3.3.1 General Functions 12 3.3.2 Inserting the batteries in the remote control 13 C O N N EC T IO N S T O EX T ERN A L EQ U IPMEN T 14 4.1 Connecting external equipment (VCR, DVD, camcorder, satellite receiver 14 4.1.1 Using S-Video...

User manual
Page 5
... electric shock) • Bend down ) • Do not damage the power cord. (This can result in a risk of re or electric shock) • The PDP panel is not used for a long period of time, unplug the power cord. (This can result in a risk of electric shock) 4 Please use new batteries with... product on the screen as a xed point of your eye sight. (Your eye sight can get worse if you watch TV very nearly) • Place remote control away from a humid or hot place because it down the outdoor antenna cable to prevent the rain water ows and not to enter the...
... electric shock) • Bend down ) • Do not damage the power cord. (This can result in a risk of re or electric shock) • The PDP panel is not used for a long period of time, unplug the power cord. (This can result in a risk of electric shock) 4 Please use new batteries with... product on the screen as a xed point of your eye sight. (Your eye sight can get worse if you watch TV very nearly) • Place remote control away from a humid or hot place because it down the outdoor antenna cable to prevent the rain water ows and not to enter the...
User manual
Page 9
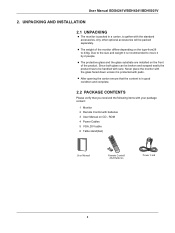
... with the glass faced down unless it by 2 people. After opening the carton ensure that you received the following items with your package content : 1 Monitor 2 Remote Control with pads. ROM 4 Power Cables 5 VGA, DVI cable 6 Table stand(feet) User Manual R emote C ontrol/ AAA B atteries P ower C ord...
... with the glass faced down unless it by 2 people. After opening the carton ensure that you received the following items with your package content : 1 Monitor 2 Remote Control with pads. ROM 4 Power Cables 5 VGA, DVI cable 6 Table stand(feet) User Manual R emote C ontrol/ AAA B atteries P ower C ord...
User manual
Page 11
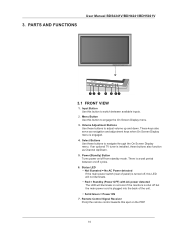
... of the unit. Volume Adjustment Buttons Use these buttons to switch between on/off from standby mode. There is plugged into the back of panel) is turned off but the main power cord is a wait period between available inputs. 2. Input Button Use this LED will illuminate in red... on /off cycles. 6. These keys also serve as Channel Up/Down. 5. Power(Standly) Button Turns power on the PDP. 10 Remote Control Signal Receiver Poinjt the remote control towards this button to adjust volume up and down. Red = Standby (Power OFF) with AC power detected The LED will not...
... of the unit. Volume Adjustment Buttons Use these buttons to switch between on/off from standby mode. There is plugged into the back of panel) is turned off but the main power cord is a wait period between available inputs. 2. Input Button Use this LED will illuminate in red... on /off cycles. 6. These keys also serve as Channel Up/Down. 5. Power(Standly) Button Turns power on the PDP. 10 Remote Control Signal Receiver Poinjt the remote control towards this button to adjust volume up and down. Red = Standby (Power OFF) with AC power detected The LED will not...
User manual
Page 13
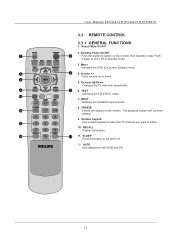
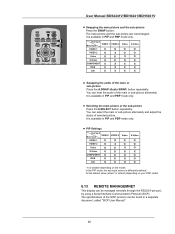
... to set timer off to watch 10. The playback system will continue playing. 9. RECALL Display information. 110 111 11. U ser Manual BD S 4241V /B D H 4241V /B D H 5021V 3.3 REMOTE CONTROL 3.3.1 GENERAL FUNCTIONS 1. FREEZE 18 Freeze the display on the monitor from Standby mode. INPUT Displays the available input sources. 8. AUTO Auto adjustment with RGB...
... to set timer off to watch 10. The playback system will continue playing. 9. RECALL Display information. 110 111 11. U ser Manual BD S 4241V /B D H 4241V /B D H 5021V 3.3 REMOTE CONTROL 3.3.1 GENERAL FUNCTIONS 1. FREEZE 18 Freeze the display on the monitor from Standby mode. INPUT Displays the available input sources. 8. AUTO Auto adjustment with RGB...

User manual
Page 14
Replace the cover. Insert two AAA size 1.5V batteries ensuring that the "+" and "-" ends of the remote control. 2. Note : Do not mix battery types, e.g. Remove the cover on the rear of the batteries are correctl aligned. 3. alkaline and managnese. 13 U ser Manual BD S 4241V /B D H 4241V /B D H 5021V 3.3.2 INSERTING THE BATTERIES IN THE REMOTE CONTROL 1.
Replace the cover. Insert two AAA size 1.5V batteries ensuring that the "+" and "-" ends of the remote control. 2. Note : Do not mix battery types, e.g. Remove the cover on the rear of the batteries are correctl aligned. 3. alkaline and managnese. 13 U ser Manual BD S 4241V /B D H 4241V /B D H 5021V 3.3.2 INSERTING THE BATTERIES IN THE REMOTE CONTROL 1.
User manual
Page 19
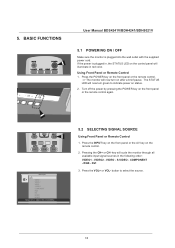
... 5.1 POWERING ON / OFF Make sure the monitor is plugged in, the STATUS LED on the control panel will now turn green to select the source. 18 Press the POWER key on the front panel or the remote control. => The monitor will illuminate in the following order: VIDEO1 - VIDEO - button to indicate power on...
... 5.1 POWERING ON / OFF Make sure the monitor is plugged in, the STATUS LED on the control panel will now turn green to select the source. 18 Press the POWER key on the front panel or the remote control. => The monitor will illuminate in the following order: VIDEO1 - VIDEO - button to indicate power on...
User manual
Page 20
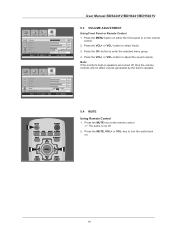
...NU] User Manual BDS4241V/BDH4241/BDH5021V 5.3 VOLUME ADJUSTMENT Using Front Panel or Remote Control 1. Press the MUTE, VOL+ or VOL- button to adjust the sound volume. Note: If the monitor's built-in speaker. 5.4 MUTE Using Remote Control 1. Press the CH- button to enter the selected ...menu group. 4. key to select Audio. 3. Press the MENU button on either the front panel or on . 19 C H +]elect [- Image S creen S etup Audio Volume...
...NU] User Manual BDS4241V/BDH4241/BDH5021V 5.3 VOLUME ADJUSTMENT Using Front Panel or Remote Control 1. Press the MUTE, VOL+ or VOL- button to adjust the sound volume. Note: If the monitor's built-in speaker. 5.4 MUTE Using Remote Control 1. Press the CH- button to enter the selected ...menu group. 4. key to select Audio. 3. Press the MENU button on either the front panel or on . 19 C H +]elect [- Image S creen S etup Audio Volume...
User manual
Page 21
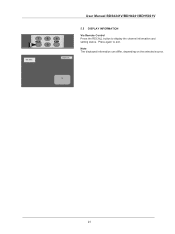
Press again to display the channel information and setting status. TV 20 Note The displayed information can differ, depending on the selected source. 001-ABC TIMER OFF User Manual BDS4241V/BDH4241/BDH5021V 5.5 DISPLAY INFORMATION Via Remote Control Press the RECALL button to exit.
Press again to display the channel information and setting status. TV 20 Note The displayed information can differ, depending on the selected source. 001-ABC TIMER OFF User Manual BDS4241V/BDH4241/BDH5021V 5.5 DISPLAY INFORMATION Via Remote Control Press the RECALL button to exit.

User manual
Page 23
... the CH- Image preset Brightness - Press the VOL+ or VOL- Press the VOL+ or VOL- VOL [-VOL+]to the previous menu. Depending on the monitor panel or remote control. Phase - Press the CH+ or CH- Press the MENU button on the input source, the following menu's appear: Brightness - Contrast - Press the MENU...
... the CH- Image preset Brightness - Press the VOL+ or VOL- Press the VOL+ or VOL- VOL [-VOL+]to the previous menu. Depending on the monitor panel or remote control. Phase - Press the CH+ or CH- Press the MENU button on the input source, the following menu's appear: Brightness - Contrast - Press the MENU...
User manual
Page 24
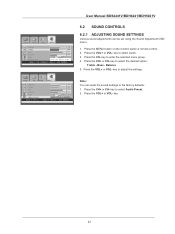
.../BDH5021V 6.2 SOUND CONTROLS 6.2.1 ADJUSTING SOUND SETTINGS Various sound adjustments can reset the sound settings to adjust the settings. Press the MENU button on the monitor panel or remote control. 2. Press the VOL+ or VOL- key to the factory defaults: 1. VOL +] E xit [ME NU] Note: You can be set using the Sound Adjustment...
.../BDH5021V 6.2 SOUND CONTROLS 6.2.1 ADJUSTING SOUND SETTINGS Various sound adjustments can reset the sound settings to adjust the settings. Press the MENU button on the monitor panel or remote control. 2. Press the VOL+ or VOL- key to the factory defaults: 1. VOL +] E xit [ME NU] Note: You can be set using the Sound Adjustment...

User manual
Page 25
...to enter the selected menu group. 4. WARM - key to select setup. Press the VOL+ or VOL- Press the MENU button on the monitor panel or remote control. 2. key to select required option. button to enter the selected menu group. 4. COOL Image S creen S etup Audio L anguage S ...) or DVI input modes. key to select the required language. When there are no signals detected by repeatedly pressing the SLEEP button on the monitor panel or remote control. 2. Setting OSD Menu Language 1. Press the VOL+ or VOL- C H +] S elect [- Press the CH- Image S creen S etup Audio ...
...to enter the selected menu group. 4. WARM - key to select setup. Press the VOL+ or VOL- Press the MENU button on the monitor panel or remote control. 2. key to select required option. button to enter the selected menu group. 4. COOL Image S creen S etup Audio L anguage S ...) or DVI input modes. key to select the required language. When there are no signals detected by repeatedly pressing the SLEEP button on the monitor panel or remote control. 2. Setting OSD Menu Language 1. Press the VOL+ or VOL- C H +] S elect [- Press the CH- Image S creen S etup Audio ...

User manual
Page 26
...key to enter the selected menu group. 4. Press the CH- Press the VOL+ or VOL- Note: Simply press the FREEZE button on the monitor panel or remote control. 2. Press the VOL+ or VOL- key to select Screen. 3. Press the MENU button. 2. key to deterioration in the fluorescent substance ...[- Press the MENU button. 2. key until you reach the optimal setting 6.9 ADJUSTING THE MENU TRANSPARENCY You can select for a long time, a difference in the plasma module. Press the CH- Press the CH- Press the VOL+ or VOL- key to enter the selected menu group. 4. Press the VOL+ or VOL-
...key to enter the selected menu group. 4. Press the CH- Press the VOL+ or VOL- Note: Simply press the FREEZE button on the monitor panel or remote control. 2. Press the VOL+ or VOL- key to select Screen. 3. Press the MENU button. 2. key to deterioration in the fluorescent substance ...[- Press the MENU button. 2. key until you reach the optimal setting 6.9 ADJUSTING THE MENU TRANSPARENCY You can select for a long time, a difference in the plasma module. Press the CH- Press the CH- Press the VOL+ or VOL- key to enter the selected menu group. 4. Press the VOL+ or VOL-

User manual
Page 27
.... 2. or CH+ key to select required screen size. Note: You can adjust the PC screen automatically by simply pressing the AUTO button on the remote control. Selecting the position of the PC screen if it does not fit the PDP screen 1. Press the VOL+ or VOL- FILL ALL - VOL... key. >The screen quality and position are automatically adjusted. key to the RGB mode by repeatedly pressing the I.SIZE (Image SIZE) button on the remote control. Press the CH+ or CH- VOL +] Exit [MENU] User Manual BDS4241V/BDH4241/BDH5021V 6.10 CHANGING THE SCREEN SIZE You can simply select ...
.... 2. or CH+ key to select required screen size. Note: You can adjust the PC screen automatically by simply pressing the AUTO button on the remote control. Selecting the position of the PC screen if it does not fit the PDP screen 1. Press the VOL+ or VOL- FILL ALL - VOL... key. >The screen quality and position are automatically adjusted. key to the RGB mode by repeatedly pressing the I.SIZE (Image SIZE) button on the remote control. Press the CH+ or CH- VOL +] Exit [MENU] User Manual BDS4241V/BDH4241/BDH5021V 6.10 CHANGING THE SCREEN SIZE You can simply select ...
User manual
Page 29
... default value (video1 or video2) depending on the model. In the PIP mode, the sub input source is variable depending on your PDP model. 6.13 REMOTE MANAGEMNET This display can select the main or sub-picture alternately and adjust the status of selected picture. You can be managed... remotely through the RS232 9-pin port, by using a Serial Interface Communication Protocol (SICP). The specifications of the SICP protocol can hear the audio of the main ...
... default value (video1 or video2) depending on the model. In the PIP mode, the sub input source is variable depending on your PDP model. 6.13 REMOTE MANAGEMNET This display can select the main or sub-picture alternately and adjust the status of selected picture. You can be managed... remotely through the RS232 9-pin port, by using a Serial Interface Communication Protocol (SICP). The specifications of the SICP protocol can hear the audio of the main ...
Leaflet
Page 1
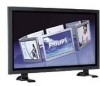
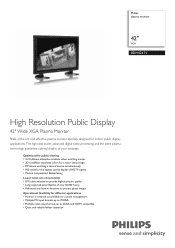
Philips plasma monitor 42" XGA BDH4241V High Resolution Public Display 42" Wide XGA Plasma Monitor State of your message. The high class scaler, advanced digital video processing and the latest plasma technology guarantee optimal display of the art, cost effective plasma monitor specially designed for remote management • ...deinterlacing Lower total cost of ownership • DVI cable included to provide highest picture quality • Long expected panel lifetime of over 60.000 hours • Advanced anti burn-in functions to SXGA and HDTV compatible • Quiet ...
Philips plasma monitor 42" XGA BDH4241V High Resolution Public Display 42" Wide XGA Plasma Monitor State of your message. The high class scaler, advanced digital video processing and the latest plasma technology guarantee optimal display of the art, cost effective plasma monitor specially designed for remote management • ...deinterlacing Lower total cost of ownership • DVI cable included to provide highest picture quality • Long expected panel lifetime of over 60.000 hours • Advanced anti burn-in functions to SXGA and HDTV compatible • Quiet ...
Leaflet
Page 2
... universal connection for both horizontally and vertically hanging dots, as well as dot crawl. Plasma monitor 42" XGA Highlights BDH4241V/27 Free DVI cable A DVI cable is standard included with data/graphics Multiple PC input... formats The product supports PC compatibility for VGA, SVGA, XGA and WXGA. Network controllability: RS232 Network controllability allows user to SXGA. Long expected panel... up to control and adjust monitors remotely through RS232 protocol.
... universal connection for both horizontally and vertically hanging dots, as well as dot crawl. Plasma monitor 42" XGA Highlights BDH4241V/27 Free DVI cable A DVI cable is standard included with data/graphics Multiple PC input... formats The product supports PC compatibility for VGA, SVGA, XGA and WXGA. Network controllability: RS232 Network controllability allows user to SXGA. Long expected panel... up to control and adjust monitors remotely through RS232 protocol.
Leaflet
Page 3
...: 5 Watts Max. Plasma monitor 42" XGA Specifications BDH4241V/27 Picture/Display • Display screen type: XGA Plasma panel • Panel Size: 42" / 106.7cm • Aspect ratio: 16:9 • Panel resolution: 1024 x 768...3/2 - 2/2 motion pull down, 3D Combfilter, Motion compens. All Rights reserved. www.philips.com Dimensions • Dimensions (without notice. Trademarks are subject to 140°F •...% Accessories • Included accessories: Table top stand, DVI-D cable, VGA cable, Remote Control, Battery, AC Power Cord • User Guide on CD-ROM: (RS232 protocol...
...: 5 Watts Max. Plasma monitor 42" XGA Specifications BDH4241V/27 Picture/Display • Display screen type: XGA Plasma panel • Panel Size: 42" / 106.7cm • Aspect ratio: 16:9 • Panel resolution: 1024 x 768...3/2 - 2/2 motion pull down, 3D Combfilter, Motion compens. All Rights reserved. www.philips.com Dimensions • Dimensions (without notice. Trademarks are subject to 140°F •...% Accessories • Included accessories: Table top stand, DVI-D cable, VGA cable, Remote Control, Battery, AC Power Cord • User Guide on CD-ROM: (RS232 protocol...


