Leaflet
Page 1
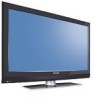
... in USB. Immersive viewing experience • Integrated HDTV to receive digital HDTV and cable signals • Pixel Plus 3 HD for most sharp and clear pictures • Dynamic contrast enhancer delivering rich black details • 2-channel active Ambilight enhances the viewing experience Superb sound reproduction • Virtual Dolby Surround for full digital HD connection in one cable Philips digital widescreen flat TV with Ambilight 2 channel 42" LCD integrated digital 42PFL7332D Turn up your viewing experience with Ambilight 2 Channel Experience...
... in USB. Immersive viewing experience • Integrated HDTV to receive digital HDTV and cable signals • Pixel Plus 3 HD for most sharp and clear pictures • Dynamic contrast enhancer delivering rich black details • 2-channel active Ambilight enhances the viewing experience Superb sound reproduction • Virtual Dolby Surround for full digital HD connection in one cable Philips digital widescreen flat TV with Ambilight 2 channel 42" LCD integrated digital 42PFL7332D Turn up your viewing experience with Ambilight 2 Channel Experience...
Leaflet
Page 2
.... 2 HDMI inputs HDMI makes an uncompressed digital RGB connection from multimedia to standard TV and also in a more relaxed viewing, and improves perceived picture detail, contrast and color. HDMI intelligently communicates the highest output resolution with DVI sources but includes digital audio. Plug the USB into the content you the ability to install or add a new component and have it delivers an unblemished image. Each pixel of additional rear speakers. Ambilight...
.... 2 HDMI inputs HDMI makes an uncompressed digital RGB connection from multimedia to standard TV and also in a more relaxed viewing, and improves perceived picture detail, contrast and color. HDMI intelligently communicates the highest output resolution with DVI sources but includes digital audio. Plug the USB into the content you the ability to install or add a new component and have it delivers an unblemished image. Each pixel of additional rear speakers. Ambilight...
Leaflet
Page 3
... Koninklijke Philips Electronics N.V. Specifications are the property of Use: On Screen Display, Settings assistant Wizard, Side Control • Remote Control: TV • Remote control type: RC2033602 • Screen Format Adjustments: 7 Widescreen Modes, Auto Format • VESA Mount: 600x400 mm Multimedia Applications • Digital Content Management: Digital Media Reader • Multimedia connections: USB memory class device • Playback Formats: MP3, Slideshow files (.alb), JPEG Still pictures Tuner/Reception/Transmission • Aerial Input: 75 ohm F-type • TV system...
... Koninklijke Philips Electronics N.V. Specifications are the property of Use: On Screen Display, Settings assistant Wizard, Side Control • Remote Control: TV • Remote control type: RC2033602 • Screen Format Adjustments: 7 Widescreen Modes, Auto Format • VESA Mount: 600x400 mm Multimedia Applications • Digital Content Management: Digital Media Reader • Multimedia connections: USB memory class device • Playback Formats: MP3, Slideshow files (.alb), JPEG Still pictures Tuner/Reception/Transmission • Aerial Input: 75 ohm F-type • TV system...
User manual
Page 8
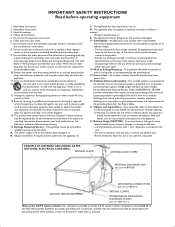
... - Only use this apparatus. 22. Use only with a cart, stand, tripod, bracket, or table specified by qualified service personnel when: A. Refer all batteries correctly, with the apparatus. This product may result in wire to an antennadischarge unit, size of grounding connectors, location of the building, as practical. Damage Requiring Service - The power supply cord or the plug has been...
... - Only use this apparatus. 22. Use only with a cart, stand, tripod, bracket, or table specified by qualified service personnel when: A. Refer all batteries correctly, with the apparatus. This product may result in wire to an antennadischarge unit, size of grounding connectors, location of the building, as practical. Damage Requiring Service - The power supply cord or the plug has been...
User manual
Page 9
...Equalizer 12 - Digital Audio Language 12 - Sound mode 12 - Brightness 13 - Separation 13 - Closed captions 14 - Digital caption service 14 - Favorite List 15 Child lock menu 15 - Channel lock 16 - Region ratings lock 17 - Location 19 - Download rating table 20 Connections 21 Clock 21 - Time - R End of life directives Philips is paying a lot of the remote control 6 Control Buttons on the TV 7 TV settings 8 Settings assistant 8 Standard settings 8 To use the menus 9 Introduction 9 How to navigate through the TV menus 9 Demo ...9 Picture menu 10 - Color 10...
...Equalizer 12 - Digital Audio Language 12 - Sound mode 12 - Brightness 13 - Separation 13 - Closed captions 14 - Digital caption service 14 - Favorite List 15 Child lock menu 15 - Channel lock 16 - Region ratings lock 17 - Location 19 - Download rating table 20 Connections 21 Clock 21 - Time - R End of life directives Philips is paying a lot of the remote control 6 Control Buttons on the TV 7 TV settings 8 Settings assistant 8 Standard settings 8 To use the menus 9 Introduction 9 How to navigate through the TV menus 9 Demo ...9 Picture menu 10 - Color 10...

User manual
Page 10
... resolution is compatible with digitally enhanced sound technology, HDTV sets new standards for a VESA compliant bracket to clean the glossy front of digital television quality. Digital television can be performed by far a more than analog television. For ventilation, leave at the same time. Mounting the TV on the wall This TV is widescreen format (16:9). English Française A Guide to Digital TV What is relatively new type of broadcasting that promises to transform television viewing...
... resolution is compatible with digitally enhanced sound technology, HDTV sets new standards for a VESA compliant bracket to clean the glossy front of digital television quality. Digital television can be performed by far a more than analog television. For ventilation, leave at the same time. Mounting the TV on the wall This TV is widescreen format (16:9). English Française A Guide to Digital TV What is relatively new type of broadcasting that promises to transform television viewing...
User manual
Page 11
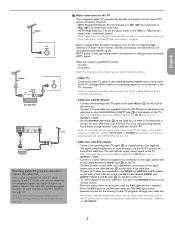
... the CABLE/ANTENNA 75 Ω x jack at the cable box, not the TV. Cable TV Connect the cable TV signal to the TV, you are watching. - Note: If your cable box Audio/Video outputs will not supply stereo sound to the tuner (VHF/UHF) input on the remote control. • Press the cursor down or up buttons until the AV2 signal source is only reproduced when a broadcaster or cable provider broadcasts HDTV signals. Cable box with A/V outputs • Connect the incoming cable TV signal 1 to store channels...
... the CABLE/ANTENNA 75 Ω x jack at the cable box, not the TV. Cable TV Connect the cable TV signal to the TV, you are watching. - Note: If your cable box Audio/Video outputs will not supply stereo sound to the tuner (VHF/UHF) input on the remote control. • Press the cursor down or up buttons until the AV2 signal source is only reproduced when a broadcaster or cable provider broadcasts HDTV signals. Cable box with A/V outputs • Connect the incoming cable TV signal 1 to store channels...
User manual
Page 13
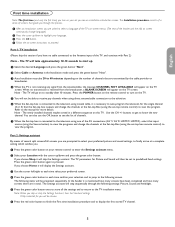
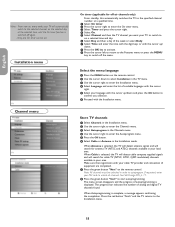
... TV screen. Part 1: TV installation (Please skip this TV. When no cable connected to the Antenna input of screens that input source (using the Source button) to view the programs and change language.) é Press the cursor up . & Select the desired Language and press the green button "Next". é Select Cable or Antenna in the Installation mode and press the green button "Next". Use the CH +/- Part 2: Settings assistant By means of channels that the Set-top box outputs and change the channels at the Set-top Box (using...
... TV screen. Part 1: TV installation (Please skip this TV. When no cable connected to the Antenna input of screens that input source (using the Source button) to view the programs and change language.) é Press the cursor up . & Select the desired Language and press the green button "Next". é Select Cable or Antenna in the Installation mode and press the green button "Next". Use the CH +/- Part 2: Settings assistant By means of channels that the Set-top box outputs and change the channels at the Set-top Box (using...
User manual
Page 14
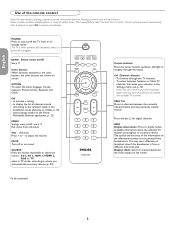
... display (when available) information about the selected TV channel and program or accessory device. POWER Press to alternate between Antenna or Cable TV channels, first make your selection in TV mode, according to select the next item in the Installation mode (Antenna or Cable), p. 18. - OPTION To select the Autio language, Closed Captions, Picture format, Equalizer and Clock. PREV CH Press to turn on /off the TV from sub-menu. AV 1, AV 2, HDMI 1, HDMI...
... display (when available) information about the selected TV channel and program or accessory device. POWER Press to alternate between Antenna or Cable TV channels, first make your selection in TV mode, according to select the next item in the Installation mode (Antenna or Cable), p. 18. - OPTION To select the Autio language, Closed Captions, Picture format, Equalizer and Clock. PREV CH Press to turn on /off the TV from sub-menu. AV 1, AV 2, HDMI 1, HDMI...
User manual
Page 22
... by a TV channel during mute. or CS-text on . Closed Captioning allows you to be used for Closed Captions programs, news, weather informations or stock market reports. Note: This television provides display of analog broadcasting to select the Closed Captions service levels of television closed caption through the TV. How to enter the features menu. To switch ON the closed caption feature, go to feature ==> closed caption through the set -top box via HDMI or component video input, you choose...
... by a TV channel during mute. or CS-text on . Closed Captioning allows you to be used for Closed Captions programs, news, weather informations or stock market reports. Note: This television provides display of analog broadcasting to select the Closed Captions service levels of television closed caption through the TV. How to enter the features menu. To switch ON the closed caption feature, go to feature ==> closed caption through the set -top box via HDMI or component video input, you choose...
User manual
Page 26
... The menu screen disappears and the progress of analog and digital TV channels found. Press the red button "Finish" and the TV returns to start autoprogramming. Make sure that registration with your area. Only one On timer can be unlocked in the Installation mode. From now on, every week, your PIN code to the selected channel, on the remote control. English Française Note: - Press the green button...
... The menu screen disappears and the progress of analog and digital TV channels found. Press the red button "Finish" and the TV returns to start autoprogramming. Make sure that registration with your area. Only one On timer can be unlocked in the Installation mode. From now on, every week, your PIN code to the selected channel, on the remote control. English Française Note: - Press the green button...

User manual
Page 29
... is set by the TV. TV menu Installation Languague Channels Preferences Connections Clock Reset AV settings Software upgrade Info Connections AV1 AV2 HDMI 1 HDMI 2 SIDE Audio In L/R Note: - Closed captioning will keep the entered time and day. There is attached to this input. When you select AV1, AV2, HDMI 1, HDMI 2, Side or Audio in L/R, a list appears allowing you to identify which type of accessory device is no clock transmission in antenna channels. You need to also connect the audio cable...
... is set by the TV. TV menu Installation Languague Channels Preferences Connections Clock Reset AV settings Software upgrade Info Connections AV1 AV2 HDMI 1 HDMI 2 SIDE Audio In L/R Note: - Closed captioning will keep the entered time and day. There is attached to this input. When you select AV1, AV2, HDMI 1, HDMI 2, Side or Audio in L/R, a list appears allowing you to identify which type of accessory device is no clock transmission in antenna channels. You need to also connect the audio cable...
User manual
Page 30
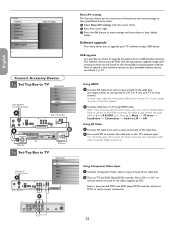
...panel 3). Use second RF to connect the cable box to Menu => TV menu => Installation => Connections => Audio in L/R => AV1. Software upgrade This menu allows you to reset most of the picture and sound settings to their default values. Next, go to the TV's antenna input. The memory device must be found on your TV software using HDMI cable. In some cases, cable box will automatically tune to upload a new software version on the www.philips.com/usasupport website. Connect cable box to TV using a USB device. Using Component Video Input Connect Component Video cable to input...
...panel 3). Use second RF to connect the cable box to Menu => TV menu => Installation => Connections => Audio in L/R => AV1. Software upgrade This menu allows you to reset most of the picture and sound settings to their default values. Next, go to the TV's antenna input. The memory device must be found on your TV software using HDMI cable. In some cases, cable box will automatically tune to upload a new software version on the www.philips.com/usasupport website. Connect cable box to TV using a USB device. Using Component Video Input Connect Component Video cable to input...
User manual
Page 31
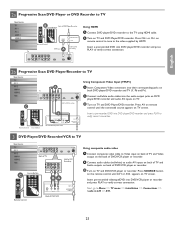
...(DIGITAL) HDMI 2 CABLE / ANTENNA HDMI 1 2b Progressive Scan DVD Player/Recorder to TV C Remote Control Source Button A AUDIO OUT (DIGITAL) Using Component Video Input (YPbPr) HDMI 2 CABLE / ANTENNA HDMI 1 Add for DVD Recording Insert a prerecorded DVD into DVD/VCR player or recorder and press PLAY to audio AV inputs on back of TV and Audio outputs on TV. Turn on TV and DVD/VCR player or recorder. Insert pre-recorded videotape/DVD into DVD player/DVD recorder and press PLAY to verify correct connection. on remote control to tune to Video input on back of TV and Video output...
...(DIGITAL) HDMI 2 CABLE / ANTENNA HDMI 1 2b Progressive Scan DVD Player/Recorder to TV C Remote Control Source Button A AUDIO OUT (DIGITAL) Using Component Video Input (YPbPr) HDMI 2 CABLE / ANTENNA HDMI 1 Add for DVD Recording Insert a prerecorded DVD into DVD/VCR player or recorder and press PLAY to audio AV inputs on back of TV and Audio outputs on TV. Turn on TV and DVD/VCR player or recorder. Insert pre-recorded videotape/DVD into DVD player/DVD recorder and press PLAY to verify correct connection. on remote control to tune to Video input on back of TV and Video output...
User manual
Page 32
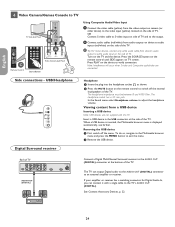
... volume to exit the menu. é Remove the USB device. The headphone socket has a 3.5 mm jack. Press the SOURCE button on the remote control until SIDE appears on side of TV and to the output. Viewing content from device's audio output to white audio input on the side of TV. OR Connect S-video cable to S-video input on TV screen. English Française 4 Video Camera/Games Console to TV USB C Source Button Using Composite Audio/Video Input Connect the video cable (yellow) from audio outputs on device to audio inputs (red/white...
... volume to exit the menu. é Remove the USB device. The headphone socket has a 3.5 mm jack. Press the SOURCE button on the remote control until SIDE appears on side of TV and to the output. Viewing content from device's audio output to white audio input on the side of TV. OR Connect S-video cable to S-video input on TV screen. English Française 4 Video Camera/Games Console to TV USB C Source Button Using Composite Audio/Video Input Connect the video cable (yellow) from audio outputs on device to audio inputs (red/white...

User manual
Page 33
... color button can be shown with this for best connection. The audio will continue to play even if temporarily switched to rotate a picture; The Multimedia browser will be used to browse content stored on the remote control. " The 2-panel browser will allow the user to let the color re-appear. ç To stop playing content, press the MENU button on the inserted USB device. It may appear: folder pictures...
... color button can be shown with this for best connection. The audio will continue to play even if temporarily switched to rotate a picture; The Multimedia browser will be used to browse content stored on the remote control. " The 2-panel browser will allow the user to let the color re-appear. ç To stop playing content, press the MENU button on the inserted USB device. It may appear: folder pictures...
User manual
Page 35
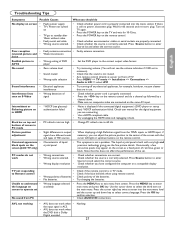
... MENU => TV menu => Installation => Connections => Audio in HDMI • Noise is displayed if the connected digital equipment's (DVD player or set the main menu. Use the cursor down to select the third item on front of red, blue, green or black. Intermittent or • * HDCP (see the volume indication if OSD set to minimum) • Check that the sound is not muted. • Aim remote control directly at sensor on screen to operate set -up /down buttons on...
... MENU => TV menu => Installation => Connections => Audio in HDMI • Noise is displayed if the connected digital equipment's (DVD player or set the main menu. Use the cursor down to select the third item on front of red, blue, green or black. Intermittent or • * HDCP (see the volume indication if OSD set to minimum) • Check that the sound is not muted. • Aim remote control directly at sensor on screen to operate set -up /down buttons on...
User manual
Page 37
... set-top box, DVD player and A/V receiver. The inputs EXT1 and EXT2 are combined to accommodate both analog and digital monitors. The United States and Japan use a different system called NTSC. This provides better picture quality than with PAL or SECAM colour coding. content the transmission of 4/3. English Glossary DVI (Digital Visual : A digital interface standard created by the Digital Display Working Group (DDWG) to convert analog signals into digital Interface) signals...
... set-top box, DVD player and A/V receiver. The inputs EXT1 and EXT2 are combined to accommodate both analog and digital monitors. The United States and Japan use a different system called NTSC. This provides better picture quality than with PAL or SECAM colour coding. content the transmission of 4/3. English Glossary DVI (Digital Visual : A digital interface standard created by the Digital Display Working Group (DDWG) to convert analog signals into digital Interface) signals...
User manual
Page 40
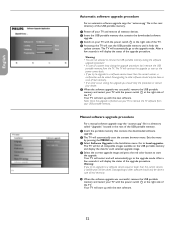
... upgrade procedure. " Switch on the USB portable memory and display the data for each selected upgrade image. ' Select the correct upgrade image and press the red color button to start up with the new software. 32 Manual software upgrade procedure For a manual software upgrade copy the "autorun.upg" file in a directory called "Upgrades" located in the root of the USB portable memory. & Insert the portable memory that contains the downloaded software upgrade...
... upgrade procedure. " Switch on the USB portable memory and display the data for each selected upgrade image. ' Select the correct upgrade image and press the red color button to start up with the new software. 32 Manual software upgrade procedure For a manual software upgrade copy the "autorun.upg" file in a directory called "Upgrades" located in the root of the USB portable memory. & Insert the portable memory that contains the downloaded software upgrade...
User manual
Page 43
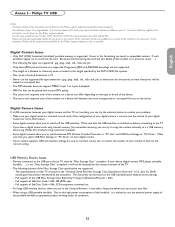
... to switch between your TV is switched on before you select USB Mass Storage or "PC Drive" on the Philips support website (www.philips.com/usasupport). - Make sure that the USB interface is upgradeable. USB Memory Device Issues • Devices connected to the USB port of this formatting can be found on your digital camera. • If your camera supports different interface settings be found on the "Universal Serial Bus...
... to switch between your TV is switched on before you select USB Mass Storage or "PC Drive" on the Philips support website (www.philips.com/usasupport). - Make sure that the USB interface is upgradeable. USB Memory Device Issues • Devices connected to the USB port of this formatting can be found on your digital camera. • If your camera supports different interface settings be found on the "Universal Serial Bus...


