Leaflet
Page 3
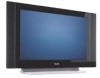
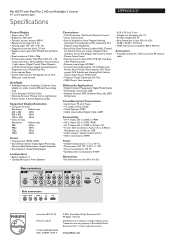
...; Display screen type: LCD WXGA Active Matrix TFT • Panel resolution: 1366 x 768p • Picture enhancement: Pixel Plus 2 HD, 3/2 - 2/2 motion pull down, 3D Combfilter, Active Control + Light sensor, Digital Crystal Clear, Dynamic contrast enhancement, Jagged Line Suppression, Progressive scan, Widescreen Plus • Color cabinet: Black • Screen enhancement: Anti ageing circuit, AntiReflection coated screen Ambilight • Ambilight Features: Ambilight 2 Channel, Auto adaptive to video content, Efficient low energy lamp • Color Settings...
...; Display screen type: LCD WXGA Active Matrix TFT • Panel resolution: 1366 x 768p • Picture enhancement: Pixel Plus 2 HD, 3/2 - 2/2 motion pull down, 3D Combfilter, Active Control + Light sensor, Digital Crystal Clear, Dynamic contrast enhancement, Jagged Line Suppression, Progressive scan, Widescreen Plus • Color cabinet: Black • Screen enhancement: Anti ageing circuit, AntiReflection coated screen Ambilight • Ambilight Features: Ambilight 2 Channel, Auto adaptive to video content, Efficient low energy lamp • Color Settings...

User manual
Page 2
... not be located away from power lines. 20. Use only with a cart, stand, tripod, bracket, or table specified by the manufacturer. 12. or C. The appliance has been exposed to operate normally or exhibits a marked change in wire to rain or moisture and objects filled with a dry cloth. 7. Tilt/Stability - Wall or Ceiling Mounting - Do not install near water. 6. A grounding type plug has two...
... not be located away from power lines. 20. Use only with a cart, stand, tripod, bracket, or table specified by the manufacturer. 12. or C. The appliance has been exposed to operate normally or exhibits a marked change in wire to rain or moisture and objects filled with a dry cloth. 7. Tilt/Stability - Wall or Ceiling Mounting - Do not install near water. 6. A grounding type plug has two...
User manual
Page 3
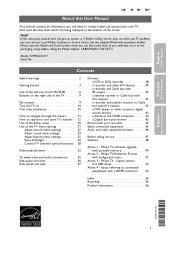
...) Model: 37PF9631D/37 Serial No: Contents Safety warnings 2 Getting started 3 Use of the remote control RC4348 6 Buttons on the right side of the TV 9 My content 9 Turn the TV on 10 First time installation 10 How to navigate through the menus 11 How to search for and store TV channels . . 12 Use of the Setup menu 16 Use of the screen. Philips TV software upgrade with portable memory 49 Annex 2 - Help? If this User Manual This manual...
...) Model: 37PF9631D/37 Serial No: Contents Safety warnings 2 Getting started 3 Use of the remote control RC4348 6 Buttons on the right side of the TV 9 My content 9 Turn the TV on 10 First time installation 10 How to navigate through the menus 11 How to search for and store TV channels . . 12 Use of the Setup menu 16 Use of the screen. Philips TV software upgrade with portable memory 49 Annex 2 - Help? If this User Manual This manual...
User manual
Page 6
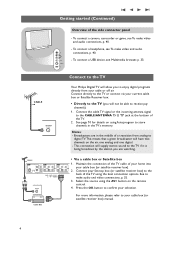
... video and audio connections, p. 40. - USB Connect to the TV CABLE ANTENNA 75 Your Philips Digital TV will allow you will not be able to the CABLE/ANTENNA 75 Ω x jack at the bottom of the side connector panel - Connect the cable TV signal or the incoming antenna signal to receive pay channels) 1. Press the OK button to your selection. Broadcasters are watching. IN OUT For more information, please refer to confirm your cable box...
... video and audio connections, p. 40. - USB Connect to the TV CABLE ANTENNA 75 Your Philips Digital TV will allow you will not be able to the CABLE/ANTENNA 75 Ω x jack at the bottom of the side connector panel - Connect the cable TV signal or the incoming antenna signal to receive pay channels) 1. Press the OK button to your selection. Broadcasters are watching. IN OUT For more information, please refer to confirm your cable box...

User manual
Page 8
... Installation mode - Audio and Video equipment buttons See Audio and Video equipment buttons, p. 46. OK - to TV mode. starts playing content in the list.The list will be programmed to the selection made in this remote control can be used. DEMO Demo on /off completely unless it . 6 to display the list of the system modes in which the remote control can not be shown. MUTE Interrupt the sound or restore it is never powered off the TV...
... Installation mode - Audio and Video equipment buttons See Audio and Video equipment buttons, p. 46. OK - to TV mode. starts playing content in the list.The list will be programmed to the selection made in this remote control can be used. DEMO Demo on /off completely unless it . 6 to display the list of the system modes in which the remote control can not be shown. MUTE Interrupt the sound or restore it is never powered off the TV...
User manual
Page 13
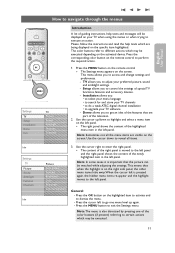
... a weak ATSC digital channel installation • to upgrade your TV when using the menus or when trying to get an idea of guiding instructions, help texts which may be executed depending on the specific item highlighted. Note: Sometimes not all items. Info Settings TV Picture Sound Ambilight Features Channels Info Picture Auto picture Contrast Brightness Color Sharpness Color temperature ....... 3. Demo allows you to execute an action. MENU 1 2 3 4 5 6 Settings TV Setup Installation Demo Exit TV Picture Sound Ambilight Features Channels Introduction A lot...
... a weak ATSC digital channel installation • to upgrade your TV when using the menus or when trying to get an idea of guiding instructions, help texts which may be executed depending on the specific item highlighted. Note: Sometimes not all items. Info Settings TV Picture Sound Ambilight Features Channels Info Picture Auto picture Contrast Brightness Color Sharpness Color temperature ....... 3. Demo allows you to execute an action. MENU 1 2 3 4 5 6 Settings TV Setup Installation Demo Exit TV Picture Sound Ambilight Features Channels Introduction A lot...
User manual
Page 15
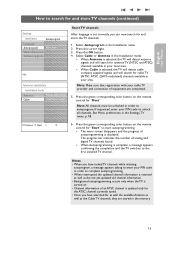
.... > The menu screen disappears and the progress of equipment are stored in order to unlock all channels. Press the OK button. 4. See Menu preferences in the Installation menu. 2. Press the green corresponding color button on the remote control for and store TV channels (continued) Settings Installation Autoprogram Language Autoprogram Start now Weak channel ins. Software upgrade Info Television installation Installation mode Antenna Cable Please select your cable TV provider and connection of autoprogramming is set correctly, you have locked TV channels while initiating...
.... > The menu screen disappears and the progress of equipment are stored in order to unlock all channels. Press the OK button. 4. See Menu preferences in the Installation menu. 2. Press the green corresponding color button on the remote control for and store TV channels (continued) Settings Installation Autoprogram Language Autoprogram Start now Weak channel ins. Software upgrade Info Television installation Installation mode Antenna Cable Please select your cable TV provider and connection of autoprogramming is set correctly, you have locked TV channels while initiating...
User manual
Page 18
... the TV, Features menu, see p. 22, to turn the Caption service On or Off. Adjust picture/sound preferences Auto surround Sometimes the broadcaster transmits special signals for the action on the captioned TV program shows on -screen 'text boxes' to show dialogue and conversations while the TV program is the most used by a TV channel during captioned broadcasts. 1. Info Adjust features preferences Caption service This allows you to the best surround sound mode. Select the desired Caption service: > CC...
... the TV, Features menu, see p. 22, to turn the Caption service On or Off. Adjust picture/sound preferences Auto surround Sometimes the broadcaster transmits special signals for the action on the captioned TV program shows on -screen 'text boxes' to show dialogue and conversations while the TV program is the most used by a TV channel during captioned broadcasts. 1. Info Adjust features preferences Caption service This allows you to the best surround sound mode. Select the desired Caption service: > CC...

User manual
Page 19
.... Size Dig. caption opt. Downloaded ratin... This service contains the verbatim, or near-verbatim captions for the primary language being spoken in a secondary language which are 6 standard services. - English User Manual Use of caption display according to your current ones. Text Background Info Settings/Setup/Preferences Features prefer. Service 1 is up to the discretion of the individual caption provider to view the digital captioning. < Select one of the digital service channels...
.... Size Dig. caption opt. Downloaded ratin... This service contains the verbatim, or near-verbatim captions for the primary language being spoken in a secondary language which are 6 standard services. - English User Manual Use of caption display according to your current ones. Text Background Info Settings/Setup/Preferences Features prefer. Service 1 is up to the discretion of the individual caption provider to view the digital captioning. < Select one of the digital service channels...

User manual
Page 22
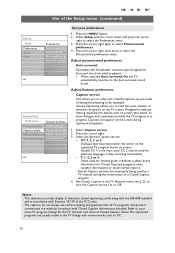
... signal is in antenna channels. If your amplifier or receiver has a matching connector for the correct working of devices connected to the selected input. 5. Set your clock Clock Auto clock mode Auto clock channel Time Day Time zone Daylight saving This allows you have selected the source type, e.g. See To make Video and Audio connections, Digital Surround receiver, p. 45. Use of the Setup menu (continued) Settings Setup Preferences Source Clock Info Settings Setup Preferences Source Clock Info Source AV1 AV2 AV3 HDMI...
... signal is in antenna channels. If your amplifier or receiver has a matching connector for the correct working of devices connected to the selected input. 5. Set your clock Clock Auto clock mode Auto clock channel Time Day Time zone Daylight saving This allows you have selected the source type, e.g. See To make Video and Audio connections, Digital Surround receiver, p. 45. Use of the Setup menu (continued) Settings Setup Preferences Source Clock Info Settings Setup Preferences Source Clock Info Source AV1 AV2 AV3 HDMI...
User manual
Page 24
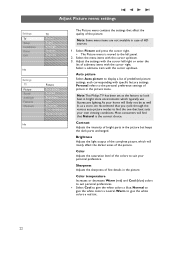
... up /down . 3. Select the menu items with specific factory settings. Color Adjusts the saturation level of the colors to display a list of fine details in the picture but keeps the dark parts unchanged. Settings TV Setup Installation Demo Exit Info Settings TV Picture Sound Ambilight Features Channels Info Adjust Picture menu settings TV Picture Sound Ambilight Features Channels Picture Auto picture Contrast Brightness Color Sharpness Color temperature Digital processing ........ Select Picture and press the cursor right. > The Picture menu is the correct choice. Select...
... up /down . 3. Select the menu items with specific factory settings. Color Adjusts the saturation level of the colors to display a list of fine details in the picture but keeps the dark parts unchanged. Settings TV Setup Installation Demo Exit Info Settings TV Picture Sound Ambilight Features Channels Info Adjust Picture menu settings TV Picture Sound Ambilight Features Channels Picture Auto picture Contrast Brightness Color Sharpness Color temperature Digital processing ........ Select Picture and press the cursor right. > The Picture menu is the correct choice. Select...

User manual
Page 25
.... - Standard mode is recommended only for very noisy or poorly mastered sources or for everyday viewing, Pixel Plus is the most ideal setting, as the FORMAT button on the screen changes. < Normally select Medium. See Use of Active Control values. 3. Digital processing Dynamic contrast DNR Off Minimum Medium Maximum Color enhancem. It may be preferred to dismiss the Active Control display. 23 Picture format This menu item...
.... - Standard mode is recommended only for very noisy or poorly mastered sources or for everyday viewing, Pixel Plus is the most ideal setting, as the FORMAT button on the screen changes. < Normally select Medium. See Use of Active Control values. 3. Digital processing Dynamic contrast DNR Off Minimum Medium Maximum Color enhancem. It may be preferred to dismiss the Active Control display. 23 Picture format This menu item...
User manual
Page 26
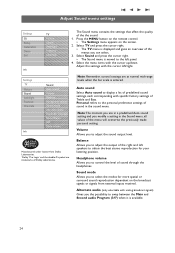
... the sound. 1. Press the MENU button on the remote control. > The Settings menu appears on the broadcast signals or signals from Dolby Laboratories. 'Dolby' 'Pro Logic' and the double-D symbol are trademarks of sound in the Sound menu, all values of the right and left panel. 4. Settings TV Picture Sound Ambilight Features Channels Info Sound Auto sound Volume Balance Headphone volume Sound mode Alternate audio Dig.Audio language Mono/Stereo AVL Delta volume Manufactured under license from external inputs received. Personal...
... the sound. 1. Press the MENU button on the remote control. > The Settings menu appears on the broadcast signals or signals from Dolby Laboratories. 'Dolby' 'Pro Logic' and the double-D symbol are trademarks of sound in the Sound menu, all values of the right and left panel. 4. Settings TV Picture Sound Ambilight Features Channels Info Sound Auto sound Volume Balance Headphone volume Sound mode Alternate audio Dig.Audio language Mono/Stereo AVL Delta volume Manufactured under license from external inputs received. Personal...

User manual
Page 30
... time and date are sent by the broadcaster or program provider. 1. Select TV ratings lock with the cursor right, and select one content-based rating. 4. Press the MENU button on the remote control. > The Settings menu appears on screen. 2. Select Channels and press the cursor right. > The Channel menu is moved to the left panel. 4. xx. This allows you to control special functions for the TV channels. 1. Control TV channels' special functions Settings TV Picture Sound...
... time and date are sent by the broadcaster or program provider. 1. Select TV ratings lock with the cursor right, and select one content-based rating. 4. Press the MENU button on the remote control. > The Settings menu appears on screen. 2. Select Channels and press the cursor right. > The Channel menu is moved to the left panel. 4. xx. This allows you to control special functions for the TV channels. 1. Control TV channels' special functions Settings TV Picture Sound...

User manual
Page 39
... ANTENNA 75 R AUDIO VIDEO AUDIO VIDEO HDMI L R L R VIDEO + AV3 : S-VIDEO AUDIO L+R AV1/AV2/AV3 : VIDEO + AUDIO L+R AV1 : HDMI + AUDIO L+R HDMI VCR VCR DVI DVD recorder DVD recorder Satellite receiver Satellite receiver Cable box Cable box Note: - Changing this setting during reviewing will not be stored as Personal setting after switch off. 37 Due to possible digital image distortion when displaying signals from connected digital equipment, automatically the Auto picture setting Soft is selected, if you selected Digital STB in the Source menu. See Adjust Picture...
... ANTENNA 75 R AUDIO VIDEO AUDIO VIDEO HDMI L R L R VIDEO + AV3 : S-VIDEO AUDIO L+R AV1/AV2/AV3 : VIDEO + AUDIO L+R AV1 : HDMI + AUDIO L+R HDMI VCR VCR DVI DVD recorder DVD recorder Satellite receiver Satellite receiver Cable box Cable box Note: - Changing this setting during reviewing will not be stored as Personal setting after switch off. 37 Due to possible digital image distortion when displaying signals from connected digital equipment, automatically the Auto picture setting Soft is selected, if you selected Digital STB in the Source menu. See Adjust Picture...

User manual
Page 40
.../or Cable TV converter box) 1 to the RF IN socket of 0,5 m from the display. Use a mono to stereo adapter (not supplied) for signals from the screen. Keep a minimum distance of your equipment to. Connect a VCR or DVD recorder Warning: do not connect any device to the AV3 VIDEO jack; - CABLE AV3 S-VIDEO DIGITAL AV2 L AUDIO OUT Pr Pb Y AV1 For DVI-HDMI convertor cable Pr Pb Y connect AV1 Audio L/R ANTENNA 75 R AUDIO VIDEO AUDIO VIDEO HDMI L R L R VIDEO AV1...
.../or Cable TV converter box) 1 to the RF IN socket of 0,5 m from the display. Use a mono to stereo adapter (not supplied) for signals from the screen. Keep a minimum distance of your equipment to. Connect a VCR or DVD recorder Warning: do not connect any device to the AV3 VIDEO jack; - CABLE AV3 S-VIDEO DIGITAL AV2 L AUDIO OUT Pr Pb Y AV1 For DVI-HDMI convertor cable Pr Pb Y connect AV1 Audio L/R ANTENNA 75 R AUDIO VIDEO AUDIO VIDEO HDMI L R L R VIDEO AV1...
User manual
Page 46
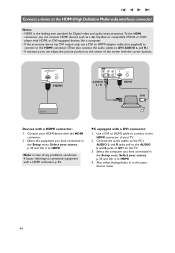
... adjust the picture position to the center of any problems, see Annex 4: Issues referring to HDMI. HDMI is the leading new standard for Digital video and audio interconnection.To the HDMI connector you can connect HDMI devices such as a Set Top Box or compatible DVD-R or DVD player with the cursor buttons. Connect a device to AV1 AUDIO L and R.) - Connect the audio cables to the PC's AUDIO L and R jacks and to the AUDIO L and R jacks of your source...
... adjust the picture position to the center of any problems, see Annex 4: Issues referring to HDMI. HDMI is the leading new standard for Digital video and audio interconnection.To the HDMI connector you can connect HDMI devices such as a Set Top Box or compatible DVD-R or DVD player with the cursor buttons. Connect a device to AV1 AUDIO L and R.) - Connect the audio cables to the PC's AUDIO L and R jacks and to the AUDIO L and R jacks of your source...

User manual
Page 49
... another auto picture setting. • Check the Closed Captions control. E.g. Snowish picture and noise • Check the antenna connection. Replace if necessary. • Clean the remote control sensor lens on the remote control. • When no signal is in output signals from the YPbPr inputs or HDMI input, if necessary, you selected the correct AV source. keep away a wireless headphone from within a radius of your TV. • Check if the remote control is detected, the TV automatically switches...
... another auto picture setting. • Check the Closed Captions control. E.g. Snowish picture and noise • Check the antenna connection. Replace if necessary. • Clean the remote control sensor lens on the remote control. • When no signal is in output signals from the YPbPr inputs or HDMI input, if necessary, you selected the correct AV source. keep away a wireless headphone from within a radius of your TV. • Check if the remote control is detected, the TV automatically switches...

User manual
Page 52
... TV with the POWER B button on the USB portable memory and display the data for each selected upgrade version. 3. Switch off your remote control.Your TV will be done in the root of the upgrade procedure. Software Upgrade Application Upgrade busy... if an error occurs during the software upgrade procedure; - Settings Installation Software upgrade Language Current softw. Select the correct upgrade version and press the red color button to the upgrade mode. After a few seconds it will display...
... TV with the POWER B button on the USB portable memory and display the data for each selected upgrade version. 3. Switch off your remote control.Your TV will be done in the root of the upgrade procedure. Software Upgrade Application Upgrade busy... if an error occurs during the software upgrade procedure; - Settings Installation Software upgrade Language Current softw. Select the correct upgrade version and press the red color button to the upgrade mode. After a few seconds it will display...
User manual
Page 57
English User Manual Index active control 23 adjust picture menu settings ..22 adjust sound menu settings ....24 adjust features menu settings 25 alternate audio 24 ambilight 26 antenna 4 audio/video equipment buttons 46 audio/video connections .........38 autoprogram 13 auto picture 22 auto surround 16 auto sound 24 avl (audio volume leveller)......25 balance 24 batteries 5 before calling service 47 brightness 22 cable 4 camera 36 camcorder 36 captions service 25 captions options 25 care of the screen 2 change pin 19 channel list 31 channel lock 28 channel tuning 14 ...
English User Manual Index active control 23 adjust picture menu settings ..22 adjust sound menu settings ....24 adjust features menu settings 25 alternate audio 24 ambilight 26 antenna 4 audio/video equipment buttons 46 audio/video connections .........38 autoprogram 13 auto picture 22 auto surround 16 auto sound 24 avl (audio volume leveller)......25 balance 24 batteries 5 before calling service 47 brightness 22 cable 4 camera 36 camcorder 36 captions service 25 captions options 25 care of the screen 2 change pin 19 channel list 31 channel lock 28 channel tuning 14 ...


