
Leaflet
Page 2
... working with wide documents without the quality loss than comes from any format of HD input signal. This vibrant and sharp image will increase the contrast with excellent blacklevel and accurate rendition of images and videos for ultimate display performance - Lead-free materials are intelligent, touch sensitive icons that replace protruding buttons that lets the user adjust the monitor to their requirement. Philips easy picture format control on a different screen size...
... working with wide documents without the quality loss than comes from any format of HD input signal. This vibrant and sharp image will increase the contrast with excellent blacklevel and accurate rendition of images and videos for ultimate display performance - Lead-free materials are intelligent, touch sensitive icons that replace protruding buttons that lets the user adjust the monitor to their requirement. Philips easy picture format control on a different screen size...
Leaflet
Page 3
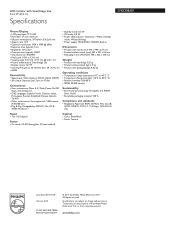
... Scanning Frequency: 30 -83 kHz (H) / 56 -75 Hz (V) • sRGB Connectivity • Signal Input: VGA (Analog ), DVI-D (digital, HDCP) • Sync Input: Separate Sync, Sync on Green Convenience • User convenience: Menu, 4:3 / Wide, Power On/Off, Input, SmartImage lite • OSD Languages: English, French, German, Italian, Portuguese, Russian, Simplified Chinese, Spanish, Turkish • Other convenience: Kensington lock, VESA mount (100x100mm) • Plug & Play Compatibility: DDC/CI, Mac OS X, sRGB, Windows 7 • Standby mode: 0.5 W • Off mode: 0.5 W • Power LED...
... Scanning Frequency: 30 -83 kHz (H) / 56 -75 Hz (V) • sRGB Connectivity • Signal Input: VGA (Analog ), DVI-D (digital, HDCP) • Sync Input: Separate Sync, Sync on Green Convenience • User convenience: Menu, 4:3 / Wide, Power On/Off, Input, SmartImage lite • OSD Languages: English, French, German, Italian, Portuguese, Russian, Simplified Chinese, Spanish, Turkish • Other convenience: Kensington lock, VESA mount (100x100mm) • Plug & Play Compatibility: DDC/CI, Mac OS X, sRGB, Windows 7 • Standby mode: 0.5 W • Off mode: 0.5 W • Power LED...

User manual (English)
Page 2
... 1 1.2 Notational Descriptions 2 1.3 Disposal of product and packing material.... 3 2 Setting up the monitor 4 2.1 Installation 4 2.2 Operating the monitor 5 2.3 Remove Base Stand and Base 7 3 Product information 9 3.1 Smartimage Lite 9 3.2 SmartContrast 10 3.3 SmartControl Lite 11 3.4 Philips Pixel Defect Policy 18 4 Technical Specifications 20 4.1 Resolution & Preset Modes 23 4.2 Automatic PowerSaving 23 5 Regulatory Information 24 6 Customer care and warranty 30 7 Troubleshooting & FAQs 45 7.1 Troubleshooting 45 7.2 SmartControl Lite FAQs 47 7.3 General FAQs 48
... 1 1.2 Notational Descriptions 2 1.3 Disposal of product and packing material.... 3 2 Setting up the monitor 4 2.1 Installation 4 2.2 Operating the monitor 5 2.3 Remove Base Stand and Base 7 3 Product information 9 3.1 Smartimage Lite 9 3.2 SmartContrast 10 3.3 SmartControl Lite 11 3.4 Philips Pixel Defect Policy 18 4 Technical Specifications 20 4.1 Resolution & Preset Modes 23 4.2 Automatic PowerSaving 23 5 Regulatory Information 24 6 Customer care and warranty 30 7 Troubleshooting & FAQs 45 7.1 Troubleshooting 45 7.2 SmartControl Lite FAQs 47 7.3 General FAQs 48
User manual (English)
Page 3
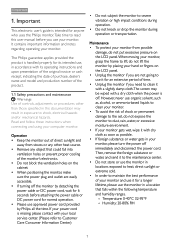
...; When positioning the monitor, make sure the power plug and outlet are not going to use it for its operating instructions and upon presentation of the original invoice or cash receipt, indicating the date of purchase, dealer's name and model and production number of the product. 1.1 Safety precautions and maintenance Warnings Use of controls, adjustments or procedures other heat source. • Remove any object...
...; When positioning the monitor, make sure the power plug and outlet are not going to use it for its operating instructions and upon presentation of the original invoice or cash receipt, indicating the date of purchase, dealer's name and model and production number of the product. 1.1 Safety precautions and maintenance Warnings Use of controls, adjustments or procedures other heat source. • Remove any object...

User manual (English)
Page 6
... insert the base stand into the base column. 2. Register your product and get support at www.philips.com/welcome 273E3 Quick Star t hina. All Quick Start Guide SmartControl software Monitor drivers rights reserved. Place the monitor face down on soft and smooth surface taking care to avoid scratching or damaging the screen. 4 Setting up the monitor 2.1 Installation 273E3 Package contents 2. Made and printed in C DVI (optional) VGA (optional) Install base stand 273E3 1.
... insert the base stand into the base column. 2. Register your product and get support at www.philips.com/welcome 273E3 Quick Star t hina. All Quick Start Guide SmartControl software Monitor drivers rights reserved. Place the monitor face down on soft and smooth surface taking care to avoid scratching or damaging the screen. 4 Setting up the monitor 2.1 Installation 273E3 Package contents 2. Made and printed in C DVI (optional) VGA (optional) Install base stand 273E3 1.

User manual (English)
Page 7
... power cable. 3. 2. Turn off . : To adjust the OSD menu. : To change the signal input source. : SmartImage Lite.There are three modes to PC 1. Turn on the back of your computer and monitor. Connect the power cord to the back of your computer and your PC 2.2 Operating the monitor AC power input VGA input DVI-D input(Available for selected models) Kensington anti-thief lock Connect to be selected: Standard, Internet and Game. 5 Plug the power cord of the monitor firmly. 2. Connect the monitor signal cable...
... power cable. 3. 2. Turn off . : To adjust the OSD menu. : To change the signal input source. : SmartImage Lite.There are three modes to PC 1. Turn on the back of your computer and monitor. Connect the power cord to the back of your computer and your PC 2.2 Operating the monitor AC power input VGA input DVI-D input(Available for selected models) Kensington anti-thief lock Connect to be selected: Standard, Internet and Game. 5 Plug the power cord of the monitor firmly. 2. Connect the monitor signal cable...
User manual (English)
Page 8
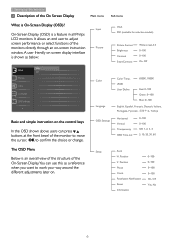
Input Picture VGA DVI (available for selective models) Picture Format Brightness Contrast SmartContrast Wide screen,4:3 0~100 0~100 On, Off Color Language OSD Settings Color Temp. Auto H. Setting up the monitor Description of the On Screen Display Main menu Sub menu What is a feature in all Philips LCD monitors. A user friendly on screen display interface is an overall view of the structure of the On-Screen Display.You can press buttons at the front bezel of the monitors directly through an on . Position Phase Clock Resolution Notification...
Input Picture VGA DVI (available for selective models) Picture Format Brightness Contrast SmartContrast Wide screen,4:3 0~100 0~100 On, Off Color Language OSD Settings Color Temp. Auto H. Setting up the monitor Description of the On Screen Display Main menu Sub menu What is a feature in all Philips LCD monitors. A user friendly on screen display interface is an overall view of the structure of the On-Screen Display.You can press buttons at the front bezel of the monitors directly through an on . Position Phase Clock Resolution Notification...

User manual (English)
Page 9
... Tilt 2. Press the locking clips to avoid damage or injury. 1. Display of the native resolution alert can be switched off from the base column. 7 Setting up the monitor Resolution notification 2.3 Remove Base Stand and Base This monitor is displayed on a smooth surface, taking care to avoid scratching or damaging the screen. Remove the Base Stand Before you start disassembling the monitor base, please follow the instructions below to detach the base stand away from Setup in the OSD (On Screen Display) menu...
... Tilt 2. Press the locking clips to avoid damage or injury. 1. Display of the native resolution alert can be switched off from the base column. 7 Setting up the monitor Resolution notification 2.3 Remove Base Stand and Base This monitor is displayed on a smooth surface, taking care to avoid scratching or damaging the screen. Remove the Base Stand Before you start disassembling the monitor base, please follow the instructions below to detach the base stand away from Setup in the OSD (On Screen Display) menu...

User manual (English)
Page 16
... Allows user to the plug in page. Options>Preferences - Disabled removes SmartControl Lite from the right click context menu. • Enable Task Tray icon is disabled until the second color screen. • Next goes to the succeeding target (6-targets). • Final next goes File>Presets pane. • Cancel closes the UI and returns to change setting for Select Preset and Tune Display in...
... Allows user to the plug in page. Options>Preferences - Disabled removes SmartControl Lite from the right click context menu. • Enable Task Tray icon is disabled until the second color screen. • Next goes to the succeeding target (6-targets). • Final next goes File>Presets pane. • Cancel closes the UI and returns to change setting for Select Preset and Tune Display in...

User manual (English)
Page 22
... Contrast ratio (typ.) Response time (typical) Optimum Resolution Viewing angle Picture Enhancement Display colors Vertical refresh rate Horizontal Frequency sRGB Connectivity Signal input Input Signal Convenience User Convenience OSD Languages Other convenience Plug & Play Compatibility Stand Tilt TFT-LCD CCFL 273E3 27" ( 68.6 cm) 16:9 0.31 x 0.31 mm 395 cd/m² 500,000:1 1000:1 5 ms 1920x1080 @ 60Hz 170° (H) / 160° (V)@C/R>10 SmartImage Lite 16.7 M 56Hz -76Hz 30kHz - 83kHz YES DVI-D (digital),VGA (Analog) Separate Sync, Sync on Green English...
... Contrast ratio (typ.) Response time (typical) Optimum Resolution Viewing angle Picture Enhancement Display colors Vertical refresh rate Horizontal Frequency sRGB Connectivity Signal input Input Signal Convenience User Convenience OSD Languages Other convenience Plug & Play Compatibility Stand Tilt TFT-LCD CCFL 273E3 27" ( 68.6 cm) 16:9 0.31 x 0.31 mm 395 cd/m² 500,000:1 1000:1 5 ms 1920x1080 @ 60Hz 170° (H) / 160° (V)@C/R>10 SmartImage Lite 16.7 M 56Hz -76Hz 30kHz - 83kHz YES DVI-D (digital),VGA (Analog) Separate Sync, Sync on Green English...

User manual (English)
Page 25
....00 4.2 Automatic PowerSaving If you have VESA DPM compliance display card or software installed in your PC, the monitor can automatically reduce its power consumption when not in use. 4.Technical Specifications 4.1 Resolution & Preset Modes Maximum Resolution For 273E3 1920 x 1080 at 60 Hz (analog input) 1920 x 1080 at 60 Hz (digital input) Recommended Resolution For 273E3 1920 x 1080 at 60 Hz (digital input) H. freq (kHz) 31.47 31.47...
....00 4.2 Automatic PowerSaving If you have VESA DPM compliance display card or software installed in your PC, the monitor can automatically reduce its power consumption when not in use. 4.Technical Specifications 4.1 Resolution & Preset Modes Maximum Resolution For 273E3 1920 x 1080 at 60 Hz (analog input) 1920 x 1080 at 60 Hz (digital input) Recommended Resolution For 273E3 1920 x 1080 at 60 Hz (digital input) H. freq (kHz) 31.47 31.47...
User manual (English)
Page 33
... as from the purchase date of your original monitor For the B, P and S models, your monitor will be used in any problems, we advise you to read the operating instructions carefully or go to the http:// www.philips.com/support website for remote areas like Island or other geographically difficult to the Philips F1rst Choice Warranty. Just a click away In case...
... as from the purchase date of your original monitor For the B, P and S models, your monitor will be used in any problems, we advise you to read the operating instructions carefully or go to the http:// www.philips.com/support website for remote areas like Island or other geographically difficult to the Philips F1rst Choice Warranty. Just a click away In case...
User manual (English)
Page 35
...; The model or production number on the model you can pick him up or it to comply with its intended use and ease of our Certified Service Center or your address within 10 working days after the unit is requested. What is excluded? The Philips guarantee applies provided the product is repaired you purchased when your monitor turns out to...
...; The model or production number on the model you can pick him up or it to comply with its intended use and ease of our Certified Service Center or your address within 10 working days after the unit is requested. What is excluded? The Philips guarantee applies provided the product is repaired you purchased when your monitor turns out to...

User manual (English)
Page 36
... instructions manual or your official warranty card delivered to you to the www.philips.com/ support website for all replaced and repaired products and parts also expires. Just a phone call away You need to check your warranty card carefully or go to read the operating instructions ... check your Philips dealer or directly the Philips Service and Consumer Information Centers. For two years thereafter, all parts will be used in any problems, we advise you at your day of purchase for installation or setup of the product, adjustment of your product. reception problems ...
... instructions manual or your official warranty card delivered to you to the www.philips.com/ support website for all replaced and repaired products and parts also expires. Just a phone call away You need to check your warranty card carefully or go to read the operating instructions ... check your Philips dealer or directly the Philips Service and Consumer Information Centers. For two years thereafter, all parts will be used in any problems, we advise you at your day of purchase for installation or setup of the product, adjustment of your product. reception problems ...
User manual (English)
Page 44
... model or production number on -site within 48 hours of your monitor within the control of the product. Your warranty does not cover: Labor charges for installation or setup of the product, adjustment of customer controls on Parts / One Year Exchange* a product that you pay for the replacement or repair of all countries where the product is not limited to this owner's manual and keep...
... model or production number on -site within 48 hours of your monitor within the control of the product. Your warranty does not cover: Labor charges for installation or setup of the product, adjustment of customer controls on Parts / One Year Exchange* a product that you pay for the replacement or repair of all countries where the product is not limited to this owner's manual and keep...
User manual (English)
Page 47
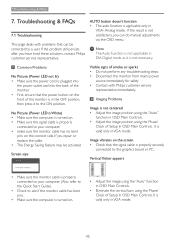
... perform any troubleshooting steps • Disconnect the monitor from mains power source immediately for safety • Contact with problems that can do manual adjustments via the OSD menu. 7.Troubleshooting & FAQs 7. No Picture (Power LED is White) • Make sure the computer is turned on. • Make sure the signal cable is properly connected to your computer. (Also refer to the Quick Start Guide). • Check to the graphics board or PC. Analog mode. If the problem still persists...
... perform any troubleshooting steps • Disconnect the monitor from mains power source immediately for safety • Contact with problems that can do manual adjustments via the OSD menu. 7.Troubleshooting & FAQs 7. No Picture (Power LED is White) • Make sure the computer is turned on. • Make sure the signal cable is properly connected to your computer. (Also refer to the Quick Start Guide). • Check to the graphics board or PC. Analog mode. If the problem still persists...

User manual (English)
Page 48
... only in VGA mode. Image appears blurred, indistinct or too dark • Adjust the contrast and brightness on " light using the Phase/ Clock of still or static images over an extended period may cause " burn in", also known as monitor's recommended screen native resolution. 46 An "after-image", "burn-in" or "ghost image" remains after the power has been turned off . • Always activate a moving screen saver program...
... only in VGA mode. Image appears blurred, indistinct or too dark • Adjust the contrast and brightness on " light using the Phase/ Clock of still or static images over an extended period may cause " burn in", also known as monitor's recommended screen native resolution. 46 An "after-image", "burn-in" or "ghost image" remains after the power has been turned off . • Always activate a moving screen saver program...
User manual (English)
Page 49
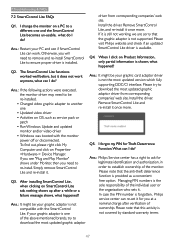
... "Plug and Play Monitor" shows under Monitor, then you need to be re-installed. • Changed video graphic adapter to another one of the individual user or the organization who sets it for you will need to remove and re-install SmartControl Lite to re-install. Please visit Philips website and check if an updated SmartControl Lite driver is one • Updated video driver • Activities on a PC to download the most updated...
... "Plug and Play Monitor" shows under Monitor, then you need to be re-installed. • Changed video graphic adapter to another one of the individual user or the organization who sets it for you will need to remove and re-install SmartControl Lite to re-install. Please visit Philips website and check if an updated SmartControl Lite driver is one • Updated video driver • Activities on a PC to download the most updated...

User manual (English)
Page 50
... Display Control Panel, select the 'Settings' tab. Follow the instructions in this video mode'? Ans.: Simply press the OK button, then select 'Reset' to install the drivers.Your computer may affect your monitor. Ans.: In general it up to 75Hz to the panel surface side. For extensive cleaning, please use isopropyl alcohol. How do I do I am making monitor adjustments via OSD? In the Control Panel Window, select the Display icon. Ans.: Recommended resolution for LCD monitor...
... Display Control Panel, select the 'Settings' tab. Follow the instructions in this video mode'? Ans.: Simply press the OK button, then select 'Reset' to install the drivers.Your computer may affect your monitor. Ans.: In general it up to 75Hz to the panel surface side. For extensive cleaning, please use isopropyl alcohol. How do I do I am making monitor adjustments via OSD? In the Control Panel Window, select the Display icon. Ans.: Recommended resolution for LCD monitor...

User manual (English)
Page 51
... is white, at its native resolution of absolute scale, (degrees Kelvin). 7.Troubleshooting & FAQs Q8: Can I connect my LCD monitor to your screen. Always activate a periodic screen refresh application if your Philips sales representative for ensuring correct exchange of my monitor? Neutral temperature is displaying jagged characters? All Philips LCD monitors are Plug-and-Play compatible with Windows 7/Vista/XP/NT, Mac OSX, Linux Q11: What is Image Sticking, or Image Burn-in...
... is white, at its native resolution of absolute scale, (degrees Kelvin). 7.Troubleshooting & FAQs Q8: Can I connect my LCD monitor to your screen. Always activate a periodic screen refresh application if your Philips sales representative for ensuring correct exchange of my monitor? Neutral temperature is displaying jagged characters? All Philips LCD monitors are Plug-and-Play compatible with Windows 7/Vista/XP/NT, Mac OSX, Linux Q11: What is Image Sticking, or Image Burn-in...


