
User manual
Page 5
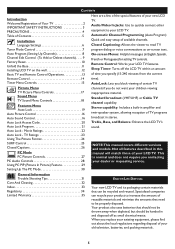
...LCD TV. On-screen Menus: Helpful messages (in amplifier and twin-speaker system, allowing reception of certain TV Picture Menu TV Picture Menu Controls 17 Sound Menu TV Sound Menu Controls 18 Features Menu Auto Lock 19 Auto Picture Control 16 Auto Sound Control 16 Auto Lock Access Code 20.... . 9 Factory Reset 10 Unfold the Base 11 Installing LCD TV on -screen text. When you replace your new LCD TV. Sleep Timer: Turns off as on the wall 12 Basic TV and Remote Control Operations 13 Remote Control 14 Timer Menu Controls 15 Here are a few of the special features of your ...
...LCD TV. On-screen Menus: Helpful messages (in amplifier and twin-speaker system, allowing reception of certain TV Picture Menu TV Picture Menu Controls 17 Sound Menu TV Sound Menu Controls 18 Features Menu Auto Lock 19 Auto Picture Control 16 Auto Sound Control 16 Auto Lock Access Code 20.... . 9 Factory Reset 10 Unfold the Base 11 Installing LCD TV on -screen text. When you replace your new LCD TV. Sleep Timer: Turns off as on the wall 12 Basic TV and Remote Control Operations 13 Remote Control 14 Timer Menu Controls 15 Here are a few of the special features of your ...
User manual
Page 6
...or ON. Green LED lit on front of the TV. Remote transmitter will operate the TV. Red LED lit on front of operation: OFF - Remote does not work: - Once the POWER is in the OFF mode (No LED lit on using the remote control. Remote transmitter will change the mode from OFF to indicate ...ON, whichever mode the TV was in three modes of TV. By pressing POWER on the TV, the LED will ...
...or ON. Green LED lit on front of the TV. Remote transmitter will operate the TV. Red LED lit on front of operation: OFF - Remote does not work: - Once the POWER is in the OFF mode (No LED lit on using the remote control. Remote transmitter will change the mode from OFF to indicate ...ON, whichever mode the TV was in three modes of TV. By pressing POWER on the TV, the LED will ...
User manual
Page 7
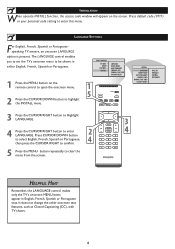
...When operate INSTALL function, the access code window will appear on the remote control to open the onscreen menu. 2 Press the CURSOR DOWN button to enter this menu. The LANGUAGE control enables you to set the TV's onscreen menu to be shown in English, French, Spanish or Portuguese... to highlight the INSTALL menu. LANGUAGE SETTINGS For English, French, Spanish or Portuguese speaking TV owners, an onscreen LANGUAGE option is present. HELPFUL HINT Remember, the LANGUAGE control makes only the TV's onscreen MENU items appear in either English, French, Spanish or Portuguese. 1 Press the...
...When operate INSTALL function, the access code window will appear on the remote control to open the onscreen menu. 2 Press the CURSOR DOWN button to enter this menu. The LANGUAGE control enables you to set the TV's onscreen menu to be shown in English, French, Spanish or Portuguese... to highlight the INSTALL menu. LANGUAGE SETTINGS For English, French, Spanish or Portuguese speaking TV owners, an onscreen LANGUAGE option is present. HELPFUL HINT Remember, the LANGUAGE control makes only the TV's onscreen MENU items appear in either English, French, Spanish or Portuguese. 1 Press the...
User manual
Page 9
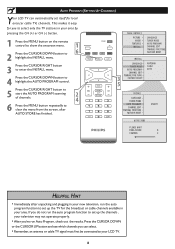
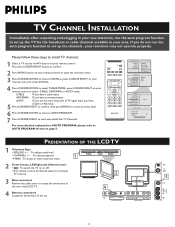
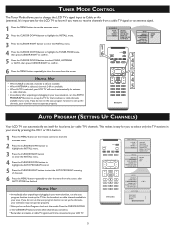
... the TV for local area (or cable TV) channels. AUTO PROGRAM (SETTING UP CHANNELS) Your LCD TV can select. • Remember, an antenna or cable TV signal must first be connected to your area by pressing the CH (+) or CH (-) button. 1 Press the MENU button on the remote control to ...start the AUTO PROGRAM scanning of channels. � � 6 Press the MENU button repeatedly to select only the TV stations in your LCD TV. 8 MAIN CONTROLS PICTURE AUDIO FEATURES INSTALL LANGUAGE TUNER MODE AUTO PROGRAM CHANNEL EDIT MANUAL FINE TUNE FACTORY RESET INSTALL LANGUAGE TUNER MODE AUTO ...
... the TV for local area (or cable TV) channels. AUTO PROGRAM (SETTING UP CHANNELS) Your LCD TV can select. • Remember, an antenna or cable TV signal must first be connected to your area by pressing the CH (+) or CH (-) button. 1 Press the MENU button on the remote control to ...start the AUTO PROGRAM scanning of channels. � � 6 Press the MENU button repeatedly to select only the TV stations in your LCD TV. 8 MAIN CONTROLS PICTURE AUDIO FEATURES INSTALL LANGUAGE TUNER MODE AUTO PROGRAM CHANNEL EDIT MANUAL FINE TUNE FACTORY RESET INSTALL LANGUAGE TUNER MODE AUTO ...
User manual
Page 11
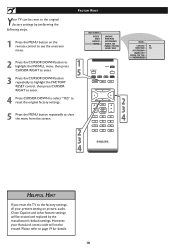
..., your present setting on the remote control to see the onscreen menu. 2 Press the CURSOR DOWN button to highlight the INSTALL menu, then press � CURSOR RIGHT to enter. � 3 Press the CURSOR DOWN button repeatedly to highlight the FACTORY RESET control, then press CURSOR RIGHT to enter...CHANNEL EDIT MANUAL FINE TUNE FACTORY RESET � � � � � � HELPFUL HINT If you reset the TV to the factory settings, all your AutoLock access code will be reset to the original factory settings by the manufacture's default settings. FACTORY RESET...
..., your present setting on the remote control to see the onscreen menu. 2 Press the CURSOR DOWN button to highlight the INSTALL menu, then press � CURSOR RIGHT to enter. � 3 Press the CURSOR DOWN button repeatedly to highlight the FACTORY RESET control, then press CURSOR RIGHT to enter...CHANNEL EDIT MANUAL FINE TUNE FACTORY RESET � � � � � � HELPFUL HINT If you reset the TV to the factory settings, all your AutoLock access code will be reset to the original factory settings by the manufacture's default settings. FACTORY RESET...
User manual
Page 14
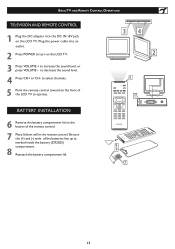
... operate. - - �� 2 � � BATTERY INSTALLATION 6 Remove the battery compartment lid on the LCD TV. BASIC TV AND REMOTE CONTROL OPERATIONS TELEVISION AND REMOTE CONTROL 1 Plug the DC adapter into an outlet. 2 Press POWER to turn on the LCD TV. 3 Press VOLUME + to decrease the sound level. 4 Press CH+ or CH- Plug the power cable into the DC...
... operate. - - �� 2 � � BATTERY INSTALLATION 6 Remove the battery compartment lid on the LCD TV. BASIC TV AND REMOTE CONTROL OPERATIONS TELEVISION AND REMOTE CONTROL 1 Plug the DC adapter into an outlet. 2 Press POWER to turn on the LCD TV. 3 Press VOLUME + to decrease the sound level. 4 Press CH+ or CH- Plug the power cable into the DC...
User manual
Page 15
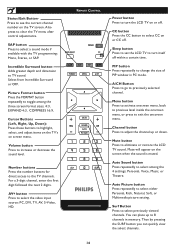
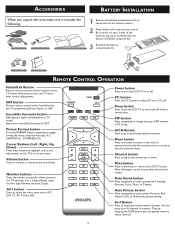
... to go to see the current channel number on screen menu. Mute button Press to clear the TV menu after control adjustments. Also press to eliminate or restore the LCD TV sound. Picture Format button Press the FORMAT button repeatedly to turn itself off . AV+ button Press.... Auto Picture button Press repeatedly to select a sound mode if available with the TV programming: Mono, Stereo, or SAP. SAP button Press to select either Personal, Rich, Natural, Soft, or Multimedia picture setting. REMOTE CONTROL Power button Press to toggle among the 4 settings; For a 3-digit channel, ...
... to go to see the current channel number on screen menu. Mute button Press to clear the TV menu after control adjustments. Also press to eliminate or restore the LCD TV sound. Picture Format button Press the FORMAT button repeatedly to turn itself off . AV+ button Press.... Auto Picture button Press repeatedly to select a sound mode if available with the TV programming: Mono, Stereo, or SAP. SAP button Press to select either Personal, Rich, Natural, Soft, or Multimedia picture setting. REMOTE CONTROL Power button Press to toggle among the 4 settings; For a 3-digit channel, ...

User manual
Page 16
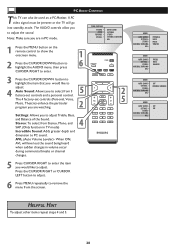
SLEEP 240 MIN. � � HELPFUL HINT IMPORTANT For the Timer to select your requiring sleep timing. Once the set must not be turned off , the Timer is turned off . TIMER MENU CONTROLS 1 Press the SLEEP button on the remote control to show the onscreen menu.. 2 Press the SLEEP button repeatedly to function, the set is disabled. 15 SLEEP OFF SLEEP 15 MIN.
SLEEP 240 MIN. � � HELPFUL HINT IMPORTANT For the Timer to select your requiring sleep timing. Once the set must not be turned off , the Timer is turned off . TIMER MENU CONTROLS 1 Press the SLEEP button on the remote control to show the onscreen menu.. 2 Press the SLEEP button repeatedly to function, the set is disabled. 15 SLEEP OFF SLEEP 15 MIN.
User manual
Page 19
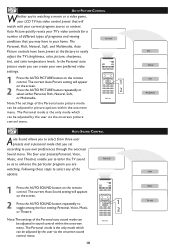
..., Voice, Music, and Theatre) enable you can be adjusted by the user via the onscreen picture control menu. Auto Picture quickly resets your LCD TV has video control preset that will appear � on the remote control. AUTO SOUND CONTROL Auto Sound allows you to select from three user presets and a personal mode that you may have...
..., Voice, Music, and Theatre) enable you can be adjusted by the user via the onscreen picture control menu. Auto Picture quickly resets your LCD TV has video control preset that will appear � on the remote control. AUTO SOUND CONTROL Auto Sound allows you to select from three user presets and a personal mode that you may have...
User manual
Page 26
between different TV channels that the external A/V Jacks and their channel and use the same steps described on the remote control. The number of previously viewed channels can be selected with the SURF button on the screen, press the CURSOR RIGHT button to add the present .... 4 If you want to delete the present channel from the SURF list, press the CURSOR RIGHT button again. SURF EDIT 22 36 Add? to your remote control. SURF EDIT 22 36 Delete? HELPFUL HINT Along with regularly programmed channels, the external video source connections can be added to the right. 3 While the...
between different TV channels that the external A/V Jacks and their channel and use the same steps described on the remote control. The number of previously viewed channels can be selected with the SURF button on the screen, press the CURSOR RIGHT button to add the present .... 4 If you want to delete the present channel from the SURF list, press the CURSOR RIGHT button again. SURF EDIT 22 36 Add? to your remote control. SURF EDIT 22 36 Delete? HELPFUL HINT Along with regularly programmed channels, the external video source connections can be added to the right. 3 While the...

User manual
Page 27
Refer to your remote control. FEATURES PICTURE FORMAT PICTURE ALIGNMENT AUTOLOCK CLOSED CAPTION COLOR TEMP LOCK PROGRAM CHANG CODE CLEAR ALL BLOCK OPTION MOVIE RATING TV RATING CLOSED CAPTION CAPTION MODE CC1 CC DISPLAY 2 Press the CURSOR DOWN button to highlight the FEATURES menu, then .... Designed to help the hearing impaired, this feature uses onscreen "text boxes" to show dialogue and conversations while the TV program is in MAIN CONTROL PICTURE AUDIO FEATURES INSTALL PICTURE FORMAT PICTURE ALIGNMENT AUTOLOCK CLOSED CAPTION COLOR TEMP progress. 1 � 1 Press the MENU...
Refer to your remote control. FEATURES PICTURE FORMAT PICTURE ALIGNMENT AUTOLOCK CLOSED CAPTION COLOR TEMP LOCK PROGRAM CHANG CODE CLEAR ALL BLOCK OPTION MOVIE RATING TV RATING CLOSED CAPTION CAPTION MODE CC1 CC DISPLAY 2 Press the CURSOR DOWN button to highlight the FEATURES menu, then .... Designed to help the hearing impaired, this feature uses onscreen "text boxes" to show dialogue and conversations while the TV program is in MAIN CONTROL PICTURE AUDIO FEATURES INSTALL PICTURE FORMAT PICTURE ALIGNMENT AUTOLOCK CLOSED CAPTION COLOR TEMP progress. 1 � 1 Press the MENU...
User manual
Page 28
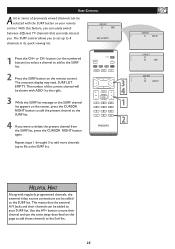
... HELPFUL HINT 1. To adjust other items repeat steps 3 and 4. 2. If you are in PC mode. 1 1 Press the MENU button on the remote control to see the onscreen menu. � 2 When the PICTURE menu is highlighted, Press the CURSOR RIGHT button to enter the PICTURE menu. 3 Press ...Adjust: The LCD Monitor will go into standby mode. A PC video signal must be present or the TV will automatically adjust to manually fine tune the image as a PC Monitor. PC PICTURE CONTROLS T his TV can also be activated by pressing Auto Picture button on your Remote Control. Vertical-adjust ...
... HELPFUL HINT 1. To adjust other items repeat steps 3 and 4. 2. If you are in PC mode. 1 1 Press the MENU button on the remote control to see the onscreen menu. � 2 When the PICTURE menu is highlighted, Press the CURSOR RIGHT button to enter the PICTURE menu. 3 Press ...Adjust: The LCD Monitor will go into standby mode. A PC video signal must be present or the TV will automatically adjust to manually fine tune the image as a PC Monitor. PC PICTURE CONTROLS T his TV can also be activated by pressing Auto Picture button on your Remote Control. Vertical-adjust ...
User manual
Page 29
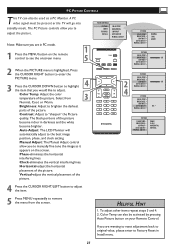
PC AUDIO CONTROLS This TV can also be present or the TV will level out the sound being heard when sudden changes in TV mode) Incredible Sound: Adds greater depth and dimension to PC sound. AVL (Auto Volume Leveler)- AUDIO AUTO SOUND SETTINGS STEREO ...STEREO INCREDIBLE SURROUND AVL HELPFUL HINT To adjust other items repeat steps 4 and 5. 28 MAIN CONTROLS PICTURE AUDIO FEATURES INSTALL AUTO SOUND SETTINGS STEREO INCREDIBLE SURROUND AVL 1 Press the MENU button on the remote control to show the onscreen menu. 1 2 Press the CURSOR DOWN button to highlight the AUDIO ...
PC AUDIO CONTROLS This TV can also be present or the TV will level out the sound being heard when sudden changes in TV mode) Incredible Sound: Adds greater depth and dimension to PC sound. AVL (Auto Volume Leveler)- AUDIO AUTO SOUND SETTINGS STEREO ...STEREO INCREDIBLE SURROUND AVL HELPFUL HINT To adjust other items repeat steps 4 and 5. 28 MAIN CONTROLS PICTURE AUDIO FEATURES INSTALL AUTO SOUND SETTINGS STEREO INCREDIBLE SURROUND AVL 1 Press the MENU button on the remote control to show the onscreen menu. 1 2 Press the CURSOR DOWN button to highlight the AUDIO ...

User manual
Page 32
... MONO Sound • If using an accessory device, be produced in the remote. Remote Does Not Work • Check the batteries. TROUBLE SHOOTING TIPS No Power • Check the TV power cord. Place lithium cell in MONO only. • Check Sound control setting. Unplug the TV, wait 10 seconds, then reinsert the plug into the...
... MONO Sound • If using an accessory device, be produced in the remote. Remote Does Not Work • Check the batteries. TROUBLE SHOOTING TIPS No Power • Check the TV power cord. Place lithium cell in MONO only. • Check Sound control setting. Unplug the TV, wait 10 seconds, then reinsert the plug into the...
Quick start guide
Page 1
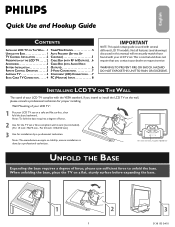
.... . . 4 PC (MONITOR) INPUTS 8 Espãnol Português INSTALLING LCD TV ON THE WALL The stand of force. 2 Use for the TV set a Vesa compliant wall mount (not included). (For 15 inch: 75x75 mm , For 20 inch: 100x100 mm) 3 Use for proper installing. Note: The manufacture accepts no ...BATTERY INSTALLATION 3 OUTPUTS 6 WARNING:TO PREVENT FIRE OR SHOCK HAZARD REMOTE CONTROL OPERATION 3 S-VIDEO CONNECTIONS 7 DO NOT EXPOSE THIS UNIT TO RAIN OR EXCESSIVE. Note: To fold the base requires a degree of your LCD TV complies with the VESA standard, if you contact your dealer or request...
.... . . 4 PC (MONITOR) INPUTS 8 Espãnol Português INSTALLING LCD TV ON THE WALL The stand of force. 2 Use for the TV set a Vesa compliant wall mount (not included). (For 15 inch: 75x75 mm , For 20 inch: 100x100 mm) 3 Use for proper installing. Note: The manufacture accepts no ...BATTERY INSTALLATION 3 OUTPUTS 6 WARNING:TO PREVENT FIRE OR SHOCK HAZARD REMOTE CONTROL OPERATION 3 S-VIDEO CONNECTIONS 7 DO NOT EXPOSE THIS UNIT TO RAIN OR EXCESSIVE. Note: To fold the base requires a degree of your LCD TV complies with the VESA standard, if you contact your dealer or request...
Quick start guide
Page 2
... LCD TV. 4 Bottom connectors Located at the bottom of TV signal input you do not run the auto program function to set up the channels , your television may not operate properly. Please follow these steps to install TV channels: 1 Select a TV source via AV+ button on your remote control... button, LED light and infrared sensor • : To switch the TV on or off. • Aim remote control at infrared sensors to activate TV controls. 2 3 Rear connectors Remove the cable cover to AUTO PROGRAM section on your remote control. If you have an antenna input AUTO IF you are not sure ...
... LCD TV. 4 Bottom connectors Located at the bottom of TV signal input you do not run the auto program function to set up the channels , your television may not operate properly. Please follow these steps to install TV channels: 1 Select a TV source via AV+ button on your remote control... button, LED light and infrared sensor • : To switch the TV on or off. • Aim remote control at infrared sensors to activate TV controls. 2 3 Rear connectors Remove the cable cover to AUTO PROGRAM section on your remote control. If you have an antenna input AUTO IF you are not sure ...
Quick start guide
Page 3
... tment. 3 Reattach the battery TunceroLm-Adpapaterr tment lid.Warranty Card 1 3 2 REMOTE CONTROL OPERATION Status/Exit Button- SAP button Press to turn the LCD TV on or CC off . PIP button Press repeatedly to eliminate or restore the LCD TV sound. Incredible Surround button- You can quickly view the select channels. 3 Select .... Mute will appear on the bottom of PIP window in PC mode. Mute button Press to change the size of the remote control. 2 Place lithium cell in the remote control. ACCESSORIES BATTERY INSTALLATION When you can place up to 8 channels in memory.
... tment. 3 Reattach the battery TunceroLm-Adpapaterr tment lid.Warranty Card 1 3 2 REMOTE CONTROL OPERATION Status/Exit Button- SAP button Press to turn the LCD TV on or CC off . PIP button Press repeatedly to eliminate or restore the LCD TV sound. Incredible Surround button- You can quickly view the select channels. 3 Select .... Mute will appear on the bottom of PIP window in PC mode. Mute button Press to change the size of the remote control. 2 Place lithium cell in the remote control. ACCESSORIES BATTERY INSTALLATION When you can place up to 8 channels in memory.
Quick start guide
Page 4
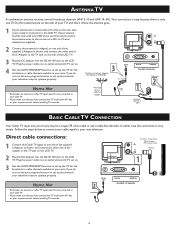
... properly. If you do not run the auto program function to the screws on the side of the LCD TV. 3 Plug the DC adapter into your remote control, before installing TV channels. ANTENNA TV A combination antenna receives normal broadcast channels (VHF 2-13 and UHF 14-69). Plug the power cable ...into an outlet and switch TV set on the LCD TV. Plug the power cable into an outlet and switch TV set on the LCD TV. Follow the steps below to connect your cable signal to set up the channels , your remote control, before installing TV channels. The Cable TV signal from Cable Company (75...
... properly. If you do not run the auto program function to the screws on the side of the LCD TV. 3 Plug the DC adapter into your remote control, before installing TV channels. ANTENNA TV A combination antenna receives normal broadcast channels (VHF 2-13 and UHF 14-69). Plug the power cable ...into an outlet and switch TV set on the LCD TV. Plug the power cable into an outlet and switch TV set on the LCD TV. Follow the steps below to connect your cable signal to set up the channels , your remote control, before installing TV channels. The Cable TV signal from Cable Company (75...
Quick start guide
Page 5
... is selected, your LCD TV will search automatically for antenna or cable channels. • Immediately after unpacking and plugging in your new television, run the AUTO PROGRAM function to set up the TV for the broadcast or cable channels available in your area. button. 1 Press the MENU button on the remote control to show the...
... is selected, your LCD TV will search automatically for antenna or cable channels. • Immediately after unpacking and plugging in your new television, run the AUTO PROGRAM function to set up the TV for the broadcast or cable channels available in your area. button. 1 Press the MENU button on the remote control to show the...
Quick start guide
Page 6
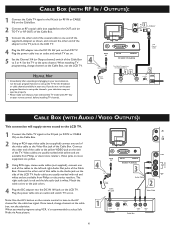
... cable to the Video Out jack of the Cable Box to the AV channel for the broadcast or cable channels available in your remote control, before installing TV channels. 3 L-Adapter TV 4 DC IN 16V DC Adapter Power Cable DVI-I IN AUDIO IN DVI (HDCP / PC ANALOG) 3 Audio Cable 2 Video Cable S-...jack on the remote control to tune to 3 or 4. TV DC IN 16V 4 DC Adapter Power Cable Cable TV signal DVI-I IN AUDIO IN DVI (HDCP / PC ANALOG) 75 Ω Coaxial Cable The Cable TV signal from Philips or electronics retailers. Note: Use the AV+ button on the LCD TV. If you watch...
... cable to the Video Out jack of the Cable Box to the AV channel for the broadcast or cable channels available in your remote control, before installing TV channels. 3 L-Adapter TV 4 DC IN 16V DC Adapter Power Cable DVI-I IN AUDIO IN DVI (HDCP / PC ANALOG) 3 Audio Cable 2 Video Cable S-...jack on the remote control to tune to 3 or 4. TV DC IN 16V 4 DC Adapter Power Cable Cable TV signal DVI-I IN AUDIO IN DVI (HDCP / PC ANALOG) 75 Ω Coaxial Cable The Cable TV signal from Philips or electronics retailers. Note: Use the AV+ button on the LCD TV. If you watch...


