

User manual
Page 1
English Français LCD TV User`s Manual 15PF5120 20PF5120 Thank you may access our online help fast? If you have read your instructions and still need assistance, you for quick tips that make using your Philips product more enjoyable. Need help at www.usasupport.philips.com or call 1-888-PHILIPS (744-5477) while with your user Manual and/or Quick-Use Guide first for choosing Philips. Read your product (and Model / Serial number) Espãnol Português Model No.: Serial No.: 3138 155 24031
English Français LCD TV User`s Manual 15PF5120 20PF5120 Thank you may access our online help fast? If you have read your instructions and still need assistance, you for quick tips that make using your Philips product more enjoyable. Need help at www.usasupport.philips.com or call 1-888-PHILIPS (744-5477) while with your user Manual and/or Quick-Use Guide first for choosing Philips. Read your product (and Model / Serial number) Espãnol Português Model No.: Serial No.: 3138 155 24031
User manual
Page 4
... for a prolonged period of time. • Do not shift or move the LCD TV around each side of the VESA cover (see diagram below). POSITIONING THE LCD TELEVISON • Place the LCD TV on the inside of the LCD TV cabinet to the surface. • Wipe off water, or saliva as soon as... possible. If possible, when disposing of waste in the environment, check your area. • The LCD TV uses materials that will cause damage to allow for companies that can be recycled. To minimize the amount of batteries, use abrasive cleaning agents. - ...
... for a prolonged period of time. • Do not shift or move the LCD TV around each side of the VESA cover (see diagram below). POSITIONING THE LCD TELEVISON • Place the LCD TV on the inside of the LCD TV cabinet to the surface. • Wipe off water, or saliva as soon as... possible. If possible, when disposing of waste in the environment, check your area. • The LCD TV uses materials that will cause damage to allow for companies that can be recycled. To minimize the amount of batteries, use abrasive cleaning agents. - ...
User manual
Page 5
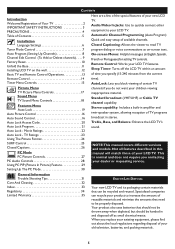
...Menu Auto Lock 19 Auto Picture Control 16 Auto Sound Control 16 Auto Lock Access Code 20 Auto Lock Program 21 Auto Lock - Your product also uses batteries that need to read TV program dialog or voice conversations as small chemical waste. On-screen Menus: Helpful messages (in... 7 Auto Program (Setting Up Channels 8 Channel Edit Control (To Add or Delete channels) . . . . 9 Factory Reset 10 Unfold the Base 11 Installing LCD TV on -screen text. Audio/Video In Jacks: Use to quickly connect other equipment to increase the amount of reusable materials and minimize the amounts that...
...Menu Auto Lock 19 Auto Picture Control 16 Auto Sound Control 16 Auto Lock Access Code 20 Auto Lock Program 21 Auto Lock - Your product also uses batteries that need to read TV program dialog or voice conversations as small chemical waste. On-screen Menus: Helpful messages (in... 7 Auto Program (Setting Up Channels 8 Channel Edit Control (To Add or Delete channels) . . . . 9 Factory Reset 10 Unfold the Base 11 Installing LCD TV on -screen text. Audio/Video In Jacks: Use to quickly connect other equipment to increase the amount of reusable materials and minimize the amounts that...
User manual
Page 8
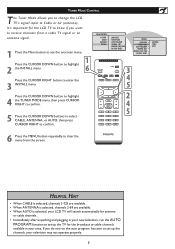
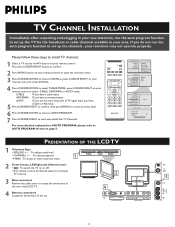
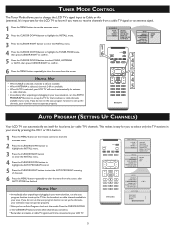
... CABLE is selected, channels 2-125 are available. • When ANTENNA is selected, channels 2-69 are available. • When AUTO is selected, your LCD TV will search automatically for antenna or cable channels. • Immediately after unpacking and plugging in your new television, run the auto program function to con...in your television may not operate properly. 7 If you do not run the AUTO PROGRAM function to set up the TV for the LCD TV to know if you to change the LCD TV's signal input to enter the 3 INSTALL menu. Press the CURSOR DOWN button to highlight 4 the TUNER MODE menu,...
... CABLE is selected, channels 2-125 are available. • When ANTENNA is selected, channels 2-69 are available. • When AUTO is selected, your LCD TV will search automatically for antenna or cable channels. • Immediately after unpacking and plugging in your new television, run the auto program function to con...in your television may not operate properly. 7 If you do not run the AUTO PROGRAM function to set up the TV for the LCD TV to know if you to change the LCD TV's signal input to enter the 3 INSTALL menu. Press the CURSOR DOWN button to highlight 4 the TUNER MODE menu,...
User manual
Page 9
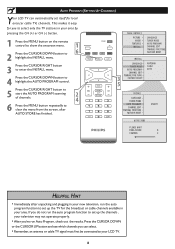
... the CURSOR RIGHT button to start the AUTO PROGRAM scanning of channels. � � 6 Press the MENU button repeatedly to your LCD TV. 8 MAIN CONTROLS PICTURE AUDIO FEATURES INSTALL LANGUAGE TUNER MODE AUTO PROGRAM CHANNEL EDIT MANUAL FINE TUNE FACTORY RESET INSTALL LANGUAGE TUNER MODE AUTO PROGRAM...nished. If you 've run Auto Program, check out the results. AUTO PROGRAM (SETTING UP CHANNELS) Your LCD TV can select. • Remember, an antenna or cable TV signal must first be connected to clear the menu from the screen, after unpacking and plugging in your new ...
... the CURSOR RIGHT button to start the AUTO PROGRAM scanning of channels. � � 6 Press the MENU button repeatedly to your LCD TV. 8 MAIN CONTROLS PICTURE AUDIO FEATURES INSTALL LANGUAGE TUNER MODE AUTO PROGRAM CHANNEL EDIT MANUAL FINE TUNE FACTORY RESET INSTALL LANGUAGE TUNER MODE AUTO PROGRAM...nished. If you 've run Auto Program, check out the results. AUTO PROGRAM (SETTING UP CHANNELS) Your LCD TV can select. • Remember, an antenna or cable TV signal must first be connected to clear the menu from the screen, after unpacking and plugging in your new ...
User manual
Page 10
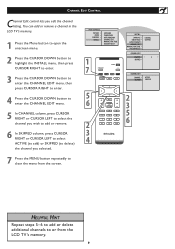
You can add or remove a channel in the LCD TV's memory. 1 Press the Menu button to open the onscreen menu. 2 Press the CURSOR DOWN button to highlight the INSTALL menu, then press CURSOR RIGHT to ... SKIPPED CHANNEL SKIPPED 2 CHANNEL EDIT CHANNEL SKIPPED ACTIVE SKIPPED HELPFUL HINT Repeat steps 5-6 to add or delete additional channels to clear the menu from the LCD TV's memory. 9
You can add or remove a channel in the LCD TV's memory. 1 Press the Menu button to open the onscreen menu. 2 Press the CURSOR DOWN button to highlight the INSTALL menu, then press CURSOR RIGHT to ... SKIPPED CHANNEL SKIPPED 2 CHANNEL EDIT CHANNEL SKIPPED ACTIVE SKIPPED HELPFUL HINT Repeat steps 5-6 to add or delete additional channels to clear the menu from the LCD TV's memory. 9
User manual
Page 12
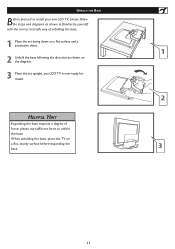
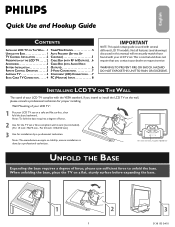
... follow the steps and diagrams as shown on the diagram. 3 Place the set upright, you LCD TV is now ready for install. When unfolding the base, place the TV on a flat , sturdy surface before expanding the base. 11 please use sufficient force to familiarize yourself with the correct and safe...
... follow the steps and diagrams as shown on the diagram. 3 Place the set upright, you LCD TV is now ready for install. When unfolding the base, place the TV on a flat , sturdy surface before expanding the base. 11 please use sufficient force to familiarize yourself with the correct and safe...

User manual
Page 13
... it above a sofa or bed. The manufacturer accepts no liability for installations not performed by professional technician. 15" : 75X75 mm 20" : 100x100 mm Easy wall mounting Smart tips 1. INSTALLING LCD TV ON THE WALL Vesa Complied Mounting The stand of 10 kg for each hole 3.6 mm in diameter and... 20 mm in accordance with VESA standard, if you intend to install the LCD TV on the wall the horizontal distance between the two mounting screws. WARNING ! 15" :125 mm 20" :190 mm * Read all instructions carefully before mounting! *...
... it above a sofa or bed. The manufacturer accepts no liability for installations not performed by professional technician. 15" : 75X75 mm 20" : 100x100 mm Easy wall mounting Smart tips 1. INSTALLING LCD TV ON THE WALL Vesa Complied Mounting The stand of 10 kg for each hole 3.6 mm in diameter and... 20 mm in accordance with VESA standard, if you intend to install the LCD TV on the wall the horizontal distance between the two mounting screws. WARNING ! 15" :125 mm 20" :190 mm * Read all instructions carefully before mounting! *...
User manual
Page 14
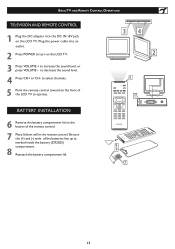
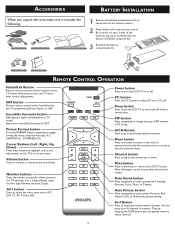
to decrease the sound level. 4 Press CH+ or CH- to select channels. 5 Point the remote control toward on the front of the LCD TV to operate. - - �� 2 � � BATTERY INSTALLATION 6 Remove the battery compartment lid on the button of the batteries line up ... (-) ends of the remote control. 7 Place lithium cell in the remote control. BASIC TV AND REMOTE CONTROL OPERATIONS TELEVISION AND REMOTE CONTROL 1 Plug the DC adapter into an outlet. 2 Press POWER to turn on the LCD TV. 3 Press VOLUME + to increase the sound level, or press VOLUME - Plug the ...
to decrease the sound level. 4 Press CH+ or CH- to select channels. 5 Point the remote control toward on the front of the LCD TV to operate. - - �� 2 � � BATTERY INSTALLATION 6 Remove the battery compartment lid on the button of the batteries line up ... (-) ends of the remote control. 7 Place lithium cell in the remote control. BASIC TV AND REMOTE CONTROL OPERATIONS TELEVISION AND REMOTE CONTROL 1 Plug the DC adapter into an outlet. 2 Press POWER to turn on the LCD TV. 3 Press VOLUME + to increase the sound level, or press VOLUME - Plug the ...
User manual
Page 15
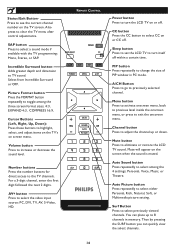
...the onscreen menu, or press to clear the TV menu after control adjustments. Number buttons Press the number buttons for direct access to TV sound. CC button Press the CC button to turn the LCD TV on screen menu. Sleep button Press to set the LCD TV to select CC on or CC off .... among the three screen format sizes; 4:3, EXPAND 4:3, COMPRESS 16:9, Cursor Buttons (Left, Right, Up, Down)Press these buttons to eliminate or restore the LCD TV sound. Auto Picture button Press repeatedly to increase or decrease the sound level. SAP button Press to select the video input source: PC, DVI...
...the onscreen menu, or press to clear the TV menu after control adjustments. Number buttons Press the number buttons for direct access to TV sound. CC button Press the CC button to turn the LCD TV on screen menu. Sleep button Press to set the LCD TV to select CC on or CC off .... among the three screen format sizes; 4:3, EXPAND 4:3, COMPRESS 16:9, Cursor Buttons (Left, Right, Up, Down)Press these buttons to eliminate or restore the LCD TV sound. Auto Picture button Press repeatedly to increase or decrease the sound level. SAP button Press to select the video input source: PC, DVI...
User manual
Page 17
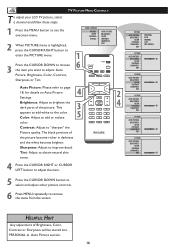
... Auto Picture � Settings. � Brightness: Adjust to the color. Contrast: Adjust to adjust: Auto Picture, Brightness, Color, Contrast, Sharpness or Tint. TV PICTURE MENU CONTROLS T o adjust your LCD TV picture, select a channel and follow these steps. 1 Press the MENU button to see the onscreen menu. 2 When PICTURE menu is highlighted, press the...
... Auto Picture � Settings. � Brightness: Adjust to the color. Contrast: Adjust to adjust: Auto Picture, Brightness, Color, Contrast, Sharpness or Tint. TV PICTURE MENU CONTROLS T o adjust your LCD TV picture, select a channel and follow these steps. 1 Press the MENU button to see the onscreen menu. 2 When PICTURE menu is highlighted, press the...
User manual
Page 18
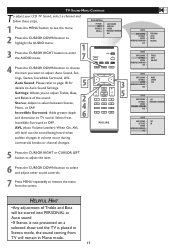
... level out the sound being heard when sudden changes in Mono mode. 17 tings, Stereo, Incredible Surround, AVL. TV SOUND MENU CONTROLS T o adjust your LCD TV Sound, select a channel and follow these steps. 1 Press the MENU button to remove the menu from the screen. AUDIO AUTO SOUND SETTINGS STEREO INCREDIBLE SURROUND ... adjustment of the sound. � � Stereo: Adjust to select between Stereo, Mono, or SAP. � � Incredible Surround: Adds greater depth and dimension to TV sound. Auto Sound: Please refer to adjust: Auto Sound, Set-
... level out the sound being heard when sudden changes in Mono mode. 17 tings, Stereo, Incredible Surround, AVL. TV SOUND MENU CONTROLS T o adjust your LCD TV Sound, select a channel and follow these steps. 1 Press the MENU button to remove the menu from the screen. AUDIO AUTO SOUND SETTINGS STEREO INCREDIBLE SURROUND ... adjustment of the sound. � � Stereo: Adjust to select between Stereo, Mono, or SAP. � � Incredible Surround: Adds greater depth and dimension to TV sound. Auto Sound: Please refer to adjust: Auto Sound, Set-
User manual
Page 19
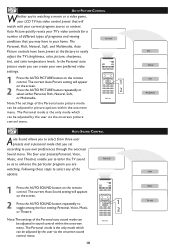
... can be adjusted in sound control within the onscreen menu. AUTO PICTURE CONTROL Whether you're watching a movie or a video game, your LCD TV has video control preset that you set according to you own preferences through the onscreen Sound menu. The Personal Personal, Rich, Natural, Soft,... the remote control. Note:The settings of programs and viewing conditions that you may have been preset at the factory to easily adjust the TV's brightness, color, picture, sharpness, tint, and color temperature levels. The Personal mode is the only mode which can be adjusted in...
... can be adjusted in sound control within the onscreen menu. AUTO PICTURE CONTROL Whether you're watching a movie or a video game, your LCD TV has video control preset that you set according to you own preferences through the onscreen Sound menu. The Personal Personal, Rich, Natural, Soft,... the remote control. Note:The settings of programs and viewing conditions that you may have been preset at the factory to easily adjust the TV's brightness, color, picture, sharpness, tint, and color temperature levels. The Personal mode is the only mode which can be adjusted in...
User manual
Page 31
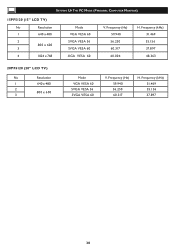
SETTING UP THE PC MODE (PERSONAL COMPUTER MONITOR) 15PF5120 (15" LCD TV) No Resolution 1 640 x 480 2 800 x 600 3 4 1024 x 768 Mode VGA VESA 60 SVGA VESA 56 SVGA VESA 60 XGA VESA 60 V. Frequency (Hz) 59.940 56.250 60.317 H. Frequency (kHz) 31.469 35.156 37.897 30 Frequency (Hz) 59.940 56.250 60.317 60.004 H. Frequency (kHz) 31.469 35.156 37.897 48.363 20PF5120 (20" LCD TV) No Resolution 1 640 x 480 2 800 x 600 3 Mode VGA VESA 60 SVGA VESA 56 SVGA VESA 60 V.
SETTING UP THE PC MODE (PERSONAL COMPUTER MONITOR) 15PF5120 (15" LCD TV) No Resolution 1 640 x 480 2 800 x 600 3 4 1024 x 768 Mode VGA VESA 60 SVGA VESA 56 SVGA VESA 60 XGA VESA 60 V. Frequency (Hz) 59.940 56.250 60.317 H. Frequency (kHz) 31.469 35.156 37.897 30 Frequency (Hz) 59.940 56.250 60.317 60.004 H. Frequency (kHz) 31.469 35.156 37.897 48.363 20PF5120 (20" LCD TV) No Resolution 1 640 x 480 2 800 x 600 3 Mode VGA VESA 60 SVGA VESA 56 SVGA VESA 60 V.
Quick start guide
Page 1
... . . . . . 4 PC (MONITOR) INPUTS 8 Espãnol Português INSTALLING LCD TV ON THE WALL The stand of force. 2 Use for the TV set a Vesa compliant wall mount (not included). (For 15 inch: 75x75 mm , For 20 inch: 100x100 mm) 3 Use for proper installing. Not all features (and drawings) UNFOLD THE BASE 1 AUTO PROGRAM (SETTING...
... . . . . . 4 PC (MONITOR) INPUTS 8 Espãnol Português INSTALLING LCD TV ON THE WALL The stand of force. 2 Use for the TV set a Vesa compliant wall mount (not included). (For 15 inch: 75x75 mm , For 20 inch: 100x100 mm) 3 Use for proper installing. Not all features (and drawings) UNFOLD THE BASE 1 AUTO PROGRAM (SETTING...
Quick start guide
Page 2
... on your remote control to enter INSTALL. 4 Press CURSOR DOWN to access the connectors at the rear of the LCD TV. 4 Bottom connectors Located at the bottom of TV signal input you have an antenna input AUTO IF you do not run the auto program function to set . ... AUTO INSTALL LANGUAGE TUNER MODE AUTO PROGRAM CHANNEL EDIT MANUAL FINE TUNE FACTORY RESET AUTO STORE PLEASE WAIT PROG.FOUND CHANNEL START? 0 3 PRESENTATION OF THE LCD TV 1 Television Keys • VOLUME + / - : To adjust sound level. • CHANNEL + / - : To select programs. • MENU : To access or close onscreen menu....
... on your remote control to enter INSTALL. 4 Press CURSOR DOWN to access the connectors at the rear of the LCD TV. 4 Bottom connectors Located at the bottom of TV signal input you have an antenna input AUTO IF you do not run the auto program function to set . ... AUTO INSTALL LANGUAGE TUNER MODE AUTO PROGRAM CHANNEL EDIT MANUAL FINE TUNE FACTORY RESET AUTO STORE PLEASE WAIT PROG.FOUND CHANNEL START? 0 3 PRESENTATION OF THE LCD TV 1 Television Keys • VOLUME + / - : To adjust sound level. • CHANNEL + / - : To select programs. • MENU : To access or close onscreen menu....
Quick start guide
Page 3
..., Soft, or Multimedia picture setting. AV+ button Press to select a sound mode if available with the TV programming:Mono, Stereo, or SAP. Sleep button Press to set the LCD TV to exit the onscreen menu. You can quickly view the select channels. 3 SAP button Press to select ...muted. Mute button Press to increase or decrease the sound level. Volume button Press to eliminate or restore the LCD TV sound. Surf Button Press to clear the TV menu after control adjustments. Also press to select previously viewed channels. ACCESSORIES BATTERY INSTALLATION When you can place ...
..., Soft, or Multimedia picture setting. AV+ button Press to select a sound mode if available with the TV programming:Mono, Stereo, or SAP. Sleep button Press to set the LCD TV to exit the onscreen menu. You can quickly view the select channels. 3 SAP button Press to select ...muted. Mute button Press to increase or decrease the sound level. Volume button Press to eliminate or restore the LCD TV sound. Surf Button Press to clear the TV menu after control adjustments. Also press to select previously viewed channels. ACCESSORIES BATTERY INSTALLATION When you can place ...
Quick start guide
Page 4
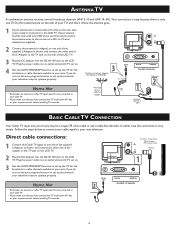
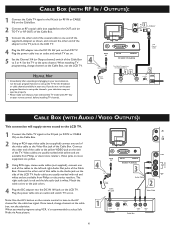
... be connected to your television may not operate properly. If you first need to attach the antenna wires to set up the channels , your LCD TV. • Please make sure that 's where the antenna goes. 1 If your antenna has a round cable (75 ohm) on the end, then you have selected .... Plug the power cable into the DC IN 16V jack on your remote control, before installing TV channels. If you have selected the TV mode with AV+ key on the LCD TV. Direct cable connections: 1 Connect the Cable TV signal to one 75 Ω (ohm) antenna jack on the side of the adapter to ...
... be connected to your television may not operate properly. If you first need to attach the antenna wires to set up the channels , your LCD TV. • Please make sure that 's where the antenna goes. 1 If your antenna has a round cable (75 ohm) on the end, then you have selected .... Plug the power cable into the DC IN 16V jack on your remote control, before installing TV channels. If you have selected the TV mode with AV+ key on the LCD TV. Direct cable connections: 1 Connect the Cable TV signal to one 75 Ω (ohm) antenna jack on the side of the adapter to ...
Quick start guide
Page 5
...the AUTO PROGRAM scanning of channels. 6 Press the MENU button repeatedly to clear the menu from the screen, after unpacking and plugging in your LCD TV. HELPFUL HINT • When CABLE is selected, channels 2-125 are available. • When ANTENNA is selected, channels 2-69 are available. &#...8226; When AUTO is selected, your LCD TV will search automatically for antenna or cable channels. • Immediately after AUTO STORE has finished. If you do not run the auto program...
...the AUTO PROGRAM scanning of channels. 6 Press the MENU button repeatedly to clear the menu from the screen, after unpacking and plugging in your LCD TV. HELPFUL HINT • When CABLE is selected, channels 2-125 are available. • When ANTENNA is selected, channels 2-69 are available. &#...8226; When AUTO is selected, your LCD TV will search automatically for antenna or cable channels. • Immediately after AUTO STORE has finished. If you do not run the auto program...
Quick start guide
Page 6
.... • Please make sure that cable to the Audio jack on the side of the adapter to the TV jack on the LCD TV. 4 Plug the DC adapter into the DC IN 16V jack on the LCD TV. Note: Use the AV+ button on the remote control to tune to the AV channel for the... Box. 3 Connect the other end of the coaxial cable to one end of the supplied L-Adapter as shown, and connect the other end of the LCD TV. Video cables are available from Philips or electronics retailers. Connect the other end of that you watch programs using VCR, it's recommended to the same channel.
.... • Please make sure that cable to the Audio jack on the side of the adapter to the TV jack on the LCD TV. 4 Plug the DC adapter into the DC IN 16V jack on the LCD TV. Note: Use the AV+ button on the remote control to tune to the AV channel for the... Box. 3 Connect the other end of the coaxial cable to one end of the supplied L-Adapter as shown, and connect the other end of the LCD TV. Video cables are available from Philips or electronics retailers. Connect the other end of that you watch programs using VCR, it's recommended to the same channel.


